linux基础命令及bash shell特性
linux基础命令及bash shell特性
1.linux基础命令
1.1 查看内核版本和linux发行版本
查看内核版本
[root@xuzhichao test]# uname -r

3.10.0-1127.el7.x86_64

[root@xuzhichao test]# uname -a

Linux xuzhichao 3.10.0-1127.el7.x86_64 #1 SMP Tue Mar 31 23:36:51 UTC 2020 x86_64 x86_64 x86_64 GNU/Linux
查看操作系统发行版本
[root@xuzhichao test]# cat /etc/os-release

NAME="CentOS Linux"

VERSION="7 (Core)"

ID="centos"

ID_LIKE="rhel fedora"

VERSION_ID="7"

PRETTY_NAME="CentOS Linux 7 (Core)"

ANSI_COLOR="0;31"

CPE_NAME="cpe:/o:centos:centos:7"

HOME_URL="https://www.centos.org/"

BUG_REPORT_URL="https://bugs.centos.org/"

CENTOS_MANTISBT_PROJECT="CentOS-7"

CENTOS_MANTISBT_PROJECT_VERSION="7"

REDHAT_SUPPORT_PRODUCT="centos"

REDHAT_SUPPORT_PRODUCT_VERSION="7"

#执行 lsb_release -a ,即可列出所有版本信息,这个命令适用于所有的linux,包括Redhat、SuSE、Debian等发行版

[root@xuzhichao test]# yum install redhat-lsb-core

[root@xuzhichao test]# lsb_release -a

LSB Version:	:core-4.1-amd64:core-4.1-noarch

Distributor ID:	CentOS

Description:	CentOS Linux release 7.8.2003 (Core)

Release:	7.8.2003

Codename:	Core

[root@xuzhichao test]# lsb_release

LSB Version:	:core-4.1-amd64:core-4.1-noarch

#执行cat /etc/redhat-release,适用于红帽系统

[root@xuzhichao test]# cat /etc/redhat-release

CentOS Linux release 7.8.2003 (Core)
1.2 查看服务器硬件信息
查看CPU型号
#方法一:系统有两颗CPU,每个CPU一个核心

[root@xuzhichao test]# lscpu

Architecture:          x86_64

CPU op-mode(s):        32-bit, 64-bit

Byte Order:            Little Endian

CPU(s):                2      <==共有两个CPU

On-line CPU(s) list:   0,1

Thread(s) per core:    1      <==每个CPU一个核心

Core(s) per socket:    2

Socket(s):             1

NUMA node(s):          1

Vendor ID:             GenuineIntel

CPU family:            6

Model:                 142

Model name:            Intel(R) Core(TM) i5-8265U CPU @ 1.60GHz

Stepping:              11

CPU MHz:               1799.999

BogoMIPS:              3599.99

Hypervisor vendor:     VMware

Virtualization type:   full

L1d cache:             32K

L1i cache:             32K

L2 cache:              256K

L3 cache:              6144K

NUMA node0 CPU(s):     0,1

Flags:                 fpu vme de pse tsc msr pae mce cx8 apic sep mtrr pge mca cmov pat pse36 clflush mmx fxsr sse sse2 ss ht syscall nx pdpe1gb rdtscp lm constant_tsc arch_perfmon nopl xtopology tsc_reliable nonstop_tsc eagerfpu pni pclmulqdq ssse3 fma cx16 pcid sse4_1 sse4_2 x2apic movbe popcnt tsc_deadline_timer aes xsave avx f16c rdrand hypervisor lahf_lm abm 3dnowprefetch invpcid_single ssbd ibrs ibpb stibp fsgsbase tsc_adjust bmi1 avx2 smep bmi2 invpcid mpx rdseed adx smap clflushopt xsaveopt xsavec arat spec_ctrl intel_stibp flush_l1d arch_capabilities

#方法二:

[root@xuzhichao test]# cat /proc/cpuinfo

processor	: 0    <==CPU核心0

vendor_id	: GenuineIntel

cpu family	: 6

model		: 142

model name	: Intel(R) Core(TM) i5-8265U CPU @ 1.60GHz

stepping	: 11

microcode	: 0xde

cpu MHz		: 1799.999

cache size	: 6144 KB

physical id	: 0

siblings	: 2

core id		: 0

cpu cores	: 2

apicid		: 0

initial apicid	: 0

fpu		: yes

fpu_exception	: yes

cpuid level	: 22

wp		: yes

flags		: fpu vme de pse tsc msr pae mce cx8 apic sep mtrr pge mca cmov pat pse36 clflush mmx fxsr sse sse2 ss ht syscall nx pdpe1gb rdtscp lm constant_tsc arch_perfmon nopl xtopology tsc_reliable nonstop_tsc eagerfpu pni pclmulqdq ssse3 fma cx16 pcid sse4_1 sse4_2 x2apic movbe popcnt tsc_deadline_timer aes xsave avx f16c rdrand hypervisor lahf_lm abm 3dnowprefetch invpcid_single ssbd ibrs ibpb stibp fsgsbase tsc_adjust bmi1 avx2 smep bmi2 invpcid mpx rdseed adx smap clflushopt xsaveopt xsavec arat spec_ctrl intel_stibp flush_l1d arch_capabilities

bogomips	: 3599.99

clflush size	: 64

cache_alignment	: 64

address sizes	: 43 bits physical, 48 bits virtual

power management:

processor	: 1    <==CPU核心1

vendor_id	: GenuineIntel

cpu family	: 6

model		: 142

model name	: Intel(R) Core(TM) i5-8265U CPU @ 1.60GHz

stepping	: 11

microcode	: 0xde

cpu MHz		: 1799.999

cache size	: 6144 KB

physical id	: 0

siblings	: 2

core id		: 1

cpu cores	: 2

apicid		: 1

initial apicid	: 1

fpu		: yes

fpu_exception	: yes

cpuid level	: 22

wp		: yes

flags		: fpu vme de pse tsc msr pae mce cx8 apic sep mtrr pge mca cmov pat pse36 clflush mmx fxsr sse sse2 ss ht syscall nx pdpe1gb rdtscp lm constant_tsc arch_perfmon nopl xtopology tsc_reliable nonstop_tsc eagerfpu pni pclmulqdq ssse3 fma cx16 pcid sse4_1 sse4_2 x2apic movbe popcnt tsc_deadline_timer aes xsave avx f16c rdrand hypervisor lahf_lm abm 3dnowprefetch invpcid_single ssbd ibrs ibpb stibp fsgsbase tsc_adjust bmi1 avx2 smep bmi2 invpcid mpx rdseed adx smap clflushopt xsaveopt xsavec arat spec_ctrl intel_stibp flush_l1d arch_capabilities

bogomips	: 3599.99

clflush size	: 64

cache_alignment	: 64

address sizes	: 43 bits physical, 48 bits virtual

power management:
查看内存大小
[root@xuzhichao test]# cat /proc/meminfo

MemTotal:        1863040 kB

MemFree:         1031876 kB

MemAvailable:    1443616 kB

Buffers:            2120 kB

Cached:           513628 kB

SwapCached:            0 kB

Active:           451992 kB

Inactive:         145396 kB

Active(anon):      82148 kB

Inactive(anon):     9572 kB

Active(file):     369844 kB

Inactive(file):   135824 kB

Unevictable:           0 kB

Mlocked:               0 kB

SwapTotal:       2097148 kB

SwapFree:        2097148 kB

Dirty:                 0 kB

Writeback:             0 kB

AnonPages:         81556 kB

Mapped:            31468 kB

Shmem:             10080 kB

Slab:             111196 kB

SReclaimable:      74316 kB

SUnreclaim:        36880 kB

KernelStack:        4464 kB

PageTables:         7020 kB

NFS_Unstable:          0 kB

Bounce:                0 kB

WritebackTmp:          0 kB

CommitLimit:     3028668 kB

Committed_AS:     421208 kB

VmallocTotal:   34359738367 kB

VmallocUsed:      182652 kB

VmallocChunk:   34359310332 kB

Percpu:            33792 kB

HardwareCorrupted:     0 kB

AnonHugePages:      8192 kB

CmaTotal:              0 kB

CmaFree:               0 kB

HugePages_Total:       0

HugePages_Free:        0

HugePages_Rsvd:        0

HugePages_Surp:        0

Hugepagesize:       2048 kB

DirectMap4k:       92032 kB

DirectMap2M:     2004992 kB

DirectMap1G:           0 kB

[root@xuzhichao test]# free -m

              total        used        free      shared  buff/cache   available

Mem:           1819         235        1007           9         576        1409

Swap:          2047           0        2047

[root@xuzhichao test]# free -th

              total        used        free      shared  buff/cache   available

Mem:           1.8G        235M        1.0G        9.8M        576M        1.4G

Swap:          2.0G          0B        2.0G

Total:         3.8G        235M        3.0G
1.3 关机和重启命令
关机命令如下:
- init 0
- halt
- poweroff
- shutdown -h now
- systemctl halt
重启命令如下:
- init 6
- reboot
- shutdown -r now
- systemctl reboot
shutdown命令的语法如下:
shutdown [OPTIONS...] [TIME] [WALL...]

  options:

  -r --reboot    重启机器

  -h             关机

  -k             不关机,仅发送警告信息

  -c             取消关机操作
其中[TIME]字段为延迟关机的时间,有如下几种格式:
- hh:mm:24小时格式,表示在制定的时间关机或重启;
- +m:表示m分钟后执行关机或重启;
- now:表示立即关机或重启;
[WALL...]字段表示关机前发送的告警信息,会向所有的在线用户进行发送。
shutdown用法如下:
#系统的23:00进行关机

[root@xuzhichao ~]# shutdown -h 23:00 "The system will be shutdown at 23:00"

Shutdown scheduled for Sun 2021-05-16 23:00:00 CST, use 'shutdown -c' to cancel.

#取消关机

[root@xuzhichao ~]# shutdown -c

Broadcast message from root@xuzhichao (Sun 2021-05-16 21:26:11 CST):

The system shutdown has been cancelled at Sun 2021-05-16 21:27:11 CST!

#系统在10分钟后进行重启

[root@xuzhichao ~]# shutdown -r +10 "The system will be reboot after 10 min"

Shutdown scheduled for Sun 2021-05-16 21:38:05 CST, use 'shutdown -c' to cancel.

Broadcast message from root@xuzhichao (Sun 2021-05-16 21:28:05 CST):

The system will be reboot after 10 min

The system is going down for reboot at Sun 2021-05-16 21:38:05 CST!
1.4 显示时间和日期命令
linux的时钟分为硬件时钟和系统时钟两种:
- 硬件时钟:由计算机的主板内部物理芯片计时,并由主板上的电池进行供电。
- 系统时钟:系统启动时,从硬件时钟读取,由linux内核通过CPU工作频率进行计时。
1.4.1 date命令
date命令语法格式如下:
Usage: date [OPTION]... [+FORMAT]     <==显示系统时间

  or:  date [-u|--utc|--universal] [MMDDhhmm[[CC]YY][.ss]]    <==设定系统时间

 options:

 -d, --date=STRING         显示指定字符串的时间

 -s, --set=STRING          设定系统时间

 FORMAT可用格式如下:

  %%   a literal %

  %a   星期缩写 (e.g., Sun)

  %A   星期全写 (e.g., Sunday)

  %b   月份缩写 (e.g., Jan)

  %B   月份全写 (e.g., January)

  %c   时间和日期格式 (e.g., Thu Mar  3 23:05:25 2005)

  %d   日期,只显示数字 (e.g., 01)

  %D   显示日志,相当于 %m/%d/%y(e.g., 05/16/21)

  %F   完整日期,相当于%Y-%m-%d(e.g., 2021-05-16)

  %H   小时,24小时制格式(00..23)

  %I   小时,12小时制格式 (01..12)

  %k   小时, 显示格式为 ( 0..23); same as %_H

  %l   小时, 显示格式为 ( 1..12); same as %_I

  %m   月,显示格式为 (01..12)

  %M   分钟,显示格式为 (00..59)

  %r   显示格式为 (e.g., 11:11:04 PM)

  %R   24-hour hour and minute; same as %H:%M(e.g., 21:59)

  %s   从1970年1月1日到此时所经历的秒数,显示格式为1621173674

  %S   秒,显示格式为 (00..60)

  %T   显示时间,相当于%H:%M:%S(e.g., 22:01:52)

  %y   只显示年的后两位(00..99)

  %Y   年份(e.g., 2021)
date的用法如下:
#以默认格式显示当前日期

[root@xuzhichao test]# date

Sun May 16 22:06:31 CST 2021

#以特定格式显示当前日期

[root@xuzhichao test]# date +%c

Sun May 16 21:52:57 2021

[root@xuzhichao test]# date +%D

05/16/21

[root@xuzhichao test]# date +%F

2021-05-16

[root@xuzhichao test]# date +%R

21:59

[root@xuzhichao test]# date +%s

1621173674

[root@xuzhichao test]# date +%T

22:01:52

[root@xuzhichao test]# date +"%F %T"

2021-05-16 22:05:52

#以特定格式显示指定时间的日期

[root@xuzhichao test]# date -d "1 day" +%F

2021-05-17

[root@xuzhichao test]# date -d "-1 day" +%F

2021-05-15

[root@xuzhichao test]# date +%F

2021-05-16

[root@xuzhichao test]# date -d "20210101" +%F

2021-01-01

[root@xuzhichao test]# date --date=20210302121212 +"%F %T"

2021030212-12-12 00:00:00

[root@xuzhichao test]# date --date=20210302 +%s   <==此格式多用于shell脚本中计算时间差使用

1614614400

[root@xuzhichao test]# date --date='@2147483647' +"%F %T"

2038-01-19 11:14:07

#设定系统时间

[root@xuzhichao test]# date 030104052021.02

Mon Mar  1 04:05:02 CST 2021

[root@xuzhichao test]# date -s "-1 day"

Sun Feb 28 04:05:20 CST 2021
1.4.2 hwclock/clock命令:操作硬件时间
hwclock用于同步硬件时间和系统时间,主要选项如下:
| 选项 | 说明 |
|---|---|
| -s --hctosys | 以硬件时间为准,设定系统时间 |
| -w --systohc | 以系统时间为准,设定硬件时间 |
hwclock命令的主要用法如下:
#显示硬件时间

[root@xuzhichao test]# hwclock

Sun May 16 22:26:16 2021  -0.784858 seconds

[root@xuzhichao test]# clock

Sun May 16 22:26:18 2021  -0.362403 seconds

[root@xuzhichao test]# date

Sun Feb 28 04:16:40 CST 2021

#以硬件时间校准系统时间

[root@xuzhichao test]# hwclock -s

[root@xuzhichao test]# date

Sun May 16 22:26:36 CST 2021

#以系统时间校准硬件时间

[root@xuzhichao test]# hwclock -w

[root@xuzhichao test]# hwclock

Sun May 16 22:26:55 2021  -0.836115 seconds
1.4.3 cal命令:显示日历
#显示当前日期的月厉

[root@xuzhichao test]# cal

      May 2021

Su Mo Tu We Th Fr Sa

                   1

 2  3  4  5  6  7  8

 9 10 11 12 13 14 15

16 17 18 19 20 21 22

23 24 25 26 27 28 29

30 31

#显示指定年和月的月厉

[root@xuzhichao test]# cal 9 1752

   September 1752

Su Mo Tu We Th Fr Sa

       1  2 14 15 16

17 18 19 20 21 22 23

24 25 26 27 28 29 30

#显示指定年的月厉

[root@xuzhichao test]# cal 2021

                               2021

       January               February                 March

Su Mo Tu We Th Fr Sa   Su Mo Tu We Th Fr Sa   Su Mo Tu We Th Fr Sa

                1  2       1  2  3  4  5  6       1  2  3  4  5  6

 3  4  5  6  7  8  9    7  8  9 10 11 12 13    7  8  9 10 11 12 13

10 11 12 13 14 15 16   14 15 16 17 18 19 20   14 15 16 17 18 19 20

17 18 19 20 21 22 23   21 22 23 24 25 26 27   21 22 23 24 25 26 27

24 25 26 27 28 29 30   28                     28 29 30 31

31

        April                   May                   June

Su Mo Tu We Th Fr Sa   Su Mo Tu We Th Fr Sa   Su Mo Tu We Th Fr Sa

             1  2  3                      1          1  2  3  4  5

 4  5  6  7  8  9 10    2  3  4  5  6  7  8    6  7  8  9 10 11 12

11 12 13 14 15 16 17    9 10 11 12 13 14 15   13 14 15 16 17 18 19

18 19 20 21 22 23 24   16 17 18 19 20 21 22   20 21 22 23 24 25 26

25 26 27 28 29 30      23 24 25 26 27 28 29   27 28 29 30

                       30 31

        July                  August                September

Su Mo Tu We Th Fr Sa   Su Mo Tu We Th Fr Sa   Su Mo Tu We Th Fr Sa

             1  2  3    1  2  3  4  5  6  7             1  2  3  4

 4  5  6  7  8  9 10    8  9 10 11 12 13 14    5  6  7  8  9 10 11

11 12 13 14 15 16 17   15 16 17 18 19 20 21   12 13 14 15 16 17 18

18 19 20 21 22 23 24   22 23 24 25 26 27 28   19 20 21 22 23 24 25

25 26 27 28 29 30 31   29 30 31               26 27 28 29 30

       October               November               December

Su Mo Tu We Th Fr Sa   Su Mo Tu We Th Fr Sa   Su Mo Tu We Th Fr Sa

                1  2       1  2  3  4  5  6             1  2  3  4

 3  4  5  6  7  8  9    7  8  9 10 11 12 13    5  6  7  8  9 10 11

10 11 12 13 14 15 16   14 15 16 17 18 19 20   12 13 14 15 16 17 18

17 18 19 20 21 22 23   21 22 23 24 25 26 27   19 20 21 22 23 24 25

24 25 26 27 28 29 30   28 29 30               26 27 28 29 30 31

31
1.4.4 设置时区
linux的时区文件放置在/etc/localtime文件中,通过软链接的方式指定时区。
[root@xuzhichao test]# ll /etc/localtime

lrwxrwxrwx. 1 root root 35 Nov  4  2020 /etc/localtime -> ../usr/share/zoneinfo/Asia/Shanghai
设置时区可以使用timedatectl命令,永久生效。
timedatectl主要命令如下:
Commands:

  status                   Show current time settings

  set-time TIME            Set system time

  set-timezone ZONE        Set system time zone

  list-timezones           Show known time zones

  set-local-rtc BOOL       Control whether RTC is in local time

  set-ntp BOOL             Control whether NTP is enabled
timedatectl命令用法如下:
[root@xuzhichao test]# timedatectl status

      Local time: Sun 2021-05-16 22:36:32 CST

  Universal time: Sun 2021-05-16 14:36:32 UTC

        RTC time: Sun 2021-05-16 14:36:32

       Time zone: Asia/Shanghai (CST, +0800)

     NTP enabled: yes

NTP synchronized: yes

 RTC in local TZ: no

      DST active: n/a

[root@xuzhichao test]# timedatectl list-timezones

Africa/Abidjan

Africa/Accra

Africa/Addis_Ababa

Africa/Algiers

Africa/Asmara

...(此处省略)...

[root@xuzhichao test]# timedatectl set-timezone Asia/Shanghai

[root@xuzhichao test]# timedatectl

      Local time: Sun 2021-05-16 22:37:26 CST

  Universal time: Sun 2021-05-16 14:37:26 UTC

        RTC time: Sun 2021-05-16 14:37:26

       Time zone: Asia/Shanghai (CST, +0800)

     NTP enabled: yes

NTP synchronized: yes

 RTC in local TZ: no

      DST active: n/a
1.5 用户登录信息查看命令
who命令:显示系统当前的所有登录会话
w命令:显示系统当前所有登录会话及所做的操作
whoami命令:显示当前登录的用户
last命令:显示系统的历史登录用户,登录终端,ip地址,登录时间,登录时长等信息,根据/var/log/wtmp文件生成
lastlog命令:显示系统上所有用户的最近登录时间,根据/var/log/lastlog文件生成
[root@xuzhichao test]# who

root     pts/0        May 16 15:56 (192.168.20.1)

root     pts/1        May 16 21:25 (192.168.20.1)

[root@xuzhichao test]# w

 09:17:57 up 17:27,  2 users,  load average: 0.00, 0.01, 0.05

USER     TTY      FROM             LOGIN@   IDLE   JCPU   PCPU WHAT

root     pts/0    192.168.20.1     Sun15    5.00s  0.71s  0.00s w

root     pts/1    192.168.20.1     21:25   11:40m  0.11s  0.11s -bash

[root@xuzhichao test]# whoami

root

[root@xuzhichao test]# last

root     pts/1        192.168.20.1     Sun May 16 21:25   still logged in

root     pts/0        192.168.20.1     Sun May 16 15:56   still logged in

reboot   system boot  3.10.0-1127.el7. Sun May 16 15:51 - 09:19  (17:27)

root     pts/0        192.168.20.1     Sat May 15 22:51 - crash  (16:59)

reboot   system boot  3.10.0-1127.el7. Sat May 15 22:50 - 09:19 (1+10:29)

root     pts/1        192.168.20.1     Thu May 13 10:30 - crash (2+12:19)

root     pts/0        192.168.20.1     Wed May 12 21:35 - crash (3+01:15)

reboot   system boot  3.10.0-1127.el7. Wed May 12 21:30 - 09:19 (4+11:48)

root     pts/1        192.168.20.1     Tue May 11 22:35 - down   (00:53)

root     pts/0        192.168.20.1     Tue May 11 21:43 - down   (01:44)

reboot   system boot  3.10.0-1127.el7. Tue May 11 21:43 - 23:28  (01:44)

root     pts/1        192.168.20.1     Tue May 11 10:53 - down   (00:00)

root     pts/0        192.168.20.1     Mon May 10 17:16 - down   (17:36)

reboot   system boot  3.10.0-1127.el7. Mon May 10 17:16 - 10:53  (17:36)

root     tty1                          Thu May  6 18:34 - 18:34  (00:00)

root     pts/0        192.168.20.1     Thu May  6 12:22 - 18:34  (06:11)

root     pts/0        192.168.20.1     Wed May  5 21:17 - 12:22  (15:05)

root     pts/0        192.168.20.1     Wed May  5 21:14 - 21:16  (00:02)

reboot   system boot  3.10.0-1127.el7. Wed May  5 21:14 - 10:53 (5+13:39)

root     pts/0        192.168.20.1     Wed Apr 28 09:50 - crash (7+11:23)

root     pts/0        192.168.20.1     Wed Apr 28 09:48 - 09:50  (00:01)

root     pts/0        192.168.20.1     Wed Apr 28 09:28 - 09:48  (00:20)

root     tty1                          Wed Apr 28 09:27 - 00:06  (14:38)

reboot   system boot  3.10.0-1127.el7. Wed Apr 28 09:25 - 10:53 (13+01:27)

root     pts/0        192.168.20.1     Tue Nov  3 17:48 - down   (00:44)

root     pts/0        192.168.20.1     Tue Nov  3 17:47 - 17:48  (00:01)

root     pts/0        192.168.20.1     Tue Nov  3 17:42 - 17:47  (00:04)

root     pts/0        192.168.20.1     Tue Nov  3 17:37 - 17:42  (00:05)

root     tty1                          Tue Nov  3 17:28 - 18:33  (01:04)

reboot   system boot  3.10.0-1127.el7. Wed Nov  4 01:27 - 18:33  (-6:-54)

root     tty1                          Wed Nov  4 01:13 - 01:27  (00:14)

root     tty1                          Wed Nov  4 01:12 - 01:12  (00:00)

xu       pts/1        :0               Wed Nov  4 01:11 - down   (00:15)

xu       pts/0        :0               Wed Nov  4 01:11 - down   (00:16)

xu       :0           :0               Wed Nov  4 01:11 - down   (00:16)

reboot   system boot  3.10.0-1127.el7. Wed Nov  4 01:10 - 01:27  (00:16)

reboot   system boot  3.10.0-1127.el7. Wed Nov  4 01:06 - 01:27  (00:21)

reboot   system boot  3.10.0-1127.el7. Wed Nov  4 00:46 - 01:27  (00:40)

wtmp begins Wed Nov  4 00:46:56 2020

[root@xuzhichao test]# lastlog

Username         Port     From             Latest

root             pts/1    192.168.20.1     Sun May 16 21:25:07 +0800 2021

bin                                        **Never logged in**

daemon                                     **Never logged in**

adm                                        **Never logged in**

lp                                         **Never logged in**

sync                                       **Never logged in**

shutdown                                   **Never logged in**

halt                                       **Never logged in**

mail                                       **Never logged in**

operator                                   **Never logged in**

games                                      **Never logged in**

ftp                                        **Never logged in**

nobody                                     **Never logged in**

systemd-network                            **Never logged in**

dbus                                       **Never logged in**

polkitd                                    **Never logged in**

libstoragemgmt                             **Never logged in**

colord                                     **Never logged in**

rpc                                        **Never logged in**

abrt                                       **Never logged in**

rtkit                                      **Never logged in**

pulse                                      **Never logged in**

chrony                                     **Never logged in**

gluster                                    **Never logged in**

ntp                                        **Never logged in**

tss                                        **Never logged in**

sssd                                       **Never logged in**

geoclue                                    **Never logged in**

mysql                                      **Never logged in**

setroubleshoot                             **Never logged in**

gdm              :0                        Wed Nov  4 01:11:09 +0800 2020

rpcuser                                    **Never logged in**

nfsnobody                                  **Never logged in**

sshd                                       **Never logged in**

postfix                                    **Never logged in**

tcpdump                                    **Never logged in**

xu               :0                        Wed Nov  4 01:11:21 +0800 2020

apache                                     **Never logged in**
1.6 echo命令
echo命令在linux中用于回显信息,也支持以特定格式显示。
echo命令的选项如下:
| 选项 | 说明 |
|---|---|
| -E | 不支持\解释功能(默认) |
| -e | 支持\解释功能 |
| -n | 不自动换行 |
当启用-e选项时,以下字符将具有特殊意义:
| 字符 | 意义 |
|---|---|
| \a | 发出警告声 |
| \b | 退格键 |
| \c | 最后不加换行符 |
| \n | 换行且光标移到行首 |
| \r | 回车,光标移到行首,不换行 |
| \t | tab键 |
| \\ | 插入“\”键 |
echo支持输出带颜色的字体,使用如下格式:
echo -e “\033[字背景颜色;字体颜色m字符串\033[控制码”

字体背景颜色 :

40:黑  41:深红  42:绿   43:黄色  44:蓝色  45:紫色  46:深绿  47:白色

字体颜色 :

1:高亮  5:闪烁  30:黑  31:红  32:绿  33:黄   34:蓝色   35:紫色   36:深绿 37:白色
echo的用法如下:
[root@xuzhichao test]# echo "abc"

abc

#显示变量

[root@xuzhichao test]# echo $LANG

en_US.utf8

#不换行

[root@xuzhichao test]# echo -n "abc"

abc[root@xuzhichao test]#

[root@xuzhichao test]# echo  -e "abc\tcba"

abc	cba

[root@xuzhichao test]# echo -e "\033[40;31mabc\033[m"

abc
1.7 linux命令分类
linux中的命令可以分为内部命令,外部命令,别名三种。
1.7.1 内部命令
内部命令是指集成在特定shell中的命令,shell工具中默认包含了一些工具,常用的/bin/bash shell中就有很多内部命令。
shell程序是加载到内存中的,因此内部命令的执行效率很高。
enable命令:用于显示所有内部命令:
enable -n cmd:禁用外部命令;

enable cmd:启用外部命令;
[root@xuzhichao test]# enable

enable .

enable :

enable [

enable alias

enable bg

enable bind

enable break

enable builtin

enable caller

enable cd

enable command

enable compgen

enable complete

enable compopt

enable continue

enable declare

enable dirs

enable disown

enable echo

enable enable

enable eval

enable exec

enable exit

enable export

enable false

... (此处省略部分内容)...
- type命令:用于判断一个命令是内部命令还是外部命令:
[root@xuzhichao test]# type alias

alias is a shell builtin    <==内部命令为此提示
- 内部命令的帮助信息可以使用help查看:
[root@xuzhichao test]# help alias

alias: alias [-p] [name[=value] ... ]

    Define or display aliases.

    Without arguments, `alias' prints the list of aliases in the reusable

    form `alias NAME=VALUE' on standard output.

    Otherwise, an alias is defined for each NAME whose VALUE is given.

    A trailing space in VALUE causes the next word to be checked for

    alias substitution when the alias is expanded.

    Options:

      -p	Print all defined aliases in a reusable format

    Exit Status:

    alias returns true unless a NAME is supplied for which no alias has been

    defined.
1.7.2 外部命令
外部命令为独立的外部文件所提供的命令,可以使用type命令判断:
[root@xuzhichao test]# type hostname

hostname is /usr/bin/hostname      <==外部命令可以看到命令的文件路劲

[root@xuzhichao test]# hostname

xuzhichao

[root@xuzhichao test]# type hostname

hostname is hashed (/usr/bin/hostname)   <==执行过的外部文件在系统中会有缓存
外部命令实际是一个磁盘中的实际文件,当用户输入一个外部命令时,系统如果去磁盘中搜索所有的文件,那效率会相当低下。
实际上,在系统中有一个变量PATH,里面保存了外部命令存放的路径。执行外部命令时,系统会根据PATH中存放的目录顺序依次查找文件,一旦在某个目录中找到,就会停止向下查找,执行该命令。
[root@xuzhichao test]# echo $PATH

/usr/lib64/qt-3.3/bin:/usr/local/sbin:/usr/local/bin:/usr/sbin:/usr/bin:/root/bin
为了加快命令执行的速度,每次执行完外部命令时,系统会将其命令路径缓存到内存中,下次执行命令时,直接在缓存中查找路径即可,这样可以大大加快命令执行速度。
hash命令:用于查看外部命令缓存下来的路径
注意:退出当前登录后hash缓存清空。
hash选项如下:
选项 说明 -t NAME 打印缓存中NAME的路径 -d NAME 删除缓存中NAME的路径 -r 清除缓存 -l 显示缓存,可以作为输入使用 [root@xuzhichao test]# hash
hits command
2 /usr/bin/hostname
1 /usr/bin/lscpu
3 /usr/bin/cal
1 /usr/bin/lastlog
6 /usr/bin/timedatectl
1 /usr/bin/last
1 /usr/bin/lastb
6 /usr/bin/rm
29 /usr/bin/date [root@xuzhichao test]# hash -l
builtin hash -p /usr/bin/hostname hostname
builtin hash -p /usr/bin/lscpu lscpu
builtin hash -p /usr/bin/cal cal
builtin hash -p /usr/bin/lastlog lastlog
builtin hash -p /usr/bin/timedatectl timedatectl
builtin hash -p /usr/bin/last last
builtin hash -p /usr/bin/lastb lastb
builtin hash -p /usr/bin/rm rm
builtin hash -p /usr/bin/date date [root@xuzhichao test]# hash -d who #清空缓存
[root@xuzhichao test]# hash -r
[root@xuzhichao test]# hash
hash: hash table empty
which命令:查看外部命令对应的文件路径
#默认which会显示外部命令的别名和文件路径

[root@xuzhichao test]# which ls

alias ls='ls --color=auto'

	/usr/bin/ls

#只显示文件路径,不显示别名

[root@xuzhichao test]# which --skip-alias ls

/usr/bin/ls

#where命令也可以显示文件路径及其帮助文档的路径

[root@xuzhichao test]# whereis ls

ls: /usr/bin/ls /usr/share/man/man1/ls.1.gz /usr/share/man/man1p/ls.1p.gz
1.7.3 别名
别名:就是将一些常用的命令,起一个较短的名称,这样执行别名就相当于执行这些命令了。
alias命令和unalias命令用于定义和取消别名。
#定义别名cdnet

[root@xuzhichao test]# alias cdnet='cd /etc/sysconfig/network-scripts/'

[root@xuzhichao test]# cdnet

[root@xuzhichao network-scripts]# pwd

/etc/sysconfig/network-scripts

#查看cdnet别名

[root@xuzhichao network-scripts]# alias cdnet

alias cdnet='cd /etc/sysconfig/network-scripts/'

#查看所有别名

[root@xuzhichao network-scripts]# alias

alias cdnet='cd /etc/sysconfig/network-scripts/'

alias cp='cp -i'

alias egrep='egrep --color=auto'

alias fgrep='fgrep --color=auto'

alias grep='grep --color=auto'

alias l.='ls -d .* --color=auto'

alias ll='ls -l --color=auto'

alias ls='ls --color=auto'

alias mv='mv -i'

alias rm='rm -i'

alias which='alias | /usr/bin/which --tty-only --read-alias --show-dot --show-tilde'

#取消cdnet别名

[root@xuzhichao network-scripts]# unalias cdnet

[root@xuzhichao network-scripts]# alias cdnet

-bash: alias: cdnet: not found
如果别名和某个内部或外部命令同名时,系统会优先执行别名,如果需要执行内部或外部命令可以使用以下方法:
- \别名;
- ‘别名’
- 命令的完整路径
- command 别名
#默认执行别名,内容带颜色显示

[root@xuzhichao ~]# ls

anaconda-ks.cfg  boot  fstab  fstab.~1~  initial-setup-ks.cfg  passwd

#执行外部命令ls而非别名

[root@xuzhichao ~]# \ls

anaconda-ks.cfg  boot  fstab  fstab.~1~  initial-setup-ks.cfg  passwd

[root@xuzhichao ~]# 'ls'

anaconda-ks.cfg  boot  fstab  fstab.~1~  initial-setup-ks.cfg  passwd

[root@xuzhichao ~]# which ls

alias ls='ls --color=auto'

	/usr/bin/ls

[root@xuzhichao ~]# /usr/bin/ls

anaconda-ks.cfg  boot  fstab  fstab.~1~  initial-setup-ks.cfg  passwd

[root@xuzhichao ~]# command ls

anaconda-ks.cfg  boot  fstab  fstab.~1~  initial-setup-ks.cfg  passwd
设置别名永久生效
默认情况下,使用alias命令设置的别名只对当前shell生效,永久生效需要写入配置文件中。
- ~/.bashrc:仅针对当前用户生效;
- /etc/bashrc:针对所有用户生效;
编辑配置文件后别名不会立即生效,可以使用以下方法让别名生效:
- 重新登录shell窗口;
- 执行source config_path,读取配置文件;
- 执行. config_path,读取配置文件;
#在~/.bashrc文件中增加别名

[root@xuzhichao ~]# cat ~/.bashrc

# .bashrc

# User specific aliases and functions

alias rm='rm -i'

alias cp='cp -i'

alias mv='mv -i'

alias datetime='date +"%F %T"'   <==新定义的别名

# Source global definitions

if [ -f /etc/bashrc ]; then

	. /etc/bashrc

fi

[root@xuzhichao ~]# datetime

-bash: datetime: command not found

#读取配置文件

[root@xuzhichao ~]# source ~/.bashrc

-bash: colorscheme: command not found

[root@xuzhichao ~]# datetime

2021-05-17 12:21:04
1.7.4 linux执行命令流程
linux中执行一个命令的执行流程如下:
系统先判断是否是别名,如果是别名,则执行别名;
若不是别名,系统判断是否是内部命令,若果是,执行该内部命令;
若不是内部命令,则查询hash的缓存,若果能找到此命令对应的路径,则按照此路径执行命令,若找到的路径已经删除,则提示“no such file or directory”;
如果hash缓存中未找到此命令,则按照PATH变量中定义的路径顺序查找,一旦在某个目录中找到命令文件,则停止查找,直接执行此命令。如果PATH变量中有多个路径都有此命令文件,则只会执行排序在前的目录下的命令文件;
如果PATH变量中的所有路径都没有此命令文件,则提示“command not found”,执行失败。
[root@xuzhichao ~]# who

root     pts/0        May 16 15:56 (192.168.20.1)

root     pts/1        May 16 21:25 (192.168.20.1)

[root@xuzhichao ~]# hash

hits	command

   1	/usr/bin/date

   1	/usr/bin/cat

   2	/usr/bin/vim

   1	/usr/bin/whereis

   1	/usr/bin/who

   5	/usr/bin/ls

#删除缓存中who命令文件,执行报错

[root@xuzhichao ~]# mv /usr/bin/who /usr/bin/who.bak

[root@xuzhichao ~]# who

-bash: /usr/bin/who: No such file or directory

[root@xuzhichao ~]# mv /usr/bin/who.bak /usr/bin/who

[root@xuzhichao ~]# who

root     pts/0        May 16 15:56 (192.168.20.1)

root     pts/1        May 16 21:25 (192.168.20.1)
1.8 linux的语系
linux中已经支持很多语言和编码,通过变量和一些命令可以调整语系。
locale命令:显示语系。
#显示本机支持的所有语系

[root@xuzhichao ~]# locale -a

C

POSIX

aa_DJ

aa_DJ.iso88591

aa_DJ.utf8

aa_ER

aa_ER.utf8

aa_ER.utf8@saaho

aa_ER@saaho

aa_ET

aa_ET.utf8

af_ZA

af_ZA.iso88591

af_ZA.utf8

am_ET

#显示系统语系相关的变量

[root@xuzhichao ~]# locale

LANG=

LC_CTYPE="POSIX"

LC_NUMERIC="POSIX"

LC_TIME="POSIX"

LC_COLLATE="POSIX"

LC_MONETARY="POSIX"

LC_MESSAGES="POSIX"

LC_PAPER="POSIX"

LC_NAME="POSIX"

LC_ADDRESS="POSIX"

LC_TELEPHONE="POSIX"

LC_MEASUREMENT="POSIX"

LC_IDENTIFICATION="POSIX"

LC_ALL=

#通过设置LANG变量可以设置当前shell的语系

[root@xuzhichao ~]# echo $LANG

en_US.utf8
localectl 命令:centos7上管理语系命令,永久生效
#显示当前语系

[root@xuzhichao ~]# localectl

   System Locale: LANG=zh_CN.utf8

       VC Keymap: cn

      X11 Layout: cn

#修改语系为en_US.utf8

[root@xuzhichao ~]# localectl set-locale LANG=en_US.utf8

[root@xuzhichao ~]# localectl

   System Locale: LANG=en_US.utf8

       VC Keymap: cn

      X11 Layout: cn

#修改语系为zh_CN.utf8

[root@xuzhichao ~]# localectl set-locale LANG=zh_CN.utf8

[root@xuzhichao ~]# localectl

   System Locale: LANG=zh_CN.utf8

       VC Keymap: cn

      X11 Layout: cn
/etc/locale.conf文件是centos7上设置语系永久生效的文件
[root@xuzhichao ~]# cat /etc/locale.conf

LANG=en_US.utf8
unix和windows文件互转
unix和windows下创建的文件在换行符上存在一些区别,Windows格式文件的换行符为\r\n ,而Unix&Linux文件的换行符为\n。
dos2unix命令:是将Windows格式文件转换为Unix、Linux格式
unix2dos命令:是将Linux&Unix格式文件转换为Windows格式。
主要用法如下:
#windows下的文件

[root@xuzhichao ~]# cat windows.txt

echo "ţºã¬windows"

date

[root@xuzhichao ~]# cat windows.txt -A

echo "M-DM-cM-:M-CM-#M-,windows"^M$  <==windows下的换行符

date^M$

#linux下的文件

[root@xuzhichao ~]# cat linux.txt -A

#!/bin/bash$

$

echo "hello,i am linux"$             <==linux下的换行符

date$

#windows中的文件在linux中因为换行符不同不能执行

[root@xuzhichao ~]# bash windows.txt

ţºã¬windows

windows.txt: line 2: $'date\r': command not found

[root@xuzhichao ~]# bash linux.txt

hello,i am linux

Mon May 17 16:43:23 CST 2021

#使用file命令查看

[root@xuzhichao ~]# file windows.txt

windows.txt: ISO-8859 text, with CRLF line terminators     <==windows下的换行符

[root@xuzhichao ~]# file linux.txt

linux.txt: Bourne-Again shell script, ASCII text executable

#安装dos2unix工具

[root@xuzhichao ~]# yum install dos2unix -y

#格式转换

[root@xuzhichao ~]# dos2unix -n windows.txt windows.linux

dos2unix: converting file windows.txt to file windows.linux in Unix format ...

[root@xuzhichao ~]# file windows.linux

windows.linux: ISO-8859 text

[root@xuzhichao ~]# cat windows.linux -A

echo "M-DM-cM-:M-CM-#M-,windows"$         <==转换完成后换行符发生变化

date$

[root@xuzhichao ~]# bash windows.linux

ţºã¬windows

Mon May 17 16:53:10 CST 2021
1.9 修改linux主机名
hostname命令:显示和修改当前的主机名:
#显示当前主机名

[root@xuzhichao ~]# hostname

xuzhichao

#修改主机名,注意:需要打开新的终端才能失效,重启设备失效

[root@xuzhichao ~]# hostname abc

[root@xuzhichao ~]# echo $HOSTNAME

xuzhichao

#放置主机名的文件

[root@xuzhichao ~]# cat /etc/hostname

xuzhichao
hostnamectl命令:显示和修改当前的主机名:
#设置主机名,会连同/etc/hostname文件一起修改,重启设备主机名不会失效,需要重新打开终端生效。

[root@xuzhichao ~]# hostnamectl set-hostname abc

[root@xuzhichao ~]# echo $HOSTNAME

xuzhichao

[root@xuzhichao ~]# cat /etc/hostname

abc

#查看当前主机名即系统信息

[root@xuzhichao ~]# hostnamectl

   Static hostname: abc

         Icon name: computer-vm

           Chassis: vm

        Machine ID: d9abb103c9b943b0bfbbb212ed3dee7f

           Boot ID: 18af1eea21c849cdbea8288fc3527c81

    Virtualization: vmware

  Operating System: CentOS Linux 7 (Core)

       CPE OS Name: cpe:/o:centos:centos:7

            Kernel: Linux 3.10.0-1127.el7.x86_64

      Architecture: x86-64
有时仍需要在/etc/sysconfig/network和/etc/hosts文件中修改主机名信息。
/etc/hosts:域名和ip对应关系的文件
/etc/sysconfig/network:其中HOSTNAME=主机名字用于设置主机名
[root@xuzhichao ~]# cat /etc/hosts

127.0.0.1   localhost localhost.localdomain localhost4 localhost4.localdomain4 xuzhichao

::1         localhost localhost.localdomain localhost6 localhost6.localdomain6
2.bash shell特性
shell提供了用户和内核进行交互的一种接口。shell是一种命令解释器,它把用户输入的命令送到内核中去执行。
目前linux各个发行版中主流的shell都是/bin/bash程序,系统支持的bash程序可以在/etc/shells文件中看到。
[root@xuzhichao ~]# cat /etc/shells

/bin/sh

/bin/bash

/usr/bin/sh

/usr/bin/bash

/bin/tcsh

/bin/csh
- /sbin/nologin是一个特殊的bash程序,该bash不能登录系统,主要用于一些系统用户使用,因为这些系统用户无需登录系统。
2.1 历史命令
bash shell会记录用户所有操作的命令到缓存区,用户注销时自动保存到~/.bash_history文件中,当用户下次登录系统时,会读取该文件中的命令到命令缓存中。
2.1.1 history命令
history命令用于显示和管理历史命令,主要选项如下:
| 选项 | 说明 |
|---|---|
| -c | 清空历史命令 |
| -d offset | 删除历史中第offset条命令 |
| n | 显示最近的n条命令 |
| -a | 追加本次会话新执行的命令到~/.bash_history中 |
| -r | 读取历史文件追加到历史命令列表中 |
| -w | 保存历史命令到/.bash_history文件中,会覆盖原有/.bash_history文件中的命令。慎用! |
| -n | 读取历史文件中未读过的行到历史列表中 |
| -p | 展开历史参数成多行,但不存在历史列表中 |
| -s | 展开历史参数成一行,附加到历史列表中 |
history命令的用法如下:
#显示历史命令

[root@xuzhichao ~]# history

    1  2021-05-17 18:29:36 init 3

    2  2021-05-17 18:29:36 hostnamectl set-hostname Centos7-8

    3  2021-05-17 18:29:36 exit

    4  2021-05-17 18:29:36 ip add

    5  2021-05-17 18:29:36 nmcli connection

    6  2021-05-17 18:29:36 nmcli connection modify ens33 con-name ens33 ifname ens33 method none ipv4.addresses 192.168.20.27/24

#显示最近3条历史命令

[root@xuzhichao ~]# history 3

  620  2021-05-17 18:29:43 echo $LANG

  621  2021-05-17 18:30:12 history

  622  2021-05-17 18:31:16 history 3

#删除第623条历史命令

[root@xuzhichao ~]# history 1

  623  2021-05-17 18:32:08 history 1

[root@xuzhichao ~]# history -d 623

[root@xuzhichao ~]# history 3

  622  2021-05-17 18:32:00 history -d 622

  623  2021-05-17 18:32:31 history -d 623

  624  2021-05-17 18:32:34 history 3

#清空历史命令列表

[root@xuzhichao ~]# history -c

[root@xuzhichao ~]# history

  247  2021-05-17 18:33:47 history

[root@xuzhichao ~]# tail ~/.bash_history

#1621248034

hostnamectl set-hostname efg

#1621248040

cat /etc/hostname

#1621248046

hostnamectl

#1621248063

cat /etc/hostname

#1621248755

cat /etc/sysconfig/network

[root@xuzhichao ~]# history

  247  2021-05-17 21:41:59 history

  248  2021-05-17 21:44:22 tail ~/.bash_history

  249  2021-05-17 21:45:28 echo "abc"

  250  2021-05-17 21:45:31 history

#追加本次会话到到历史命令文件中

[root@xuzhichao ~]# history -a

[root@xuzhichao ~]# tail ~/.bash_history

#1621258919

history

#1621259062

tail ~/.bash_history

#1621259128

echo "abc"

#1621259131

history

#1621259140

history -a

#清除命令列表再把命令列表覆盖写入历史命令文件中,会导致丢失历史命令。

[root@xuzhichao ~]# history -c

[root@xuzhichao ~]# history -w

[root@xuzhichao ~]# cat ~/.bash_history

#1621259799

history -w

#-p参数可以使得命令不记录在历史命令中,仅对部分命令有效

[root@xuzhichao ~]# history -p `id`

uid=0(root)

gid=0(root)

groups=0(root)

[root@xuzhichao ~]# history

  247  2021-05-17 21:56:39 history -w

  248  2021-05-17 21:56:50 cat ~/.bash_history

  249  2021-05-17 21:58:51 echo "aaa"

  250  2021-05-17 21:58:55 history

  251  2021-05-17 21:58:58 history -r

  252  2021-05-17 21:56:39 history -w

  253  2021-05-17 21:59:00 history

  254  2021-05-17 22:00:54 history -r

  255  2021-05-17 21:56:39 history -w

  256  2021-05-17 22:00:57 history

  257  2021-05-17 22:01:17 cat ~/.bash_history

  258  2021-05-17 22:03:49 history

# -s 选项可以用来在历史列表末尾添加命令,而不真正执行它们,从而在接下来的调用中可以使用它们。

[root@xuzhichao ~]# history -s "rm -rf /"

[root@xuzhichao ~]# history

  247  2021-05-17 21:56:39 history -w

  248  2021-05-17 21:56:50 cat ~/.bash_history

  249  2021-05-17 21:58:51 echo "aaa"

  250  2021-05-17 21:58:55 history

  251  2021-05-17 21:58:58 history -r

  252  2021-05-17 21:56:39 history -w

  253  2021-05-17 21:59:00 history

  254  2021-05-17 22:00:54 history -r

  255  2021-05-17 21:56:39 history -w

  256  2021-05-17 22:00:57 history

  257  2021-05-17 22:01:17 cat ~/.bash_history

  258  2021-05-17 22:03:49 history

  259  2021-05-17 22:05:27 rm -rf /

  260  2021-05-17 22:05:30 history
history命令中有一些变量用于控制history的相关属性
变量及其意义如下表:
变量名称 说明 HISTSIZE 命令历史列表记录的最大条数,超过从时间最前的开始覆盖,默认为1000条 HISTFILE 指定历史命令记录的文件,默认为~/.bash_history HISTFILESIZE 命令历史文件记录的最大条数,默认为1000条 HISTTIMEFORMAT 指定在显示历史命令列表时同时显示时间 HISTIGNORE 指定在历史命令中不记录的命令 HISTCONTROL 控制历史命令的记录方式,可以设置如下值: 1、ignoredups:默认值,忽略重复的命令,连续且相同视为重复; 2、ignorespace:忽略所有以空格开头的命令; 3、ignoreboth:相当于ignoredups和ignorespace的组合 4、erasedups:删除重复命令 [root@xuzhichao ~]# echo $HISTSIZE
1000
[root@xuzhichao ~]# echo $HISTFILESIZE
1000
[root@xuzhichao ~]# echo $HISTTIMEFORMAT
%F %T
[root@xuzhichao ~]# echo $HISTCONTROL
ignoreboth #忽略ls开头的命令以及hostname命令
[root@xuzhichao ~]# HISTIGNORE="ls*:hostname"
[root@xuzhichao ~]# echo $HISTIGNORE
ls*:hostname
[root@xuzhichao ~]# ls /tmp
dir1 file1_softlink
[root@xuzhichao ~]# hostname
xuzhichao
#不记录上述命令的历史命令
[root@xuzhichao ~]# history 3
269 2021-05-17 22:20:09 echo $HISTIGNORE
270 2021-05-17 22:20:31 history
271 2021-05-17 22:20:38 history 3
PS:如果需要永久保存上述变量,需要写入/etc/profile或~/.bash_profile文件中。
2.1.2 历史命令的快捷键
- 重复前一个命令有4中方法:
- 使用向上的方向键并回车执行
- 使用!!并回车执行
- 使用 !-1 回车执行
- 按ctrl+p 回车执行
- !:0:执行前一条命令(不带参数)
- !string:重复前一个以string开头的命令
- !n:执行history命令输出对应序号为n的命令
- !-n:执行history命令倒数第n个命令
- up/down:浏览从前输入的命令
- Ctrl+r:在历史命令中搜索命令
- Ctrl+g:退出命令历史搜索模式
- 重新调用前一个命令的最后一个参数:
- !$
- Esc .
- command !^:调用上一个命令第一个参数做为command的参数
- command !$:调用上一个命令的最后一个参数做为command的参数
- command !*:调用上一个命令的全部参数作为command的参数
2.2 命令行展开{}
{}:可包含一个以逗号分隔的字符串或序列,能够将其展开为多个字符串。
使用示例如下:
[root@xuzhichao ~]# echo a{b,c,d}e

abe ace ade

[root@xuzhichao ~]# echo /tmp/{a,b,c}

/tmp/a /tmp/b /tmp/c

[root@xuzhichao ~]# echo {1..6}

1 2 3 4 5 6

[root@xuzhichao ~]# echo {a..z}

a b c d e f g h i j k l m n o p q r s t u v w x y z

[root@xuzhichao ~]# echo {1..10..2}

1 3 5 7 9

[root@xuzhichao ~]# echo {a..z..2}

a c e g i k m o q s u w y
2.3 通配符
通配符glob,使用特定的字符,对相关的一系列文件进行匹配。
通配符的元字符如下:
| 元字符 | 说明 |
|---|---|
| * | 匹配任意长度字符 |
| ? | 匹配任意单个字符 |
| [] | 中括号匹配指定集合内的任意单个字符,[xu]代表x,u两个字符中的任意一个 |
| [0-9] | 匹配任意数字 |
| [a-z] | 匹配任意单个小写字母 |
| [[:upper:]] | 匹配任意单个大写字母 |
| [[:lower:]] | 匹配任意单个小写字母 |
| [[:digit:]] | 匹配任意单个数字 |
| [[:alnum:]] | 匹配任意单个所有字母和数字 |
| [[:alpha:]] | 匹配任意单个大写和小写字母 |
| [[:space:]] | 匹配单个空白字符 |
| [[:punctl:]] | 匹配单个标点符号 |
| [^xu] | 匹配除了x,u以外的其他单个字符 |
| [^a-z] | 匹配除了小写字母以外的其他单个字符 |
通配符使用示例:
[root@xuzhichao test]# touch file{a..d} file{A..D}

[root@xuzhichao test]# ls

fileA  fileB  fileC  fileD  filea  fileb  filec  filed

#显示a-z的所有文件,注意字母的排序为aAbBcCdD

[root@xuzhichao test]# ls file[a-c]

fileA  fileB  filea  fileb  filec

[root@xuzhichao test]# ls file[[:upper:]]

fileA  fileB  fileC  fileD

[root@xuzhichao test]# ls file[^aAd]

fileB  fileC  fileD  fileb  filec

[root@xuzhichao test]# ls /etc/rc.d/rc[0-6]*/S*

/etc/rc.d/rc2.d/S10network  /etc/rc.d/rc3.d/S10network  /etc/rc.d/rc4.d/S10network  /etc/rc.d/rc5.d/S10network

#显示/etc下的非隐藏目录

[root@xuzhichao test]# ls /etc/[^.]*/ -d

#显示/etc下以conf结尾的文件

[root@xuzhichao test]# ls /etc/*.conf
2.4 bash shell的快捷键
bash shell的常用快捷键如下:
- Ctrl+l:清屏,相当于clear命令
- Ctrl+c:终止命令
- Ctrl+z:挂起当前命令,放入后台
- Ctrl+s:阻止屏幕输出,锁定屏幕
- Ctrl+q:允许屏幕输出
- Ctrl+a:光标移到行首
- Ctrl+e:光标移到行尾
- Ctrl+u:从光标处删除到行首
- Ctrl+k:从光标处删除到行尾
- Alt+r:删除当前行
- Ctrl+xx:光标在行首和光标之间移动
- Ctrl+d:输入结束(EOF),例如邮件结束的时候
2.5 变量
2.5.1 变量的声明及引用
bash中变量需要预先定义,才能进行引用。
- 变量的赋值格式为:
变量名=变量的值
变量的引用格式为:
在变量前加上$
echo $NAME 或 echo ${NAME}
删除自定义的变量:
unset 变量名
变量的使用需要遵循如下规则:
变量两边不能直接使用空格符。
变量名称只能包含英文字母和数字,但是开头字符不能是数字。
不能使用shell中定义的命令或关键字作为变量名称。
变量内容中如有空格,使用单引号或双引号括起来。
[root@xuzhichao ~]# str="a b c"

[root@xuzhichao ~]# echo $str

a b c

[root@xuzhichao ~]# str1=a\ b\ c

[root@xuzhichao ~]# echo $str1

a b c
可以使用转义字符“\”将特殊符号,如[enter]、$、空格符、\、!、单引号(')等变为一般字符。
[root@xuzhichao ~]# money=\$10000

[root@xuzhichao ~]# echo $money

$10000

[root@xuzhichao ~]# money=$10000

[root@xuzhichao ~]# echo $money

cul0000
若变量没有赋值直接引用,变量的值为空,null。
变量引用时,若变量名与其他字符相连接,需要使用${变量名}格式
[root@xuzhichao ~]# name=xuzhichao

[root@xuzhichao ~]# echo $nameabc

[root@xuzhichao ~]# echo ${name}abc

xuzhichaoabc

[root@xuzhichao ~]# echo ${name}_${str}

xuzhichao_a b c
变量需要增加内容时,可以使用“\(变量名”或\){变量名}累加内容。
[root@xuzhichao ~]# echo $PATH

/usr/lib64/qt-3.3/bin:/usr/local/sbin:/usr/local/bin:/usr/sbin:/usr/bin:/root/bin

[root@xuzhichao ~]# PATH=${PATH}:/usr/local/bin

[root@xuzhichao ~]# echo $PATH

/usr/lib64/qt-3.3/bin:/usr/local/sbin:/usr/local/bin:/usr/sbin:/usr/bin:/root/bin:/usr/local/bin
在命令中引用其他命令的结果可以使用“``”或“$()”格式。
[root@xuzhichao ~]# ll `which awk`

lrwxrwxrwx. 1 root root 4 Nov  4  2020 /usr/bin/awk -> gawk

[root@xuzhichao ~]# version=$(uname -r)

[root@xuzhichao ~]# echo $version

3.10.0-1127.el7.x86_64

[root@xuzhichao ~]# touch file.log.`date +"%F %T"`

[root@xuzhichao ~]# ls file.log.2021-05-18

file.log.2021-05-18
2.5.2 变量类型
变量可以分为以下变量类型:
- 普通变量:普通变量的作用域为当前的shell进程,不包含其子进程,在shell进程结束时,普通变量会被注销。
- 本地变量:本地变量在函数中使用,作用域为当前函数,声明方式如下:
- local 变量名
- 环境变量:环境变量用于控制shell的一些特性,作用域为当前shell及其子进程,环境变量一般使用大写字母作为变量名,声明方式如下:
- export 变量名
- declare -x 变量名
- 只读变量:根据变量是否可修改又有一种只读变量,该类型变量不能修改,声明方式如下:
- readonly 变量名
- declare -r 变量名
以上类型变量的使用示例如下:
#普通变量声明

[root@xuzhichao ~]# age=20

[root@xuzhichao ~]# echo $age

20

#开启一个字shell进程

[root@xuzhichao ~]# bash

[root@xuzhichao ~]# echo $age   <==显示为空

#退出到父进程

[root@xuzhichao ~]# exit

exit

#变量仍然可以显示内容

[root@xuzhichao ~]# echo $age

20

#把变量声明为环境变量

[root@xuzhichao ~]# export age

#开启子shell进程,可以显示变量的内容

[root@xuzhichao ~]# bash

[root@xuzhichao ~]# echo $age

20

#只读变量不能修改内容和删除变量

[root@xuzhichao ~]# declare -r name=xu

[root@xuzhichao ~]# name=wang

-bash: name: readonly variable   <==无法修改内容

[root@xuzhichao ~]# unset name

-bash: unset: name: cannot unset: readonly variable    <==不能删除只读变量
显示所有环境变量的命令如下:
export
env
set:显示环境变量和函数
declare -x
[root@xuzhichao ~]# env

XDG_SESSION_ID=1

HOSTNAME=xuzhichao

TERM=xterm

SHELL=/bin/bash

...(省略部分内容)...

[root@xuzhichao ~]# declare -x

declare -x DISPLAY="localhost:10.0"

declare -x EDITOR="vim"

declare -x HISTCONTROL="ignoreboth"

declare -x HISTSIZE="1000"

declare -x HOME="/root"

declare -x HOSTNAME="xuzhichao"

...(省略部分内容)...

[root@xuzhichao ~]# export

declare -x DISPLAY="localhost:10.0"

declare -x EDITOR="vim"

declare -x HISTCONTROL="ignoreboth"

declare -x HISTSIZE="1000"

declare -x HOME="/root"

declare -x HOSTNAME="xuzhichao"

declare -x KDEDIRS="/usr"

...(省略部分内容)...
declare命令:声明变量
主要选项如下:
选项 说明 -a 声明数组型变量 -i 声明变量类型为整数数字类型 -x 声明变量类型为环境变量 -r 声明变量类型为只读变量 #默认变量类型为字符串
[root@xuzhichao ~]# echo $sum
1+2+3 #声明为整数类型时可以进行算数运算
[root@xuzhichao ~]# declare -i sum=1+2+3
[root@xuzhichao ~]# echo $sum
6
2.5.3 常用环境变量
linux中内置了一些常用的环境变量,实行了shell的特定功能。
UID:当前用户的UID
[root@xuzhichao ~]# echo $UID

0
HOSTNAME:当前主机的主机名
[root@xuzhichao ~]# echo $HOSTNAME

xuzhichao
HOME:当前用户的家目录
[root@xuzhichao ~]# echo $HOME

/root
SHELL:当前使用的shell类型
[root@xuzhichao ~]# echo $SHELL

/bin/bash
MAIL:当前用户的邮件文件存放目录
[root@xuzhichao ~]# echo $MAIL

/var/spool/mail/root
PATH:执行外部命令查找的路径,路径之间使用:分割
LANG:系统使用的语系和字符编码集
$、BASHPID :都表示当前shell的PID
[root@xuzhichao ~]# echo $BASHPID

3738

[root@xuzhichao ~]# echo $$

3738
PS1:shell的命令提示符
[root@xuzhichao ~]# echo $PS1

\[\e[1;36m\][\u@\h \W]\$ \[\e[0m\]   <==带颜色显示

\u:当前用户账号信息

\h:主机第一个小数点之前的命令

\w:当前完整工作目录

\$:提示符,root提示#,其他用户提示$

\#:执行的第n条命令
PS2:命令过长或一条命令分两行写第二行的提示符
[root@xuzhichao ~]# echo $PS2

>
RANDOM:随机数,随机数范围为0~32768
[root@xuzhichao ~]# echo $RANDOM

7283

[root@xuzhichao ~]# declare -i num=$RANDOM*10/32768; echo $num    <==取0-10之间的随机数

6
?:上一个执行的命令的回传码,0代表上一个命令执行成功,1-255代表上一个命令出现了各种错误。
[root@xuzhichao ~]# ls anaconda-ks.cfg

anaconda-ks.cfg

[root@xuzhichao ~]# echo $?

0

[root@xuzhichao ~]# ls abc

ls: cannot access abc: No such file or directory

[root@xuzhichao ~]# echo $?

2

[root@xuzhichao ~]# echo $?

0
2.5.4 单引号、双引号、反向单引号
在使用变量时,单引号、双引号、反向单引号的区别如下:
- 单引号:强引用,变量内容使用单引号时,对其中的命令和变量都无法识别,只能识别为字符串本身。 最傻
- 双引号:弱引用,变量内容使用双引号时,对其中的命令无法识别,但是变量可以识别,显示变量的内容。 中间傻
- 反向单引号:变量内容使用反向单引号时,对其中的命令和变量都可以识别,执行命令,显示变量内容。 最聪明
使用示例如下:
[root@xuzhichao ~]# echo "echo username is $USER"

echo username is root

[root@xuzhichao ~]# echo 'echo username is $USER'

echo username is $USER

[root@xuzhichao ~]# echo `echo username is $USER`

username is root
2.6 bash shell命令的执行逻辑
2.6.1 分号连接多个命令
把多个命令合并在一起执行,缺点是无论前一个命令是否执行成功都会执行下一个命令。若命令之间存在逻辑性,则会存在问题。
使用格式如下:
- command1;command2;command3
使用示例:
[root@xuzhichao ~]# ls a ; cd /data ; pwd

ls: cannot access a: No such file or directory

/data

[root@xuzhichao data]# sync ; sync ; shutdown -h 0
2.6.2 小括号()包含多个命令
小括号()包含多个命令,可以一次执行多个命令,提高执行效率。
使用格式如下:
- (command1;command2;command3)
注意:小括号会开启一个字shell进程,所有在()中的变量不会影响到当前shell的变量。
[root@xuzhichao /]# ls /data/ ; pwd ; (cd /data;pwd);pwd

python  python-v1.1  python-v1.2  test   <==ls /data/的结果

/                                        <==第二个pwd的执行结果

/data                                    <==()中的pwd执行结果

/                                        <==最后一个pwd的执行结果,在()中的执行的cd /data命令不会影响当前shell的环境

[root@xuzhichao ~]# name=123;(name=abc; echo $name);echo $name

abc

123    <==()中变量的赋值不会影响当前shell的变量
2.6.3 大括号{}包含多个命令
大括号{}包含多个命令,可以一次执行多个命令,提高执行效率。
使用格式如下:
{ command1;command2;command3; }
注意:{ }和命令之间至少要有一个空格,且最后一个命令需要以分号;结束
注意:大括号{}中不会开启子shell,{}中的命令是在当前shell下执行的,会对当前shell的变量产生影响
[root@xuzhichao ~]#  name=123;{ name=abc; echo $name; };echo $name

abc

abc
2.6.4 && 和||的用法
多个命令之间如果存在逻辑判断关系,例如前一个命令执行成功则执行下一条命令,此时就需要&&和||的帮助了。
- cmd1 && cmd2:若cmd1执行完毕且正确执行(\(?=0)则开始执行cmd2,若cmd1执行完毕但是执行错误(\)?!=0),则cmd2不执行。
- cmd1 || cmd2:若cmd1执行完毕且正确执行(\(?=0)则不开始执行cmd2,若cmd1执行完毕但是执行错误(\)?!=0),则开始执行cmd2。
&&和||的用法示例如下:
#/data/test目录如果存在则在该目录下创建file1文件

[root@xuzhichao ~]# ls /data/test && touch /data/test/file1

ls: cannot access /data/test: No such file or directory

[root@xuzhichao ~]# ll /data/test/file1

ls: cannot access /data/test/file1: No such file or directory  <==因为/data/test不存在,file1没有创建

[root@xuzhichao ~]# mkdir /data/test

[root@xuzhichao ~]# ls /data/test && touch /data/test/file1

[root@xuzhichao ~]# ls /data/test/file1

/data/test/file1                                               <==因为/data/test已经存在,故file1创建成功

#/data/test如果不存在就创建该目录

[root@xuzhichao ~]# rm -rf /data/test/

[root@xuzhichao ~]# ls /data/test/ || mkdir /data/test/

ls: cannot access /data/test/: No such file or directory

[root@xuzhichao ~]# ll /data/test/ -d

drwxr-xr-x 2 root root 6 May 18 23:52 /data/test/              <==因为/data/test不存在,故/data/test创建成功

#无论/date/test/目录是否存在,都需要在/data/test下创建/data/test/file1文件

#当ls /data/test/命令运行失败时,执行mkdir /data/test/和touch /data/test/file1,当ls /data/test/命令运行成功时,只执行ch /data/test/file1命令

[root@xuzhichao ~]# rm -rf /data/test/

[root@xuzhichao ~]# ls /data/test/ || mkdir /data/test/ && touch /data/test/file1

ls: cannot access /data/test/: No such file or directory

[root@xuzhichao ~]# ls /data/test/file1

/data/test/file1

#判断/data/test/目录是否存在,存在则显示exist,不存在则显示not exist

[root@xuzhichao ~]# ls /data/test/ &> /dev/null && echo "exist" || echo "not exist"

exist

[root@xuzhichao ~]# rm -rf /data/test/

[root@xuzhichao ~]# ls /data/test/ &> /dev/null && echo "exist" || echo "not exist"

not exist
注意:以上两个例子中&&和||混合使用时&&和||放置的位置,位置不同实现的功能也不通。
2.7 I/O重定向
I/0数据流:
I/0数据流分为标准输入STDIN,标准输出STDOUT和标准错误输出STFERR三种,标准输入一般从键盘实现,标准输出一般从屏幕实现,三个都可以修改。
文件描述符fd:
当程序打开一个文件时,linux会自动分配一个软链接,指向正在打开的文件,这就是文件描述符。
文件描述符一般是一个正整数,是内核为了高效管理已打开的文件的索引,所有执行I/0操作的系统调用都需要使用fd。
当一个程序启动时,会自动打开STDIN,STDOUT,STDERR这三个I/0设备文件,这三个I/0设备文件对应的文件描述符分别是0,1,2.这个程序打开的其他文件的描述符从3开始计数。
#查看当前shell打开的fd

[root@xuzhichao ~]# ll /proc/$BASHPID/fd

total 0

lrwx------ 1 root root 64 May 19 09:42 0 -> /dev/pts/1         <==标准输入,从pts/1输入

lrwx------ 1 root root 64 May 19 09:42 1 -> /dev/pts/1

lrwx------ 1 root root 64 May 19 09:42 2 -> /dev/pts/1

lrwx------ 1 root root 64 May 19 10:14 255 -> /dev/pts/1

#查看当前PID为1的进程打开的文件描述符

[root@xuzhichao ~]# ll /proc/1/fd

total 0

lrwx------ 1 root root 64 May 18 17:01 0 -> /dev/null           <==标准输入,指向/dev/null即为不输入

lrwx------ 1 root root 64 May 18 17:01 1 -> /dev/null           <==标准输出

lr-x------ 1 root root 64 May 19 10:09 10 -> anon_inode:inotify

lr-x------ 1 root root 64 May 19 10:09 11 -> /proc/swaps        <==打开的文件的fd

lrwx------ 1 root root 64 May 19 10:09 12 -> socket:[10974]

lr-x------ 1 root root 64 May 19 10:09 14 -> anon_inode:inotify

lrwx------ 1 root root 64 May 19 10:09 19 -> socket:[10979]

lrwx------ 1 root root 64 May 18 17:01 2 -> /dev/null           <==错误输出

lrwx------ 1 root root 64 May 19 10:09 20 -> /run/dmeventd-server
I/O重定向实现方法:
I/O类型 操作符 意义 标准覆盖输出重定向 1> (1可以省略) 将程序输出的正确结果输出到指定的文件中,会覆盖文件原有的内容 标准追加输出重定向 1>> (1可以省略) 将程序输出的正确结果输出到指定的文件中,会追加到文件原有的内容后面 错误覆盖输出重定向 2> 将程序输出的错误结果输出到指定的文件中,会覆盖文件原有的内容 错误追加输出重定向 2>> 将程序输出的错误结果输出到指定的文件中,会追加到文件原有的内容后面 输入重定向 0< (0可以省略) 从指定的文件中向程序输入内容 多行输入重定向 << 一次向程序输入多行内容 set -C命令:禁止将内容覆盖已有文件,可以追加。
#设置文件内容禁止覆盖

[root@xuzhichao ~]# set -C

[root@xuzhichao ~]# ls > file1

[root@xuzhichao ~]# ls > file1

-bash: file1: cannot overwrite existing file  <==文件不能覆盖

#使用 >| file 方式可以强行覆盖文件

[root@xuzhichao ~]# ls >| file1

#取消文件内容禁止覆盖

[root@xuzhichao ~]# set +C
2.7.1 输出重定向
输出重定向分为以下三种类型:
标准输出重定向
#hostname命令重定向到/dev/pts/1终端上输出,本终端不在输出到屏幕中。

[root@xuzhichao ~]# hostname > /dev/pts/1

#把ls命令存放到stdout.txt文件中,>>可实现追加

#当stdout.txt不存在时,会自动创建,存在时,使用>会覆盖其内容

[root@xuzhichao ~]# ls > stdout.txt

[root@xuzhichao ~]# cat stdout.txt

anaconda-ks.cfg

[root@xuzhichao ~]# ls > stdout.txt

[root@xuzhichao ~]# cat stdout.txt

anaconda-ks.cfg

#追加内容而不覆盖

[root@xuzhichao ~]# ls >> stdout.tx

[root@xuzhichao ~]# cat stdout.txt

anaconda-ks.cfg

anaconda-ks.cfg
错误输出重定向
#文件不存在,有错误输出

[root@xuzhichao ~]# ls err

ls: cannot access err: No such file or directory

#把错误输出指向文件stderr.txt

[root@xuzhichao ~]# ls err 2> stderr.txt

[root@xuzhichao ~]# ls err 2> stderr.txt

[root@xuzhichao ~]# cat stderr.txt

ls: cannot access err: No such file or directory

#把错误输出追加到文件stderr.txt

[root@xuzhichao ~]# ls err 2>> stderr.txt

[root@xuzhichao ~]# cat stderr.txt

ls: cannot access err: No such file or directory

ls: cannot access err: No such file or directory
标准输出和错误输出结合使用
标准输出和错误输出可以同时使用,分别输出到不同的地方,也可以同时输出到同一个地方,使用如下方式:
&> file
> file 2>&1
第一种命令实现的逻辑示例图如下:

第二种命令实现的逻辑示例图如下:

```shell

#示例一:把标准输出重定向到stdout.txt,把错误输出重定向到stderr.txt

[root@xuzhichao ~]# ls /data/ err > stdout.txt 2> stderr.txt

#示例二:把标准输出和错误输出合并到一个文件stdall.txt

[root@xuzhichao ~]# ls /data/ err &> stdall.txt

[root@xuzhichao ~]# ls /data/ err > stdall.txt 2>&1

#示例三:把标准输出和错误输出合并到一个文件stdall.txt,使用追加的方式

[root@xuzhichao ~]# ls /data/ err >> stdall.txt 2>&1

[root@xuzhichao ~]# ls /data/ err &>> stdall.txt

#示例四:使用/dev/null可以把一些不需要的输出屏蔽掉,/dev/null称为垃圾桶。

#使用id命令判断xu用户是否存在

[root@xuzhichao ~]# id xu &> /dev/null

[root@xuzhichao ~]# echo $?

0                                 <==结果为0代表用户xu存在

#示例五:把多条命令的正确执行结果合并到一个文件

[root@xuzhichao ~]# (id xu ; date) > all.log

[root@xuzhichao ~]# cat all.log

uid=1000(xu) gid=1000(xu) groups=1000(xu)

Wed May 19 11:45:11 CST 2021

#示例六:通过覆盖软链接可以把真实文件覆盖

[root@xuzhichao ~]# cat all.log

uid=1000(xu) gid=1000(xu) groups=1000(xu)

Wed May 19 11:45:11 CST 2021

[root@xuzhichao ~]# ln -s all.log all.link

[root@xuzhichao ~]# ll all.*

lrwxrwxrwx 1 root root  7 May 19 11:47 all.link -> all.log

-rw-r--r-- 1 root root 71 May 19 11:45 all.log

[root@xuzhichao ~]# > all.link

[root@xuzhichao ~]# cat all.log   <==内容被覆盖

[root@xuzhichao ~]#

```
2.7.2 输入重定向
很多命令的默认是从键盘获取数据,可以使用文件来代替键盘获取输入。
#示例一:使用文件中的y作为rm命令的输入

[root@xuzhichao ~]# rm f1

rm: remove regular empty file 'f1'? y

[root@xuzhichao ~]# echo "y" > y.txt

[root@xuzhichao ~]# rm f2 < y.txt

rm: remove regular empty file 'f2'?

#示例二:利用标准输入,备份文件

[root@xuzhichao ~]# echo "welcome" > /etc/motd

[root@xuzhichao ~]# cat > motd.bak < /etc/motd

[root@xuzhichao ~]# cat motd.bak

welcome

#示例三:使用文件作为cat的输入

[root@xuzhichao ~]# cat < /etc/issue

\S

Kernel \r on an \m
2.7.3 多行输入重定向
当我们需要一次性输入多行数据,批量提交时,可以使用多行重定向实现。
多行重定向格式为:
command << [-] 结束符

line1

line2

...

结束符

说明:

1.结束符可以是任意字符,但需要保持一致,一般使用EOF;

2.结束符必须为独立的一行,前后不能有其他字符;

3.“-”一般用于在脚本中实现对齐效果;
使用示例如下:
[root@xuzhichao ~]# cat > file1 <<EOF

> abc

> 123

> qwe

> EOF

[root@xuzhichao ~]# cat file1

abc

123

qwe
2.8 管道
利用管道符“|”可以把两个无关的程序结合起来实现复杂功能。管道可以把前一个程序输出的结果作为后一个程序的输入进行处理。
管道使用格式如下:
- command1 | command2 | command3
注意:管道只能用于传递前一个命令的标准输出,不能传递错误输出。
如果需要让command2接收command1的错误输出,可以使用如下格式:
- command1 2>&1 | command2
- command1 |& command2
管道的使用示例如下:
[root@xuzhichao ~]# echo "1+1" | bc

2

[root@xuzhichao ~]# echo {1..100} | tr ' ' '+' | bc

5050

[root@xuzhichao ~]# ls

22:18:01  all.link  all.log  anaconda-ks.cfg  boot  file.log.2021-05-18  file1  fstab  fstab.~1~  initial-setup-ks.cfg

[root@xuzhichao ~]# ls | tr 'a-z' 'A-Z'

22:18:01

ALL.LINK

ALL.LOG

ANACONDA-KS.CFG

BOOT

FILE.LOG.2021-05-18

FILE1

FSTAB

FSTAB.~1~

INITIAL-SETUP-KS.CFG

#处理前一个命令的错误输出

[root@xuzhichao ~]# ls err | tr 'a-z' 'A-Z'

ls: cannot access err: No such file or directory

[root@xuzhichao ~]# ls err |& tr 'a-z' 'A-Z'

LS: CANNOT ACCESS ERR: NO SUCH FILE OR DIRECTORY
2.8.1 tee命令
tee命令可以接收标准输入,实现同时将数据分送到文件和屏幕。实现的逻辑如下:
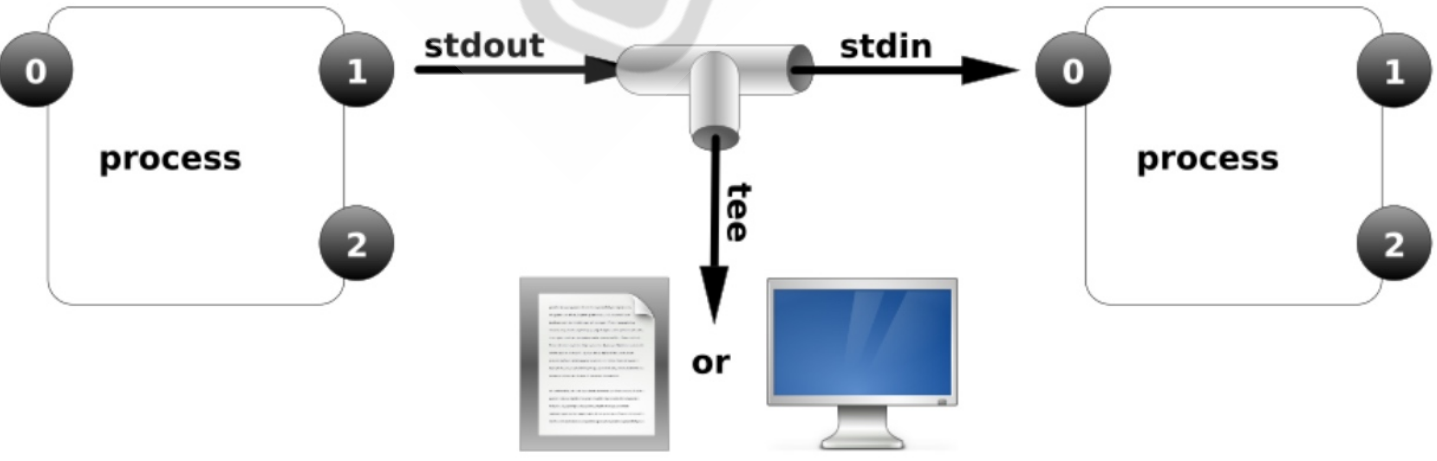
tee命令的语法格式:
tee [OPTION]... [FILE]...

-a, --append              追加到文件,而非覆盖
tee用法如下:
[root@xuzhichao ~]# hostname | tee -a tee.log | tr 'a-z' 'A-Z'

XUZHICHAO

[root@xuzhichao ~]# cat tee.log

xuzhichao
2.8.2 减号“-”的用法
在管道中,经常会使用前一个命令的输出作为后一个命令的输入,当某些命令需要使用到文件名来处理时,stdin和stdout就可以使用减号“-”来代替文件。
示例:
#将/home目录的内容备份到当前目录下。

[root@xuzhichao ~]# tar -cvf - /home/ | tar -xvf -
这个例子意思是将/home目录下的文件打包,打包的数据不是记录到文件,而是传送到stdout;经过管道后将-传送给后一个命令tar -xvf - ,这样后一个命令的“-”则是取前一个命令的stdout,这样我们就不需要临时文件了。
linux基础命令及bash shell特性的更多相关文章
- Linux基础命令---enable开启shell命令
enable enable指令用来关闭或者激活shell内部命令.此命令的适用范围:RedHat.RHEL.Ubuntu.CentOS.Fedora. 1.语法 enable [-a] ...
- 【Python之路】第一篇--Linux基础命令
pwd 命令 查看”当前工作目录“的完整路径 pwd -P # 显示出实际路径,而非使用连接(link)路径:pwd显示的是连接路径 . 表示当前目录 .. 表示上级目录 / 表示根目录 ls ...
- linux基础命令一
linux基础命令一 1.date命令 date命令介绍:显示或者设置系统日期 date命令的语法: 显示日期:date [options...] [+FORMAT] FORMAT:为显示日期的格 ...
- 常用的linux基础命令
常用的linux基础命令 1.ls 显示目录属性 -l:(也可以简写成ll),列表显示权限等属性 -a:显示所有文件包括隐藏文件等 -d:只列出目录本身 2.chgrp 改变档案所属群组 eg:chg ...
- Linux基础命令-查看基本硬件信息
Linux基础命令-查看基本硬件信息 作者:尹正杰 版权声明:原创作品,谢绝转载!否则将追究法律责任. 一.查看CPU信息 [root@node101.yinzhengjie.org.cn ~]# l ...
- Linux基础命令小结(超全!!)
Linux目录结构 1.bin 存放经常使用的指令比如ll,cp 2.sbin 系统管理员使用的系统管理指令 3.home 存放普通用户的住目录 4.root 系统管理员的用户主目录 5.boot 存 ...
- Linux基础命令整合
linux基础命令整理 1.系统相关命令 shutdown -h now 关闭系统(1) init 0 关闭系统(2) telinit 0 关闭系统(3) shutdown -h hours:minu ...
- Linux——基础命令用法(上)
一.Linux基础命令 1.Linux命令行的格式 命令行的格式为:用户名+主机名+当前工作目录 输入内容的命令格式为:命令 [-短选项/--长选项] [参数] [root@localhost ~]# ...
- 第四节,Linux基础命令
第四节,Linux基础命令 命令是系统操作员对系统传入的指令,传入指令后回车,系统接收到指令做出相应的行为 1.查看用户位于系统什么位置 [pmd]检查操作用户位于系统的什么位置 命令 ...
- Linux编程 3 (初识bash shell与man查看手册)
一.初识bash shell 1.1 启动 shell GNU bash shell 能提供对Linux系统的交互式访问.通常是在用户登录终端时启动,登录时系统启动shell依赖于用户账户的配置. ...
随机推荐
- arch xfce启用自动挂载usb设备,自动访问usb设备,自动连接usb设备
1.安装gvfs sudo pacman -S gvfs GVFS(Gnome Virtual File System)是一个用于 GNOME 桌面环境的虚拟文件系统,它提供了一种统一的方式来访问和管 ...
- 【Java】try {}里有一个 return 语句,那么紧跟在这个 try 后的 finally {}里的 code 会不会被执行,什么时候被执行,在 return 前还是后?
try {}里有一个 return 语句,那么紧跟在这个 try 后的 finally {}里的 code 会不会被执行,什么时候被执行,在 return 前还是后? package com.test ...
- Android---ListView控件用法
首先要使用ListView是要自定义一个适配器类的,先简单分析一下适配器怎么写: 示例程序是要使用ListView列表显示出水果的图片以及对应的水果文字描述(水果名字). public class F ...
- Supervisor 安装与使用
一.Supervisor 介绍 Supervisor 是一个用 Python 编写的进程管理工具,它可以用于监控和控制类 UNIX 操作系统上的多个进程.它是一个客户端/服务器系统,其中 Superv ...
- #斐波那契#洛谷 3424 [POI2005] SUM-Fibonacci Sums
题目 已知\(x,y\)的斐波那契表示,求\(x+y\)的斐波那契表示 分析 显然得到两条性质: \(f_{i+1}=f_{i-1}+f_i\) \(2f_i=f_{i+1}+f_{i-2}\) 那么 ...
- 巴延兴:从主导多个SIG组到OpenHarmony“代码贡献之星”,我是如何做到的?
编者按:在 OpenHarmony 生态发展过程中,涌现了大批优秀的代码贡献者,本专题旨在表彰贡献.分享经验,文中内容来自嘉宾访谈,不代表 OpenHarmony 工作委员会观点. 巴延兴 深圳开鸿数 ...
- Go 语言中切片的使用和理解
切片与数组类似,但更强大和灵活.与数组一样,切片也用于在单个变量中存储相同类型的多个值.然而,与数组不同的是,切片的长度可以根据需要增长和缩小.在 Go 中,有几种创建切片的方法: 使用[]datat ...
- 构筑立体世界,AR Engine助力B站会员购打造沉浸式营销
随着购物场景的逐渐多元化,越来越多电商平台把线下购物体验搬到线上,运用AR技术,跨越空间距离,帮助用户在购买前"体验"商品,增强购买意愿. 哔哩哔哩会员购(后称会员购)是B站于20 ...
- 重新点亮shell————测试命令[六]
前言 我们写好脚本之后希望有一个测试. 正文 介绍一下exit,如果exit 0,那么表示正常退出. 如果exit 10,也就是非0,那么就是异常退出. 然后这个test 标准为[]和 [[]]这样子 ...
- sql 语句系列(行与列处理)[八百章之第一章]
排序时对null进行处理 比如说: select * from EMP order by COMM 我需要对红框部分进行desc处理,也就是从大到小排列. 解析: 重点是如何让null独立出去. se ...