
ros kinect calibration
RGB camera
Bring up the OpenNI driver:
roslaunch openni_launch openni.launch
Now follow the standard monocular camera calibration instructions. Use the following command (substituting the correct dimensions of your checkerboard):
rosrun camera_calibration cameracalibrator.py image:=/camera/rgb/image_raw camera:=/camera/rgb --size 5x4 --square 0.0245
Don't forget to Commit your successful calibration.
IR (depth) camera
The Kinect detects depth by using an IR camera and IR speckle projector as a pseudo-stereo pair. We will calibrate the "depth" camera by detecting checkerboards in the IR image, just as we calibrated the RGB camera.
The speckle pattern makes it impossible to detect the checkerboard corners accurately in the IR image. The simplest solution is to cover the projector (lone opening on the far left) with one or two Post-it notes, mostly diffusing the speckles. An ideal solution is to block the projector completely and provide a separate IR light source. Good illumination sources include sunlight, halogen lamps, or incandescent lamps.
|
|
|
|
IR with speckle pattern |
IR with projector covered by Post-it note |
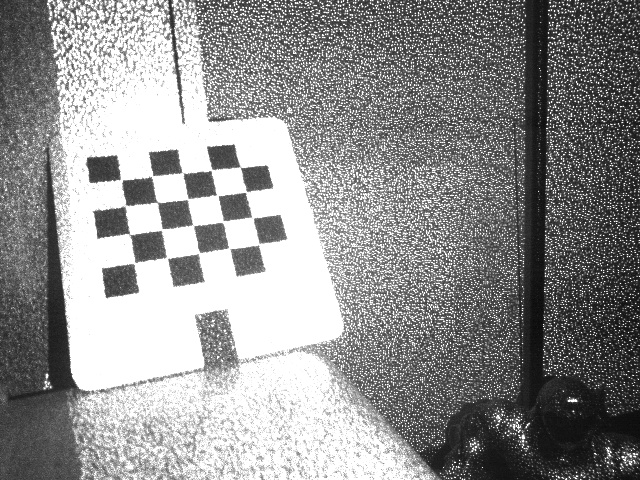
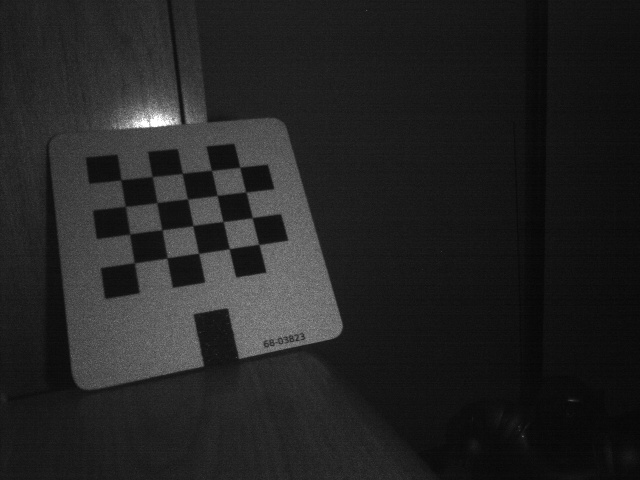
As before, follow the monocular camera calibration instructions:
rosrun camera_calibration cameracalibrator.py image:=/camera/ir/image_raw camera:=/camera/ir --size 5x4 --square 0.0245
The Kinect camera driver cannot stream both IR and RGB images. It will decide which of the two to stream based on the amount of subscribers, so kill nodes that subscribe to RGB images before doing the IR calibration.
Don't forget to Commit your successful calibration.
Where are the intrinsics saved?
When you click Commit, cameracalibrator.py sends the new calibration to the camera driver as a service call. The driver immediately begins publishing the updated calibration on its camera_info topic.
openni_camera uses camera_info_manager to manage calibration parameters. By default, it saves intrinsics to $HOME/.ros/camera_info/NAME.yaml and identifies them by the device serial number:
$ ls ~/.ros/camera_info/

depth_B00362708888047B.yaml  rgb_B00362708888047B.yaml
Whenever you bring up the OpenNI driver, it will look for a previously saved calibration. If you want to share the intrinsics among multiple users, move them somewhere public (e.g. /public/path/) and use a launch file which configures the camera info URLs:
<launch>

 <!-- Include official launch file and specify camera_info urls -->

 <include file="$(find openni_launch)/launch/openni.launch">

   <!-- provide arguments to that launch file -->

   <arg name="rgb_camera_info_url"

        value="file:///public/path/rgb_B00362708888047B.yaml" />

   <arg name="depth_camera_info_url"

        value="file:///public/path/depth_B00362708888047B.yaml" />

 </include>

</launch>
Wiki: openni_launch/Tutorials/IntrinsicCalibration (last edited 2015-02-06 01:36:34 by AlexanderReimann)
http://wiki.ros.org/openni_launch/Tutorials/IntrinsicCalibration
使用ls ~/.ros/camera_info/之后,发现有7个.yaml后缀文件。使用cat ~/.ros/camera_info/1.yaml
image_width:

image_height:

camera_name: head_camera

camera_matrix:

  rows:

  cols:

  data: [370.515976248363, , 313.8790868840471, , 372.6830969227434, 231.7153990263267, , , ]

distortion_model: plumb_bob

distortion_coefficients:

  rows:

  cols:

  data: [-0.3004104519610615, 0.07652258370676726, -0.001477826771302646, -0.001199374872901745, ]

rectification_matrix:

  rows:

  cols:

  data: [, , , , , , , , ]

projection_matrix:

  rows:

  cols:

  data: [270.0549621582031, , 307.5854707490471, , , 317.0104064941406, 226.6749221178361, , , , , ]xiaoqiang@xiaoqiang-desktop:~$
2.yaml
image_width:

image_height:

camera_name: head_camera

camera_matrix:

  rows:

  cols:

  data: [366.8006737481114, , 313.2319307503966, , 369.4691705536239, 225.8932701116596, , , ]

distortion_model: plumb_bob

distortion_coefficients:

  rows:

  cols:

  data: [-0.2955066415987022, 0.07398741879692314, 0.001109057089446478, 0.0005550013886223383, ]

rectification_matrix:

  rows:

  cols:

  data: [, , , , , , , , ]

projection_matrix:

  rows:

  cols:

  data: [267.2522277832031, , 310.626720252556, , , 314.1973266601562, 220.8795998314854, , , , , ]xiaoqiang@xiaoqiang-desktop:~$
3.yaml
image_width:

image_height:

camera_name: head_camera

camera_matrix:

  rows:

  cols:

  data: [367.7203842386191, , 312.1633776999364, , 369.8504643810227, 222.327969033836, , , ]

distortion_model: plumb_bob

distortion_coefficients:

  rows:

  cols:

  data: [-0.3028043701396974, 0.08016316913146398, 0.001972259854054233, -0.0005855105383069578, ]

rectification_matrix:

  rows:

  cols:

  data: [, , , , , , , , ]

projection_matrix:

  rows:

  cols:

  data: [271.3121643066406, , 309.4569959074397, , , 313.3587341308594, 216.6703090559513, , , , , ]xiaoqiang@xiaoqiang-desktop:~$
4.yaml
image_width:

image_height:

camera_name: head_camera

camera_matrix:

  rows:

  cols:

  data: [374.4079261743749, , 312.6902058006406, , 377.1063870868036, 231.8591658323552, , , ]

distortion_model: plumb_bob

distortion_coefficients:

  rows:

  cols:

  data: [-0.3010382975004438, 0.07439561116406565, -0.001492430415890119, -0.0003780448972454258, ]

rectification_matrix:

  rows:

  cols:

  data: [, , , , , , , , ]

projection_matrix:

  rows:

  cols:

  data: [271.7996520996094, , 307.0881469125889, , , 321.7455749511719, 226.9183813513646, , , , , ]xiaoqiang@xiaoqiang-desktop:~$
5.yaml
image_width:

image_height:

camera_name: head_camera

camera_matrix:

  rows:

  cols:

  data: [373.5111594774043, , 315.8084189513565, , 375.5234360862851, 229.6133929271384, , , ]

distortion_model: plumb_bob

distortion_coefficients:

  rows:

  cols:

  data: [-0.2970245237058798, 0.07110293616491861, -0.0001459348712873391, -0.0009524327516462756, ]

rectification_matrix:

  rows:

  cols:

  data: [, , , , , , , , ]

projection_matrix:

  rows:

  cols:

  data: [257.2185668945312, , 313.4603221630314, , , 259.698974609375, 229.0707409084716, , , , , ]xiaoqiang@xiaoqiang-desktop:~$
6.yaml
image_width:

image_height:

camera_name: head_camera

camera_matrix:

  rows:

  cols:

  data: [371.5469859488027, , 313.7857920360233, , 374.1714701553096, 230.9875296271416, , , ]

distortion_model: plumb_bob

distortion_coefficients:

  rows:

  cols:

  data: [-0.3041189203607426, 0.07966724101404286, -0.001437047423319973, -0.0007192846641734516, ]

rectification_matrix:

  rows:

  cols:

  data: [, , , , , , , , ]

projection_matrix:

  rows:

  cols:

  data: [262.8392028808594, , 312.3786083245795, , , 265.9633483886719, 227.7569378555927, , , , , ]xiaoqiang@xiaoqiang-desktop:~$
7.yaml
image_width:

image_height:

camera_name: head_camera

camera_matrix:

  rows:

  cols:

  data: [371.5334862939256, , 315.9415386864103, , 374.2254744680155, 230.2973984145617, , , ]

distortion_model: plumb_bob

distortion_coefficients:

  rows:

  cols:

  data: [-0.3008205280473007, 0.07564784106509534, -0.0009834589984554513, -0.001248593384655783, ]

rectification_matrix:

  rows:

  cols:

  data: [, , , , , , , , ]

projection_matrix:

  rows:

  cols:

  data: [259.6164855957031, , 313.3351599445923, , , 262.554443359375, 227.852100494405, , , , , ]xiaoqiang@xiaoqiang-desktop:~$


相机矩阵(Camera Matrix):https://blog.csdn.net/zb1165048017/article/details/71104241
ros kinect calibration的更多相关文章
- 关于ros将opencv版本固定“写死”的一些想法
今天主要工作是将ros和zed结合起来,但是发现自己安装了opencv3.1,ros indigo安装的是opencv2.4.8,这就麻烦了,zed支持的是opencv3.1.一开始使用slam2时, ...
- ROS indigo下Kinect v1的驱动安装与调试
ROS indigo下Kinect v1的驱动安装与调试 本文简要叙述了在ROS indigo版本下Kinect v1的驱动安装与调试过程. 1. 实验环境 (1)硬件: 台式机和Kinect v1 ...
- kinect在ros上的初步测试---17
摘要: 原创博客:转载请表明出处:http://www.cnblogs.com/zxouxuewei/ 1.在使用本贴前必须先按照我的上一个博文正确在ubuntu上安装kinect驱动:http:// ...
- ubuntu14.04 and ros indigo install kinect driver--16
摘要: 原创博客:转载请表明出处:http://www.cnblogs.com/zxouxuewei/ 今日多次测设ros indigo install kinect driver ,提示各种失败,然 ...
- ubuntu14.04下 Kinect V2+Ros接口安装
1. 首先git下载代码,放到主文件夹下面 git clone https://github.com/OpenKinect/libfreenect2.git 2. 然后安装依赖项如下,最好事先编译安装 ...
- ROS与深度相机入门教程-在ROS使用kinect v1摄像头
ROS与深度相机入门教程-在ROS使用kinect v1摄像头 说明: 介绍在ros安装和使用kinect v1摄像头 介绍freenect包 安装驱动 deb安装 $ sudo apt-get in ...
- ORB-SLAM2实现(kinect V1/ROS)
实验室电脑环境ubuntu14.04和ROS indigo已经装好. 1. 构建工作空间[非常重要的一步] mkdir -p ~/catkin_ws/src cd ~/catkin_ws/ catki ...
- Kinect for Xbox one(v2) + Ubuntu 14.04 +ROS 安装
相比于kinect for xbox 360(v1)通过结构光来获取深度,Kinect for Xbox one(v2) 采用time flight技术,极大改善了深度图像的性能. kinect fo ...
- ROS学习(一)Ros 中使用kinect
上的安装说明如下: 官网上明确写了如果安装windows kinect还需要安装一个驱动,但是有些ROS的书上并没有这么做,只提到了使用如下两步进行安装即可使用: sudo apt-get insta ...
随机推荐
- Androoid studio 2.3 AAPT err(Facade for 596378712): \\?\C:\Users\中文文件夹\.android\build-cache
错误如下: Error:Some file crunching failed, see logs for details Error:Execution failed for task ':app:m ...
- 【解决Jira】Chrome提示Java插件因过期而遭到阻止(JIRA上传截屏截图)
最近经常被这个问题所困扰:用Chrome访问JIRA上传截屏截图时,地址栏下面弹出通知,提示JAVA插件已过期.但是由于公司要求统一开发环境和设置,不能更新到最新版,就像这样: 结果网页上的Java就 ...
- Build fast jar 打包,增加配置文件
Build fast jar 打包,增加配置文件
- 南京邮电大学网络攻防平台——WriteUp(持续更新)
1.签到题 右键查看源代码直接获得flag 2.MD5collision(MD5碰撞) 观察源码发现md51等于QNKCDZO通过MD5加密的结果,使用在线解密发现结果为 0e830400451993 ...
- xlrd库的使用
- delete删除属性
/* 删除实例属性 */ function MyObject() { this.name = "我是实例的name"; } var obj = new MyObject(); al ...
- Docker系列05:docker镜像制作 &Docker file
1 什么是Dockerfile? Dockerfile是一个包含用于组合映像的命令的文本文档.可以使用在命令行中调用任何命令. Docker通过读取Dockerfile中的指令自动生成映像. dock ...
- MySql 日期函数比较
查询当天数据 select * from tab where FROM_UNIXTIME(fabutime, '%Y%m%d') = 20121217; mysql TO_DAYS(date) 函 ...
- Pthreads 环境配置,VisualStudio
▶ Visual Studio 下配置MPI环境 ● 下载 Pthreads(http://pthreads.org/),解压. ● 针对 x64 程序的配置 ■ 将 Pre-built.2\incl ...
- echart改变legend样式及分页
legend: { type: 'scroll', orient: 'horizontal', bottom:0, left:'center', itemGap: 0, itemWidth: 10, ...