
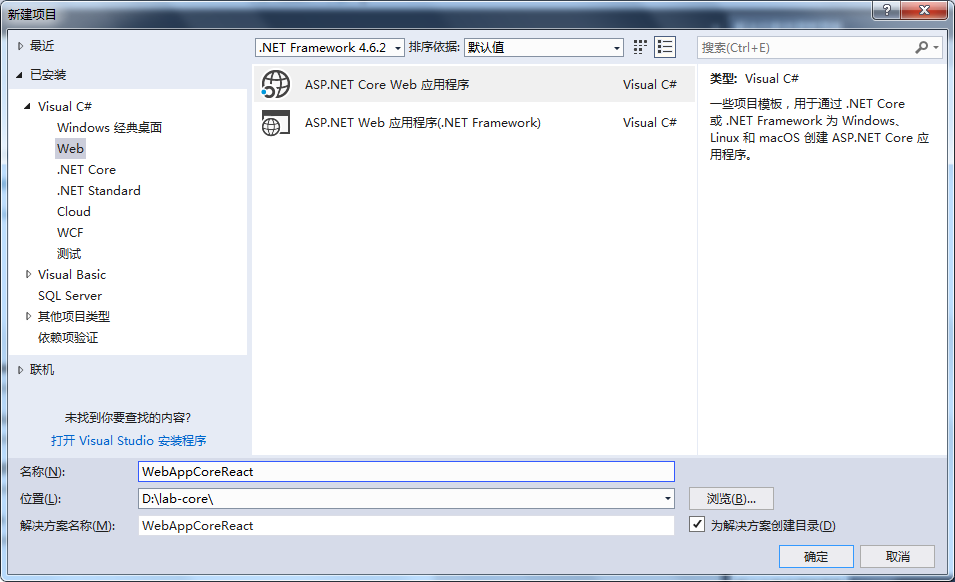
ASP.NET Core:WebAppCoreReact
| ylbtech-ASP.NET Core:WebAppCoreReact |
| 1.返回顶部 |
|

|

5、
6、

7、
| 2. wwwroot 返回顶部 |
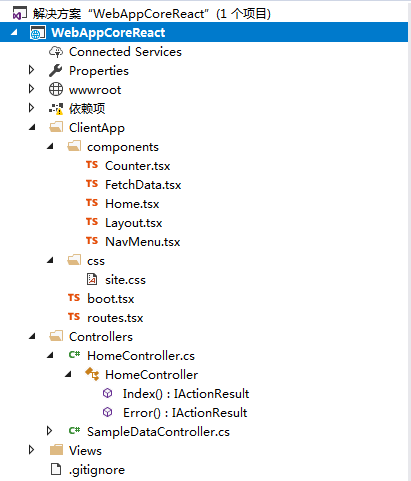
| 3. ClientApp返回顶部 |
import * as React from 'react';

import { RouteComponentProps } from 'react-router';

interface CounterState {

    currentCount: number;

}

export class Counter extends React.Component<RouteComponentProps<{}>, CounterState> {

    constructor() {

        super();

        this.state = { currentCount:  };

    }

    public render() {

        return <div>

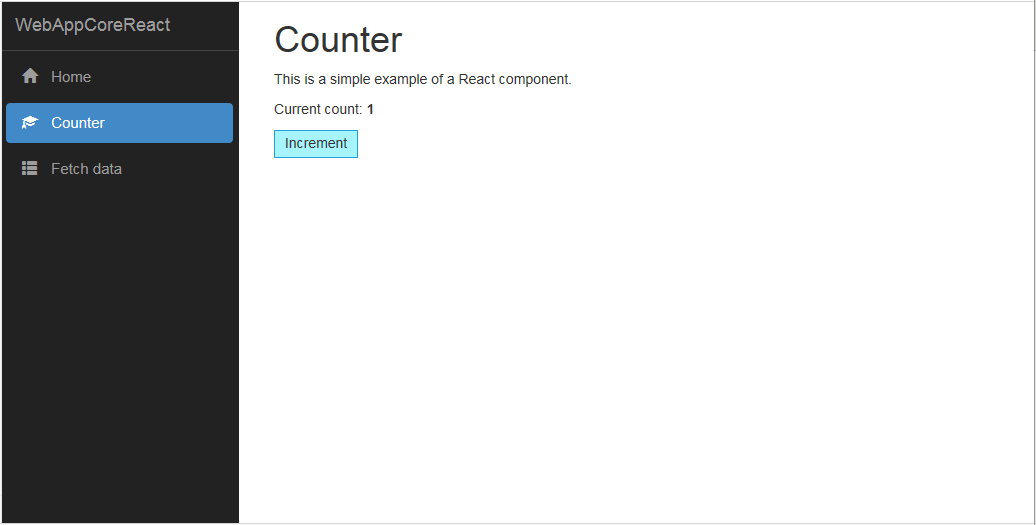
            <h1>Counter</h1>

            <p>This is a simple example of a React component.</p>

            <p>Current count: <strong>{ this.state.currentCount }</strong></p>

            <button onClick={ () => { this.incrementCounter() } }>Increment</button>

        </div>;

    }

    incrementCounter() {

        this.setState({

            currentCount: this.state.currentCount +

        });

    }

}
import * as React from 'react';

import { RouteComponentProps } from 'react-router';

import 'isomorphic-fetch';

interface FetchDataExampleState {

    forecasts: WeatherForecast[];

    loading: boolean;

}

export class FetchData extends React.Component<RouteComponentProps<{}>, FetchDataExampleState> {

    constructor() {

        super();

        this.state = { forecasts: [], loading: true };

        fetch('api/SampleData/WeatherForecasts')

            .then(response => response.json() as Promise<WeatherForecast[]>)

            .then(data => {

                this.setState({ forecasts: data, loading: false });

            });

    }

    public render() {

        let contents = this.state.loading

            ? <p><em>Loading...</em></p>

            : FetchData.renderForecastsTable(this.state.forecasts);

        return <div>

            <h1>Weather forecast</h1>

            <p>This component demonstrates fetching data from the server.</p>

            { contents }

        </div>;

    }

    private static renderForecastsTable(forecasts: WeatherForecast[]) {

        return <table className='table'>

            <thead>

                <tr>

                    <th>Date</th>

                    <th>Temp. (C)</th>

                    <th>Temp. (F)</th>

                    <th>Summary</th>

                </tr>

            </thead>

            <tbody>

            {forecasts.map(forecast =>

                <tr key={ forecast.dateFormatted }>

                    <td>{ forecast.dateFormatted }</td>

                    <td>{ forecast.temperatureC }</td>

                    <td>{ forecast.temperatureF }</td>

                    <td>{ forecast.summary }</td>

                </tr>

            )}

            </tbody>

        </table>;

    }

}

interface WeatherForecast {

    dateFormatted: string;

    temperatureC: number;

    temperatureF: number;

    summary: string;

}
import * as React from 'react';

import { RouteComponentProps } from 'react-router';

export class Home extends React.Component<RouteComponentProps<{}>, {}> {

    public render() {

        return <div>

            <h1>Hello, world!</h1>

            <p>Welcome to your new single-page application, built with:</p>

            <ul>

                <li><a href='https://get.asp.net/'>ASP.NET Core</a> and <a href='https://msdn.microsoft.com/en-us/library/67ef8sbd.aspx'>C#</a> for cross-platform server-side code</li>

                <li><a href='https://facebook.github.io/react/'>React</a> and <a href='http://www.typescriptlang.org/'>TypeScript</a> for client-side code</li>

                <li><a href='https://webpack.github.io/'>Webpack</a> for building and bundling client-side resources</li>

                <li><a href='http://getbootstrap.com/'>Bootstrap</a> for layout and styling</li>

            </ul>

            <p>To help you get started, we've also set up:</p>

            <ul>

                <li><strong>Client-side navigation</strong>. For example, click <em>Counter</em> then <em>Back</em> to return here.</li>

                <li><strong>Webpack dev middleware</strong>. In development mode, there's no need to run the <code>webpack</code> build tool. Your client-side resources are dynamically built on demand. Updates are available as soon as you modify any file.</li>

                <li><strong>Hot module replacement</strong>. In development mode, you don't even need to reload the page after making most changes. Within seconds of saving changes to files, rebuilt React components will be injected directly into your running application, preserving its live state.</li>

                <li><strong>Efficient production builds</strong>. In production mode, development-time features are disabled, and the <code>webpack</code> build tool produces minified static CSS and JavaScript files.</li>

            </ul>

            <h4>Going further</h4>

            <p>

                For larger applications, or for server-side prerendering (i.e., for <em>isomorphic</em> or <em>universal</em> applications), you should consider using a Flux/Redux-like architecture.

                You can generate an ASP.NET Core application with React and Redux using <code>dotnet new reactredux</code> instead of using this template.

            </p>

        </div>;

    }

}
import * as React from 'react';

import { NavMenu } from './NavMenu';

export interface LayoutProps {

    children?: React.ReactNode;

}

export class Layout extends React.Component<LayoutProps, {}> {

    public render() {

        return <div className='container-fluid'>

            <div className='row'>

                <div className='col-sm-3'>

                    <NavMenu />

                </div>

                <div className='col-sm-9'>

                    { this.props.children }

                </div>

            </div>

        </div>;

    }

}
import * as React from 'react';

import { Link, NavLink } from 'react-router-dom';

export class NavMenu extends React.Component<{}, {}> {

    public render() {

        return <div className='main-nav'>

                <div className='navbar navbar-inverse'>

                <div className='navbar-header'>

                    <button type='button' className='navbar-toggle' data-toggle='collapse' data-target='.navbar-collapse'>

                        <span className='sr-only'>Toggle navigation</span>

                        <span className='icon-bar'></span>

                        <span className='icon-bar'></span>

                        <span className='icon-bar'></span>

                    </button>

                    <Link className='navbar-brand' to={ '/' }>WebAppCoreReact</Link>

                </div>

                <div className='clearfix'></div>

                <div className='navbar-collapse collapse'>

                    <ul className='nav navbar-nav'>

                        <li>

                            <NavLink to={ '/' } exact activeClassName='active'>

                                <span className='glyphicon glyphicon-home'></span> Home

                            </NavLink>

                        </li>

                        <li>

                            <NavLink to={ '/counter' } activeClassName='active'>

                                <span className='glyphicon glyphicon-education'></span> Counter

                            </NavLink>

                        </li>

                        <li>

                            <NavLink to={ '/fetchdata' } activeClassName='active'>

                                <span className='glyphicon glyphicon-th-list'></span> Fetch data

                            </NavLink>

                        </li>

                    </ul>

                </div>

            </div>

        </div>;

    }

}
.main-nav li .glyphicon {

    margin-right: 10px;

}

/* Highlighting rules for nav menu items */

.main-nav li a.active,

.main-nav li a.active:hover,

.main-nav li a.active:focus {

    background-color: #4189C7;

    color: white;

}

/* Keep the nav menu independent of scrolling and on top of other items */

.main-nav {

    position: fixed;

    top:;

    left:;

    right:;

    z-index:;

}

@media (max-width: 767px) {

    /* On small screens, the nav menu spans the full width of the screen. Leave a space for it. */

    body {

        padding-top: 50px;

    }

}

@media (min-width: 768px) {

    /* On small screens, convert the nav menu to a vertical sidebar */

    .main-nav {

        height: 100%;

        width: calc(25% - 20px);

    }

    .main-nav .navbar {

        border-radius: 0px;

        border-width: 0px;

        height: 100%;

    }

    .main-nav .navbar-header {

        float: none;

    }

    .main-nav .navbar-collapse {

        border-top: 1px solid #444;

        padding: 0px;

    }

    .main-nav .navbar ul {

        float: none;

    }

    .main-nav .navbar li {

        float: none;

        font-size: 15px;

        margin: 6px;

    }

    .main-nav .navbar li a {

        padding: 10px 16px;

        border-radius: 4px;

    }

    .main-nav .navbar a {

        /* If a menu item's text is too long, truncate it */

        width: 100%;

        white-space: nowrap;

        overflow: hidden;

        text-overflow: ellipsis;

    }

}
import './css/site.css';

import 'bootstrap';

import * as React from 'react';

import * as ReactDOM from 'react-dom';

import { AppContainer } from 'react-hot-loader';

import { BrowserRouter } from 'react-router-dom';

import * as RoutesModule from './routes';

let routes = RoutesModule.routes;

function renderApp() {

    // This code starts up the React app when it runs in a browser. It sets up the routing

    // configuration and injects the app into a DOM element.

    const baseUrl = document.getElementsByTagName('base')[].getAttribute('href')!;

    ReactDOM.render(

        <AppContainer>

            <BrowserRouter children={ routes } basename={ baseUrl } />

        </AppContainer>,

        document.getElementById('react-app')

    );

}

renderApp();

// Allow Hot Module Replacement

if (module.hot) {

    module.hot.accept('./routes', () => {

        routes = require<typeof RoutesModule>('./routes').routes;

        renderApp();

    });

}
import * as React from 'react';

import { Route } from 'react-router-dom';

import { Layout } from './components/Layout';

import { Home } from './components/Home';

import { FetchData } from './components/FetchData';

import { Counter } from './components/Counter';

export const routes = <Layout>

    <Route exact path='/' component={ Home } />

    <Route path='/counter' component={ Counter } />

    <Route path='/fetchdata' component={ FetchData } />

</Layout>;
| 4. Controllers返回顶部 |
using System;

using System.Collections.Generic;

using System.Diagnostics;

using System.Linq;

using System.Threading.Tasks;

using Microsoft.AspNetCore.Mvc;

namespace WebAppCoreReact.Controllers

{

    public class HomeController : Controller

    {

        public IActionResult Index()

        {

            return View();

        }

        public IActionResult Error()

        {

            ViewData["RequestId"] = Activity.Current?.Id ?? HttpContext.TraceIdentifier;

            return View();

        }

    }

}
using System;

using System.Collections.Generic;

using System.Linq;

using System.Threading.Tasks;

using Microsoft.AspNetCore.Mvc;

namespace WebAppCoreReact.Controllers

{

    [Route("api/[controller]")]

    public class SampleDataController : Controller

    {

        private static string[] Summaries = new[]

        {

            "Freezing", "Bracing", "Chilly", "Cool", "Mild", "Warm", "Balmy", "Hot", "Sweltering", "Scorching"

        };

        [HttpGet("[action]")]

        public IEnumerable<WeatherForecast> WeatherForecasts()

        {

            var rng = new Random();

            return Enumerable.Range(, ).Select(index => new WeatherForecast

            {

                DateFormatted = DateTime.Now.AddDays(index).ToString("d"),

                TemperatureC = rng.Next(-, ),

                Summary = Summaries[rng.Next(Summaries.Length)]

            });

        }

        public class WeatherForecast

        {

            public string DateFormatted { get; set; }

            public int TemperatureC { get; set; }

            public string Summary { get; set; }

            public int TemperatureF

            {

                get

                {

                    return  + (int)(TemperatureC / 0.5556);

                }

            }

        }

    }

}
| 5. Views返回顶部 |
@{

    ViewData["Title"] = "Home Page";

}

<div id="react-app">Loading...</div>

@section scripts {

    <script src="~/dist/main.js" asp-append-version="true"></script>

}
<!DOCTYPE html>

<html>

<head>

    <meta charset="utf-8" />

    <meta name="viewport" content="width=device-width, initial-scale=1.0" />

    <title>@ViewData["Title"] - WebAppCoreReact</title>

    <base href="~/" />

    <link rel="stylesheet" href="~/dist/vendor.css" asp-append-version="true" />

    <environment exclude="Development">

        <link rel="stylesheet" href="~/dist/site.css" asp-append-version="true" />

    </environment>

</head>

<body>

    @RenderBody()

    <script src="~/dist/vendor.js" asp-append-version="true"></script>

    @RenderSection("scripts", required: false)

</body>

</html>
@{

    ViewData["Title"] = "Error";

}

<h1 class="text-danger">Error.</h1>

<h2 class="text-danger">An error occurred while processing your request.</h2>

@if (!string.IsNullOrEmpty((string)ViewData["RequestId"]))

{

    <p>

        <strong>Request ID:</strong> <code>@ViewData["RequestId"]</code>

    </p>

}

<h3>Development Mode</h3>

<p>

    Swapping to <strong>Development</strong> environment will display more detailed information about the error that occurred.

</p>

<p>

    <strong>Development environment should not be enabled in deployed applications</strong>, as it can result in sensitive information from exceptions being displayed to end users. For local debugging, development environment can be enabled by setting the <strong>ASPNETCORE_ENVIRONMENT</strong> environment variable to <strong>Development</strong>, and restarting the application.

</p>
@using WebAppCoreReact

@addTagHelper *, Microsoft.AspNetCore.Mvc.TagHelpers

@addTagHelper *, Microsoft.AspNetCore.SpaServices
@{

    Layout = "_Layout";

}
| 6.返回顶部 |
{

  "Logging": {

    "IncludeScopes": false,

    "Debug": {

      "LogLevel": {

        "Default": "Warning"

      }

    },

    "Console": {

      "LogLevel": {

        "Default": "Warning"

      }

    }

  }

}
{

  "name": "WebAppCoreReact",

  "private": true,

  "version": "0.0.0",

  "devDependencies": {

    "@types/history": "4.6.0",

    "@types/react": "15.0.35",

    "@types/react-dom": "15.5.1",

    "@types/react-hot-loader": "3.0.3",

    "@types/react-router": "4.0.12",

    "@types/react-router-dom": "4.0.5",

    "@types/webpack-env": "1.13.0",

    "aspnet-webpack": "^2.0.1",

    "aspnet-webpack-react": "^3.0.0",

    "awesome-typescript-loader": "3.2.1",

    "bootstrap": "3.3.7",

    "css-loader": "0.28.4",

    "event-source-polyfill": "0.0.9",

    "extract-text-webpack-plugin": "2.1.2",

    "file-loader": "0.11.2",

    "isomorphic-fetch": "2.2.1",

    "jquery": "3.2.1",

    "json-loader": "0.5.4",

    "react": "15.6.1",

    "react-dom": "15.6.1",

    "react-hot-loader": "3.0.0-beta.7",

    "react-router-dom": "4.1.1",

    "style-loader": "0.18.2",

    "typescript": "2.4.1",

    "url-loader": "0.5.9",

    "webpack": "2.5.1",

    "webpack-hot-middleware": "2.18.2"

  }

}
using System;

using System.Collections.Generic;

using System.IO;

using System.Linq;

using System.Threading.Tasks;

using Microsoft.AspNetCore;

using Microsoft.AspNetCore.Hosting;

using Microsoft.Extensions.Configuration;

using Microsoft.Extensions.Logging;

namespace WebAppCoreReact

{

    public class Program

    {

        public static void Main(string[] args)

        {

            BuildWebHost(args).Run();

        }

        public static IWebHost BuildWebHost(string[] args) =>

            WebHost.CreateDefaultBuilder(args)

                .UseStartup<Startup>()

                .Build();

    }

}
using System;

using System.Collections.Generic;

using System.Linq;

using System.Threading.Tasks;

using Microsoft.AspNetCore.Builder;

using Microsoft.AspNetCore.Hosting;

using Microsoft.AspNetCore.SpaServices.Webpack;

using Microsoft.Extensions.Configuration;

using Microsoft.Extensions.DependencyInjection;

namespace WebAppCoreReact

{

    public class Startup

    {

        public Startup(IConfiguration configuration)

        {

            Configuration = configuration;

        }

        public IConfiguration Configuration { get; }

        // This method gets called by the runtime. Use this method to add services to the container.

        public void ConfigureServices(IServiceCollection services)

        {

            services.AddMvc();

        }

        // This method gets called by the runtime. Use this method to configure the HTTP request pipeline.

        public void Configure(IApplicationBuilder app, IHostingEnvironment env)

        {

            if (env.IsDevelopment())

            {

                app.UseDeveloperExceptionPage();

                app.UseWebpackDevMiddleware(new WebpackDevMiddlewareOptions

                {

                    HotModuleReplacement = true,

                    ReactHotModuleReplacement = true

                });

            }

            else

            {

                app.UseExceptionHandler("/Home/Error");

            }

            app.UseStaticFiles();

            app.UseMvc(routes =>

            {

                routes.MapRoute(

                    name: "default",

                    template: "{controller=Home}/{action=Index}/{id?}");

                routes.MapSpaFallbackRoute(

                    name: "spa-fallback",

                    defaults: new { controller = "Home", action = "Index" });

            });

        }

    }

}
{

  "compilerOptions": {

    "baseUrl": ".",

    "module": "es2015",

    "moduleResolution": "node",

    "target": "es5",

    "jsx": "react",

    "sourceMap": true,

    "skipDefaultLibCheck": true,

    "strict": true,

    "types": ["webpack-env"]

  },

  "exclude": [

      "bin",

      "node_modules"

  ]

}
const path = require('path');

const webpack = require('webpack');

const ExtractTextPlugin = require('extract-text-webpack-plugin');

const CheckerPlugin = require('awesome-typescript-loader').CheckerPlugin;

const bundleOutputDir = './wwwroot/dist';

module.exports = (env) => {

    const isDevBuild = !(env && env.prod);

    return [{

        stats: { modules: false },

        entry: { 'main': './ClientApp/boot.tsx' },

        resolve: { extensions: ['.js', '.jsx', '.ts', '.tsx'] },

        output: {

            path: path.join(__dirname, bundleOutputDir),

            filename: '[name].js',

            publicPath: 'dist/'

        },

        module: {

            rules: [

                { test: /\.tsx?$/, include: /ClientApp/, use: 'awesome-typescript-loader?silent=true' },

                { test: /\.css$/, use: isDevBuild ? ['style-loader', 'css-loader'] : ExtractTextPlugin.extract({ use: 'css-loader?minimize' }) },

                { test: /\.(png|jpg|jpeg|gif|svg)$/, use: 'url-loader?limit=25000' }

            ]

        },

        plugins: [

            new CheckerPlugin(),

            new webpack.DllReferencePlugin({

                context: __dirname,

                manifest: require('./wwwroot/dist/vendor-manifest.json')

            })

        ].concat(isDevBuild ? [

            // Plugins that apply in development builds only

            new webpack.SourceMapDevToolPlugin({

                filename: '[file].map', // Remove this line if you prefer inline source maps

                moduleFilenameTemplate: path.relative(bundleOutputDir, '[resourcePath]') // Point sourcemap entries to the original file locations on disk

            })

        ] : [

            // Plugins that apply in production builds only

            new webpack.optimize.UglifyJsPlugin(),

            new ExtractTextPlugin('site.css')

        ])

    }];

};
 |
作者:ylbtech 出处:http://ylbtech.cnblogs.com/ 本文版权归作者和博客园共有,欢迎转载,但未经作者同意必须保留此段声明,且在文章页面明显位置给出原文连接,否则保留追究法律责任的权利。 |
ASP.NET Core:WebAppCoreReact的更多相关文章
- ASP.NET Core:部署项目到Ubuntu Server
概述 基于上一篇成功安装Ubuntu Server 16.10的基础上,接下来继续我们ASP.NET Core项目的部署之旅! 只是对于这些年整天和Windows打交道的我,初次使用Linux确实有点 ...
- 实战Asp.Net Core:DI生命周期
title: 实战Asp.Net Core:DI生命周期 date: 2018-11-30 21:54:52 --- 1.前言 Asp.Net Core 默认支持 DI(依赖注入) 软件设计模式,那使 ...
- 初识ASP.NET CORE:二、优劣
Which one is right for me? ASP.NET is a mature web platform that provides all the services that you ...
- 初识ASP.NET CORE:一、HTTP pipeline
完整的http请求在asp.net framework中的处理流程: Asp.Net HttpRequest--> HTTP.exe--> inetinfo.exe(w3wp.exe)-& ...
- ASP.NET Core:CMD命令行+记事本 创建Console程序和Web Application
今天看了Scott关于ASP.NET Core的介绍视频,发现用命令行一步一步新建项目.添加Package.Restore.Build.Run 执行的实现方式,更让容易让我们了解.NET Core的运 ...
- ASP.NET Core:使用Dapper和SwaggerUI来丰富你的系统框架
一.概述 1.用VS2017创建如下图的几个.NET Standard类库,默认版本为1.4,你可以通过项目属性进行修改,最高支持到1.6,大概五月份左右会更新至2.0,API会翻倍,很期待! 排名分 ...
- 实战Asp.Net Core:部署应用
1.前言 某一刻,你已经把 .Net Core 的程序写好了.接下来,还可以做什么呢?那就是部署了. 作为一名开发工程师,如果不会部署自己开发的应用,那么这也是不完整的.接下来,我们就来说说,如何部署 ...
- ASP.NET Core:WebAppCoreRESTful
ylbtech-ASP.NET Core:WebAppCoreRESTFul 1.返回顶部 1. 2. 3. 4. 2. Controllers返回顶部 1.HomeControlle ...
- ASP.NET Core:Pages
ylbtech-ASP.NET Core:Pages 1.返回顶部 1._Layout.cshtm <!DOCTYPE html> <html> <head> &l ...
随机推荐
- LeetCode:926. 将字符串翻转到单调递增
暴力法超时:思想:动态规划 public int minFlipsMonoIncrb(String S) { int result = S.length(); for (int i = 0; i &l ...
- BIM
BIM进入中国已经有十来个年头,随着对BIM概念的深入了解.当前国内BIM应用逐渐由三维模型的可视化应用升级为基于BIM模型的信息进行项目精细化动态管理. 传统粗放的项目管理方法是工程项目难以进行精细 ...
- Oracle 12c agent install for linux
安装Agent代理 在EM11g时,agent安装是通过在被监制主机端下载agent代理并安装,在EM12c版本号上,能够在EM12c服务端.通过"推送"的方式把agent代理在远 ...
- 基于Lua插件化的Pcap流量监听代理
1.前言 我们在实际工作中,遇到了一个这样的用例,在每天例行扫描活动中,发现有些应用系统不定期的被扫挂,因为我们不是服务的制造者,没有办法在不同的系统里打印日志,所以我们就想用一个工具来获取特定服务的 ...
- BUPT复试专题—日期(2013)
题目描述 请你计算出第年月日是第X年的第几天.其中,1月1日是第一天,1月2日是第二天,以此类推. 计算时请注意闰年的影响.对于非整百年,年数能整除4是闰年,否则不是闰年:对于整百年,年数能整除400 ...
- 前端高频面试题 CSS篇
通过从网上看到的面经,总结的一些高频的前端CSS面试题,有很多不会,于是找资料,并通过代码实现,自己提供了一些参考答案. 目录 1.怎样会产生浮动? 2.如何清除浮动? 3.盒子模型,以及IE和其他浏 ...
- ubutu强制结束进程 kill -9 ProcessID
强制终止进程 kill -9 2128 表示强制结束进程号 2128 对应的进程.
- C语言的代码内存布局具体解释
一个程序本质上都是由 BSS 段.data段.text段三个组成的.这种概念在当前的计算机程序设计中是非常重要的一个基本概念,并且在嵌入式系统的设计中也非常重要,牵涉到嵌入式系统执行时的内存大小分配, ...
- 一次mysql优化经历
某日运维突然说无线终端的频道页接口訪问量非常大,memcache缓存扛只是来.导致mysql并发查询量太大,导致server不停地宕机,仅仅能不停地重新启动机器.遗憾的是运维并没有告诉mysql查询量 ...
- LeetCode ||& Word Break && Word Break II(转)——动态规划
一. Given a string s and a dictionary of words dict, determine if s can be segmented into a space-sep ...