Android 4 学习(18):搜索
参考《Professional Android 4 Development》
搜索
通过下面这几种方式可以给应用程序添加搜索功能:
- Search Bar

- Search View

- Quick Search Box

可搜索的Content Provider
首先,要在res./xml目录下创建一个xml文件,例如:
<?xml version=”1.0” encoding=”utf-8”?>

  <searchable xmlns:android=”http://schemas.android.com/apk/res/android” android:label=”@string/app_name” android:hint=”@string/search_hint”>

</searchable>
其中,Label一般是应用程序的名称。
为应用程序创建Search Activity
Search Activity和普通的Activity不同,它是一直在back stack的栈顶,每次有新的search activity创建时,不会有将其简单的入栈,因为用户是不会希望按返回键时返回自己前面的查询结果。为了表明该Activity可以被搜索,需要将android.intent.action.SEARCH加入到自己的Intent Filter中,同时需要将前面创建的searchable的xml文件加到meta-data标签中:
<activity android:name=”.DatabaseSkeletonSearchActivity” android:label=”Element Search” android:launchMode=”singleTop”>

  <intent-filter>

    <action android:name=”android.intent.action.SEARCH” />

    <category android:name=”android.intent.category.DEFAULT” />

  </intent-filter>

  <meta-data android:name=”android.app.searchable” android:resource=”@xml/searchable” />

</activity>
用户进行搜索后,可以在搜索结果中继续搜索,而这种操作会生成新的Intent,而这些Intent可以通过onNewIntent handler来处理:
@Override

public void onCreate(Bundle savedInstanceState) {

  super.onCreate(savedInstanceState);

  // Get the launch Intent

  parseIntent(getIntent());

}

@Override

protected void onNewIntent(Intent intent) {

  super.onNewIntent(intent);

  parseIntent(getIntent());

}

private void parseIntent(Intent intent) {

  // If the Activity was started to service a Search request, extract the search query.

  if (Intent.ACTION_SEARCH.equals(intent.getAction())) {

    String searchQuery = intent.getStringExtra(SearchManager.QUERY);

    // Perform the search

    performSearch(searchQuery);

  }

}
设置默认的Serach Provider
在应用程序中,最好设置一个Activity,让所有的搜索结果都从这个Activity中出来,设置方法也简单,将下面的配置加到程序配置中就可以了:
<meta-data android:name=”android.app.default_searchable” android:value=”.DatabaseSkeletonSearchActivity” />
使用Cursor Loader的Search Activity示例
import android.app.ListActivity;

import android.app.LoaderManager;

import android.app.SearchManager;

import android.content.ContentUris;

import android.content.CursorLoader;

import android.content.Intent;

import android.content.Loader;

import android.database.Cursor;

import android.net.Uri;

import android.os.Bundle;

import android.view.View;

import android.widget.ListView;

import android.widget.SimpleCursorAdapter;

public class DatabaseSkeletonSearchActivity extends ListActivity implements LoaderManager.LoaderCallbacks<Cursor> {

  private static String QUERY_EXTRA_KEY = “QUERY_EXTRA_KEY”;

  private SimpleCursorAdapter adapter;

  @Override

  public void onCreate(Bundle savedInstanceState) {

    super.onCreate(savedInstanceState);

    // Create a new adapter and bind it to the List View

    adapter = new SimpleCursorAdapter(this, android.R.layout.simple_list_item_1, null, new String[] { MyContentProvider.KEY_COLUMN_1_NAME }, new int[] { android.R.id.text1 }, 0);

    setListAdapter(adapter);

    // Initiate the Cursor Loader

    getLoaderManager().initLoader(0, null, this);

    // Get the launch Intent

    parseIntent(getIntent());

  }

  @Override

  protected void onNewIntent(Intent intent) {

    super.onNewIntent(intent);

    parseIntent(getIntent());

  }

  private void parseIntent(Intent intent) {

    // If the Activity was started to service a Search request, extract the search query.

    if (Intent.ACTION_SEARCH.equals(intent.getAction())) {

      String searchQuery = intent.getStringExtra(SearchManager.QUERY);

      // Perform the search

      performSearch(searchQuery);

    }

  }

  // Execute the search.

  private void performSearch(String query) {

    // Pass the search query as an argument to the Cursor Loader

    Bundle args = new Bundle();

    args.putString(QUERY_EXTRA_KEY, query);

    // Restart the Cursor Loader to execute the new query.

    getLoaderManager().restartLoader(0, args, this);

  }

  public Loader<Cursor> onCreateLoader(int id, Bundle args) {

    String query = “0”;

    // Extract the search query from the arguments.

    if (args != null)

      query = args.getString(QUERY_EXTRA_KEY);

    // Construct the new query in the form of a Cursor Loader.

    String[] projection = {MyContentProvider.KEY_ID, MyContentProvider.KEY_COLUMN_1_NAME};

    String where = MyContentProvider.KEY_COLUMN_1_NAME + “ LIKE \”%” + query + “%\””;

    String[] whereArgs = null;

    String sortOrder = MyContentProvider.KEY_COLUMN_1_NAME + “ COLLATE LOCALIZED ASC”;

    // Create the new Cursor loader.

    return new CursorLoader(this, MyContentProvider.CONTENT_URI, projection, where, whereArgs, sortOrder);

  }

  public void onLoadFinished(Loader<Cursor> loader, Cursor cursor) {

    // Replace the result Cursor displayed by the Cursor Adapter with the new result set.

    adapter.swapCursor(cursor);

  }

  public void onLoaderReset(Loader<Cursor> loader) {

    // Remove the existing result Cursor from the List Adapter.

    adapter.swapCursor(null);

  }

}
大部分情况下,我们需要响应对搜索结果的click事件,因此需要重写onListItemClick方法:
@Override

protected void onListItemClick(ListView listView, View view, int position, long id) {

  super.onListItemClick(listView, view, position, id);

  // Create a URI to the selected item.

  Uri selectedUri = ContentUris.withAppendedId(MyContentProvider.CONTENT_URI, id);

  // Create an Intent to view the selected item.

  Intent intent = new Intent(Intent.ACTION_VIEW);

  intent.setData(selectedUri);

  // Start an Activity to view the selected item.

  startActivity(intent);

}
使用Search View Widget
Android 3.0后推出了Search View Widget以替代Search Activity。将Search View绑定到searchable activity中,首先要获取searchableInfo:
// Use the Search Manager to find the SearchableInfo related  to this Activity.

SearchManager searchManager = (SearchManager)getSystemService(Context.SEARCH_SERVICE);

SearchableInfo searchableInfo = searchManager.getSearchableInfo(getComponentName());

// Bind the Activity’s SearchableInfo to the Search View

SearchView searchView = (SearchView)findViewById(R.id.searchView);

searchView.setSearchableInfo(searchableInfo);
本地Android Content Provider
Android中提供了一些本地的Content Provider,包括下面这些:
- Media Store
- Browser
- Contacts Contract
- Calendar
- Call Log
使用Media Store Content Provider
MediaStore类有Audio,Video和Image子类,这些子类又有含有uri信息的子类。每个子类中uri信息是这么存储的:
- MediaStore.<mediatype>.Media.EXTERNAL_CONTENT_URI
- MediaStore.<mediatype>.Media.INTERNAL_CONTENT_URI
下面是一个示例:
// Get a Cursor over every piece of audio on the external volume,

// extracting the song title and album name.

String[] projection = new String[] {

  MediaStore.Audio.AudioColumns.ALBUM,

  MediaStore.Audio.AudioColumns.TITLE

};

Uri contentUri = MediaStore.Audio.Media.EXTERNAL_CONTENT_URI;

Cursor cursor = getContentResolver().query(contentUri, projection, null, null, null);

// Get the index of the columns we need.

int albumIdx = cursor.getColumnIndexOrThrow(MediaStore.Audio.AudioColumns.ALBUM);

int titleIdx = cursor.getColumnIndexOrThrow(MediaStore.Audio.AudioColumns.TITLE);

// Create an array to store the result set.

String[] result = new String[cursor.getCount()];

// Iterate over the Cursor, extracting each album name and song title.

while (cursor.moveToNext()) {

  // Extract the song title.

  String title = cursor.getString(titleIdx);

  // Extract the album name.

  String album = cursor.getString(albumIdx);

  result[cursor.getPosition()] = title + “ (“ + album + “)”;

}

// Close the Cursor.

cursor.close();
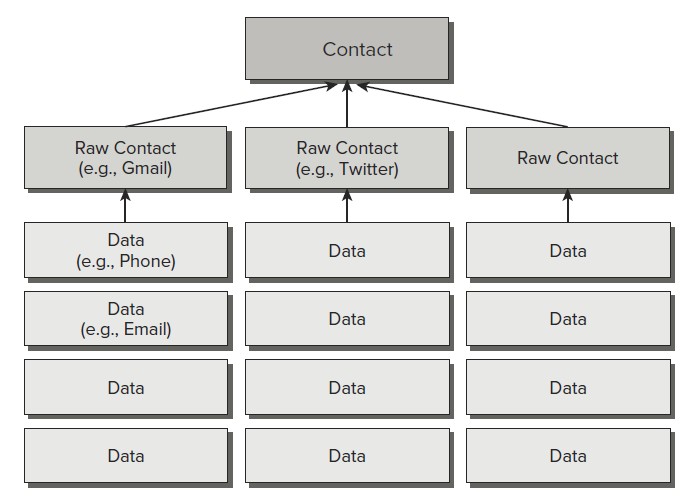
使用Contacts Contract Content Provider
Contacts Contract Provider使用三层模型存储数据:
Android 4 学习(18):搜索的更多相关文章
- Android Animation学习(二) ApiDemos解析:基本Animatiors使用
Animator类提供了创建动画的基本结构,但是一般使用的是它的子类: ValueAnimator.ObjectAnimator.AnimatorSet ApiDemos中Animation部分是单独 ...
- Android:学习AIDL,这一篇文章就够了(下)
前言 上一篇博文介绍了关于AIDL是什么,为什么我们需要AIDL,AIDL的语法以及如何使用AIDL等方面的知识,这一篇博文将顺着上一篇的思路往下走,接着介绍关于AIDL的一些更加深入的知识.强烈建议 ...
- Android WiFiDirect 学习(二)——Service Discovery
Service Discovery 简介 在Android WifiDirect学习(一 )中,简单介绍了如何使用WifiDirect进行搜索——连接——传输. 这样会有一个问题,那就是你会搜索到到附 ...
- Android 数字签名学习笔记
Android 数字签名学习笔记 在Android系统中,所有安装到系统的应用程序都必有一个数字证书,此数字证书用于标识应用程序的作者和在应用程序之间建立信任关系,如果一个permission的pro ...
- Android 布局学习之——Layout(布局)具体解释二(常见布局和布局參数)
[Android布局学习系列] 1.Android 布局学习之--Layout(布局)具体解释一 2.Android 布局学习之--Layout(布局)具体解释二(常见布局和布局參数) ...
- 我的Android 4 学习系列之数据库和Content Provider
目录 创建数据库和使用SQLite 使用Content Provider.Cusor和Content Value来存储.共享和使用应用程序数据 使用Cursor Loader异步查询Content P ...
- 我的Android 4 学习系列之文件、保存状态和首选项
目录 使用Shared Preference 保留简单的应用程序数据 保存回话间的Activity实例数据 管理应用程序首选项和创建Preference Screen 保存并加载文件以及管理本地文件系 ...
- Android 自定义支持快速搜索筛选的选择控件(一)
Android 自定义支持快速搜索筛选的选择控件 项目中遇到选择控件选项过多,需要快速查找匹配的情况. 做了简单的Demo,效果图如下: 源码地址:https://github.com/whieenz ...
- Android JNI学习(四)——JNI的常用方法的中文API
本系列文章如下: Android JNI(一)——NDK与JNI基础 Android JNI学习(二)——实战JNI之“hello world” Android JNI学习(三)——Java与Nati ...
随机推荐
- erl_0014 《硝烟中的erlang》 读书笔记001 “绪论”
1.大家听说Erlang,往往是因为其对高并发的良好支持.其实,Erlang的核心特征是容错,从某种程度上讲,并发只是容错这个约束下的一个副产品.容错是Erlang语言的DNA,也是和其他所有编程语言 ...
- sssp-springmvc+spring+spring-data-jpa问题总结
问题:Caused by: java.lang.IllegalStateException: Cannot convert value of type [java.lang.String] to re ...
- Uoj 441 保卫王国
Uoj 441 保卫王国 动态 \(dp\) .今天才来写这个题. 设 \(f[u][0/1]\) 表示子树 \(u\) 中不选/选 \(u\) 时的最小权值和,显然有:\(f[u][0]=\sum ...
- MAC OS环境下搭建基于Python语言的appium自动化测试环境
#1 安装JDK java -version #2 下载SDK http://adt.android-studio.org/ 下载adt #3 配置sdk环境变量 打开终端,依次输入命令 vim .b ...
- 查询避免Unknown column ‘xxx’ in ‘where clause’
但凡写过sql语句的人估计都曾经碰到过类似于Unknown column ‘xxx’ in ‘where clause’的问题. 单从字面理解,我们很容易得出列名不存在的结论,但是,很多时候起始并不是 ...
- UML中的几种关系(UML Relationships)
依赖(Dependency) 依赖可以理解为一个类A使用到了另一个类B,而这种使用关系是具有偶然性的.临时性的.非常弱的,但是B类的变化会影响到A:比如某人要过河,需要借用一条船,此时人与船之间的关系 ...
- laravel的学习历程
首要,表明态度:PHP是世界上最佳的言语.(梗) laravel说是php将来,形似不假. 最开端触摸的是thinkphp,格外喜爱她的分层,文档格外完全,阅读起来没任何妨碍. 比较laravel,我 ...
- db_recovery_file_dest_size 修改大一点及删除归档日志 |转|
今天给客户测 试问题,让客户把数据发过来了.解压缩后一看,他们还是用的oracle 815版本的(他们exp导出时,带了导出日志,从导出日志中看出来是oracle 815版本的),不过没有关系,低版本 ...
- Time complexity--codility
lesson 3: Time complexity exercise: Problem: You are given an integer n. Count the total of 1+2+...+ ...
- c# winform委托的使用
可参考http://bbs.csdn.net/topics/390377875中使用new Action<>的使用方式,替代delegate的申明. public delegate voi ...