Identity Server4学习系列三
1、简介
在Identity Server4学习系列一和Identity Server4学习系列二之令牌(Token)的概念的基础上,了解了Identity Server4的由来,以及令牌的相关知识,本文开始实战,实现Identity Server4基本的功能。
2、前提
本文基于.Net Core2.1和Indetity Server4 2.3.0,令牌处理包采用IdentityServer4.AccessTokenValidation 2.7.0
3、实战一Identity Server4服务端配置
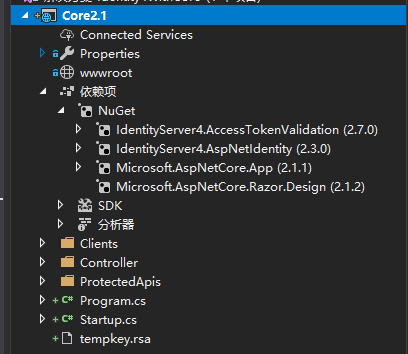
(1)、项目结构
(2)、站点入口文件Program.cs类
    public class Program

    {

        public static void Main(string[] args)

        {

            CreateWebHostBuilder(args).Build().Run();

        }

        /// <summary>

        /// 设置当前项目的服务器宿主,Windows下默认为IIS

        /// 设置启动类为Startup类

        /// </summary>

        /// <param name="args"></param>

        /// <returns></returns>

        public static IWebHostBuilder CreateWebHostBuilder(string[] args) =>

            WebHost.CreateDefaultBuilder(args)

                .UseStartup<Startup>();

    }
注意:如果时Linux环境,这里在这里可以切换站点的宿主服务器
(3)、Startup启动类(配置Identity Server4的相关参数和MVC的相关参数,并注入到管道模型中)
    public class Startup

    {

        // This method gets called by the runtime. Use this method to add services to the container.

        // For more information on how to configure your application, visit https://go.microsoft.com/fwlink/?LinkID=398940

        public void ConfigureServices(IServiceCollection services)

        {

            //优雅的链式编程

            //注入Identity Server4服务到DI容器中

            services.AddIdentityServer()

           //注入临时签名凭据到DI容器,后期可用签名证书的密钥替换,用于生成零时密钥

           .AddDeveloperSigningCredential()

           //注入需要受Identity Server4保护的Api资源添注入到DI容器中 -内存级别

           .AddInMemoryApiResources(Apis.GetApiResources())

           //注入需要访问受Identity Server4保护的Api资源的客户端注入到DI容器中 -内存级别

           .AddInMemoryClients(ThirdClients.GetClients());

            //注入基本的MVC服务

            services.AddMvcCore()

            //注入MVC的认证服务,对应控制器的Authorize特性

           .AddAuthorization()

           //注入MVC格式化程序,对应JsonResult等等的格式化操作,主要用于控制器返回值的格式化操作

           .AddJsonFormatters();

            //注入身份认证服务,设置Bearer为默认方案

            services.AddAuthentication("Bearer")

            //注入并配置Bearer为默认方案的基本参数

            .AddIdentityServerAuthentication(options =>

            {

                //设置令牌的发布者

                options.Authority = "http://localhost:5000";

                //设置Https

                options.RequireHttpsMetadata = false;

                //需要认证的api资源名称

                options.ApiName = "api1";

            });

        }

        // This method gets called by the runtime. Use this method to configure the HTTP request pipeline.

        public void Configure(IApplicationBuilder app, IHostingEnvironment env)

        {

            //如果当前时开发者模式

            if (env.IsDevelopment())

            {

                //从管道中捕获同步和异步System.Exception实例并生成HTML错误响应。

                app.UseDeveloperExceptionPage();

            }

            //将IdentityServer 4服务注入到管道模型中(对应上面的IdentityServer 4服务的配置)

            app.UseIdentityServer();

            //将认证服务通过Microsoft.AspNetCore.Authentication.AuthenticationMiddleware中间件

            //注入到管道模型中(对应上面认证服务的配置)

            app.UseAuthentication();

            //将mvc添加到Microsoft.AspNetCore.Builder.IApplicationBuilder请求执行中(对应上的MVC配置)

            app.UseMvc();

        }

    }
(4)、配置第三方客户端能成功在认证模式下能成功访问Api资源的资本参数
    /// <summary>

    /// 配置可以访问IdentityServer4 保护的Api资源模型的第三方客户端

    /// 配置客户端访问的密钥

    /// 配置

    /// </summary>

    public class ThirdClients

    {

        public static IEnumerable<Client> GetClients()

        {

            return new List<Client>()

            {

                new Client()

                {

                    //客户端的唯一Id,客户端需要指定该ClientId才能访问

                     ClientId = $"client",

                    //no interactive user, use the clientid/secret for authentication

                    //使用客户端密钥进行认证

                    AllowedGrantTypes = GrantTypes.ClientCredentials,

                    // 认证密钥

                    ClientSecrets =

                    {

                        //用Sha256对"secret"进行加密,客户端必须使用secret密钥才能成功访问

                        new Secret("secret".Sha256())

                    },

                    // scopes that client has access to

                    //如果客户端的密钥认证成功,限定该密钥可以访问的Api范围

                    AllowedScopes = { "api1" }

                }

            };

        }

    }
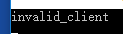
注意ClientId(分配给不同客户端的Id),对应的客户端调用时传递过来的ClientId必须一致,否则客户端发起调用时汇报这个错:

密钥也是一样,密钥是我们分配给客户端的,客户端只有给对了我们分配给它的ClientId和密钥的同时,才能访问对应的api,所以如果你的密钥不对,客户端发起调用时也会报这个错:
(5)、配置受保护的Api资源模型
    public class Apis

    {

        //ApiResource -IdentityServer4.Models下的Api资源模型

        public static IEnumerable<ApiResource> GetApiResources()

        {

            return new List<ApiResource>()

            {

                //Api资源模型

                new ApiResource("api1", "My API")

            };

        }

    }
注意ApiRescourse的名称必须和Client的AllowedScopes属性对应,否则客户端调用时会报下面这个错:

(6)、验证服务端是否配置成功
开启站点,浏览器输入http://localhost:5000/.well-known/openid-configuration,等到如下返回报文说明服务部署成功:
{
   //令牌签发者,对应StartUp中的Identity Server4中的认证配置

    "issuer":"http://localhost:5000",
    //jwt令牌处理地址

    "jwks_uri":"http://localhost:5000/.well-known/openid-configuration/jwks",

    "authorization_endpoint":"http://localhost:5000/connect/authorize",

    "token_endpoint":"http://localhost:5000/connect/token",

    "userinfo_endpoint":"http://localhost:5000/connect/userinfo",

    "end_session_endpoint":"http://localhost:5000/connect/endsession",

    "check_session_iframe":"http://localhost:5000/connect/checksession",

    "revocation_endpoint":"http://localhost:5000/connect/revocation",

    "introspection_endpoint":"http://localhost:5000/connect/introspect",

    "device_authorization_endpoint":"http://localhost:5000/connect/deviceauthorization",

    "frontchannel_logout_supported":true,

    "frontchannel_logout_session_supported":true,

    "backchannel_logout_supported":true,

    "backchannel_logout_session_supported":true,

    "scopes_supported":[

        "api1",

        "offline_access"

    ],

    "claims_supported":[

    ],

    "grant_types_supported":[

        "authorization_code",

        "client_credentials",

        "refresh_token",

        "implicit",

        "urn:ietf:params:oauth:grant-type:device_code"

    ],

    "response_types_supported":[

        "code",

        "token",

        "id_token",

        "id_token token",

        "code id_token",

        "code token",

        "code id_token token"

    ],

    "response_modes_supported":[

        "form_post",

        "query",

        "fragment"

    ],

    "token_endpoint_auth_methods_supported":[

        "client_secret_basic",

        "client_secret_post"

    ],

    "subject_types_supported":[

        "public"

    ],

    "id_token_signing_alg_values_supported":[

        "RS256"

    ],

    "code_challenge_methods_supported":[

        "plain",

        "S256"

    ]

}
参数含义,自行了解
3、实战一客户端调用受Identity Server4保护的Api资源
(1)、前提
客户端必须安装IdentityModel 3.10.4包
(2)、调用代码如下:
    class Program

    {

        static void Main(string[] args)

        {

            Request();

            Console.ReadKey();

        }

        async static void Request()

        {

            //请求Identity Server4服务

            var disco = await DiscoveryClient.GetAsync("http://localhost:5000");

            if (disco.IsError)

            {

                Console.WriteLine(disco.Error);

                return;

            }

            //生成Identity Server4授权的客户端,通过指定对应的ClientId和密钥(secret)

            var tokenClient = new TokenClient(disco.TokenEndpoint, "client", "secret");

            var tokenResponse = await tokenClient.RequestClientCredentialsAsync("api1");

            if (tokenResponse.IsError)

            {

                Console.WriteLine(tokenResponse.Error);

                return;

            }

            Console.WriteLine(tokenResponse.Json);

            //通过Identity Server4的认证过后,拿到AccessToken

            var client = new HttpClient();

            client.SetBearerToken(tokenResponse.AccessToken);

            var response = await client.GetAsync("http://localhost:5000/identity");

            if (!response.IsSuccessStatusCode)

            {

                Console.WriteLine(response.StatusCode);

            }

            else

            {

                //认证成功,输出Identity控制器的返回值

                var content = await response.Content.ReadAsStringAsync();

                Console.WriteLine(JArray.Parse(content));

            }

        }

    }
得到如下报文:

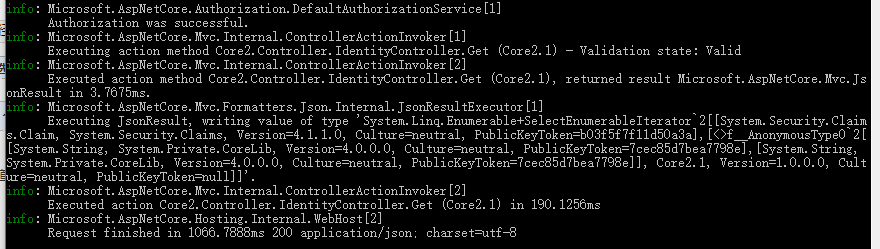
同时查看Identity Server4服务端的输出:
第一步:客户端传入在Indetity Server4中注册过的分配给该客户端的ClientId和密钥,拿到AccessToken
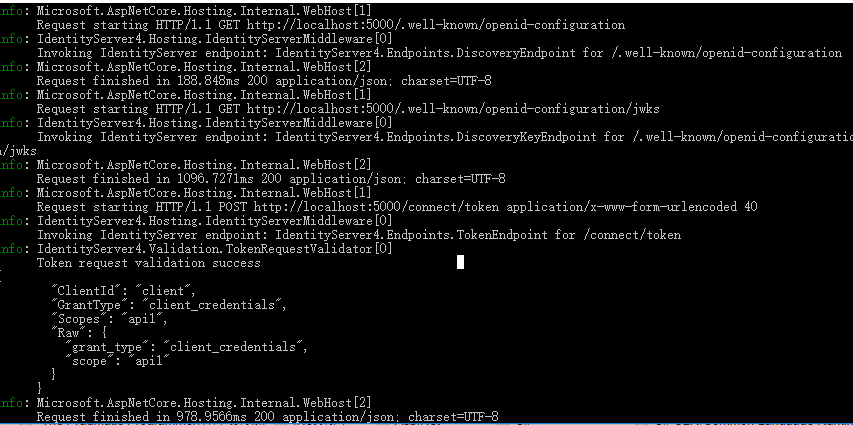
第二步:第一次请求目标控制器,并把AcessToken带过去

第三步:验证Token是否有效
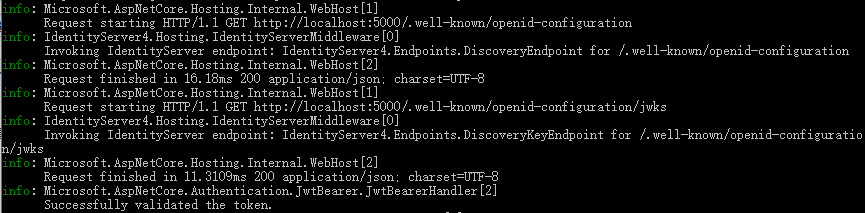
第四步:Token有效,开始调用Identity控制器方法,并拿到响应值
大致的流程如上.
Identity Server4学习系列三的更多相关文章
- Identity Server4学习系列四之用户名密码获得访问令牌
1.简介 Identity Server4支持用户名密码模式,允许调用客户端使用用户名密码来获得访问Api资源(遵循Auth 2.0协议)的Access Token,MS可能考虑兼容老的系统,实现了这 ...
- Identity Server4学习系列一
一.前言 今天开始学习Identity Server4,顺便了解下.Net Core,以便于完善技术栈,最主要的是要跟上.Net的发展潮流,顺便帮助各位整理下官方文档,加上一些我自己对他的理解. 这是 ...
- Identity Server4学习系列二之令牌(Token)的概念
1.简介 通过前文知道了Identity Server4的基本用途,现在必须了解一些实现它的基本细节. 2.关于服务端生成Token令牌 头部(Header): { “typ”: “JWT”, //t ...
- MyBatis学习系列三——结合Spring
目录 MyBatis学习系列一之环境搭建 MyBatis学习系列二——增删改查 MyBatis学习系列三——结合Spring MyBatis在项目中应用一般都要结合Spring,这一章主要把MyBat ...
- scrapy爬虫学习系列三:scrapy部署到scrapyhub上
系列文章列表: scrapy爬虫学习系列一:scrapy爬虫环境的准备: http://www.cnblogs.com/zhaojiedi1992/p/zhaojiedi_python_00 ...
- DocX开源WORD操作组件的学习系列三
DocX学习系列 DocX开源WORD操作组件的学习系列一 : http://www.cnblogs.com/zhaojiedi1992/p/zhaojiedi_sharp_001_docx1.htm ...
- RabbitMQ学习系列三-C#代码接收处理消息
RabbitMQ学习系列三:.net 环境下 C#代码订阅 RabbitMQ 消息并处理 http://www.80iter.com/blog/1438251320680361 http://www. ...
- .net reactor 学习系列(三)---.net reactor代码自动操作相关保护功能
原文:.net reactor 学习系列(三)---.net reactor代码自动操作相关保护功能 接上篇,上篇已经学习了界面的各种功能以及各种配置,这篇准备学习下代码控制许可证. ...
- RabbitMQ学习系列三:.net 环境下 C#代码订阅 RabbitMQ 消息并处理
上一篇已经讲了Rabbitmq如何在Windows平台安装 不懂请移步: RabbitMQ学习系列二:.net 环境下 C#代码使用 RabbitMQ 消息队列 一.理论 .net环境下,C#代码订阅 ...
随机推荐
- UVa 11762 Race to 1 (数学期望 + 记忆化搜索)
题意:给定一个整数 n ,然后你要把它变成 1,变换操作就是随机从小于等于 n 的素数中选一个p,如果这个数是 n 的约数,那么就可以变成 n/p,否则还是本身,问你把它变成 1 的数学期望是多少. ...
- Typecho 插件开发基础
<?php /** * 标题 插件说明 * * @package 添加标题 * @author Fan * @version 1.0.0 * @link http://cnblogs.com/f ...
- Java理论学时第二节。课后作业。
枚举不属于原始数据类型,它的每个具体值都引用一个特定的对象,相同的值则引用同一个对象. 可以使用“==”和equals()方法直接比对枚举变量的值,换句话说,对于枚举类型的变量,“==”和equals ...
- Android 模仿微信发送图片 钟罩效果
参考资料http://trylovecatch.iteye.com/blog/1189452 http://bbs.51cto.com/thread-1031415-1.html### 1.添加资源文 ...
- javascript 模块化编程
The module pattern is a common JavaScript coding pattern. It’s generally well understood, but there ...
- POJ2229 Sumsets
Sumsets Time Limit: 2000MS Memory Limit: 200000K Total Submissions: 19024 Accepted: 7431 Descrip ...
- poj 2192 Zipper
题目 刚开始本来觉得可以用队列来写,但是 例如 ta te teta,ta的t先出队列那就不行了,所以还得用dp dp[i][j] 表示A前i个字符与B前j个字符是否能构成C前i+j个字符 要使 dp ...
- hdu 2642 Stars 【二维树状数组】
题目 题目大意:Yifenfei是一个浪漫的人,他喜欢数天上的星星.为了使问题变得更容易,我们假设天空是一个二维平面,上面的星星有时会亮,有时会发暗.最开始,没有明亮的星星在天空中,然后将给出一些信息 ...
- Android-Kotlin-具名参数
先看一个这样的案例,[案例一]: package cn.kotlin.kotlin_base05 fun showAction1(country: String, volk: String) { pr ...
- Android-HttpClient-Get与Post请求登录功能
HttpClient 是org.apache.http.* 包中的: 第一种方式使用httpclient-*.jar (需要在网上去下载httpclient-*.jar包) 把httpclient-4 ...