ansible部署 lnmp+wordpress

如上,是项目的目录结构。
common: 获取阿里云的yum源
mysql: 二进制安装mysql
nginx: 编译安装nginx
php-fpm:编译安装php-fpm
wordpress: 获取wordpress源码,更改部分值。
1,首先查看入口文件。
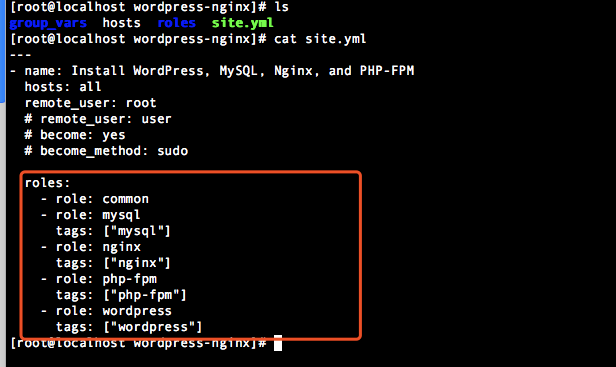
---

- name: Install WordPress, MySQL, Nginx, and PHP-FPM

  hosts: all

  remote_user: root

  # remote_user: user

  # become: yes

  # become_method: sudo

  roles:

    - role: common

    - role: mysql

      tags: ["mysql"]

    - role: nginx

      tags: ["nginx"]

    - role: php-fpm

      tags: ["php-fpm"]

    - role: wordpress

      tags: ["wordpress"]
2,查看hosts

[wordpress]

192.168.1.137
3, 查看group_vars下的变量
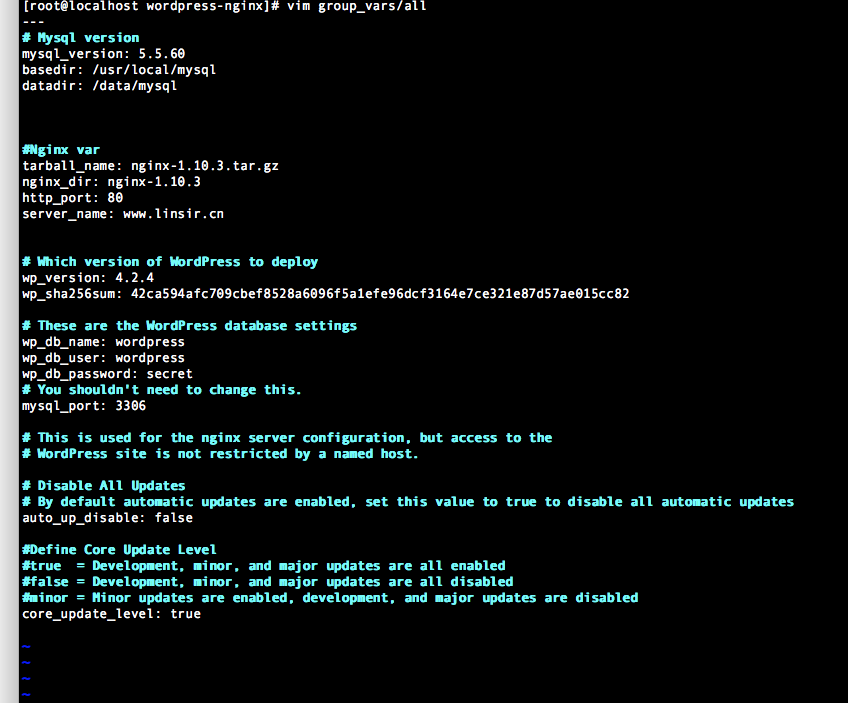
---

# Mysql version

mysql_version: 5.5.60

basedir: /usr/local/mysql

datadir: /data/mysql

#Nginx var

tarball_name: nginx-1.10.3.tar.gz

nginx_dir: nginx-1.10.3

http_port: 80

server_name: www.linsir.cn

# Which version of WordPress to deploy

wp_version: 4.2.4

wp_sha256sum: 42ca594afc709cbef8528a6096f5a1efe96dcf3164e7ce321e87d57ae015cc82

# These are the WordPress database settings

wp_db_name: wordpress

wp_db_user: wordpress

wp_db_password: secret

# You shouldn't need to change this.

mysql_port: 3306

# This is used for the nginx server configuration, but access to the

# WordPress site is not restricted by a named host.

# Disable All Updates

# By default automatic updates are enabled, set this value to true to disable all automatic updates

auto_up_disable: false

#Define Core Update Level

#true  = Development, minor, and major updates are all enabled

#false = Development, minor, and major updates are all disabled

#minor = Minor updates are enabled, development, and major updates are disabled

core_update_level: true
4,查看roles下的各个角色,根据site.yml文件中的顺序展开
1, common 主要是获取repo源用的
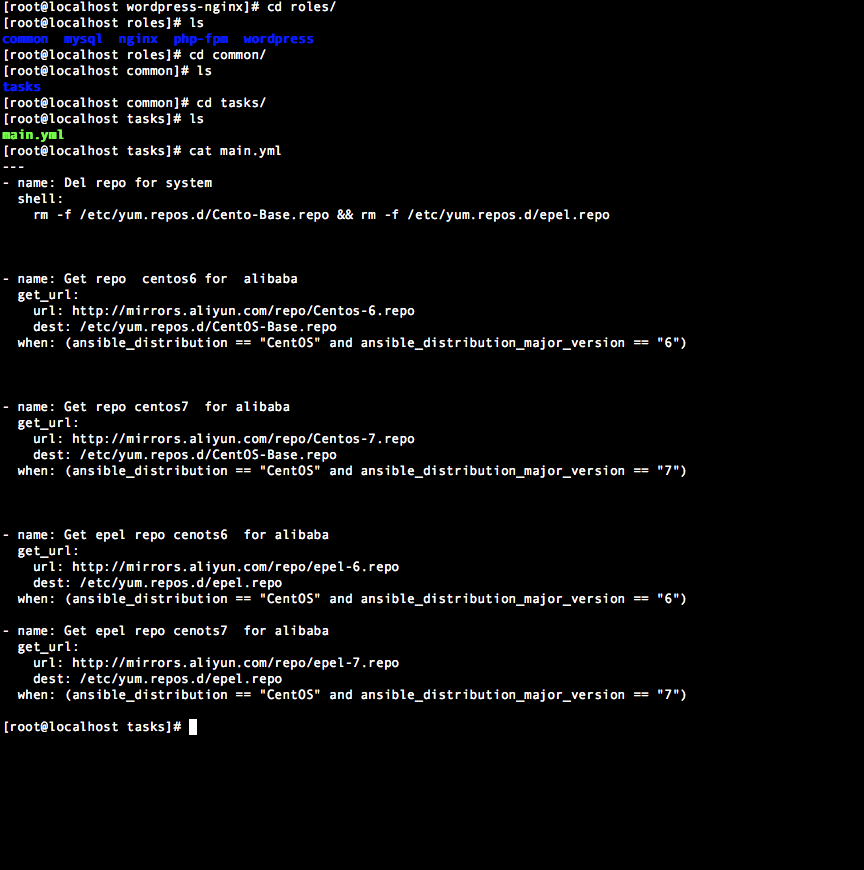
---

- name: Del repo for system

  shell:

    rm -f /etc/yum.repos.d/Cento-Base.repo && rm -f /etc/yum.repos.d/epel.repo

- name: Get repo  centos6 for  alibaba

  get_url:

    url: http://mirrors.aliyun.com/repo/Centos-6.repo

    dest: /etc/yum.repos.d/CentOS-Base.repo

  when: (ansible_distribution == "CentOS" and ansible_distribution_major_version == "6")

- name: Get repo centos7  for alibaba

  get_url:

    url: http://mirrors.aliyun.com/repo/Centos-7.repo

    dest: /etc/yum.repos.d/CentOS-Base.repo

  when: (ansible_distribution == "CentOS" and ansible_distribution_major_version == "7")

- name: Get epel repo cenots6  for alibaba

  get_url:

    url: http://mirrors.aliyun.com/repo/epel-6.repo

    dest: /etc/yum.repos.d/epel.repo

  when: (ansible_distribution == "CentOS" and ansible_distribution_major_version == "6")

- name: Get epel repo cenots7  for alibaba

  get_url:

    url: http://mirrors.aliyun.com/repo/epel-7.repo

    dest: /etc/yum.repos.d/epel.repo

  when: (ansible_distribution == "CentOS" and ansible_distribution_major_version == "7")
2,查看mysql角色
---

- name: Create mysql user

  user:

    name: mysql

- name: Download mysql

  get_url:

    url: http://mirrors.163.com/mysql/Downloads/MySQL-5.5/mysql-{{mysql_version}}-linux-glibc2.12-x86_64.tar.gz

    dest: /usr/local/src

- name: Unzip mysql

  unarchive:

    src: /usr/local/src/mysql-{{mysql_version}}-linux-glibc2.12-x86_64.tar.gz

    dest: /usr/local/src/

    copy: no

- name: Rename mysql

  shell:

    mv /usr/local/src/mysql-{{mysql_version}}-linux-glibc2.12-x86_64 /usr/local/mysql && chown -R mysql:mysql {{basedir}}

- name: Create data storage

  file:

    path: /data/mysql

    state: directory

    owner: mysql

    group: mysql

- name: Init mysql

  shell:

    ./scripts/mysql_install_db --user=mysql --basedir={{basedir}} --datadir={{datadir}}

  args:

    chdir: "{{basedir}}"

- name: Create mysql script for centos6

  shell:

    cp "{{basedir}}/support-files/mysql.server"  /etc/init.d/mysqld && chmod 755 /etc/init.d/mysqld

  when: (ansible_distribution == "CentOS" and ansible_distribution_major_version == "6")

- name: Create mysql script for centos7

  copy:

    src: mysqld.service

    dest: /usr/lib/systemd/system/mysqld.service

  when: (ansible_distribution == "CentOS" and ansible_distribution_major_version == "7")

  notify:

    - Reload service

- meta: flush_handlers

- name: Copy mysql config

  template:

    src: my.cnf.j2

    dest: /etc/my.cnf

- name: Restart mysqld

  service:

    name: mysqld

    state: restarted

  register: result

#根据服务器配置不同,mysql启动速度有所区别。

- name: sleep 10s

  shell:

    sleep 20

- name: Copy root password file

  shell:

    /usr/local/mysql/bin/mysqladmin -uroot password linlin
ansible部署 lnmp+wordpress的更多相关文章
- 使用 Docker 部署 LNMP 并搭建 wordpress
准备 系统版本:CentOS Linux release 7.4.1708 (Core) 内核版本:3.10.0-693.el7.x86_64 IP:192.168.31.43 可访问 ...
- Docker swarm 使用服务编排部署lnmp
一.简介 目的:在Docker Swarm集群中,使用stack服务编排搭建lnmp来部署WordPress 使用私有仓库的nginx和php镜像 mysql使用dockerhup最新镜像 使用nfs ...
- CentOS下搭建LNMP+WordPress+http2.0教程
此文是本人CentOS下搭建WordPress的一些笔记,环境搭建时间::将看过的几篇文章总结下来,形成一条龙长文.不用大家再找来找去. 本文大概分为此几部分: 一.基础命令更新: 二.服务器加速(非 ...
- 【超详细】vultr(CentOS7)+LNMP+WordPress 搭建个人博客
心血来潮想搭建个人博客,我的vps只用来搭ss未免太过浪费 在这里记录一下搭建个人博客的历程 0x00 写在前面 why vultr: 优点:便宜. 性能优良.按时间计费(不用包年 学生党的福音).稳 ...
- Docker Compose编排工具部署lnmp实践及理论(详细)
目录 一.理论概述 编排 部署 Compose原理 二.使用docker compose 部署lnmp 三.测试 四.总结 一.理论概述 Docker Compose是一个定义及运行多个Docker容 ...
- Docker部署lnmp 实战 (多注意配置文件,不管访问试试换个浏览器)
Docker部署LNMP环境 关闭防火墙,设置自定义网络 systemctl stop firewalld systemctl disable firewalld setenforce 0 docke ...
- 在ConoHa上Centos7环境下源码安装部署LNMP
本文记录了从源码,在Centos 7上手动部署LNMP环境的过程,为了方便以后对nginx和mariadb进行升级,这里采用yum的方式进行安装. 1.建立运行网站和数据库的用户和组 groupadd ...
- 001.Ansible部署RHCS存储集群
一 前期准备 1.1 前置条件 至少有三个不同的主机运行monitor (MON)节点: 至少三个直接存储(非外部SAN硬件)的OSD节点主: 至少两个不同的manager (MGR)节点: 如果使用 ...
- 【转载】Centos系统快速部署LNMP环境
PHP语言在Linux系统上运行的时候,需要在Linux系统上部署相应的Nginx.MySQL.PHP等环境,只有将这些环境参数都设置好,PHP相关应用程序才可正常运行,部署环境的方法有很多种,可手动 ...
随机推荐
- CentOS 7配置MariaDB允许指定IP远程连接数据库
防火墙 CentOS7 之前的防火墙是不一样的,比如你要添加3306端口: ## 全部 iptables -A INPUT -p tcp -m tcp --dport 3306 -j ACCEPT # ...
- Android中设置控件的背景颜色的方式整理
版权声明:本文为博主原创文章,未经博主允许不得转载. 前言 在Android开发中,经常需要设置控件的背景颜色或者图片的src颜色. 效果图 代码分析 根据使用的方法不同,划分为 setBackgro ...
- 2012-2014 三年浙江 acm 省赛 题目 分类
The 9th Zhejiang Provincial Collegiate Programming Contest A Taxi Fare 25.57% (166/649) (水 ...
- WebSocket 协议
1.1 背景知识 由于历史原因,在创建一个具有双向通信机制的 web 应用程序时,需要利用到 HTTP 轮询的方式.围绕轮询产生了 “短轮询” 和 “长轮询”. 短轮询 浏览器赋予了脚本网络通信的编程 ...
- eclipse中打断点debug无效
今天在测试的时候,发现在eclipse中打了断点,debug居然无效.结果是因为我无意开启了另一个功能,Run-->Skip All Breakpoints (忽略所有的断点) 快捷键:Ctrl ...
- linux http服务源码编译安装详解
相信大家大多都听过linux 的编译安装,但它到底是怎么把源代码变为自己电脑里可以应用的软件哪?今天,小编就以httpd 为例详细讲解一下. 什么是编译安装——编译:将源代码变为机器可执行的代码文件. ...
- vue+vue-router+vuex实战
shopping vue + vue-router + vuex实现电商网站 效果展示 install 下载代码: git clone https://github.com/chenchangyuan ...
- Perl的命令行参数和ARGV
程序名:$0 $0表示当前正在运行的Perl脚本名.有3种情况: 如果执行方式为perl x.pl,则$0的值为x.pl而非perl命令本身 如果执行方式为./x.pl,则$0的值为./x.pl 如果 ...
- .Net NPOI 根据excel模板导出excel、直接生成excel
一.根据Excel模板导出excel 1.导入NPOI.dll 2.DAL中添加类ExportExcel.cs using NPOI.SS.UserModel; using System; usin ...
- Request method 'POST' not supported错误和解决方法
在使用SpringBoot的时候,在html页面用form表单post提交数据的时候报错: Request method 'POST' not supported 错误解析: 我是用的前端页面是HTM ...