keras—神经网络CNN—MNIST手写数字识别
from keras.datasets import mnist
from keras.utils import np_utils
from plot_image_1 import plot_image_1
from plot_prediction_1 import plot_image_labels_prediction_1
from show_train_history import show_train_history
import numpy as np
import pandas as pd
from keras.models import Sequential
from keras.layers import Dense,Dropout,Flatten,Conv2D,MaxPooling2D
np.random.seed()
(x_Train,y_Train),(x_Test,y_Test)=mnist.load_data()
print('train data=',len(x_Train))
print('test data=',len(x_Test))
print('x_train_image:',x_Train.shape)
print('y_train_label:',y_Train.shape)
x_Train4D=x_Train.reshape(x_Train.shape[],,,).astype('float32')
x_Test4D=x_Test.reshape(x_Test.shape[],,,).astype('float32')
x_Train4D_normalize=x_Train4D/
x_Test4D_normalize=x_Test4D/
y_TrainOneHot=np_utils.to_categorical(y_Train)
y_TestOneHot=np_utils.to_categorical(y_Test)
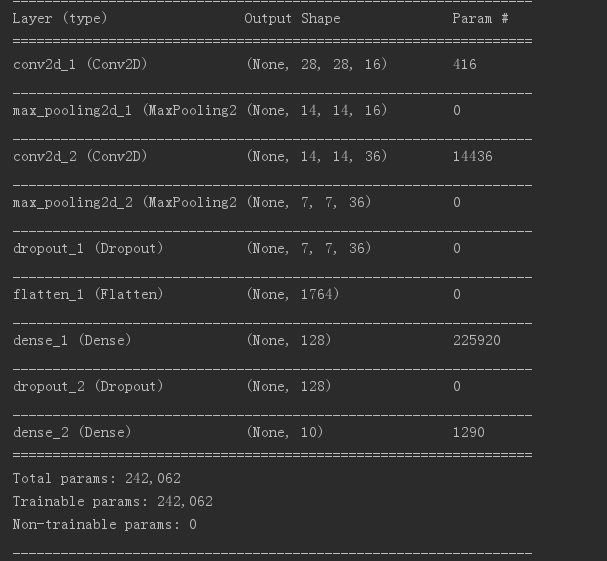
model=Sequential()
model.add(Conv2D(filters=,
kernel_size=(,),
padding='same',
input_shape=(,,),
activation='relu'))
model.add(MaxPooling2D(pool_size=(,)))
model.add(Conv2D(filters=,
kernel_size=(,),
padding='same',
activation='relu'))
model.add(MaxPooling2D(pool_size=(,)))
model.add(Dropout(0.25))
model.add(Flatten())
model.add(Dense(,activation='relu'))
model.add(Dropout(0.5))
model.add(Dense(,activation='softmax'))
print(model.summary())
model.compile(loss='categorical_crossentropy',
optimizer='adam',metrics=['accuracy'])
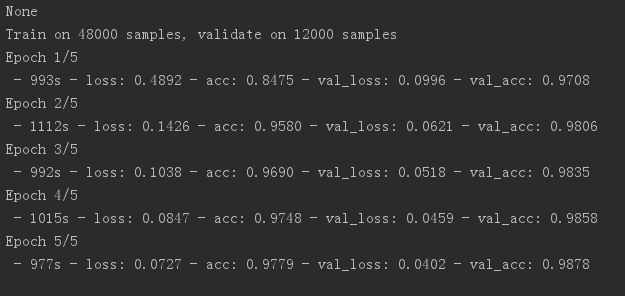
train_history=model.fit(x=x_Train4D_normalize,
y=y_TrainOneHot,validation_split=0.2,
epochs=,batch_size=,verbose=)
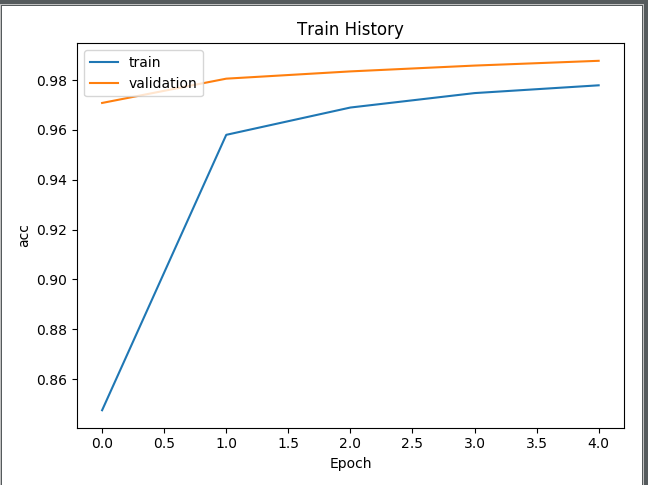
show_train_history(train_history,'acc','val_acc')
show_train_history(train_history,'loss','val_loss')
scores=model.evaluate(x_Test4D_normalize,y_TestOneHot)
print()
print('accuracy',scores[])
prediction=model.predict_classes(x_Test4D_normalize)
print("prediction[:10]",prediction[:])
plot_image_labels_prediction_1(x_Test,y_Test,prediction,idx=)
pd.crosstab(y_Test,prediction,rownames=['label'],colnames=['predict'])
 import matplotlib.pyplot as plt

 def plot_image_1(image):

     fig=plt.gcf()

     fig.set_size_inches(,)

     plt.imshow(image,cmap='binary')

     plt.show()
 import matplotlib.pyplot as plt

 def plot_image_labels_prediction_1(image,labels,prediction,idx,num=):

     fig=plt.gcf()

     fig.set_size_inches(,)

     if num>:num=

     for i in range(,num):

         ax=plt.subplot(,,i+)

         ax.imshow(image[idx],cmap='binary')

         title="label="+str(labels[idx])

         if len(prediction)>:

             title+=",predict="+str(prediction[idx])

         ax.set_title(title,fontsize=)

         ax.set_xticks([]);ax.set_yticks([])

         idx+=

     plt.show()
 import matplotlib.pyplot as plt

 def show_train_history(train_history,train,validation):

     plt.plot(train_history.history[train])

     plt.plot(train_history.history[validation])

     plt.title('Train History')

     plt.ylabel(train)

     plt.xlabel('Epoch')

     plt.legend(['train','validation'],loc='upper left')    #显示左上角标签

     plt.show()


keras—神经网络CNN—MNIST手写数字识别的更多相关文章
- Android+TensorFlow+CNN+MNIST 手写数字识别实现
Android+TensorFlow+CNN+MNIST 手写数字识别实现 SkySeraph 2018 Email:skyseraph00#163.com 更多精彩请直接访问SkySeraph个人站 ...
- Pytorch1.0入门实战一:LeNet神经网络实现 MNIST手写数字识别
记得第一次接触手写数字识别数据集还在学习TensorFlow,各种sess.run(),头都绕晕了.自从接触pytorch以来,一直想写点什么.曾经在2017年5月,Andrej Karpathy发表 ...
- 第三节,CNN案例-mnist手写数字识别
卷积:神经网络不再是对每个像素做处理,而是对一小块区域的处理,这种做法加强了图像信息的连续性,使得神经网络看到的是一个图像,而非一个点,同时也加深了神经网络对图像的理解,卷积神经网络有一个批量过滤器, ...
- 【TensorFlow-windows】(四) CNN(卷积神经网络)进行手写数字识别(mnist)
主要内容: 1.基于CNN的mnist手写数字识别(详细代码注释) 2.该实现中的函数总结 平台: 1.windows 10 64位 2.Anaconda3-4.2.0-Windows-x86_64. ...
- [Python]基于CNN的MNIST手写数字识别
目录 一.背景介绍 1.1 卷积神经网络 1.2 深度学习框架 1.3 MNIST 数据集 二.方法和原理 2.1 部署网络模型 (1)权重初始化 (2)卷积和池化 (3)搭建卷积层1 (4)搭建卷积 ...
- keras框架的MLP手写数字识别MNIST,梳理?
keras框架的MLP手写数字识别MNIST 代码: # coding: utf-8 # In[1]: import numpy as np import pandas as pd from kera ...
- mnist手写数字识别——深度学习入门项目(tensorflow+keras+Sequential模型)
前言 今天记录一下深度学习的另外一个入门项目——<mnist数据集手写数字识别>,这是一个入门必备的学习案例,主要使用了tensorflow下的keras网络结构的Sequential模型 ...
- 第三节,TensorFlow 使用CNN实现手写数字识别(卷积函数tf.nn.convd介绍)
上一节,我们已经讲解了使用全连接网络实现手写数字识别,其正确率大概能达到98%,这一节我们使用卷积神经网络来实现手写数字识别, 其准确率可以超过99%,程序主要包括以下几块内容 [1]: 导入数据,即 ...
- 基于tensorflow的MNIST手写数字识别(二)--入门篇
http://www.jianshu.com/p/4195577585e6 基于tensorflow的MNIST手写字识别(一)--白话卷积神经网络模型 基于tensorflow的MNIST手写数字识 ...
随机推荐
- HTML5中对于网络是否断开的检测.很有意思哦
//事件的封装 var EventUtil = { addHandler: function (element, type, handler) {//注册事件 if (element.addEvent ...
- Oracle 统计量NO_INVALIDATE参数配置(上)
转载:http://blog.itpub.net/17203031/viewspace-1067312/ Oracle统计量对于CBO执行是至关重要的.RBO是建立在数据结构的基础上的,DDL结构.约 ...
- 管理11gRAC基本命令 (转载)
在 Oracle Clusterware 11g 第 2 版 (11.2) 中,有许多子程序和命令已不再使用: crs_stat crs_register crs_unregiste ...
- 5S后返回首页
<!DOCTYPE html> <html> <head> <title>5S后返回首页</title> <meta http-equ ...
- 【RabbitMQ】ubuntu下RabbitMQ安装与简单使用
参考:https://blog.csdn.net/the_fool_/article/details/80570971 1.安装: https://blog.csdn.net/a295277302/a ...
- localhost 127.0.0.1
No1: localhost也叫local ,正确的解释是:本地服务器 127.0.0.1在windows等系统的正确解释是:本机地址(本机服务器) 他们的解析通过本机的host文件,windows自 ...
- ajax 实现跨域
ajax本身是不可以跨域的,通过产生一个script标签来实现跨域.因为script标签的src属性是没有跨域的限制的. 其实设置了dataType: 'jsonp'后,$.ajax方法就和ajax ...
- DSHTTPService
DSHTTPService Filters 压缩过滤器的使用 The Filters property specifies the DataSnap communication filters for ...
- AS3 注意点
当主类new 一个主影片来放内容的时候.在gc此swf时,一定要检查此主影片是否存在,如 private function initStart() { //trace("RightMenu类 ...
- CAShapeLayer 画直线
// from StackOverflow CAShapeLayer *layer = [CAShapeLayer layer]; UIBezierPath *linePath = [UIBezier ...