android中的五大布局(控件的容器,可以放button等控件)
一.android中五大布局相当于是容器,这些容器里可以放控件也可以放另一个容器,子控件和布局都需要制定属性。
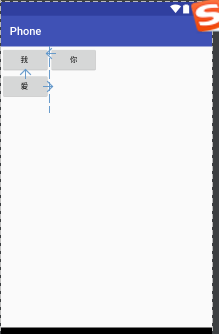
1.相对布局:RelativeLayout
@1控件默认堆叠排列,需要制定控件的相对位置
<?xml version="1.0" encoding="utf-8"?>

<RelativeLayout

    xmlns:android="http://schemas.android.com/apk/res/android"

    android:layout_width="match_parent"

    android:layout_height="match_parent">

    <Button

        android:id="@+id/bt1"

        android:layout_width="wrap_content"

        android:layout_height="wrap_content"

        android:text="我 "/>

    <Button

        android:id="@+id/bt2"

        android:layout_width="wrap_content"

        android:layout_height="wrap_content"

        android:layout_below="@+id/bt1"

        android:text="爱 "/>

    <Button

        android:id="@+id/bt3"

        android:layout_width="wrap_content"

        android:layout_height="wrap_content"

        android:layout_toRightOf="@+id/bt2"

        android:text="你"/>

</RelativeLayout>
效果:
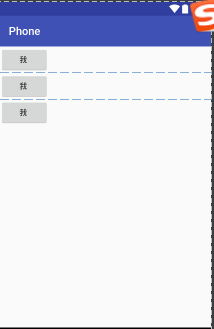
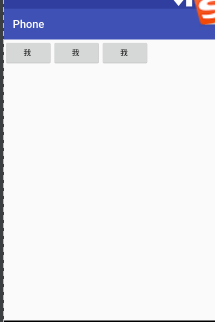
2.线性布局:LinearLayout
@1.控件线性排列,分为水平和垂直排列
@2.可以指定背景图片,透明度以及颜色
android:background="@android:color/holo_blue_bright"
<?xml version="1.0" encoding="utf-8"?>

<LinearLayout

    xmlns:android="http://schemas.android.com/apk/res/android"

    android:orientation="vertical"

    android:layout_width="match_parent"

    android:layout_height="match_parent">

    <Button

        android:layout_width="wrap_content"

        android:layout_height="wrap_content"

        android:text="我 "/>

    <Button

        android:layout_width="wrap_content"

        android:layout_height="wrap_content"

        android:text="我 "/>

    <Button

        android:layout_width="wrap_content"

        android:layout_height="wrap_content"

        android:text="我 "/>

</LinearLayout>
垂直效果:
水平效果:
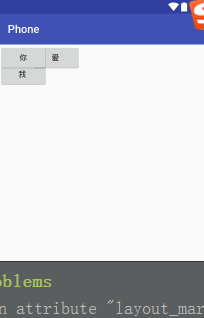
3.帧布局:FrameLayout
@1控件可以重叠的布局
<?xml version="1.0" encoding="utf-8"?>

<FrameLayout

    xmlns:android="http://schemas.android.com/apk/res/android"

    android:layout_width="match_parent"

    android:layout_height="match_parent">

    <Button

        android:id="@+id/bt1"

        android:layout_width="wrap_content"

        android:layout_height="wrap_content"

        android:layout_marginTop="30"

        android:text="我 "/>

    <Button

        android:id="@+id/bt2"

        android:layout_width="wrap_content"

        android:layout_height="wrap_content"

        android:layout_marginLeft="60"

        android:text="爱 "/>

    <Button

        android:id="@+id/bt3"

        android:layout_width="wrap_content"

        android:layout_height="wrap_content"

        android:layout_toRightOf="@+id/bt2"

        android:text="你"/>

</FrameLayout>
效果:
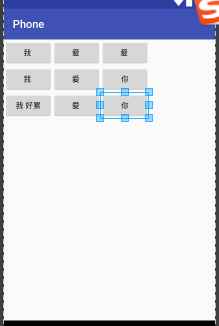
4.表格布局:TableLayout
@1控件呈现表格方式排列
@2TableRow用于制定表格的一行
<?xml version="1.0" encoding="utf-8"?>

<TableLayout

    xmlns:android="http://schemas.android.com/apk/res/android"

    android:collapseColumns="3"

    android:layout_width="match_parent"

    android:layout_height="match_parent">

    <TableRow

        android:layout_width="wrap_content"

        android:layout_height="wrap_content">

        <Button

            android:id="@+id/bt1"

            android:layout_width="wrap_content"

            android:layout_height="wrap_content"

            android:text="我 "/>

        <Button

            android:id="@+id/bt2"

            android:layout_width="wrap_content"

            android:layout_height="wrap_content"

            android:text="爱 "/>

        <Button

            android:id="@+id/bt3"

            android:layout_width="wrap_content"

            android:layout_height="wrap_content"

            android:text="爱 "/>

    </TableRow>

    <TableRow

        android:layout_width="wrap_content"

        android:layout_height="wrap_content">

        <Button

            android:id="@+id/bt4"

            android:layout_width="wrap_content"

            android:layout_height="wrap_content"

            android:text="我 "/>

        <Button

            android:id="@+id/bt5"

            android:layout_width="wrap_content"

            android:layout_height="wrap_content"

            android:text="爱 "/>

        <Button

            android:id="@+id/bt6"

            android:layout_width="wrap_content"

            android:layout_height="wrap_content"

            android:text="你"/>

    </TableRow>

    <TableRow>

        <Button

            android:id="@+id/bt8"

            android:layout_width="wrap_content"

            android:layout_height="wrap_content"

            android:text="我 好累"/>

        <Button

            android:id="@+id/bt9"

            android:layout_width="wrap_content"

            android:layout_height="wrap_content"

            android:text="爱 "/>

        <Button

            android:id="@+id/bt10"

            android:layout_width="wrap_content"

            android:layout_height="wrap_content"

            android:text="你"/>

    </TableRow>

</TableLayout>
效果:
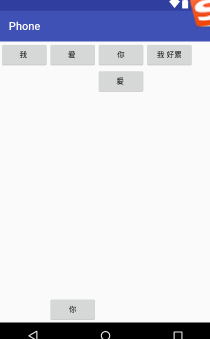
5.方格布局:GridLayout
@1可以指定控件位于第几行第几列
代码:
 <?xml version="1.0" encoding="utf-8"?>

 <GridLayout

     xmlns:android="http://schemas.android.com/apk/res/android"

     android:layout_width="match_parent"

     android:layout_height="match_parent">

         <Button

             android:id="@+id/bt4"

             android:layout_width="wrap_content"

             android:layout_height="wrap_content"

             android:text="我 "/>

         <Button

             android:id="@+id/bt5"

             android:layout_width="wrap_content"

             android:layout_height="wrap_content"

             android:text="爱 "/>

         <Button

             android:id="@+id/bt6"

             android:layout_width="wrap_content"

             android:layout_height="wrap_content"

             android:text="你"/>

         <Button

             android:id="@+id/bt8"

             android:layout_width="wrap_content"

             android:layout_height="wrap_content"

             android:text="我 好累"/>

         <Button

             android:id="@+id/bt9"

             android:layout_width="wrap_content"

             android:layout_height="wrap_content"

             android:layout_column="2"

             android:layout_row="1"

             android:text="爱 "/>

         <Button

             android:id="@+id/bt10"

             android:layout_width="wrap_content"

             android:layout_height="wrap_content"

             android:layout_column="1"

             android:layout_row="3"

             android:text="你"/>

 </GridLayout>
效果:
android中的五大布局(控件的容器,可以放button等控件)的更多相关文章
- Android中的五大布局
Android中的五大布局 1.了解布局 一个丰富的界面总是要由很多个控件组成的,那我们如何才能让各个控件都有条不紊地 摆放在界面上,而不是乱糟糟的呢?这就需要借助布局来实现了.布局是一种可用于放置很 ...
- Android中的五大布局和logcat打印日志
在android中的布局有五大类,有的时候你可能用到一种,但有的时候你也可能需要两种或者三种布局同时一起使用.这五种布局为别为:LinearLayout(线性布局),FrameLayout(框架布局) ...
- 兔子--Android中的五大布局
LinearLayout:被称为线性布局,分为水平和垂直,设置的垂直或水平的属性值,来排列全部的子元素.全部的子元素都被堆放在其他元素之后,因此一个垂直列表的每一行仅仅会有一个元素,而无论他们有多宽, ...
- Android学习笔记(第二篇)View中的五大布局
PS:人不要低估自己的实力,但是也不能高估自己的能力.凡事谦为本... 学习内容: 1.用户界面View中的五大布局... i.首先介绍一下view的概念 view是什么呢?我们已经知道一个Act ...
- Android开发-之五大布局
在html中大家都知道布局是什么意思了,简单来说就是将页面划分模块,比如html中的div.table等.那么Android中也是这样的.Android五大布局让界面更加美化,开发起来也更加方便.当然 ...
- Android中的LinearLayout布局
LinearLayout : 线性布局 在一般情况下,当有很多控件需要在一个界面列出来时,我们就可以使用线性布局(LinearLayout)了, 线性布局是按照垂直方向(vertical)或水平方向 ...
- android中的常用布局管理器(三)
接上篇博客 (5)TableLayout 表格布局管理器 在android中,线性布局和表格布局用的是最多的. 在很多的输出操作中,往往会使用表格的形式对显示的数据进行排版,tablelayo ...
- Android 中常用的布局
一.线性布局----LinearLayout horizontal 水平 <?xml version="1.0" encoding="utf-8"?& ...
- Android成长日记-五大布局
1. 五布局之线性布局LinearLayout 特点:它包含的子控件将以横向或竖向的方式排列 ps:android:gravity=”center|bottom”(gravity允许多级联用) Tip ...
随机推荐
- 报Cannot change version of project facet Dynamic web module to 2.5 错误
maven项目老是报这个错误,上网找了很多方法,把Dynamic Web Module的Version改成了2.5,结果还是报错. 后来找到一个方法说在web.xml中,将version改为3.0,就 ...
- 【面试问题】——秋招面试中遇到的一些问题&思维导图&反思
前言:秋招也跑了挺多的公司,虽然都是招Web前端,但是不同的公司,因为需求和目的不同,面试的考察点也是各不相同.我没有实习经验,只有自己学东学西比较杂也比较浅的一些知识积累可以用,这个过程我发现了自己 ...
- ML笔记:Gradient Descent
Review: Gradient Descent Tip 1: Tuning your learning rates eta恰好,可以走到局部最小值点; eta太小,走得太慢,也可以走到局部最小值点; ...
- RBAC(Role-Based Access Control,基于角色的权限访问控制)—权限管理设计
RBAC模型的核心是在用户和权限之间引入了角色的概念,将用户和权限进行解耦,采用用户确定角色,角色分配权限,进而间接达到给用户分配角色的目的 这样采用的方式优点在于 (1)降低管理成本--由于一个角色 ...
- MYSQL瓶颈
一般来说, 在使用的时候 性能从某个数值开始.突然大大下降,说明就到了瓶颈期. mysql 瓶颈有2种,一种是 cpu瓶颈 一种是 io瓶颈.cpu瓶颈多是由io引起. 而io可以通过 show ...
- 有关BOM头的一些知识
在psr开发标准中,有一条是讲的,php只能使用无bom的utf8格式 . 那么这个bom是几个意思. 说一些理论内容 . 在UCS编码中有一个叫做"ZERO WIDTH NO-BREAK ...
- 三种方法实现PCA算法(Python)
主成分分析,即Principal Component Analysis(PCA),是多元统计中的重要内容,也广泛应用于机器学习和其它领域.它的主要作用是对高维数据进行降维.PCA把原先的n个特征用数目 ...
- python项目依赖管理分享迁移后重建开发环境(一)virtualenv 和 pip
作者:Panda Fang 出处:http://www.cnblogs.com/lonkiss/p/rebuild-development-environment-with-virtualenv-an ...
- Android 7.1 WindowManagerService 屏幕旋转流程分析 (二)
一.概述 从上篇[Android 7.1 屏幕旋转流程分析]知道实际的旋转由WindowManagerService来完成,这里接着上面具体详细展开. 调了三个函数完成了三件事,即首先调用update ...
- OpenCV 读取视频 多种方式
OpenCV中常见的视频方式是while循环读取,可是,当遇到嵌套循环呢 1.常见的while循环 ,没有嵌套循环 cv::VideoCapture capture("d:/test/dem ...