简单的TableView
背景知识
每个表都是UITableView的实例,表中的每一行都是UITableViewCell的实例。
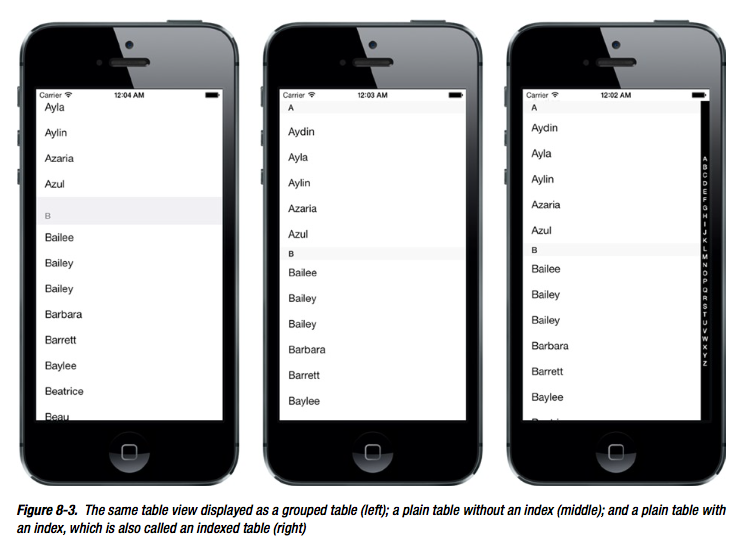
TableView的种类
- Grouped table
- Plain table without index
- Plain table with index
NSIndexPath
- NSIndexPath.section 返回int,表示第几个Section
- NSIndexPath.row 返回int,表示该Section下的第几行
UITableViewCell包含的元素
- Image (imageView.image)
- Text Label (textLabel.text, textLabel.font)
- Detail Text Label (detailTextLabel.text)
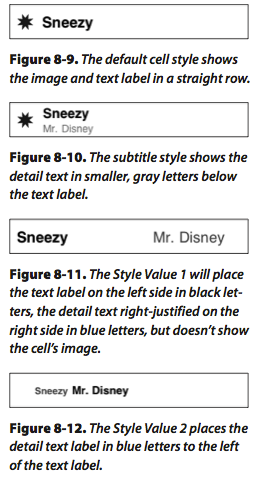
UITableViewCell样式
- UITableViewCellStyleDefault //左文,图(如果有则最左)
- UITableViewCellStyleSubtitile //左文,图(如果有则最左),detailText在Text下面
- UITableViewCellStyleValue1 //左文,图(如果有则最左),detailText在最右
- UITableViewCellStyleValue2 //左文,图(如果有则最左),detailText在Text右边
简单例子
StoryBoard拖入一个TableView,然后设置DataSource和Delegate为ViewController。
ViewController.h声明协议
#import <UIKit/UIKit.h>

@interface XYZViewController : UIViewController<UITableViewDataSource, UITableViewDelegate>

@end
ViewController.m文件如下
//

//  XYZViewController.m

//  TableView

//

//  Created by Norcy on 14-7-24.

//  Copyright (c) 2014年 QQLive. All rights reserved.

//

#import "XYZViewController.h"

@interface XYZViewController ()

@property (strong, nonatomic)NSArray *array;

@end

@implementation XYZViewController

- (void)viewDidLoad

{

    [super viewDidLoad];

    // Do any additional setup after loading the view, typically from a nib.

    self.array = [[NSArray alloc] initWithObjects:@"", @"", @"", @"", @"", @"", @"", @"", @"", @"", @"", @"", @"", @"", @"", nil];

}

- (void)didReceiveMemoryWarning

{

    [super didReceiveMemoryWarning];

    // Dispose of any resources that can be recreated.

}

#pragma mark -

#pragma mark Data Source Methods

- (NSInteger)numberOfSectionsInTableView:(UITableView *)tableView

{

    return ;

}

- (NSInteger)tableView:(UITableView *)tableView numberOfRowsInSection:(NSInteger)section

{

    return [self.array count];

}

#pragma mark Delegate Methods

- (UITableViewCell*) tableView:(UITableView *)tableView cellForRowAtIndexPath:(NSIndexPath *)indexPath

{

    static NSString *cellId = @"MyCell";

    UITableViewCell *cell = [tableView dequeueReusableCellWithIdentifier:cellId];

    if (cell == nil)

    {

        cell = [[UITableViewCell alloc] initWithStyle:UITableViewCellStyleValue1 reuseIdentifier:cellId];

    }

    cell.textLabel.text = self.array[indexPath.row];

    UIImage *image = [UIImage imageNamed:@"1.png"];

    cell.imageView.image = image;

    cell.detailTextLabel.text = @"Details";

    return cell;

}

- (NSInteger)tableView:(UITableView *)tableView indentationLevelForRowAtIndexPath:(NSIndexPath *)indexPath

{

    return indexPath.row;

}

@end
代码说明
代码说明1:
static NSString *CellID = @"MyCell";

UITableViewCell *cell = [tableView dequeueReusableCellWithIdentifier:CellIdentifier];

if (cell == nil)

{

    cell = [[UITableViewCell alloc] initWithStyle:UITableViewCellStyleDefault reuseIdentifier:CellID];

}
从ReusableCell的队列中取出带有Identifier标识的Cell,如果Cell为空,则新创建一个。
ReusableCell队列是专门存放那些生成过的,但是后来由于滚动tableView而隐藏起来的cell。这样做可以节约资源。
注意CellIdentifier这个参数是可以自定义的,如果使用storyboard的话需要跟storyboard中的cell的Identifier相同。
- dequeueReusableCellWithIdentifier: 可能返回nil(没有为TableView注册Cell的情况返回nil)
- dequeueReusableCellWithIdentifier:forIndexPath: 不可能返回nil
所以如果使用dequeueReusableCellWithIdentifier:forIndexPath的话就不用检查nil的情况了。
But,以上这种写法已经过时了。推荐最新写法
[tableView registerClass:[UITableViewCell class] forCellReuseIdentifier:CELL_ID];
UITableViewCell* cell = [tableView dequeueReusableCellWithIdentifier:CELL_ID forIndexPath:indexPath];
如果TableView已经注册了Cell,那么dequeueReusableCellWithIdentifier:一定不为空;因为当系统从重用队列中取cell取不到的时候,会自动帮我们生成并初始化一个cell。
所以建议直接用registerClass:forCellReuseIdentifier:CELL_ID + dequeueReusableCellWithIdentifier:forIndexPath: 这个组合。
代码说明2:
- (NSInteger)tableView:(UITableView *)tableView indentationLevelForRowAtIndexPath:(NSIndexPath *)indexPath

{

    return indexPath.row;
}
设置缩进。
代码说明3:
- (NSIndexPath *)tableView:(UITableView *)tableView willSelectRowAtIndexPath:(NSIndexPath *)indexPath

{

    if (indexPath.row == )

        return nil;

    else

        return indexPath;

}
选中某行之前调用,返回nil表示该行不能被选择,返回indexPath表示可以继续选择(可以返回其他路径但最好不要更改用户的选择,所以一般返回nil或indexPath来表示禁止或允许某个选择)
代码说明4:
- (void)tableView:(UITableView *)tableView

didSelectRowAtIndexPath:(NSIndexPath *)indexPath

{

    [tableView deselectRowAtIndexPath:indexPath animated:YES];

}
选中某行之后调用,一般要调用deselectRowAtIndexPath
代码说明5:
cell.textLabel.font = [UIFont boldSystemFontOfSize:];

- (CGFloat)tableView:(UITableView *)tableView

heightForRowAtIndexPath:(NSIndexPath *)indexPath

{

    return ;

}
设置TableViewCell的行高以适应TableViewCell的字体
附录,联系人Demo(Based in IOS7.0) or 直接查看主要代码
//

//  ViewController.m

//  Contact

//

//  Created by Norcy on 15/4/16.

//  Copyright (c) 2015年 Norcy. All rights reserved.

//

#import "ViewController.h"

@interface ViewController ()

{

}

@property (strong, nonatomic) NSDictionary* names;

@property (strong, nonatomic) NSArray* keys;

@end

NSMutableArray* filteredNames;

UISearchDisplayController* searchController;

static NSString* CELL_ID = @"MyCell";

@implementation ViewController

- (void)viewDidLoad

{

    [super viewDidLoad];

    //Screen

    int screenWidth = [[UIScreen mainScreen] bounds].size.width;

    int screenHeight = [[UIScreen mainScreen] bounds].size.height;

    //Filter

    filteredNames = [[NSMutableArray alloc] init];

    //TableView

    UITableView* tableView = [[UITableView alloc] initWithFrame:CGRectMake(, , screenWidth, screenHeight)];

    [tableView registerClass:[UITableViewCell class] forCellReuseIdentifier:CELL_ID];

    tableView.delegate = self;

    tableView.dataSource = self;

    tableView.tag = ;

    UIEdgeInsets insets = tableView.contentInset;    //设置与屏幕顶部的距离,防止被状态栏挡住

    insets.top = ;

    [tableView setContentInset:insets];

    //Search Bar

    UISearchBar* searchBar = [[UISearchBar alloc] initWithFrame:CGRectMake(, , screenWidth, screenHeight / )];

    tableView.tableHeaderView = searchBar;

    searchController = [[UISearchDisplayController alloc] initWithSearchBar:searchBar contentsController:self];

    searchController.delegate = self;

    searchController.searchResultsDataSource = self;

    //Names and Keys

    NSString* path = [[NSBundle mainBundle] pathForResource:@"sortednames" ofType:@"plist"];

    self.names = [NSDictionary dictionaryWithContentsOfFile:path];

    self.keys = [[self.names allKeys] sortedArrayUsingSelector:@selector(compare:)];

    [self.view addSubview:tableView];

}

#pragma mark -

#pragma mark Data Source Methods

- (NSInteger)numberOfSectionsInTableView:(UITableView*)tableView

{

    if (tableView.tag == )

        return [self.keys count];

    else

        return ;

}

- (NSInteger)tableView:(UITableView*)tableView numberOfRowsInSection:(NSInteger)section

{

    if (tableView.tag == )

    {

        NSString* key = self.keys[section];

        NSArray* curSection = self.names[key];

        return [curSection count];

    }

    else

        return [filteredNames count];

}

- (NSString*)tableView:(UITableView*)tableView titleForHeaderInSection:(NSInteger)section

{

    if (tableView.tag == )

        return self.keys[section];

    else

        return nil;

}

- (UITableViewCell*)tableView:(UITableView*)tableView cellForRowAtIndexPath:(NSIndexPath*)indexPath

{

    UITableViewCell* cell = [tableView dequeueReusableCellWithIdentifier:CELL_ID forIndexPath:indexPath];

//    UITableViewCell* cell = [tableView dequeueReusableCellWithIdentifier:CELL_ID];

//    if (cell == nil)

//    {

//        NSLog(@"asd");

//        cell = [[UITableViewCell alloc] initWithStyle:UITableViewCellStyleDefault reuseIdentifier:CELL_ID];

//    }

    if (tableView.tag == )

    {

        NSString* key = self.keys[indexPath.section];

        NSArray* curSection = self.names[key];

        cell.textLabel.text = curSection[indexPath.row];

    }

    else

        cell.textLabel.text = filteredNames[indexPath.row];

    return cell;

}

#pragma mark Delegate Methods

//显示索引

- (NSArray*)sectionIndexTitlesForTableView:(UITableView*)tableView

{

    if (tableView.tag == )

        return self.keys;

    else

        return nil;

}

- (void)tableView:(UITableView*)tableView didSelectRowAtIndexPath:(NSIndexPath*)indexPath

{

    [tableView deselectRowAtIndexPath:indexPath animated:YES];

}

#pragma mark Search Delegate Methods

- (void)searchDisplayController:(UISearchDisplayController*)controller didLoadSearchResultsTableView:(UITableView*)tableView

{

    [tableView registerClass:[UITableViewCell class] forCellReuseIdentifier:CELL_ID];

}

- (BOOL)searchDisplayController:(UISearchDisplayController*)controller shouldReloadTableForSearchString:(NSString*)searchString

{

    [filteredNames removeAllObjects];

    if (searchString.length > )

    {

        NSPredicate* predicate = [NSPredicate predicateWithBlock:^BOOL(id evaluatedObject, NSDictionary* bindings) {

            NSRange range = [evaluatedObject rangeOfString:searchString options:NSCaseInsensitiveSearch];

            return range.location != NSNotFound;

        }];

        for (NSString* key in self.keys)

        {

            NSArray* matches = [self.names[key] filteredArrayUsingPredicate:predicate];

            [filteredNames addObjectsFromArray:matches];

        }

    }

    return YES;

}

@end
简单的TableView的更多相关文章
- IOS中TableView的使用(1) -创建一个简单的tableView
创建一个简单的tableView: #import <UIKit/UIKit.h> /*tableView 一定要遵守这两个协议: UITableViewDataSource,UITabl ...
- 【转】ios tableView那些事(一)创建一个简单的tableView
工作也有半年多了!几乎每个项目中的会用到tableview这个神奇而好用的控件,在学习和工作中都会看别人的博客!对我有很大的帮助,就如同站在巨人的肩膀上的感觉吧 哈哈!于是决定重新开始写博客,希望能帮 ...
- iOS学习笔记(5)——显示简单的TableView
1. 创建工程 创建一个新的Xcode工程命名为SimpleTableTest. 删除main.storyboard文件和info.plist中有关storyboard的相关属性. 按command+ ...
- tableView
Table View简单描述: 在iPhone和其他iOS的很多程序中都会看到Table View的出现,除了一般的表格资料展示之外,设置的属性资料往往也用到Table View,Table View ...
- iOS学习之Table View的简单使用
Table View简单描述: 在iPhone和其他iOS的很多程序中都会看到Table View的出现,除了一般的表格资料展示之外,设置的属性资料往往也用到Table View,Table View ...
- TableView不显示没内容的Cell怎么办?
类似这种,我不想让下面那些空的显示. 很简单: self.tableView.tableFooterView = [[UIView alloc] init]; 加完这句之后就变成了这样:
- Swift初窥--使用Swift实现TableView
完毕Swift的语法关之后.来点实际的Task,第一个任务是写一个tableview,使用cocoaTouch里tableview这个经常使用的控件. 创建project.选择Swift语言 首先是用 ...
- OC开发_代码片段——代码编写简单的tableViewCell
许久前写的简单的tableView例子,主要针对处理缓存.协议.数据源datasource.局部刷新等问题进行解析. 其实这是一篇不全面的记录,只是用来记录一些备忘的东西,更全面的是使用TablVie ...
- ***iOS学习之Table View的简单使用和DEMO示例(共Plain普通+Grouped分组两种)
Table View简单描述: 在iPhone和其他iOS的很多程序中都会看到Table View的出现,除了一般的表格资料展示之外,设置的属性资料往往也用到Table View,Table View ...
随机推荐
- 《暗黑世界V1.3》数据库表说明文档
<暗黑世界V1.3>数据库表说明文档 (下载地址:http://www.9miao.com/forum.php?mod=viewthread&tid=38821&highl ...
- recess----2.Controller里面取用request信息
事实上,第一个APP里面除了没有model,其它的都有用过了,但是需要单独拎出来看看清楚. Recess框架里面的controller就是一个典型的MVC框架的controller,它负责处理从浏览器 ...
- iOS 移动端生成工具开发
代码地址如下:http://www.demodashi.com/demo/11284.html 一.准备工作 编译环境 xcode 用于生成冗余架构代码, 实现生成零耦合架构 二.程序实现 上个月的一 ...
- pip换国内源
pip换国内源 1.国内常用源 阿里云 http://mirrors.aliyun.com/pypi/simple/ 中国科技大学 https://pypi.mirrors.ustc.edu. ...
- 为什么说Kindle难圆“中国梦”? 支撑Kindle模式成功的要素,在当下中国并不太具备
http://www.huxiu.com/article/12993/1.html 6月7日更新:Kindle入华终于尘埃落定,苏宁将在下午4点在北京30家店面同时销售,首批产品为Kindle Pap ...
- JBoss目录结构说明
http://www.blogjava.net/livery/articles/262544.html $JBOSS-HOME/bin: 放置各种脚本文件以及相关文件,包括jb ...
- [Java基础]List,Map集合总结
java.util包下: Collection |--List 接口 |----ArrayList |----LinkedList |----Vector |-----Stack |---Set ...
- HTML5使用canvas画图时,图片被自动放大模糊的问题
最近在研究canvas技术,发现一个问题,就是所画图像会随着画布大小自动变换大小.原因如下 <canvas id="cxt" style="width: 500px ...
- GNU--gprof使用总结
Added macros ACE_USES_GPROF which enables users to use gprof in a multithreaded environment with ACE ...
- C#线程同步技术(一) lock 语句
开篇语: 上班以后,烦恼少了,至少是没有什么好烦的了,只要负责好自己的工作就可以了,因此也有更多的时间去探索自己喜欢的程序.买回来的书已经看了一半,DEMO也敲了不少,昨晚终于在这里开BLOG,记录一 ...