Mybatis3源码笔记(八)小窥MyBatis-plus
前言
Mybatis-Plus是一个 MyBatis增强工具包,简化 CRUD 操作,在 MyBatis 的基础上只做增强不做改变,为简化开发、提高效率而生,号称无侵入,现在开发中比较常用,包括我自己现在的项目中ORM框架除使用JPA就是他了。
我好奇的是他是如何实现单表的CRUD操作的?
不看源码之前,其实我大致能猜一猜:因为他号称零入侵,只做增强,那我们就能简单的理解为他只是在上面做了一层封装类似于装饰器模式,简化了许多繁重的操作。
但是万变不离其宗,他最后应该还是执行MyBatis里Mapper注册MappedStatement这一套,所以他应该是内置了一套CRUD的SQL模板,根据不同的entity来生成对应的语句,然后注册到Mapper中用来执行。
带着猜想,我们具体跟下他的注册流程。
1.MybatisPlusAutoConfiguration
Mybatis-Plus依托于spring,一切都是用的ioc这一套。创建SqlSessionFactory从之前的SqlSessionFactoryBuilder主动创建改成ioc来控制创建。具体我们看一代码:
@Bean

    @ConditionalOnMissingBean

    public SqlSessionFactory sqlSessionFactory(DataSource dataSource) throws Exception {

        // TODO 使用 MybatisSqlSessionFactoryBean 而不是 SqlSessionFactoryBean

        MybatisSqlSessionFactoryBean factory = new MybatisSqlSessionFactoryBean();

        factory.setDataSource(dataSource);

        factory.setVfs(SpringBootVFS.class);

        if (StringUtils.hasText(this.properties.getConfigLocation())) {

            factory.setConfigLocation(this.resourceLoader.getResource(this.properties.getConfigLocation()));

        }

        //初始化configuration

        applyConfiguration(factory);

        if (this.properties.getConfigurationProperties() != null) {

            factory.setConfigurationProperties(this.properties.getConfigurationProperties());

        }

        if (!ObjectUtils.isEmpty(this.interceptors)) {

            factory.setPlugins(this.interceptors);

        }

        if (this.databaseIdProvider != null) {

            factory.setDatabaseIdProvider(this.databaseIdProvider);

        }

        if (StringUtils.hasLength(this.properties.getTypeAliasesPackage())) {

            factory.setTypeAliasesPackage(this.properties.getTypeAliasesPackage());

        }

        if (this.properties.getTypeAliasesSuperType() != null) {

            factory.setTypeAliasesSuperType(this.properties.getTypeAliasesSuperType());

        }

        if (StringUtils.hasLength(this.properties.getTypeHandlersPackage())) {

            factory.setTypeHandlersPackage(this.properties.getTypeHandlersPackage());

        }

        if (!ObjectUtils.isEmpty(this.typeHandlers)) {

            factory.setTypeHandlers(this.typeHandlers);

        }

        //获得mapper文件

        Resource[] mapperLocations = this.properties.resolveMapperLocations();

        if (!ObjectUtils.isEmpty(mapperLocations)) {

            factory.setMapperLocations(mapperLocations);

        }

        // TODO 对源码做了一定的修改(因为源码适配了老旧的mybatis版本,但我们不需要适配)

        Class<? extends LanguageDriver> defaultLanguageDriver = this.properties.getDefaultScriptingLanguageDriver();

        if (!ObjectUtils.isEmpty(this.languageDrivers)) {

            factory.setScriptingLanguageDrivers(this.languageDrivers);

        }

        Optional.ofNullable(defaultLanguageDriver).ifPresent(factory::setDefaultScriptingLanguageDriver);

        // TODO 自定义枚举包

        if (StringUtils.hasLength(this.properties.getTypeEnumsPackage())) {

            factory.setTypeEnumsPackage(this.properties.getTypeEnumsPackage());

        }

        // TODO 此处必为非 NULL

        GlobalConfig globalConfig = this.properties.getGlobalConfig();

        // TODO 注入填充器

        this.getBeanThen(MetaObjectHandler.class, globalConfig::setMetaObjectHandler);

        // TODO 注入主键生成器

        this.getBeanThen(IKeyGenerator.class, i -> globalConfig.getDbConfig().setKeyGenerator(i));

        // TODO 注入sql注入器

        this.getBeanThen(ISqlInjector.class, globalConfig::setSqlInjector);

        // TODO 注入ID生成器

        this.getBeanThen(IdentifierGenerator.class, globalConfig::setIdentifierGenerator);

        // TODO 设置 GlobalConfig 到 MybatisSqlSessionFactoryBean

        factory.setGlobalConfig(globalConfig);

        return factory.getObject();

    }
代码比较简单,再加上是国人开发的框架,在关键节点上有一定的注释,所以看上去还算是轻松加愉快。这个方法基本上就是MybatisSqlSessionFactoryBean的初始化操作。
我们主要是看Mapper的生成,所以其它的放一旁,所以我们基本最在意的应该是注入sql注入器this.getBeanThen(ISqlInjector.class, globalConfig::setSqlInjector) 。
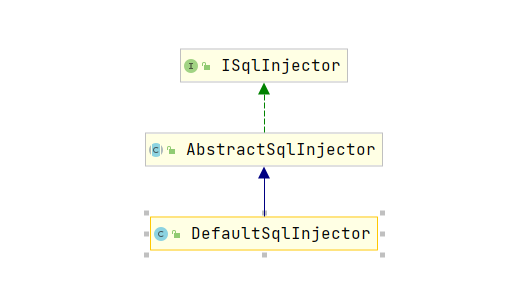
2.ISqlInjector(SQL自动注入器接口)
public interface ISqlInjector {

    /**

     * 检查SQL是否注入(已经注入过不再注入)

     *

     * @param builderAssistant mapper 信息

     * @param mapperClass      mapper 接口的 class 对象

     */

    void inspectInject(MapperBuilderAssistant builderAssistant, Class<?> mapperClass);

}
public abstract class AbstractSqlInjector implements ISqlInjector {

    private static final Log logger = LogFactory.getLog(AbstractSqlInjector.class);

    @Override

    public void inspectInject(MapperBuilderAssistant builderAssistant, Class<?> mapperClass) {

        Class<?> modelClass = extractModelClass(mapperClass);

        if (modelClass != null) {

            String className = mapperClass.toString();

            Set<String> mapperRegistryCache = GlobalConfigUtils.getMapperRegistryCache(builderAssistant.getConfiguration());

            if (!mapperRegistryCache.contains(className)) {

                //获得CRUD一系列的操作方法

                List<AbstractMethod> methodList = this.getMethodList(mapperClass);

                if (CollectionUtils.isNotEmpty(methodList)) {

                    //取得对应TableEntity

                    TableInfo tableInfo = TableInfoHelper.initTableInfo(builderAssistant, modelClass);

                    // 循环注入自定义方法

                    methodList.forEach(m -> m.inject(builderAssistant, mapperClass, modelClass, tableInfo));

                } else {

                    logger.debug(mapperClass.toString() + ", No effective injection method was found.");

                }

                mapperRegistryCache.add(className);

            }

        }

    }
/**

 * SQL 默认注入器

 *

 * @author hubin

 * @since 2018-04-10

 */

public class DefaultSqlInjector extends AbstractSqlInjector {

    @Override

    public List<AbstractMethod> getMethodList(Class<?> mapperClass) {

        return Stream.of(

            new Insert(),

            new Delete(),

            new DeleteByMap(),

            new DeleteById(),

            new DeleteBatchByIds(),

            new Update(),

            new UpdateById(),

            new SelectById(),

            new SelectBatchByIds(),

            new SelectByMap(),

            new SelectOne(),

            new SelectCount(),

            new SelectMaps(),

            new SelectMapsPage(),

            new SelectObjs(),

            new SelectList(),

            new SelectPage()

        ).collect(toList());

    }

}
ISqlInjector接口只有一个inspectInject方法来提供SQL注入的操作,在AbstractSqlInjector抽象类来提供具体的操作,最终对外的默认实现类是DefaultSqlInjector。
看到这,通过上面的注释,先是不是跟我们最开始的猜想已经有点眉目了?
我们简单看下SelectOne操作。
public class SelectOne extends AbstractMethod {

    @Override

    public MappedStatement injectMappedStatement(Class<?> mapperClass, Class<?> modelClass, TableInfo tableInfo) {

        SqlMethod sqlMethod = SqlMethod.SELECT_ONE;

        SqlSource sqlSource = languageDriver.createSqlSource(configuration, String.format(sqlMethod.getSql(),

            sqlFirst(), sqlSelectColumns(tableInfo, true), tableInfo.getTableName(),

            sqlWhereEntityWrapper(true, tableInfo), sqlComment()), modelClass);

        return this.addSelectMappedStatementForTable(mapperClass, getMethod(sqlMethod), sqlSource, tableInfo);

    }

}
上面就是具体生成MappedStatement的地方,细节就不说了,其实追踪到最后都是一跟之前篇章的分析是一样的。
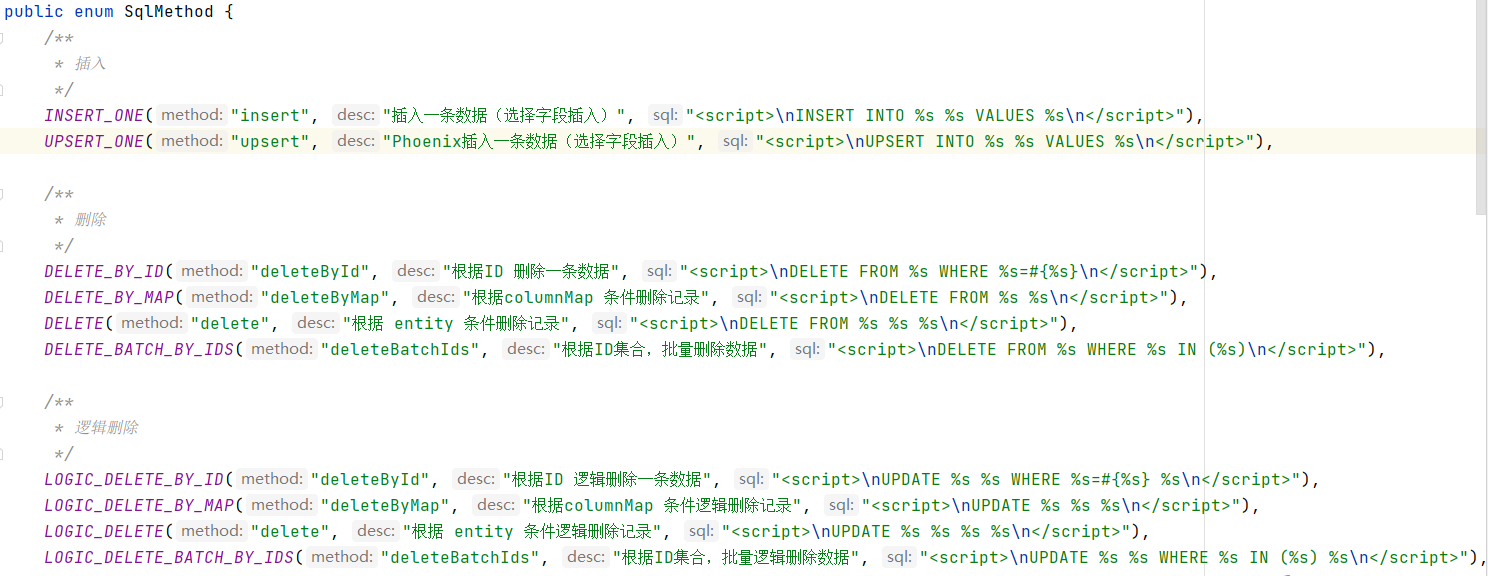
我们主要是看SqlMethod.SELECT_ONE就是框架中自定义SQL的地方。我们打开SqlMethod就可以看到全部的SQL语句。
其实看到这,我们就大概了解了整个单表CRUD生成的方法,其实如果我们想要实现自己的类似的自定义SQL,就可以实现AbstractSqlInjector抽象类。
生成自己的DefaultSqlInjector,然后在仿照框架的写法,实现自己的injectMappedStatement方法,这样就可以了。
3.inspectInject的调用
分析完上面的重头戏,我们正常还是要看下inspectInject在哪被调用的,直接跟跟踪下代码,我们就能轻易的追踪到代码调用的地方,MybatisConfiguration中addMapper的时候会调用。
我们直接跳到调用的地方。

而调用addMapper的地方,第一个我们很容易找到,就是在buildSqlSessionFactory里解析mapperLocations的时候。这一块的代码基本上就是之前的xml解析这一套,跟之前的mybatis解析是差不多的,
所以就不累述了。
...

        if (this.mapperLocations != null) {

            if (this.mapperLocations.length == 0) {

                LOGGER.warn(() -> "Property 'mapperLocations' was specified but matching resources are not found.");

            } else {

                for (Resource mapperLocation : this.mapperLocations) {

                    if (mapperLocation == null) {

                        continue;

                    }

                    try {

                        XMLMapperBuilder xmlMapperBuilder = new XMLMapperBuilder(mapperLocation.getInputStream(),

                            targetConfiguration, mapperLocation.toString(), targetConfiguration.getSqlFragments());

                        xmlMapperBuilder.parse();

                    } catch (Exception e) {

                        throw new NestedIOException("Failed to parse mapping resource: '" + mapperLocation + "'", e);

                    } finally {

                        ErrorContext.instance().reset();

                    }

                    LOGGER.debug(() -> "Parsed mapper file: '" + mapperLocation + "'");

                }

            }

...
重头戏到了,xml的解析这一套我们都找到了,那那些没有配置xml的mapper接口呢?他是如何注册的?
4.MybatisPlusAutoConfiguration
其实通过打断点,我们是能找到调用addMapper的地方,就在MapperFactoryBean中的checkDaoConfig方法中。

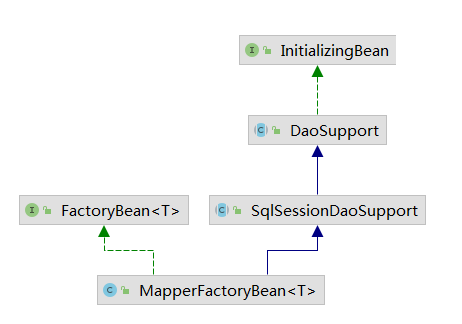
当时就懵逼了,mapper接口是怎么变成MapperFactoryBean,FactoryBean用来spring里用来bean封装这一套我们是理解的,关键是我们的mapper接口在哪进行转换的呢?
首先分析下我们的Mapper接口是怎么被发现的?这么一想,我就立刻想到了在启动类上的@MapperScan(basePackages = {"com.xx.dao"}),这个@MapperScan注解就是扫描对应包下面的mapper进行注册的。
@Retention(RetentionPolicy.RUNTIME)

@Target(ElementType.TYPE)

@Documented

@Import(MapperScannerRegistrar.class)

@Repeatable(MapperScans.class)

public @interface MapperScan {

...
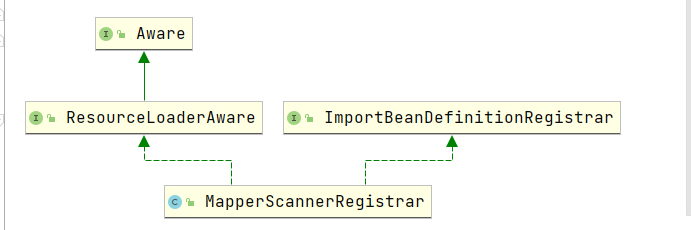
打开我们就发现了MapperScannerRegistrar类,它实现了ImportBeanDefinitionRegistrar接口,在registerBeanDefinitions方法中进行手动注册bean的操作
 void registerBeanDefinitions(AnnotationMetadata annoMeta, AnnotationAttributes annoAttrs,

      BeanDefinitionRegistry registry, String beanName) {

    BeanDefinitionBuilder builder = BeanDefinitionBuilder.genericBeanDefinition(MapperScannerConfigurer.class);

    builder.addPropertyValue("processPropertyPlaceHolders", true);

    ...

    ...

    builder.addPropertyValue("basePackage", StringUtils.collectionToCommaDelimitedString(basePackages));

    registry.registerBeanDefinition(beanName, builder.getBeanDefinition());

  }
终于找到了根源了: MapperScannerConfigurer。
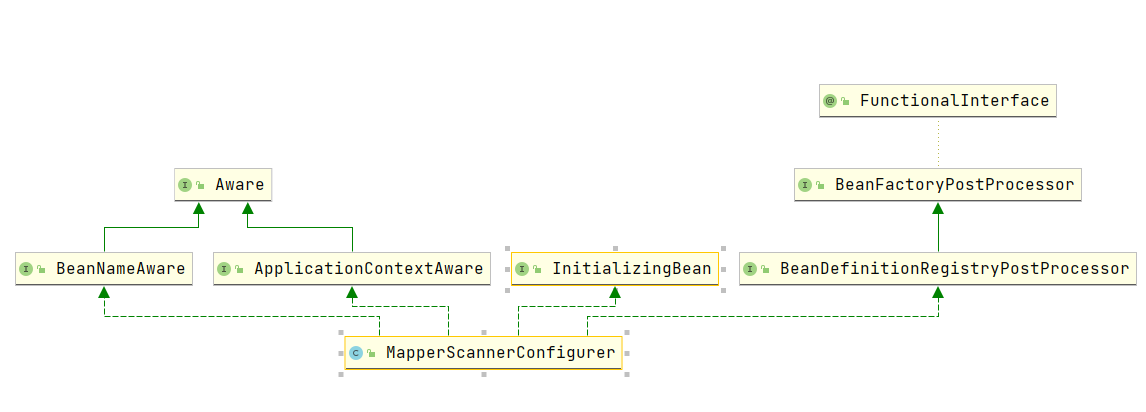
我们看下这个类的注释:BeanDefinitionRegistryPostProcessor从基包开始递归搜索接口,并将其注册为MapperFactoryBean 。 请注意,只有具有至少一种方法的接口才会被注册; 具体的类将被忽略。
从上面这段话,我们就大致知道他的作用,他实现了BeanDefinitionRegistryPostProcessor接口,在postProcessBeanDefinitionRegistry里对所有的package下扫描到的未实例但已注册的bean进行封装处理。具体我们看下代码:
  @Override

  public void postProcessBeanDefinitionRegistry(BeanDefinitionRegistry registry) {

    if (this.processPropertyPlaceHolders) {

      processPropertyPlaceHolders();

    }

    ClassPathMapperScanner scanner = new ClassPathMapperScanner(registry);

    scanner.setAddToConfig(this.addToConfig);

    scanner.setAnnotationClass(this.annotationClass);

    scanner.setMarkerInterface(this.markerInterface);

    scanner.setSqlSessionFactory(this.sqlSessionFactory);

    scanner.setSqlSessionTemplate(this.sqlSessionTemplate);

    scanner.setSqlSessionFactoryBeanName(this.sqlSessionFactoryBeanName);

    scanner.setSqlSessionTemplateBeanName(this.sqlSessionTemplateBeanName);

    scanner.setResourceLoader(this.applicationContext);

    scanner.setBeanNameGenerator(this.nameGenerator);

    scanner.setMapperFactoryBeanClass(this.mapperFactoryBeanClass);

    if (StringUtils.hasText(lazyInitialization)) {

      scanner.setLazyInitialization(Boolean.valueOf(lazyInitialization));

    }

    scanner.registerFilters();

    scanner.scan(

        StringUtils.tokenizeToStringArray(this.basePackage, ConfigurableApplicationContext.CONFIG_LOCATION_DELIMITERS));

  }
postProcessBeanDefinitionRegistry 方法里注册了一个ClassPathBeanDefinitionScanner,一个扫描器。它通过basePackage, annotationClass或markerInterface注册markerInterface 。 如果指定了annotationClass和/或markerInterface ,则仅搜索指定的类型(将禁用搜索所有接口)。作用很明显了,在我们这的作用就是通过basePackage来扫描包内的所有mapperbeans。
最后一步的scan操作,我们来看下操作。
最终再说下所有mapper注入的地方,在ServiceImpl里:

Mybatis3源码笔记(八)小窥MyBatis-plus的更多相关文章
- Tomcat8源码笔记(八)明白Tomcat怎么部署webapps下项目
以前没想过这么个问题:Tomcat怎么处理webapps下项目,并且我访问浏览器ip: port/项目名/请求路径,以SSM为例,Tomcat怎么就能将请求找到项目呢,项目还是个文件夹类型的? Tom ...
- Mybatis3源码笔记(一)环境搭建
1. 源码下载 地址:https://github.com/mybatis/mybatis-3.git. 国内访问有时确实有点慢,像我就直接先fork.然后从git上同步到国内的gitte上,然后在i ...
- Mybatis3源码笔记(六)SqlSession执行过程
前几篇大致分析了初始化的过程,今天打算走一个SqlSession具体执行过程. @Test void shouldSelectAllAuthors() { try (SqlSession sessio ...
- Mybatis3源码笔记(七)Plugin
1.Mybatis3的插件其实主要是用到了责任链和动态代理两种模式相结合而生成的.下面我们看一个例子,在执行所有update操作时,执行一个小小的测试输出. @Intercepts({@Signatu ...
- Mybatis3源码笔记(四)Configuration(续)
1.pluginElement(root.evalNode("plugins")) 解析plugins节点(注册interceptorChain里记录对应的拦截器) private ...
- Mybatis3源码笔记(三)Configuration
1. XMLConfigBuilder 上一篇大致介绍了SqlSession的生成.在DefaultSqlSessionFactory的构造函数中就提到了Configuration这个对象.现在我们来 ...
- Mybatis3源码笔记(二)SqlSession
1. 核心层次 2. SqlSession 先从顶层的SqlSession接口开始说起.SqlSession是MyBatis提供的面向用户的API,表示和数据库的会话对象,用于完成对数据库的一系列CR ...
- Mybatis3源码笔记(五)mapperElement
1.四种解析mapper方式 : package,resource,url,class. <mappers> <mapper resource="org/apache/ib ...
- Tomcat8源码笔记(三)Catalina加载过程
之前介绍过 Catalina加载过程是Bootstrap的load调用的 Tomcat8源码笔记(二)Bootstrap启动 按照Catalina的load过程,大致如下: 接下来一步步分析加载过程 ...
随机推荐
- 创建一个springboot项目
进入https://start.spring.io/ 再点击GENERATE,下载解压即可 注意配置好阿里云的仓库镜像,免得依赖无法下载 不下载最新版springboot是因为我在测试中遇到了问题,貌 ...
- MapString转Map
当把map使用toString方法转换后,如何再转换为map对象呢?方法很简单,把字符串进行截取,依次存放到新的map中: public static Map<String,Object> ...
- 调度场算法&&中缀表达式=>后缀表达式
#include<stdio.h> #include<string.h> int main(void){ char ch,stro[1001],stack[1001]; int ...
- RabbitMQ(二) Java使用RabbitMQ
2-1 RabbitMQ 生产者消息发送 创建 Maven 项目 Send 加入依赖 <dependency> <groupId>com.rabbitmq</groupI ...
- JVM之类加载器子系统
类加载器子系统 作用 负责从文件系统或网络系统中加载class文件,class文件在开头有特殊的标记(魔术开头CA FE BA BE) ClassLoader只负责加载class文件,至于能否运行,由 ...
- CentOS安装libxml2报undefined reference to `gzopen64'
主要是记录一下安装时候踩的坑 CentOS在make libxml2的时候,会报这个错误 ./.libs/libxml2.so: undefined reference to `gzopen64' c ...
- Graylog日志管理单机部署、日志节点的Sidecar配置以及简单的警告事件邮件发送
应该是上个星期的上个星期,下了个任务,要做Graylog的部署以及文档,emmm....带log,肯定是和日志有关系了呗,不过也没听过啊,去搜了一下,确实,也不少帖子博客相关的都有安装部署,还是yum ...
- AI人脸匹对
人脸匹对 技术 调用到百度的AI接口,layui的图片上传,栅格化布局 核心代码 纯py代码运行 # encoding:utf-8 from aip import AipFace import bas ...
- 《Asp.Net Core3 + Vue3入坑教程》 - Vue 1.使用vue-cli创建vue项目
简介 <Asp.Net Core3 + Vue3入坑教程> 此教程适合新手入门或者前后端分离尝试者.可以根据图文一步一步进操作编码也可以选择直接查看源码.每一篇文章都有对应的源码 目录 & ...
- 关于IO
前言 IO在计算机中指Input/Output,也就是输入和输出.由于程序和运行时数据是在内存中驻留,由CPU这个超快的计算核心来执行,涉及到数据交换的地方,通常是磁盘.网络等,就需要IO接口.IO指 ...