Android实现入门界面布局
Android实现入门界面布局
开发工具:Andorid Studio 1.3
运行环境:Android 4.4 KitKat
代码实现
首先是常量的定义,安卓中固定字符串应该定义在常量中。
strings.xml
<resources>

    <string name="app_name">Exp1</string>

    <string name="title_activity_personal_info">PersonalInfo</string>

    <string name="welcome_info">Welcome to first Android Class</string>

    <string name="personal_info">个人信息</string>

    <string name="submit">提交</string>

    <string name="student_id">学号</string>

    <string name="name">姓名</string>

    <string name="man">男</string>

    <string name="woman">女</string>

    <string name="register">Register</string>

    <string name="login">Login</string>

    <string name="user">user:</string>

    <string name="input_hint">Input Your User Account Here</string>

    <string name="input_password">password:</string>

    <string name="pick_aspect">选择你的方向</string>

    <string name="pick_birthday">选择你的生日</string>

</resources>
color.xml
<?xml version="1.0" encoding="utf-8"?>

<resources>

    <color name="green">#0eff2e</color>

    <color name="purple">#ff18c5</color>

</resources>
arrays.xml
<?xml version="1.0" encoding="utf-8"?>

<resources>

    <string-array name="aspect">

        <item>移动</item>

        <item>软院</item>

        <item>管理</item>

        <item>政务</item>

        <item>环境</item>

    </string-array>

</resources>
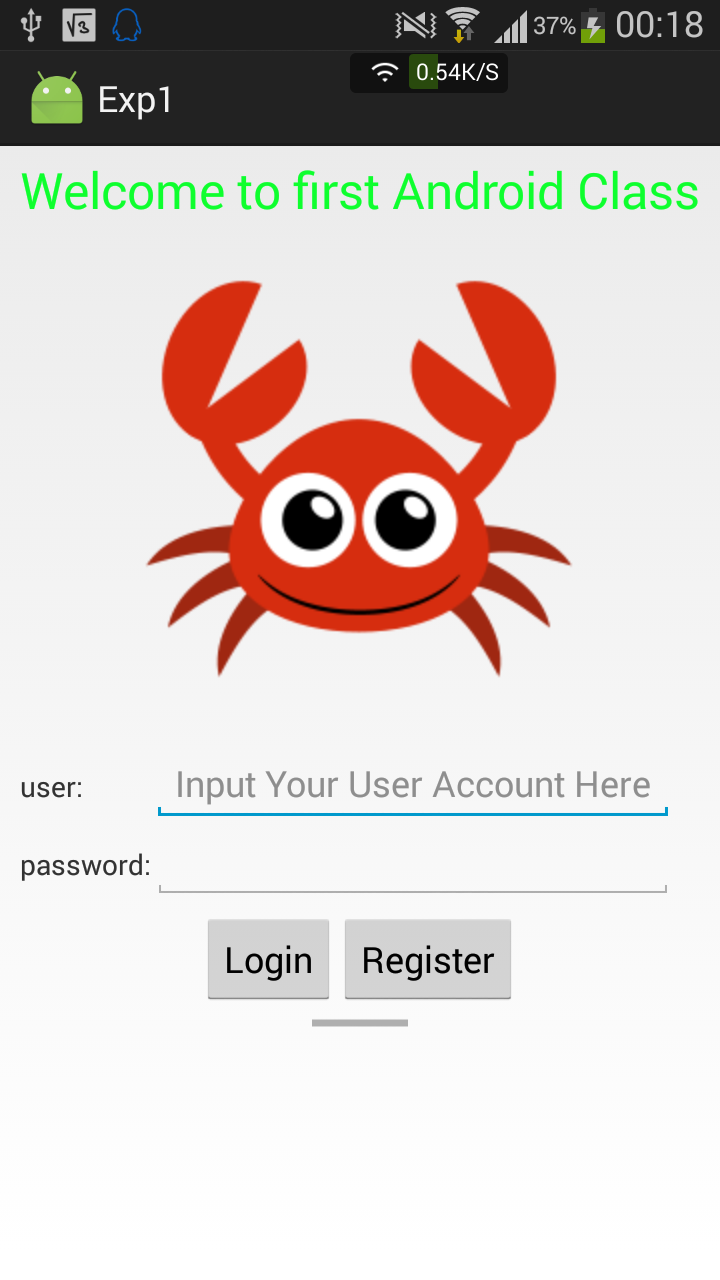
界面一:(LinearLayout、TableLayout)
<LinearLayout xmlns:android="http://schemas.android.com/apk/res/android"

    xmlns:tools="http://schemas.android.com/tools"

    android:layout_width="match_parent"

    android:layout_height="match_parent"

    android:paddingLeft="5dp"

    android:paddingRight="5dp"

    android:paddingTop="5dp"

    android:paddingBottom="5dp"

    android:orientation="vertical"

    tools:context=".MainActivity">

    <TextView

        android:layout_width="match_parent"

        android:layout_height="wrap_content"

        android:textAppearance="?android:attr/textAppearanceSmall"

        android:text="@string/welcome_info"

        android:id="@+id/title"

        android:textColor="@color/green"

        android:textSize="25sp"

        android:gravity="center"/>

    <ImageView

        android:layout_width="match_parent"

        android:layout_height="wrap_content"

        android:id="@+id/logoImage"

        android:src="@mipmap/crab"/>

    <TableLayout

        android:layout_width="match_parent"

        android:layout_height="wrap_content"

        android:paddingLeft="5dp"

        android:paddingRight="5dp"

        android:paddingTop="5dp"

        android:paddingBottom="5dp"

        >

        <TableRow>

            <TextView

                android:layout_width="wrap_content"

                android:layout_height="wrap_content"

                android:text="@string/user"

                />

            <EditText

                android:layout_height="wrap_content"

                android:layout_width="fill_parent"

                android:hint="@string/input_hint"/>

        </TableRow>

        <TableRow>

            <TextView

                android:layout_width="wrap_content"

                android:layout_height="wrap_content"

                android:text="@string/input_password"/>

            <EditText

                android:layout_width="fill_parent"

                android:layout_height="wrap_content"/>

        </TableRow>

    </TableLayout>

    <LinearLayout

        android:orientation="horizontal"

        android:layout_width="match_parent"

        android:layout_height="wrap_content"

        android:gravity="center">

        <Button

            android:layout_width="wrap_content"

            android:layout_height="wrap_content"

            android:text="@string/login"

            android:id="@+id/btn_login" />

        <Button

            android:layout_width="wrap_content"

            android:layout_height="wrap_content"

            android:text="@string/register"

            android:id="@+id/btn_register" />

    </LinearLayout>

    <ProgressBar

        style="?android:attr/progressBarStyleHorizontal"

        android:layout_width="wrap_content"

        android:layout_height="wrap_content"

        android:id="@+id/progressBar"

        android:layout_gravity="center_horizontal" />

</LinearLayout>
注意:
- 外层的定义可以使用LinearLayout,加上属性android:orientation="vertical",就变成了线性垂直布局,这是安卓开发中比较常用的基本布局。
- TableLayout中实现占据一行剩余空间还有另一种实现方法,
<EditText android:layout_width="0dp" android:layout_weight="1" />,重点就在于layout_weight这上面。 - 两个button水平居中的实现使用的是嵌套布局,也就是在Layout中还有Layout,但要合理使用Layout,避免区域重复渲染,安卓开发者人员调试工具中可以看到渲染情况。
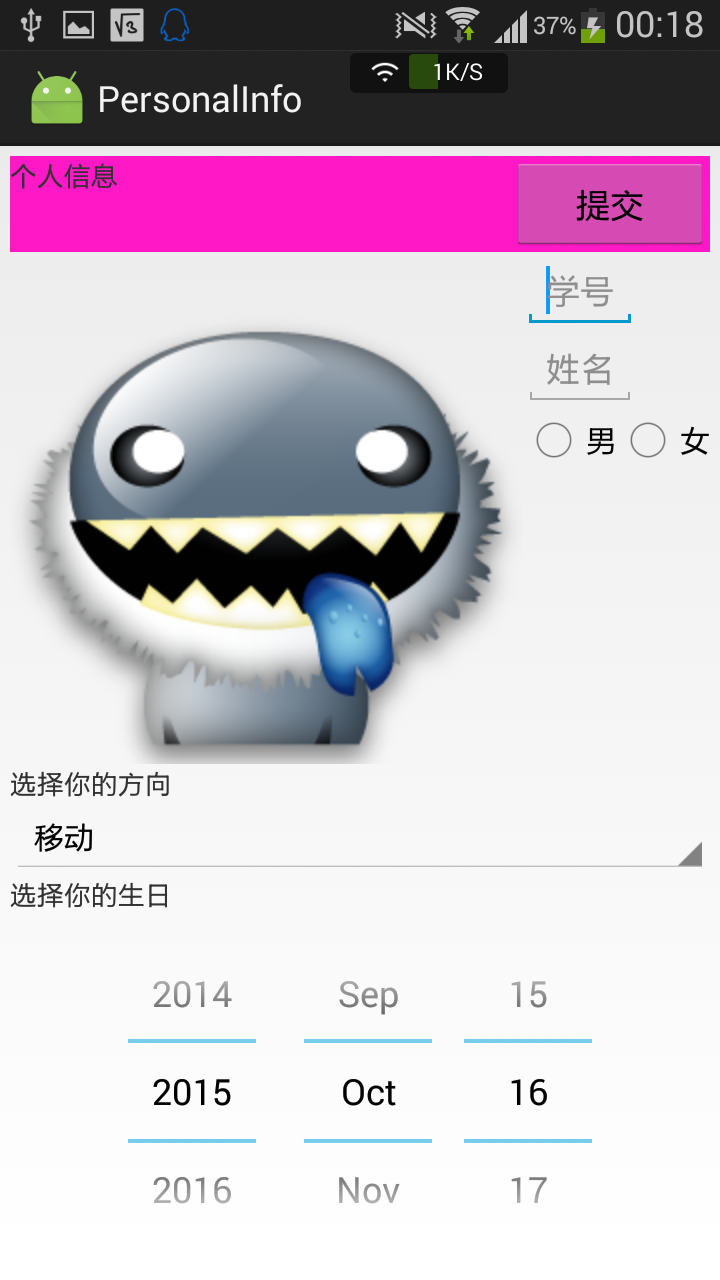
界面二:
<LinearLayout xmlns:android="http://schemas.android.com/apk/res/android"

    xmlns:tools="http://schemas.android.com/tools"

    android:layout_width="match_parent"

    android:layout_height="match_parent"

    android:paddingLeft="5dp"

    android:paddingRight="5dp"

    android:paddingTop="5dp"

    android:paddingBottom="5dp"

    android:orientation="vertical">

    <FrameLayout

        android:layout_width="match_parent"

        android:layout_height="wrap_content"

        android:background="@color/purple">

        <TextView

            android:layout_width="wrap_content"

            android:layout_height="wrap_content"

            android:text="@string/personal_info"/>

        <Button

            android:layout_width="wrap_content"

            android:layout_height="wrap_content"

            android:layout_gravity="end"

            android:text="@string/submit"

            android:minWidth="100dp"

            android:id="@+id/submit"/>

    </FrameLayout>

    <LinearLayout

        android:orientation="horizontal"

        android:layout_width="match_parent"

        android:layout_height="wrap_content">

        <ImageView

            android:layout_width="wrap_content"

            android:layout_height="wrap_content"

            android:src="@mipmap/avatar"

            android:id="@+id/avatar" />

        <LinearLayout

            android:layout_width="wrap_content"

            android:layout_height="wrap_content"

            android:orientation="vertical">

            <EditText

                android:layout_width="wrap_content"

                android:layout_height="wrap_content"

                android:hint="@string/student_id"/>

            <EditText

                android:layout_width="wrap_content"

                android:layout_height="wrap_content"

                android:hint="@string/name"/>

            <RadioGroup

                android:layout_width="wrap_content"

                android:layout_height="wrap_content"

                android:orientation="horizontal">

                <RadioButton

                    android:layout_width="wrap_content"

                    android:layout_height="wrap_content"

                    android:text="@string/man"/>

                <RadioButton

                    android:layout_width="wrap_content"

                    android:layout_height="wrap_content"

                    android:text="@string/woman"/>

            </RadioGroup>

        </LinearLayout>

    </LinearLayout>

    <TextView

        android:layout_width="fill_parent"

        android:layout_height="wrap_content"

        android:text="@string/pick_aspect"/>

    <Spinner

        android:layout_width="fill_parent"

        android:layout_height="wrap_content"

        android:id="@+id/aspect"

        android:entries="@array/aspect"

        android:prompt="@string/pick_aspect">

    </Spinner>

    <TextView

        android:layout_width="fill_parent"

        android:layout_height="wrap_content"

        android:text="@string/pick_birthday"/>

    <DatePicker

        android:layout_width="fill_parent"

        android:layout_height="wrap_content"

        android:calendarViewShown="false">

    </DatePicker>

</LinearLayout>
注意:
- FrameLayout会将所有的子元素放在整个布局的左上角,后面的子元素会直接覆盖前面的子元素,因此需要添加layout_gravity参数控制方向。
效果图
由于是真机测试,因此给两个按钮加入了跳转响应,这些内容在后面的博客中再讲实现。
一些总结
学到的东西:
- android:orientation="vertical"
布局的方向 - android:layout_width="match_parent"
和父级元素同样的宽度 - android:layout_width="fill_parent"
填充父级元素剩余的宽度 - android:layout_height="wrap_content"
根据内容来决定高度 - android:gravity="center"
决定自动靠拢的位置 - android:textColor="@color/green"
修改文本中文字的颜色 - android:src="@mipmap/crab"
图片的源地址 - android:layout_gravity="center_horizontal"
水平居中 - android:minWidth="100dp"
最小的宽度设置 - android:background="@color/purple"
布局控件的底色 - android:entries="@array/aspect"
Spinner控件的静态内容 - android:calendarViewShown="false"
DataPicker隐藏日历的方法
不同的Layout的简要不同:
| Layout名称 | 区别 |
|---|---|
| LinearLayout | 按照水平或垂直的顺序将子元素(可以是控件或布局)依次按照顺序排列,每一个元素都位于前面一个元素之后 |
| TableLayout | 适用于多行多列的布局格式,每个TableLayout是由多个TableRow组成,一个TableRow就表示TableLayout中的每一行,这一行可以由多个子元素组成 |
| RelativeLayout | 按照子元素之间的位置关系完成布局 |
| FrameLayout | 将所有的子元素放在整个界面的左上角,后面的子元素直接覆盖前面的子元素 |
| AbsoluteLayou | 将所有的子元素通过设置android:layout_x 和 android:layout_y属性,将子元素的坐标位置固定下来 |
| GridLayout | 使用虚细线将布局划分为行、列和单元格,也支持一个控件在行、列上都有交错排列 |
工程下载
传送门:下载
Android实现入门界面布局的更多相关文章
- Android 你知道界面布局嵌套多少层之后会Crash吗
我们先放一张Hierarchy Viewer的图:(模拟器Android4.4) 看到数字6了吗,那个RelativeLayout是MainActivity的根ViewGroup, 而在Relativ ...
- android 入门 001 (界面布局)
学android 首先学会怎么布局界面,我开始是学.net的,因工作需要学习一下安卓,外行写的不好,请多多见谅指教 .这一篇文章然我们来学习一下四种布局吧! RelativeLayout(相对布局) ...
- Android新手入门2016(7)--布局
布局,这个在服务端变成是没有的,也是服务端的人学习client的一道坎吧. 曾经用cocos2d-x写小游戏的时候就是这个非常难懂,或者能用,可是理解不多的话,非常难写出好的布局,难以适合商业化的应用 ...
- 2013 duilib入门简明教程 -- 界面布局(9)
上一个教程实现的标题栏代码中,并没有看到处理自适应窗口大小的代码,但是窗口大小变化后,按钮的位置会跟着变化,这是因为我们将按钮放到了HorizontalLayout.VerticalLayou ...
- Android界面布局基本知识简述
Android手机操作系统在模拟器中进行相关的编写,可以帮助我们实现各种功能需求.尤其是在界面的操作方面显得更为突出.在这里我们就可以对Android界面布局的相关操作来对这方面的知识进行一个深入的了 ...
- Android基础总结(3)——UI界面布局
Android的UI设计有好几种界面程序编写方式.大体上可分为两大类:一类是利用可视化工具来进行,允许你进行拖拽控件来进行布局:还有一类是编写xml文档来进行布局.这两种方法可以相互转换. 1.常见的 ...
- [Android 性能优化系列]降低你的界面布局层次结构的一部分
大家假设喜欢我的博客,请关注一下我的微博,请点击这里(http://weibo.com/kifile),谢谢 转载请标明出处(http://blog.csdn.net/kifile),再次感谢 原文地 ...
- duilib入门简明教程 -- 界面布局(9)
上一个教程实现的标题栏代码中,并没有看到处理自适应窗口大小的代码,但是窗口大小变化后,按钮的位置会跟着变化,这是因为我们将按钮放到了HorizontalLayout.VerticalLayou ...
- duilib入门简明教程 -- 界面布局(9) (转)
原文转自:http://www.cnblogs.com/Alberl/p/3343806.html 上一个教程实现的标题栏代码中,并没有看到处理自适应窗口大小的代码,但是窗口大小变化后,按钮的 ...
随机推荐
- dell N1500 安全配置
http://www.dell.com/Support/Article/us/en/19/HOW10832 Setting a management IP address A reachable IP ...
- Dynamics AX 4.0 多表looup
project rar:http://files.cnblogs.com/files/sxypeace/PrivateProject_MutilTableLookupOnCtronl.rar 在AX ...
- mysql 常用sql操作语句
获取数据库里所有表 SELECT TABLE_NAME,TABLE_ROWS FROM INFORMATION_SCHEMA.TABLES WHERE TABLE_SCHEMA='数据库名' 获取表里 ...
- jQuery源码的几篇文章
http://lingyu.wang/#/post/2014/5/8/read-jq-src-1 http://lingyu.wang/#/post/2014/5/10/read-jq-src-2 h ...
- Android OptionMenu
1.Java package com.fish.helloworld; import android.app.Activity; import android.content.Context; imp ...
- Linux下切换用户
0x01 使用命令[su username] 这种方法能切换普通用户和root用户 0x02 从普通用户切换到root用户,还可以使用命令[sudo su] 0x03 su 是switch user的 ...
- shp地图解析(不用AE)
AE太重型,还收费,如果只是加载地图作为底图,可以用纯C#实现.线类型用得最多,以下是线类型的数据结构: 总体架构 文件头 记录头 记录内容 记录头 记录内容 ............ 记录头 记录内 ...
- DirectDraw打造极速图形引擎(Alpha混合)
显然DirectDraw是Windows下写2D图形程序的最好选择,虽然Direct3D也可以写,但是没DirectDraw简单方便,特别对于初学者,一来就接触那么多函数和参数总不是件愉快的事,所以我 ...
- Summarize code for the three presentation experiments
Image Picker Controller @IBAction func experiment() { let controller = UIImagePickerController() sel ...
- Silverlight读取Zip文件中的图片与视频
首先看看Demo的截图: 下面我将一步步展示实现这个Demo的过程,这个需求就是读出Zip文件中的图片与视频. Demo整体架构: 首先我们准备几张图片和视频,然后将其压缩至resource.zip文 ...