win10 + gtx1060 + cuda8.0 + caffe + vs2013
一. 安装cuda8.0
1)先去官网下载cuda8.0 https://developer.nvidia.com/cuda-toolkit
2)下载完之后进行安装,安装时间有点长,请耐心等待,默认是安装在c盘目录下
安装完后会生成两个系统变量:
CUDA_PATH    C:\Program Files\NVIDIA GPU Computing Toolkit\CUDA\v8.

CUDA_PATH_V8_0    C:\Program Files\NVIDIA GPU Computing Toolkit\CUDA\v8.
3)测试是否成功 : 进入cmd,输入 nvcc -V 命令,如图所示
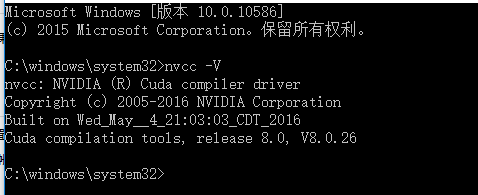
表示cuda安装成功
4)进入sdk实例安装目录
C:\ProgramData\NVIDIA Corporation\CUDA Samples\v8.
点击Samples_vs2013.sln文件打开vs2013执行
运行Samples_vs2013.sln文件就会出现如图所示
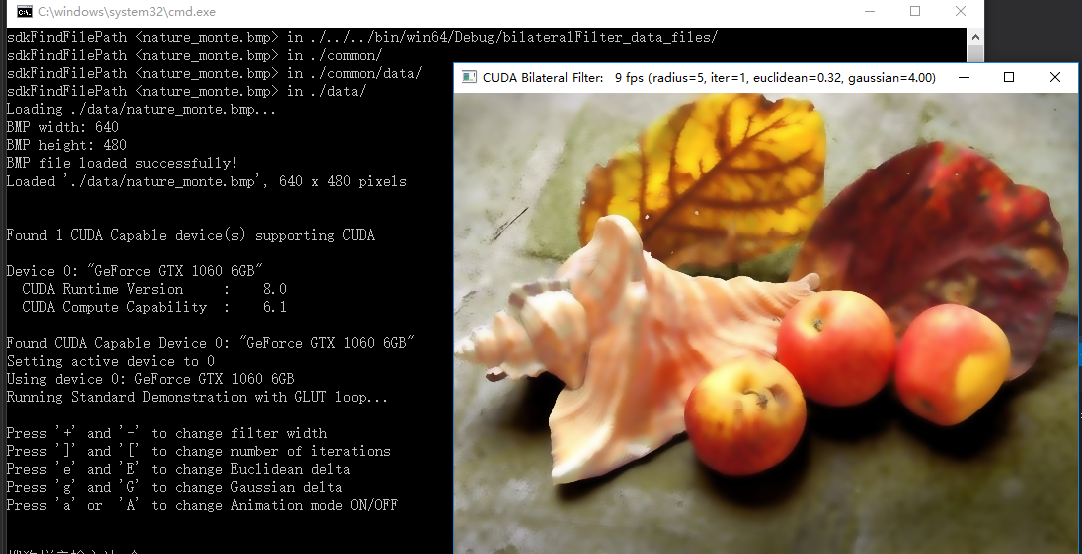
表明测试成功
或者试试
nvcc -V
二. 下载安装CAFFE
1)拷贝 .\windows\CommonSettings.props.example 到 .\windows\CommonSettings.props
默认情况下Windows版本caffe需要 CUDA 和 cuDNN 库,你也可以在.\windows\CommonSettings.props 里禁用他们。
默认情况下matlab/Python支持被没有开启的,你也可以通过修改 .\windows\CommonSettings.props 来启用。
2)如果你不需要CUDA,你可以安装CPU_ONLY版本:编辑文件.\windows\CommonSettings.props,设置CpuOnlyBuild 为 true,UseCuDNN为false。
3)cuDNN V5 下载 (不使用可以跳过)
解压下载的zip文件到 %CUDA_PATH% (这个环境变量是由上一步安装的CUDA设置的)。或者你也可以解压到任何位置, 然后再 .\windows\CommonSettings.props 里设置 CuDnnPath 来指向解压到的目录。
你可以修改.\windows\CommonSettings.props文件,设置 UseCuDNN 为 false 来禁用cuDNN。
https://developer.nvidia.com/rdp/cudnn-download
4)Python
为了编译Caffe Python封装库,需要.\windows\CommonSettings.props文件,设置 PythonSupport为 true。
下载 Anaconda2 64-bit Windows installer: Anaconda2 。
安装完后我们需要将.\windows\CommonSettings.props 中python PythonDir 改成我们自己的
接下来安装 google.protoc
编译python支持库后,你还需要执行如下之一才能在python里使用:
- 设置环境变量
PythonPath,值为<caffe_root>\Build\x64\Release\pycaffe,或者 - 复制目录
<caffe_root>\Build\x64\Release\pycaffe\caffe到<python_root>\lib\site-packages目录
注意:python 不存在debug库
5).Matlab
编译Matlab支持,修改.\windows\CommonSettings.props文件,设置 MatlabSupport 为true,MatlabDir 为 Matlab安装根目录。
    </PropertyGroup>

    <PropertyGroup Condition="'$(MatlabSupport)'=='true'">

        <MatlabDir>C:\Program Files\MATLAB\R2014a</MatlabDir>

        <LibraryPath>$(MatlabDir)\extern\lib\win64\microsoft;$(LibraryPath)</LibraryPath>

        <IncludePath>$(MatlabDir)\extern\include;$(MatlabDir);$(IncludePath)</IncludePath>

    </PropertyGroup>
注意:最近Microsoft 的github貌似更新了matcaffe中的caffe_.cpp文件,第十六行添加了对 gpu/mxGPUArray.h 的引用
修改matcaffe中的第十六行 #include"gpu/mxGPUArray.h" 中修改为
#include<toolbox/distcomp/gpu/extern/include/gpu/mxGPUArray.h>
编译Matlab支持库后,你还需要执行如下操作才能在matlab里使用:
- 添加生成的
matcaffe目录到 Matlab 搜索路径, - 添加
<caffe_root>\Build\x64\Debug到 系统环境变量PATH(不一定需要)
6)打开 Caffe.sln 解决方案
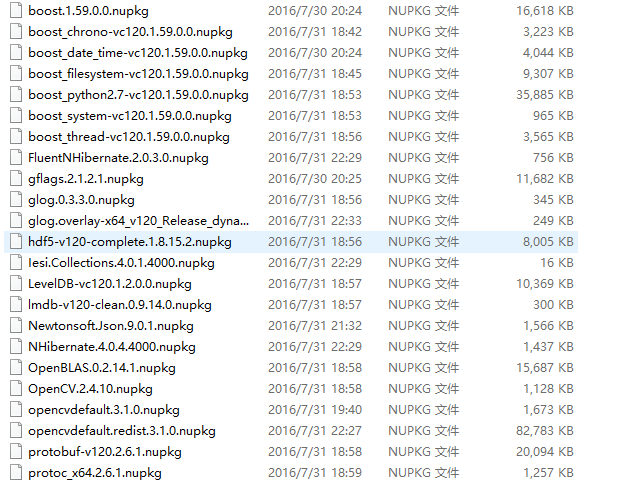
第三方Caffe依赖库被自动通过NuGet安装:
右键工程-》管理NuGet程序包,还原所有的包。原始使用的opencv是2.4.10版本(我卸掉它使用opencv3.1). 所有包会下载到
C:\Users\Administrator\AppData\Local\NuGet\Cache
这里是清单:
如果你将opencv改成了3.1注意要删除每个项目文件下 *.vcxproj 里有关opencv2.4.10的加载失败错误项。
如果某个包下载不了。。。那就参考这个吧
在项目中打开 工具->NuGet程序包管理器->控制台,并输入命令:Install-Package fluentnhibernate ,进行安装。
Install-Package boost_regex-vc120 -version 1.59 -Source C:\Users\Administrator\AppData\Local\NuGet\Cache\
7)编译
现在你可以开始编译工程文件了: .\windows\Caffe.sln
注意要先编译 libcaffe, 同时编译python时只能选Release
8)为了以后使用方便,我们将生成的exe路径放入环境目录path里
C:\caffe-master2\Build\x64\Debug
9) 为了使用caffe的sh脚本文件,我们需要安装 Git 和 wgetwin (将wget.exe放入C:\Windows\System32)
三. 安装Tensorflow
之前安装过python2.7,可是为了学习tensorflow,这里要安装下python3.5
1.首先,去下载地址(下载包含python3.5版本的Anaconda)
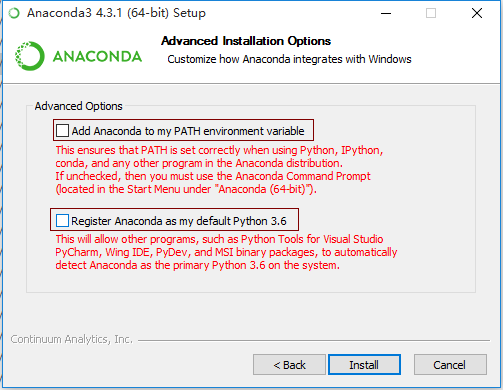
2. 安装过程和anaconda2类似,但是,安装的路径要设置在anaconda2的envs文件夹下,另起名,我起名为py3.
安装过程的不同之处在下图:
将环境变量修改了(安装结束后再改回去),然后
conda install ipython

conda install jupyter
3.完成后,检查是否安装成功,首先,cmd输入python,显示的之前的python版本(之前默认的是python版本)
python -V
我们想用3.5版本就需要激活,命令:
activate py3
4.安装Tensorflow
pip install setuptools --ignore-installed
这是指定安装tensorflow版本方式
pip install --ignore-installed --upgrade https://storage.googleapis.com/tensorflow/windows/gpu/tensorflow_gpu-1.2.1-cp36-cp36m-win_amd64.whl
这是利用conda安装方式,这种方式需要将环境变量修改了(安装结束后再改回去)
conda install -c https://conda.anaconda.org/jjhelmus tensorflow-gpu
这是官方建议的安装方式,会安装最新版
pip install -i https://pypi.tuna.tsinghua.edu.cn/simple --upgrade tensorflow-gpu
因为不同的版本对应着不同的cudnn所以用脚本 tensorflow_self_check.py 检查一遍
# Copyright 2015 The TensorFlow Authors. All Rights Reserved.

#

# Licensed under the Apache License, Version 2.0 (the "License");

# you may not use this file except in compliance with the License.

# You may obtain a copy of the License at

#

#     http://www.apache.org/licenses/LICENSE-2.0

#

# Unless required by applicable law or agreed to in writing, software

# distributed under the License is distributed on an "AS IS" BASIS,

# WITHOUT WARRANTIES OR CONDITIONS OF ANY KIND, either express or implied.

# See the License for the specific language governing permissions and

# limitations under the License.

# ==============================================================================

"""A script for testing that TensorFlow is installed correctly on Windows.

The script will attempt to verify your TensorFlow installation, and print

suggestions for how to fix your installation.

"""

import ctypes

import imp

import sys

def main():

  try:

    import tensorflow as tf

    print("TensorFlow successfully installed.")

    if tf.test.is_built_with_cuda():

      print("The installed version of TensorFlow includes GPU support.")

    else:

      print("The installed version of TensorFlow does not include GPU support.")

    sys.exit(0)

  except ImportError:

    print("ERROR: Failed to import the TensorFlow module.")

  candidate_explanation = False

  python_version = sys.version_info.major, sys.version_info.minor

  print("\n- Python version is %d.%d." % python_version)

  if not (python_version == (3, 5) or python_version == (3, 6)):

    candidate_explanation = True

    print("- The official distribution of TensorFlow for Windows requires "

          "Python version 3.5 or 3.6.")

  try:

    _, pathname, _ = imp.find_module("tensorflow")

    print("\n- TensorFlow is installed at: %s" % pathname)

  except ImportError:

    candidate_explanation = False

    print("""

- No module named TensorFlow is installed in this Python environment. You may

  install it using the command `pip install tensorflow`.""")

  try:

    msvcp140 = ctypes.WinDLL("msvcp140.dll")

  except OSError:

    candidate_explanation = True

    print("""

- Could not load 'msvcp140.dll'. TensorFlow requires that this DLL be

  installed in a directory that is named in your %PATH% environment

  variable. You may install this DLL by downloading Microsoft Visual

  C++ 2015 Redistributable Update 3 from this URL:

  https://www.microsoft.com/en-us/download/details.aspx?id=53587""")

  try:

    cudart64_80 = ctypes.WinDLL("cudart64_80.dll")

  except OSError:

    candidate_explanation = True

    print("""

- Could not load 'cudart64_80.dll'. The GPU version of TensorFlow

  requires that this DLL be installed in a directory that is named in

  your %PATH% environment variable. Download and install CUDA 8.0 from

  this URL: https://developer.nvidia.com/cuda-toolkit""")

  try:

    nvcuda = ctypes.WinDLL("nvcuda.dll")

  except OSError:

    candidate_explanation = True

    print("""

- Could not load 'nvcuda.dll'. The GPU version of TensorFlow requires that

  this DLL be installed in a directory that is named in your %PATH%

  environment variable. Typically it is installed in 'C:\Windows\System32'.

  If it is not present, ensure that you have a CUDA-capable GPU with the

  correct driver installed.""")

  cudnn5_found = False

  try:

    cudnn5 = ctypes.WinDLL("cudnn64_5.dll")

    cudnn5_found = True

  except OSError:

    candidate_explanation = True

    print("""

- Could not load 'cudnn64_5.dll'. The GPU version of TensorFlow

  requires that this DLL be installed in a directory that is named in

  your %PATH% environment variable. Note that installing cuDNN is a

  separate step from installing CUDA, and it is often found in a

  different directory from the CUDA DLLs. You may install the

  necessary DLL by downloading cuDNN 5.1 from this URL:

  https://developer.nvidia.com/cudnn""")

  cudnn6_found = False

  try:

    cudnn = ctypes.WinDLL("cudnn64_6.dll")

    cudnn6_found = True

  except OSError:

    candidate_explanation = True

  if not cudnn5_found or not cudnn6_found:

    print()

    if not cudnn5_found and not cudnn6_found:

      print("- Could not find cuDNN.")

    elif not cudnn5_found:

      print("- Could not find cuDNN 5.1.")

    else:

      print("- Could not find cuDNN 6.")

      print("""

  The GPU version of TensorFlow requires that the correct cuDNN DLL be installed

  in a directory that is named in your %PATH% environment variable. Note that

  installing cuDNN is a separate step from installing CUDA, and it is often

  found in a different directory from the CUDA DLLs. The correct version of

  cuDNN depends on your version of TensorFlow:

  * TensorFlow 1.2.1 or earlier requires cuDNN 5.1. ('cudnn64_5.dll')

  * TensorFlow 1.3 or later requires cuDNN 6. ('cudnn64_6.dll')

  You may install the necessary DLL by downloading cuDNN from this URL:

  https://developer.nvidia.com/cudnn""")

  if not candidate_explanation:

    print("""

- All required DLLs appear to be present. Please open an issue on the

  TensorFlow GitHub page: https://github.com/tensorflow/tensorflow/issues""")

  sys.exit(-1)

if __name__ == "__main__":

  main()
测试
import tensorflow as tf

h = tf.constant('Hello, Tensorflow!')

s = tf.Session()

print(s.run(h))
关闭3.5:
deactivate py3
四. 安装keras
pip install bcolz
如果安装有问题,就下载安装吧
pip install keras
安装结束后在此新建
C:\Users\MyPC\.keras\keras.json
这个文件中可以指定使用tensorflow还是theano
{

    "image_dim_ordering": "tf",

    "epsilon": 1e-07,

    "floatx": "float32",

    "image_data_format": "channels_last",

    "backend": "tensorflow"

}
{

    "image_dim_ordering": "th",

    "floatx": "float32",

    "epsilon": 1e-07,

    "backend": "theano",

    "image_data_format": "channels_last"

}
五. 安装PyTorch
安装官方建议:
conda install pytorch torchvision -c pytorch
但往往。。。安装pythorch的时候下载慢的一比,因此可以考虑离线安装
https://mirrors.tuna.tsinghua.edu.cn/anaconda/cloud/pytorch/win-64/
安装完以后可以验证下
import torch

import torchvision

print(torch.__version__)

print(torch.cuda.is_available())
简单练习

win10 + gtx1060 + cuda8.0 + caffe + vs2013的更多相关文章
- win10 + gtx1060 + cuda8.0 + caffe + vs2013 + Tensorflow + PyTorch
一. 安装cuda8.0 1)先去官网下载cuda8.0 https://developer.nvidia.com/cuda-toolkit 2)下载完之后进行安装,安装时间有点长,请耐心等待,默认 ...
- Ubuntu16.04 + gtx1060 + cuda8.0 + cudnn5.1 + caffe + Theano + Tensorflow
参考 ubuntu16.04+gtx1060+cuda8.0+caffe安装.测试经历 ,细节处有差异. 首先说明,这是在台式机上的安装测试经历,首先安装的win10,然后安装ubuntu16.04双 ...
- win10+vs2013+cuda8.0+caffe
1,首先说下环境和配置 配置: 环境:windows10,vs2013 community,cuda8.0,caffe,cudnn4 注意:先要安装好显卡驱动(我的显卡是1070),这里的例子只开通了 ...
- Win10+vs2012+cuda8.0的安装与配置
安装环境说明:NVDIA GeForce 930M.Intel(R) HD Graphics 520 显卡和cuda需要兼容匹配,我一开始下载的cuda6.5无法安装,所以又重新下了比较新的cuda8 ...
- ubuntu16.04+cuda8.0+caffe
=========== 如果出现nvidia-smi failed to communicate with nvidia driver,循环登录情况,则: sudo apt-get remove -- ...
- [Caffe]Win10+VS2015+CUDA8.0+cudnn5.1环境配置
百度:win10 caffe vs2015 编译caffe.sln工程参见->这里 caffe训练参见->这里 参见->这里 Windows+VS2013爆详细Caffe编译安装教程
- win10 + cuda8.0 + caffe SSD + vs2015 + python3
一.下载 git clone https://github.com/runhang/caffe-ssd.git cd caffe-ssd 1. 修改 build_win.cmd if !PYTHON_ ...
- tensorflow 1.12.0 gpu + python3.6.8 + win10 + GTX1060 + cuda9.0 + cudnn7.4 + vs2017)
在安装tensorflow-gpu时,也看过不少的博客,讲得乱七八糟的,也不能这样说,只是每个人安装的环境或需求不一样,因此没有找到一个适合自己的教程去安装tensorflow-gpu版本.当然,入手 ...
- utuntu16.04安装caffe+Matlab2017a+opencv3.1+CUDA8.0+cudnn6.0
上午把tensorflow安装好了,下午和晚上装caffe的确很费劲. 默认CUDA,cuDNN可以用了 caffe官方安装教程 有些安装顺序自己也不清楚,简直就是碰运气 1. 安装之前依赖项 Gen ...
随机推荐
- oracle系列--第三篇 Oracle的安装
在安装之前,我先说说我的电脑的配置: OS : Windows 7 32bit CPU : 3GHz Memory : 2GB Desk : 320GB ======================= ...
- 搭建你的第一个Django应用程序
首先你要确保你机器上面安装了python:Python开发_python的安装 python的相关学习资料:http://www.cnblogs.com/hongten/tag/python/ 其次, ...
- GC 基础
= GC 基础 ===================== JAVA堆的描述如下: 内存由 Perm 和 Heap 组成. 其中 Heap = {Old + NEW = { Eden , from, ...
- Solve Error Debug Assertion Failed Expression vector iterators incompatible Using PCL in Release Mode of VS2010
When using PCL 1.4.0 in the release mode building under VS2010, we might sometime get the error &quo ...
- HashTable的典型用法以及参考实例
Get-ADComputer -Identity "cnhzpd-f7sc83x" | select -property @{name="computername&quo ...
- SCU 2941 I NEED A OFFER!(01背包变形)
I NEED A OFFER! 64bit IO Format: %lld & %llu Submit Status Description Description Speakless ...
- 使用CodeIgniter框架搭建RESTful API服务
使用CodeIgniter框架搭建RESTful API服务 发表于 2014-07-12 | 分类于 翻译笔记 | 6条评论 在2011年8月的时候,我写了一篇博客<使用Cod ...
- 8.PHP内核探索:再次探讨SAPI
在PHP的生命周期的各个阶段,一些与服务相关的操作都是通过SAPI接口实现. 这些内置实现的物理位置在PHP源码的SAPI目录.这个目录存放了PHP对各个服务器抽象层的代码, 例如命令行程序的实现,A ...
- 原创:CentOS6.4配置solr 4.7.2+IK分词器
本文原创,转载请注明出处 相关资源下载:http://pan.baidu.com/s/1pJPpiqv 1.首先说明一下 solr是java语言开发的企业级应用服务器,所以你首先安装好jdk,配置好j ...
- InnoDB , MyISAM :MySQL 5.7 Supported Storage Engines
http://dev.mysql.com/doc/refman/5.7/en/storage-engines.html https://en.wikipedia.org/wiki/ACID https ...