WPF绘制自定义窗口
原文:WPF绘制自定义窗口
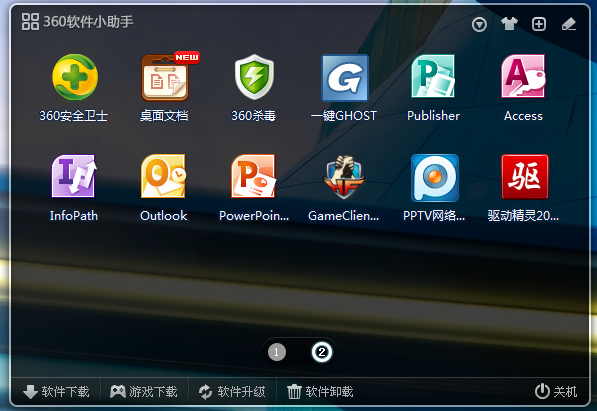
WPF是制作界面的一大利器,下面就用WPF模拟一下360的软件管理界面,360软件管理界面如下:
界面不难,主要有如下几个要素:
- 窗体的圆角
- 自定义标题栏及按钮
- 自定义状态栏
- 窗体的半透明效果
- 窗体4周有一圈半透明阴影(抓的图上看不出来)
实现思路很简单,首先隐藏默认窗口的标题栏和边框,然后用WPF的Border或Canvas等元素模拟定义窗体的标题栏、内容区和状态栏。
具体实现如下:
第一步:定义义个窗口基类,继承自Window,在构造函数中加载自定义窗口的样式文件,代码如下:
public partial class WindowBase:Window

{

InitializeTheme();

}

private void InitializeTheme()

{

string themeName = ConfigManage.CurrentTheme;//样式所在的文件夹

App.Current.Resources.MergedDictionaries.Add(Application.LoadComponent(new Uri(string.Format("../Theme/{0}/WindowBaseStyle.xaml", themeName), UriKind.Relative)) as ResourceDictionary);

}
接下来,就可以在WindowBaseStyle.xaml样式文件中定义窗口元素及样式了。
第二步:重写窗口模板
因为Window和Button等控件一样,实际是继承自System.Windows.Controls.Control类,所以可以通过使用 ControlTemplate 自定义控件的外观 ,代码如下:
<!--基窗口样式-->

<Style x:Key="BaseWindowStyle" TargetType="{x:Type Window}">

<Setter Property="Template" Value="{StaticResource BaseWindowControlTemplate}"/>

<Setter Property="Background"

Value="Transparent" />

<Setter Property="WindowStyle"

Value="None" />

<Setter Property="AllowsTransparency"

Value="True" />

</Style>

<!--基窗口模板-->

<ControlTemplate x:Key="BaseWindowControlTemplate" TargetType="{x:Type Window}">

<Grid Width="{Binding ElementName=w, Path=Width}" Height="{Binding ElementName=w, Path=Height}">

<!—第四步介绍如下Border元素的作用—>

<Border BorderThickness="5" CornerRadius="6" BorderBrush="#000000" Opacity=".08"></Border>

<!—第三步介绍borderBg元素的作用—>

<Border x:Name="borderBg" Margin="5" Background="#000000" BorderBrush="#ffffff" Opacity=".8" BorderThickness="2" CornerRadius="{StaticResource winCorner}" Style="{StaticResource winStyle}">

<!—定义窗口的元素,Grid的四行分别为标题栏、内容、状态栏上的横线、状态栏-->

<Grid>

<Grid.RowDefinitions>

<RowDefinition Height="auto"></RowDefinition>

<RowDefinition Height="*"></RowDefinition>

<RowDefinition Height="1"></RowDefinition>

<RowDefinition Height="30"></RowDefinition>

</Grid.RowDefinitions>

<Border Grid.Row="0" Background="#4f535d" CornerRadius="{StaticResource winTitleCorner}" Style="{StaticResource titleStyle}"></Border>

<Canvas Grid.Row="2" Background="#42464d"></Canvas>

<Border Grid.Row="3" CornerRadius="{StaticResource winStatusCorner}"></Border>

</Grid>

</Border>

<Grid Margin="7">

<Grid.RowDefinitions>

<RowDefinition Height="auto"></RowDefinition>

<RowDefinition Height="*"></RowDefinition>

<RowDefinition Height="1"></RowDefinition>

<RowDefinition Height="30"></RowDefinition>

</Grid.RowDefinitions>

<!--标题栏框-->

<Border x:Name="borderTitle" Grid.Row="0" CornerRadius="{StaticResource winTitleCorner}" Style="{StaticResource titleStyle}" BorderBrush="{TemplateBinding BorderBrush}" BorderThickness="{TemplateBinding BorderThickness}">

<Grid Background="Transparent">

<TextBlock Text="{Binding ElementName=w, Path=Title}" Foreground="White" Opacity=".75" HorizontalAlignment="Left"></TextBlock>

<StackPanel HorizontalAlignment="Right" VerticalAlignment="Top" Visibility="Hidden"

Orientation="Horizontal">

<!--关闭按钮-->

<Button x:Name="btnMin" Style="{StaticResource minBtnStyle}"></Button>

<Button x:Name="btnClose" Style="{StaticResource closeBtnStyle}"></Button>

</StackPanel>

</Grid>

</Border>

<!--内容-->

<Grid x:Name="gridContent" Grid.Row="1">

<ContentPresenter />

</Grid>

<Border Grid.Row="3" CornerRadius="{StaticResource winStatusCorner}">

<StackPanel Orientation="Horizontal" HorizontalAlignment="Right" >

<Button x:Name="btnYes" Style="{StaticResource btnStyle}"></Button>

<Button x:Name="btnNo" Style="{StaticResource btnStyle}"></Button>

</StackPanel>

</Border>

</Grid>

</Grid>

</ControlTemplate>
需要注意的是,实际代码中应该将BaseWindowControlTemplate的定义放到BaseWindowStyle的前边,否则会抛出异常。
第三步:实现半透明
用Js实现过遮罩型的模态窗口的同学都知道,如果将元素如按钮直接放到一个半透明的Div中,会发现按钮本身也半透明了,这显然不是我们所希望的,我们只需要背景半透明,元素本身透明度不受影响,实现的思路应该是这样,将按钮和div平级,利用定位属性将按钮和半透明的div保持相对位置,而不是将按钮放入Div中。
WPF中,实现方式和其一样,请看第二步中的x:Name="borderBg"的Border元素的定义。它和后面的Grid元素定义的实际窗口是同级的。
第四步:实现窗体四周半透明的环绕
这个先简单用一个半透明具有一定宽度的Border来模拟,代码如步骤二中所示,后续考虑做成类似外发光的效果。
第五步:实现最小化、关闭、拖动等事件
在WindowBase的构造函数中,添加如下代码:
this.Loaded += delegate

{

            InitializeEvent();

};

private void InitializeEvent()

{

 ControlTemplate baseWindowTemplate = (ControlTemplate)App.Current.Resources["BaseWindowControlTemplate"];

            Border borderTitle = (Border)baseWindowTemplate.FindName("borderTitle", this);

            Button closeBtn = (Button)baseWindowTemplate.FindName("btnClose", this);

            Button minBtn = (Button)baseWindowTemplate.FindName("btnMin", this);

            YesButton = (Button)baseWindowTemplate.FindName("btnYes", this);

            NoButton = (Button)baseWindowTemplate.FindName("btnNo", this);

            minBtn.Click += delegate

            {

                MinWin();

            };

            closeBtn.Click += delegate

            {

                this.Close();

            };

            borderTitle.MouseMove += delegate(object sender, MouseEventArgs e)

            {

                if (e.LeftButton == MouseButtonState.Pressed)

                {

                    this.DragMove();

                }

            };

}
注意, InitializeEvent方法必须放到Loaded事件处理函数中,否者会找不到按钮。
第六步: 定义最小化,关闭按钮的样式
实际上也是定义Template属性,定义方法类似于窗口模板的定义,详细见附件中完整代码。
到此,自定义窗口的基类就打造完成,完整代码见附件。
使用方法很简单,新建一个WPF窗口后将窗体的基类改成上面定义的WindowBase,同时注意将Xmal文件的根元素改成如下形式:
<my:WindowBase xmlns:my="clr-namespace:Ezhu.WPFWin"…
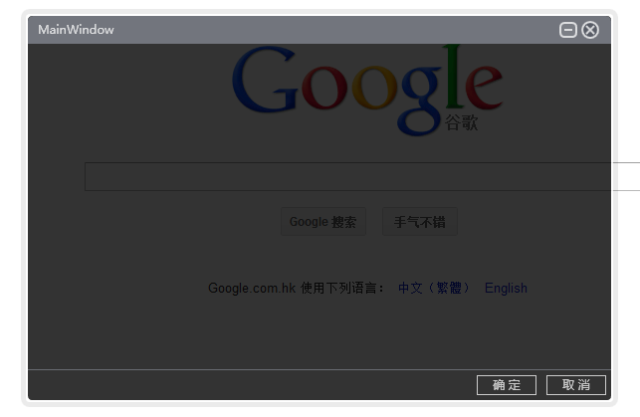
运行效果如下图所示:
附件:自定义窗口代码
WPF绘制自定义窗口的更多相关文章
- WPF WindowChrome 自定义窗口
1.wpf自定义窗口: WindowChrome类描述:https://msdn.microsoft.com/zh-cn/library/system.windows.shell.windowchro ...
- 在WPF中自定义你的绘制(五)
原文:在WPF中自定义你的绘制(五) 在WPF中自定义你的绘制(五) ...
- WPF自定义窗口基类
WPF自定义窗口基类时,窗口基类只定义.cs文件,xaml文件不定义.继承自定义窗口的类xaml文件的根节点就不再是<Window>,而是自定义窗口类名(若自定义窗口与继承者不在同一个命名 ...
- WPF.UIShell UIFramework之自定义窗口的深度技术 - 模态闪动(Blink)、窗口四边拖拽支持(WmNCHitTest)、自定义最大化位置和大小(WmGetMinMaxInfo)
无论是在工作和学习中使用WPF时,我们通常都会接触到CustomControl,今天我们就CustomWindow之后的一些边角技术进行探讨和剖析. 窗口(对话框)模态闪动(Blink) 自定义窗口的 ...
- 在WPF中自定义你的绘制(三)
原文:在WPF中自定义你的绘制(三) 在WPF中自定义你的绘制(三) ...
- 在WPF中自定义你的绘制(四)
原文:在WPF中自定义你的绘制(四) 在WPF中自定义你的绘制(四) ...
- 在WPF中自定义你的绘制(一)
原文:在WPF中自定义你的绘制(一) 在WPF中自定义你的绘制(一) ...
- 在WPF中自定义你的绘制(二)
原文:在WPF中自定义你的绘制(二) 在WPF中自定义你的绘制(二) ...
- [WPF疑难] 继承自定义窗口
原文 [WPF疑难] 继承自定义窗口 [WPF疑难] 继承自定义窗口 周银辉 项目中有不少的弹出窗口,按照美工的设计其外边框(包括最大化,最小化,关闭等按钮)自然不同于Window自身的,但每个弹出框 ...
随机推荐
- bootstrap课程3 bootstrap中常用的排版样式有哪些
bootstrap课程3 bootstrap中常用的排版样式有哪些 一.总结 一句话总结:bootstrap里面对常用表情比如p.h1.code等html中的常用表情都修改了样式,照着手册用就好,样式 ...
- [原]MFC中DIALOG(对话框)程序响应加速键(快捷键)
[原]MFC中DIALOG(对话框)程序响应加速键(快捷键) 2014-8-6阅读266 评论0 新建一个对话框程序,项目名为Test,删除默认确定,取消和静态文本框控件.添加一个按钮,Caption ...
- Loader之二:CursorLoader基本实例 分类: H1_ANDROID 2013-11-16 10:50 5447人阅读 评论(0) 收藏
参考APIDEMO:sdk\samples\android-19\content\LoaderCursor 1.创建主布局文件,里面只包含一个Fragment. <FrameLayout xml ...
- C++实现简单的内存块自己主动管理
#ifndef __MEM__H #define __MEM__H #include<iostream> using namespace std; //自己主动管理内存块 typedef ...
- 在nginx中使用lua直接訪问mysql和memcaced达到数据接口的统一
安装nginx參见<nginx+lua+redis构建高并发应用> 让nginx 中的nginx_lua_module支持mysql 和memcache 下载 https://github ...
- Angular.js回想+学习笔记(1)【ng-app和ng-model】
Angular.js中index.html简单结构: <!doctype html> <html ng-app> <head> <script src=&qu ...
- [Angular] Difference between ngAfterViewInit and ngAfterContentInit
Content is what is passed as children. View is the template of the current component. The view is in ...
- 一题多解(五) —— topK(数组中第 k 大/小的数)
根据对称性,第 k 大和第 k 小,在实现上,是一致的,我们就以第 k 小为例,进行说明: 法 1 直接排序(sort(A, A+N)),当使用一般时间复杂度的排序算法时,其时间复杂度为 O(N2) ...
- java常用api2
calendar calendar=calendar.getInstance(); StringBuilder和C#的用法一样 hashSet无序的,不可重复 LInkedHashSet有序的,不可重 ...
- WebHost failed to process a request.Memory gates checking failed because the free memory (140656640 bytes) is less than 5% of total memory
WebHost failed to process a request. Sender Information: System.ServiceModel.ServiceHostingEnvironme ...