CS231N assignment1
# Visualize some examples from the dataset.

# We show a few examples of training images from each class.

classes = ['plane', 'car', 'bird', 'cat', 'deer', 'dog', 'frog', 'horse', 'ship', 'truck'] #类别列表

num_classes = len(classes) #类别数目

samples_per_class = 7 # 每个类别采样个数

for y, cls in enumerate(classes): # 对列表的元素位置和元素进行循环,y表示元素位置(0,num_class),cls元素本身'plane'等

    idxs = np.flatnonzero(y_train == y) #找出标签中y类的位置

    idxs = np.random.choice(idxs, samples_per_class, replace=False) #从中选出我们所需的7个样本

    for i, idx in enumerate(idxs): #对所选的样本的位置和样本所对应的图片在训练集中的位置进行循环

        plt_idx = i * num_classes + y + 1 # 在子图中所占位置的计算

        plt.subplot(samples_per_class, num_classes, plt_idx) # 说明要画的子图的编号

        plt.imshow(X_train[idx].astype('uint8')) # 画图

        plt.axis('off')

        if i == 0:

            plt.title(cls) # 写上标题,也就是类别名

plt.show() # 显示
用矩阵运算取代两次循环运算,大大减少运算时间。
核心的公式:https://blog.csdn.net/zhyh1435589631/article/details/54236643
https://blog.csdn.net/geekmanong/article/details/51524402
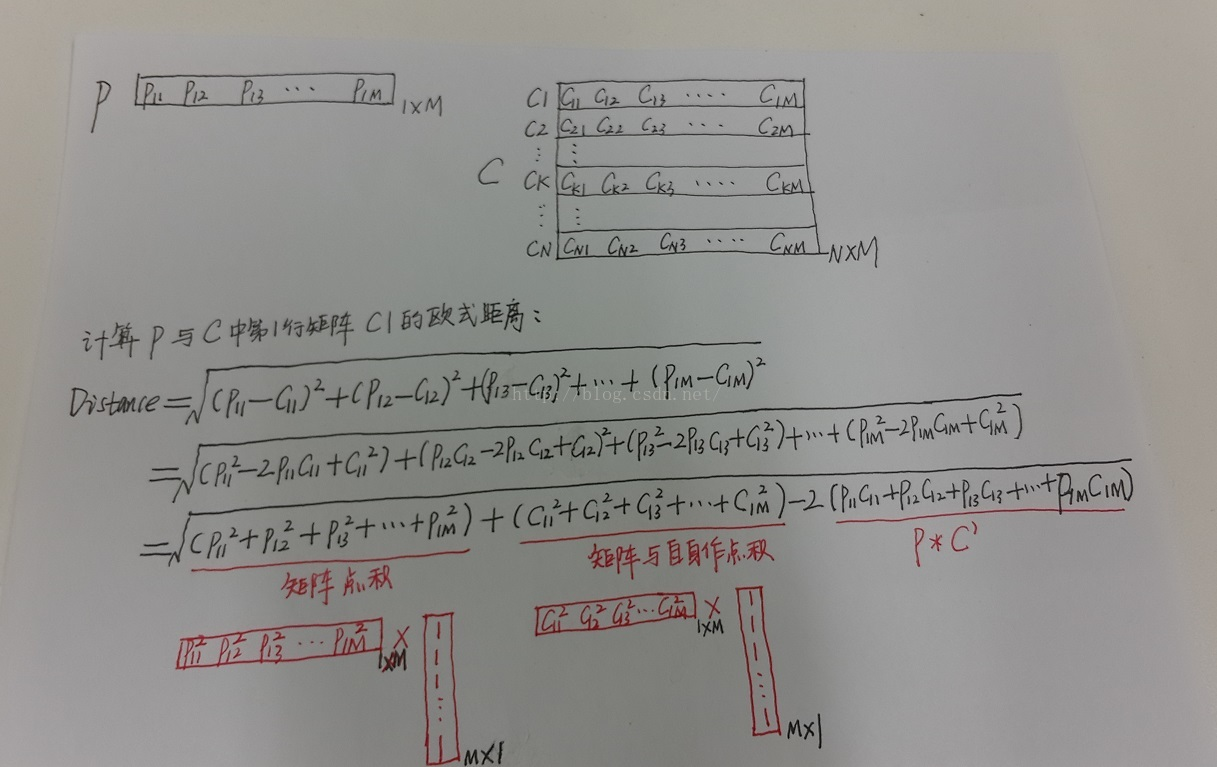
我自己的经验总结:先看最终目标矩阵的大小,可以确定前面位置。

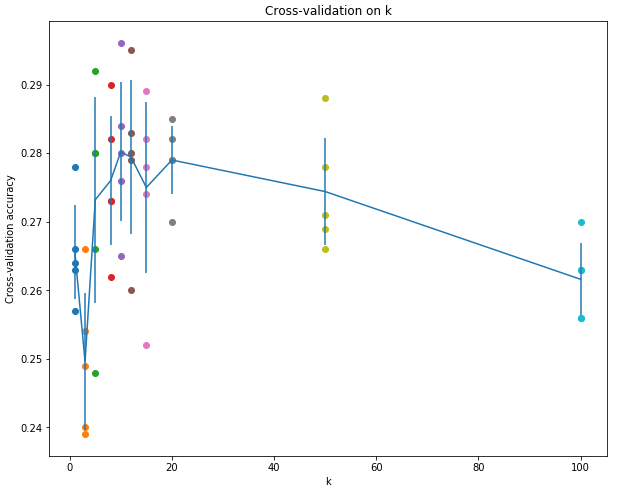
交叉验证这里:
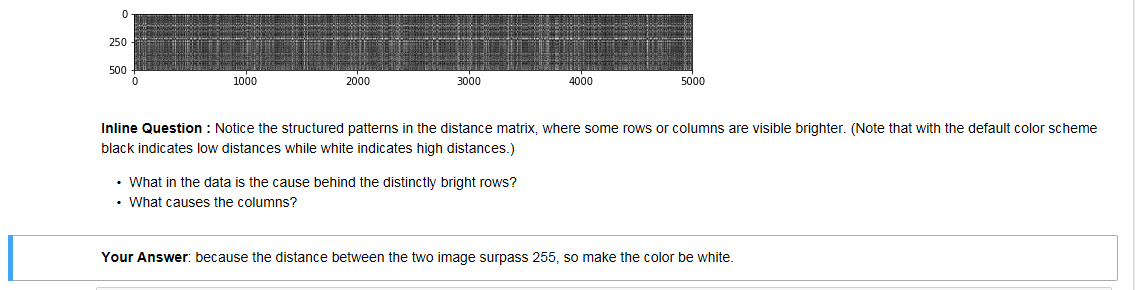
在进行分类前,一定要通过reshape函数,来确定数据输入的形状是不是符合要求。
num_folds = 5

k_choices = [1, 3, 5, 8, 10, 12, 15, 20, 50, 100]

X_train_folds = []

y_train_folds = []

################################################################################

# TODO:                                                                        #

# Split up the training data into folds. After splitting, X_train_folds and    #

# y_train_folds should each be lists of length num_folds, where                #

# y_train_folds[i] is the label vector for the points in X_train_folds[i].     #

# Hint: Look up the numpy array_split function.                                #

################################################################################

X_train_folds=np.array_split(X_train,num_folds)

y_train_folds=np.array_split(y_train,num_folds)

################################################################################

#                                 END OF YOUR CODE                             #

################################################################################

# A dictionary holding the accuracies for different values of k that we find

# when running cross-validation. After running cross-validation,

# k_to_accuracies[k] should be a list of length num_folds giving the different

# accuracy values that we found when using that value of k.

k_to_accuracies = {}

################################################################################

# TODO:                                                                        #

# Perform k-fold cross validation to find the best value of k. For each        #

# possible value of k, run the k-nearest-neighbor algorithm num_folds times,   #

# where in each case you use all but one of the folds as training data and the #

# last fold as a validation set. Store the accuracies for all fold and all     #

# values of k in the k_to_accuracies dictionary.                               #

################################################################################

num_test = X_train_folds[0].shape[0]

for j in range(len(k_choices)):

    k = k_choices[j]

    for i in range(1,num_folds+1):

        X_train_temp = np.concatenate((X_train_folds[num_folds-i],X_train_folds[num_folds-i-1],X_train_folds[num_folds-i-2],X_train_folds[num_folds-i-3]),axis = 0)

        y_train_temp = np.concatenate((y_train_folds[num_folds-i],y_train_folds[num_folds-i-1],y_train_folds[num_folds-i-2],y_train_folds[num_folds-i-3]))

        X_test_temp = X_train_folds[num_folds-i-4]

        y_test_temp = y_train_folds[num_folds-i-4]

        classifier.train(X_train_temp, y_train_temp)

        y_test_pred = classifier.predict(X_test_temp, k=k)

        num_correct = np.sum(y_test_pred == y_test_temp)

        accuracy = float(num_correct) / num_test

        k_to_accuracies.setdefault(k,[]).append(accuracy)

################################################################################

#                                 END OF YOUR CODE                             #

################################################################################

# Print out the computed accuracies

for k in sorted(k_to_accuracies):

    for accuracy in k_to_accuracies[k]:

        print('k = %d, accuracy = %f' % (k, accuracy))
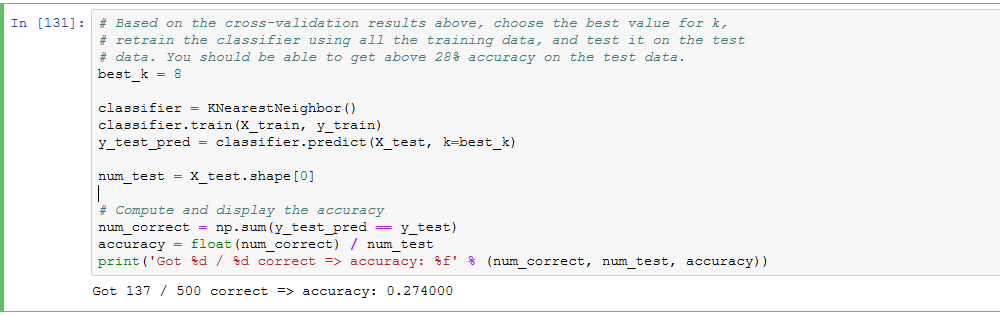
将所有数据分为train/val/test三组,使用train训练,用val调整超参数,在最后的最后,才可以使用test,并且test只允许使用这一次,并将这一次的结果作为最终结果上报。否则得到的classifier会overfitting,或者结果不准确,有cheat的嫌疑。
Evaluate on the test set only a single time, at the very end.
所谓5-fold cross validation就是将所有的train data均匀分成5份,每次取4份做train,另外一份做val,重复五次,将五次结果平均。这样做的话每个数据都做了四次train,一次val。这样做的缺点是太expensive,NN中通常不用。注意,在这个过程中,test是不参与其中的。一定先将test set拿出来放到一边,不到最后交结果的时候不要碰它。
1,2显然不正确;因为kNN是非线性分类器,所以边界也是非线性的;training set越大,在predict时需要计算test example与所有training的距离,所以在相同算力条件下,taining set越大,predict一个test sample所需时间越多,时间复杂度为O(N)。
CS231N assignment1的更多相关文章
- cs231n assignment1 KNN
title: cs231n assignment1 KNN tags: - KNN - cs231n categories: - 机器学习 date: 2019年9月16日 17:03:13 利用KN ...
- 笔记:CS231n+assignment1(作业一)
CS231n的课后作业非常的好,这里记录一下自己对作业一些笔记. 一.第一个是KNN的代码,这里的trick是计算距离的三种方法,核心的话还是python和machine learning中非常实用的 ...
- 【cs231n笔记】assignment1之KNN
k-Nearest Neighbor (kNN) 练习 这篇博文是对cs231n课程assignment1的第一个问题KNN算法的完成,参考了一些网上的博客,不具有什么创造性,以个人学习笔记为目的发布 ...
- 【cs231n作业笔记】二:SVM分类器
可以参考:cs231n assignment1 SVM 完整代码 231n作业 多类 SVM 的损失函数及其梯度计算(最好)https://blog.csdn.net/NODIECANFLY/ar ...
- cs231n线性分类器作业 svm代码 softmax
CS231n之线性分类器 斯坦福CS231n项目实战(二):线性支持向量机SVM CS231n 2016 通关 第三章-SVM与Softmax cs231n:assignment1——Q3: Impl ...
- 【cs231n作业笔记】一:KNN分类器
安装anaconda,下载assignment作业代码 作业代码数据集等2018版基于python3.6 下载提取码4put 本课程内容参考: cs231n官方笔记地址 贺完结!CS231n官方笔记授 ...
- cs231n笔记:线性分类器
cs231n线性分类器学习笔记,非完全翻译,根据自己的学习情况总结出的内容: 线性分类 本节介绍线性分类器,该方法可以自然延伸到神经网络和卷积神经网络中,这类方法主要有两部分组成,一个是评分函数(sc ...
- CS231n 2017 学习笔记01——KNN(K-Nearest Neighbors)
本博客内容来自 Stanford University CS231N 2017 Lecture 2 - Image Classification 课程官网:http://cs231n.stanford ...
- cs231n --- 3 : Convolutional Neural Networks (CNNs / ConvNets)
CNN介绍 与之前的神经网络不同之处在于,CNN明确指定了输入就是图像,这允许我们将某些特征编码到CNN的结构中去,不仅易于实现,还能极大减少网络的参数. 一. 结构概述 与一般的神经网络不同,卷积神 ...
随机推荐
- 小tip: 某简单的字符重叠与图形生成----张鑫旭
引言 字符重叠不是什么稀奇的东西. 如1像素错位模拟阴影效果: 或者powerFloat中展示的带边框三角: 以及其他很多. 但是技术这东西不是豆腐,老了可以吃,臭了也可以吃:那我这里还拿着个说事作甚 ...
- cf1000F. One Occurrence(线段树 set)
题意 题目链接 Sol (真后悔没打这场EDU qwq) 首先把询问离线,预处理每个数的\(pre, nxt\),同时线段树维护\(pre\)(下标是\(pre\),值是\(i\)),同时维护一下最大 ...
- 浏览器从输入到输出的过程与原理三之DNS
1. DNS 在互联网上的每一个计算机都拥有一个唯一的地址,称作“IP地址”(即互联网协议地址).由于IP地址(为一串数字)不方便记忆,DNS允许用户使用一串常见的字母(即“域名”)取代.比如,您只需 ...
- c# 异步和同步问题(转载)
[C#] 谈谈异步编程async await 为什么需要异步,异步对可能起阻止作用的活动(例如,应用程序访问 Web 时)至关重要. 对 Web 资源的访问有时很慢或会延迟. 如果此类活动在同步过 ...
- RPC簡介
RPC 技术原理 RPC ( Remote Procedure Call Protocol,远程过程调用协议 ): 客户端在不知道调用细节的情况下,调用存在于远程计算机上的某个对象,就像调 ...
- 【Android】Retrofit网络请求Service,@Path、@Query、@QueryMap...
对Retrofit已经使用了一点时间了,是时候归纳一下各种网络请求的service了. 下面分为GET.POST.DELETE还有PUT的请求,说明@Path.@Query.@QueryMap.@Bo ...
- linux 压缩解压命令zip、gz、tar.gz、bz2、tar.bz2、.tar.xz
linux压缩格式:.gz windows压缩格式:.zip .rar默认情况下,windows和linux都支持zip格式,都不需要安装额外软件. .zip格式 压缩zip /usr/bin/zip ...
- 【Python】Java程序员学习Python(四)— 内置方法和内置变量
<假如爱有天意> 当天边那颗星出现,你可知我又开始想念,有多少爱恋只能遥遥相望,就像月光洒向海面,年少的我们曾以为,相爱的人就能到永远,当我们相信情到深处在一起,听不见风中的叹息,谁知道爱 ...
- 你写的什么垃圾代码让Vsync命令不能及时处理呢?(1)
想想自己写的什么垃圾代码导致Vsync不能及时处理#(不高兴) 想不开? 实际开发中性能问题不好复现?这你就可能需要一些工具来帮你检测这种情况. 首先是Android系统自带的工具(4.1之后的版本) ...
- 对象的数据属性(Object)
value: 对象属性的默认值,默认值为undefined configurable: 能否使用delete.能否需改属性特性.或能否修改访问器属性.,false为不可重新定义,默认值为true en ...