
cs231n assignment1 KNN
title: cs231n assignment1 KNN
tags:
- KNN
- cs231n
categories:
- 机器学习
date: 2019年9月16日 17:03:13
利用KNN算法做图像分类。python2.7环境
首先运行cs231n/datasets下的get_datasets.sh获取数据集,如果你是windows用户,也可以在网盘下载后解压到datasets里。
链接: https://pan.baidu.com/s/1KMh7OoXAX3etAwIflorilg 提取码: q1rd
k-Nearest Neighbor (kNN) exercise
Complete and hand in this completed worksheet (including its outputs and any supporting code outside of the worksheet) with your assignment submission. For more details see the assignments page on the course website.
The kNN classifier consists of two stages:
- During training, the classifier takes the training data and simply remembers it
- During testing, kNN classifies every test image by comparing to all training images and transfering the labels of the k most similar training examples
- The value of k is cross-validated
In this exercise you will implement these steps and understand the basic Image Classification pipeline, cross-validation, and gain proficiency in writing efficient, vectorized code.
载入后的数据集里有50000个训练集和10000个测试集
cifar10_dir = 'cs231n/datasets/cifar-10-batches-py'

X_train, y_train, X_test, y_test = load_CIFAR10(cifar10_dir)

# As a sanity check, we print out the size of the training and test data.

print 'Training data shape: ', X_train.shape

print 'Training labels shape: ', y_train.shape

print 'Test data shape: ', X_test.shape

print 'Test labels shape: ', y_test.shape
Training data shape:  (50000, 32, 32, 3)

Training labels shape:  (50000,)

Test data shape:  (10000, 32, 32, 3)

Test labels shape:  (10000,)
为了减少运算量,训练集和测试集分别只取5000和500个
num_training = 5000

mask = range(num_training)

X_train = X_train[mask]

y_train = y_train[mask]

num_test = 500

mask = range(num_test)

X_test = X_test[mask]

y_test = y_test[mask]
将数据拉成二维向量
X_train = np.reshape(X_train, (X_train.shape[0], -1))

X_test = np.reshape(X_test, (X_test.shape[0], -1))

print X_train.shape, X_test.shape

out:

(5000, 3072) (500, 3072)
接下来修改cs231n/classifiers/k_nearest_neighbor.py,
先实现用两层循环求测试集和训练集的L2距离
 for i in xrange(num_test):

      for j in xrange(num_train):

        #####################################################################

        # TODO:                                                             #

        # Compute the l2 distance between the ith test point and the jth    #

        # training point, and store the result in dists[i, j]. You should   #

        # not use a loop over dimension.                                    #

        #####################################################################

        # pass

        dists[i][j] = np.sqrt(np.sum(np.square(X[i] - self.X_train[j])))

        #####################################################################

        #                       END OF YOUR CODE                            #

        #####################################################################

    return dists
用一层循环,利用了python的广播机制。
for i in xrange(num_test):

      #######################################################################

      # TODO:                                                               #

      # Compute the l2 distance between the ith test point and all training #

      # points, and store the result in dists[i, :].                        #

      #######################################################################

      # pass

      dists[i] = np.sqrt(np.sum(np.square(self.X_train - X[i]), axis = 1))

      #######################################################################

      #                         END OF YOUR CODE                            #

      #######################################################################

    return dists
不用循环的方式比较难理解,推荐https://blog.csdn.net/zhyh1435589631/article/details/54236643
如果测试集X是MxD,训练集self.X_train是NxD,那么 d1是MxN,d2.shape=(N,)可以认为是N维行向量,d3是M维列向量,所以可以相加,也是利用的python的广播机制。
 #########################################################################

    # TODO:                                                                 #

    # Compute the l2 distance between all test points and all training      #

    # points without using any explicit loops, and store the result in      #

    # dists.                                                                #

    #                                                                       #

    # You should implement this function using only basic array operations; #

    # in particular you should not use functions from scipy.                #

    #                                                                       #

    # HINT: Try to formulate the l2 distance using matrix multiplication    #

    #       and two broadcast sums.                                         #

    #########################################################################

    # pass

    d1 = -2*np.dot(X, self.X_train.T)

    d2 = np.sum(np.square(self.X_train), axis=1)

    d3 = np.sum(np.square(X), axis=1)

    d3 = d3.reshape(d3.shape[0],1)

    dists = np.sqrt(d1+d2+d3)

    #dists = np.sqrt(-2*np.dot(X, self.X_train.T) + np.sum(np.square(self.X_train), axis = 1) + np.transpose([np.sum(np.square(X), axis = 1)]))

    #########################################################################

    #                         END OF YOUR CODE                              #

    #########################################################################

    return dists
根据得到的dists对测试图像作出预测k=5时表示利用5个图像投票作出预测
def predict_labels(self, dists, k=1):

    """

    Given a matrix of distances between test points and training points,

    predict a label for each test point.

    Inputs:

    - dists: A numpy array of shape (num_test, num_train) where dists[i, j]

      gives the distance betwen the ith test point and the jth training point.

    Returns:

    返回的y是一个一维矩阵,y[i]表示对第i个测试图像的预测分类,结果是0-9

    - y: A numpy array of shape (num_test,) containing predicted labels for the

      test data, where y[i] is the predicted label for the test point X[i].

    """

    num_test = dists.shape[0]

    y_pred = np.zeros(num_test)

    for i in xrange(num_test):

      # A list of length k storing the labels of the k nearest neighbors to

      # the ith test point.

      closest_y = []

      #########################################################################

      # TODO:                                                                 #

      # Use the distance matrix to find the k nearest neighbors of the ith    #

      # testing point, and use self.y_train to find the labels of these       #

      # neighbors. Store these labels in closest_y.                           #

      # Hint: Look up the function numpy.argsort.                             #

      #########################################################################

      # pass

      # np.argsort()返回由小到大排序后的下标,比如

      # np.argsort([4,2,5,1]) return [3,1,0,2]

      # 排序后取前k个,dists存的是相近的图像,而y_train转换成图像的分类(标签)

      closest_y = self.y_train[np.argsort(dists[i])[:k]]

      #########################################################################

      # TODO:                                                                 #

      # Now that you have found the labels of the k nearest neighbors, you    #

      # need to find the most common label in the list closest_y of labels.   #

      # Store this label in y_pred[i]. Break ties by choosing the smaller     #

      # label.                                                                #

      #########################################################################

      # pass

      # np.bincount()返回索引出现的次数,比如:

      # x = np.array([0, 1, 1, 3, 2, 1, 7])

      # np.bincount(x)  out:array([1, 3, 1, 1, 0, 0, 0, 1])

      # argmax()返回最大数的下标

      y_pred[i] = np.argmax(np.bincount(closest_y))

      #########################################################################

      #                           END OF YOUR CODE                            #

      #########################################################################

    return y_pred
k_nearest_neighor.py补全完。
继续进行,你会看到得到的dists的维度是(500,5000),表示500测试集和5000训练集的差,值越小表明图像越相似。如果将dists画出来,将是类似下面的图:

黑色表示值低,白色表示值高。
如果有一个测试数据和很多训练数据都相似,你将看到暗色的一条线。
我们可以通过classifier.predict_labels(dists, k=1)来从dists里提取最相近的图像的分类,并计算识别率。
y_test_pred = classifier.predict_labels(dists, k=1)

# Compute and print the fraction of correctly predicted examples

num_correct = np.sum(y_test_pred == y_test)

accuracy = float(num_correct) / num_test

print 'Got %d / %d correct => accuracy: %f' % (num_correct, num_test, accuracy)

out: Got 137 / 500 correct => accuracy: 0.274000
如果我们尝试不同的k,结果也会有所不同。比如k=5时的识别率可能是0.278
之后我们可以测试下k_nearest_neighbor.py里循环的不同实现方式速度的差别,在我的机器上是:
Two loop version took 29.503677 seconds

One loop version took 155.006175 seconds

No loop version took 0.291267 seconds
交叉验证
在使用训练集对参数进行训练的时候,经常会发现人们通常会将一整个训练集分为三个部分(比如mnist手写训练集)。一般分为:训练集(train_set),评估集(valid_set),测试集(test_set)这三个部分。这其实是为了保证训练效果而特意设置的。其中测试集很好理解,其实就是完全不参与训练的数据,仅仅用来观测测试效果的数据。而训练集和评估集则牵涉到下面的知识了。
因为在实际的训练中,训练的结果对于训练集的拟合程度通常还是挺好的(初始条件敏感),但是对于训练集之外的数据的拟合程度通常就不那么令人满意了。因此我们通常并不会把所有的数据集都拿来训练,而是分出一部分来(这一部分不参加训练)对训练集生成的参数进行测试,相对客观的判断这些参数对训练集之外的数据的符合程度。这种思想就称为交叉验证(Cross Validation)
我们可以通过交叉验证找到使得识别率最高的k的值。
本次试验我们把训练集分成5部分放入X_train_folds和y_train_folds,其中y_train_folds[i]就是对应X_train_folds[i]的标签。
################################################################################

# TODO:                                                                        #

# Split up the training data into folds. After splitting, X_train_folds and    #

# y_train_folds should each be lists of length num_folds, where                #

# y_train_folds[i] is the label vector for the points in X_train_folds[i].     #

# Hint: Look up the numpy array_split function.                                #

################################################################################

# pass

# 将y_train拉成列向量

y_train_ = y_train.reshape(-1, 1)

#使用np.array_split将向量分成等长的num_folds份

X_train_folds , y_train_folds = np.array_split(X_train, num_folds), np.array_split(y_train_, num_folds)

################################################################################

#                                 END OF YOUR CODE                             #

################################################################################
使用k_to_accuracies = {}存储运算结果,k_to_accuracies是一个字典类型,其中k_to_accuracies[i]存储一个长度为num_folds的list,表示k=i时的交叉验证精度。
################################################################################

# pass

for k_ in k_choices:

    k_to_accuracies.setdefault(k_, [])

for i in range(num_folds):

    classifier = KNearestNeighbor()

    X_val_train = np.vstack(X_train_folds[0:i] + X_train_folds[i+1:])

    y_val_train = np.vstack(y_train_folds[0:i] + y_train_folds[i+1:])

    y_val_train = y_val_train[:,0]

    classifier.train(X_val_train, y_val_train)

    for k_ in k_choices:

        y_val_pred = classifier.predict(X_train_folds[i], k=k_)

        num_correct = np.sum(y_val_pred == y_train_folds[i][:,0])

        accuracy = float(num_correct) / len(y_val_pred)

        k_to_accuracies[k_] = k_to_accuracies[k_] + [accuracy]

################################################################################

#                                 END OF YOUR CODE                             #

################################################################################
部分结果如下:
k = 1, accuracy = 0.263000

k = 1, accuracy = 0.257000

k = 1, accuracy = 0.264000

k = 1, accuracy = 0.278000

k = 1, accuracy = 0.266000

k = 3, accuracy = 0.239000

k = 3, accuracy = 0.249000

k = 3, accuracy = 0.240000

k = 3, accuracy = 0.266000

k = 3, accuracy = 0.254000

k = 5, accuracy = 0.248000

k = 5, accuracy = 0.266000

k = 5, accuracy = 0.280000

k = 5, accuracy = 0.292000

k = 5, accuracy = 0.280000

k = 8, accuracy = 0.262000

k = 8, accuracy = 0.282000

k = 8, accuracy = 0.273000

k = 8, accuracy = 0.290000
画出图来就是这样
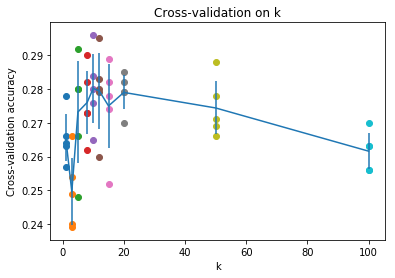
可以看到最高精度在k=10处取得,因此我们将k设置为10,重新计算knn的识别精度
# Based on the cross-validation results above, choose the best value for k,

# retrain the classifier using all the training data, and test it on the test

# data. You should be able to get above 28% accuracy on the test data.

best_k = 10

classifier = KNearestNeighbor()

classifier.train(X_train, y_train)

y_test_pred = classifier.predict(X_test, k=best_k)

# Compute and display the accuracy

num_correct = np.sum(y_test_pred == y_test)

accuracy = float(num_correct) / num_test

print 'Got %d / %d correct => accuracy: %f' % (num_correct, num_test, accuracy)

out: Got 141 / 500 correct => accuracy: 0.282000
得到精度0.282,虽然只有少许提示,但改变k的值并不会明显增加计算复杂度,所以哪怕只有少量的提升也是有意义的。
The End!
cs231n assignment1 KNN的更多相关文章
- 笔记:CS231n+assignment1(作业一)
CS231n的课后作业非常的好,这里记录一下自己对作业一些笔记. 一.第一个是KNN的代码,这里的trick是计算距离的三种方法,核心的话还是python和machine learning中非常实用的 ...
- CS231N assignment1
# Visualize some examples from the dataset. # We show a few examples of training images from each cl ...
- 【cs231n笔记】assignment1之KNN
k-Nearest Neighbor (kNN) 练习 这篇博文是对cs231n课程assignment1的第一个问题KNN算法的完成,参考了一些网上的博客,不具有什么创造性,以个人学习笔记为目的发布 ...
- 【cs231n作业笔记】二:SVM分类器
可以参考:cs231n assignment1 SVM 完整代码 231n作业 多类 SVM 的损失函数及其梯度计算(最好)https://blog.csdn.net/NODIECANFLY/ar ...
- Cs231n-assignment 1作业笔记
KNN assignment1 KNN讲解参见: https://blog.csdn.net/u014485485/article/details/79433514?utm_source=blogxg ...
- 【cs231n作业笔记】一:KNN分类器
安装anaconda,下载assignment作业代码 作业代码数据集等2018版基于python3.6 下载提取码4put 本课程内容参考: cs231n官方笔记地址 贺完结!CS231n官方笔记授 ...
- CS231n 2017 学习笔记01——KNN(K-Nearest Neighbors)
本博客内容来自 Stanford University CS231N 2017 Lecture 2 - Image Classification 课程官网:http://cs231n.stanford ...
- CS231n——图像分类(KNN实现)
图像分类 目标:已有固定的分类标签集合,然后对于输入的图像,从分类标签集合中找出一个分类标签,最后把分类标签分配给该输入图像. 图像分类流程 输入:输入是包含N个图像的集合,每个图像的标签是K ...
- CS231n 2016 通关 第二章-KNN 作业分析
KNN作业要求: 1.掌握KNN算法原理 2.实现具体K值的KNN算法 3.实现对K值的交叉验证 1.KNN原理见上一小节 2.实现KNN 过程分两步: 1.计算测试集与训练集的距离 2.通过比较la ...
随机推荐
- Time Series Anomaly Detection
这里有个2015年的综述文章,概括的比较好,各种技术的适用场景. https://iwringer.wordpress.com/2015/11/17/anomaly-detection-concep ...
- linux/linux学习笔记-初识linux(mooc)
一.linux简介 linux版本:内核版本和发行版本 linux企业应用: 1.基于linux的企业服务器 2.linux在嵌入式领域应用 android底层Linux : ios底层unix li ...
- centos7 VM虚拟机在主机关机重启后,无法ping通
解决办法 1.虚拟机的某些网络相关的服务没有启动,打开电脑的服务启动相关服务 2.打开虚拟机的虚拟网络设置,恢复默认设置即可 3.判定虚拟网卡的网关和centos的网关是否一致,如果不一致,改成一致, ...
- Linux系统常用命令之top
top - 06:58:37 up 7 days, 23:36, 2 users, load average: 0.00, 0.01, 0.05Tasks: 716 total, 1 running, ...
- Springboot2.x集成单节点Redis
Springboot2.x集成单节点Redis 说明 在Springboot 1.x版本中,默认使用Jedis客户端来操作Redis,而在Springboot 2.x 版本中,默认使用Lettuce客 ...
- [19/09/02-星期一] 基础知识_Python入门
一.计算机基础 用户界面:TUI-文本交互界面: GUI-图形化交互界面 命令行:就是一种文本交互界面,可以使用一个一个的指令来操作计算机.任何计算机的操作系统都包含命令行(Windows.Linux ...
- NOIP赛前集训备忘录(含每日总结)(日更?。。。)
NOIP赛前集训备忘录(含每日考试总结) 标签: 有用的东西~(≧▽≦)/~啦啦啦 阅读体验:https://zybuluo.com/Junlier/note/1279194 考试每日总结(这个东西是 ...
- 最长公共子序列(LCS) Easy
A subsequence of a given sequence is the given sequence with some elements (possible none) left out. ...
- PY个康托展开
卡 PY 的题,和 BIT 一样,不说了 内存还卡的挺紧的? 具体而言,刚好打完的 BIT 扒过来用用,然后打个阶乘就完事儿了 没什么好说的 Code fac=[0 for i in range(10 ...
- java中关键字final,finally,finalize的区别
-final:作为修饰符关键字,有三种用法: 1,如果一个类被声明为final,则意味着它不能被继承. 2,将变量声明为final,则表示它是一个常量,也就是保证它在使用过程中不被修改,被final修 ...