
spring boot整合RabbitMQ(Direct模式)
springboot集成RabbitMQ非常简单,如果只是简单的使用配置非常少,springboot提供了spring-boot-starter-amqp项目对消息各种支持。
Direct Exchange介绍
Direct Exchange是RabbitMQ默认的交换机模式,也是最简单的模式,根据key全文匹配去寻找队列。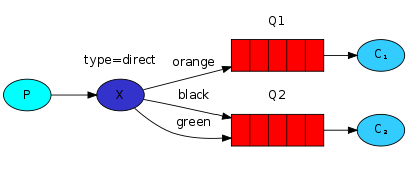
第一个
X - Q1 就有一个 binding key,名字为 orange; X - Q2 就有 2 个 binding key,名字为 black
和 green。当消息中的 路由键 和 这个 binding key 对应上的时候,那么就知道了该消息去到哪一个队列中。
Ps:为什么 X 到 Q2 要有 black,green,2个 binding key呢,一个不就行了吗? - 这个主要是因为可能又有 Q3,而Q3只接受 black 的信息,而Q2不仅接受black 的信息,还接受 green 的信息。
1.新建一个Spring Boot工程,命名为:“rabbitmq-hello”。
在pom.xml中引入如下依赖内容,其中spring-boot-starter-amqp用于支持RabbitMQ。
<dependency>
<groupId>org.springframework.boot</groupId>
<artifactId>spring-boot-starter-amqp</artifactId>
</dependency>
2.在application.properties中配置关于RabbitMQ的连接和用户信息,用户可以回到上面的安装内容,在管理页面中创建用户。
spring.application.name=rabbitmq-hello
spring.rabbitmq.host=localhost
spring.rabbitmq.port=5672
spring.rabbitmq.username=admin
spring.rabbitmq.password=123456
3.创建消息生产者Sender。通过注入AmqpTemplate接口的实例来实现消息的发送,AmqpTemplate接口定义了一套针对AMQP协议的基础操作。在Spring Boot中会根据配置来注入其具体实现。在该生产者,我们会产生一个字符串,并发送到名为hello的队列中。
@Component
public class Sender {
@Autowired
private AmqpTemplate rabbitTemplate;
public void send() {
String context = "hello " + new Date();
System.out.println("Sender : " + context);
this.rabbitTemplate.convertAndSend("hello", context);
}
}
4.创建消息消费者Receiver。通过@RabbitListener注解定义该类对hello队列的监听,并用@RabbitHandler注解来指定对消息的处理方法。所以,该消费者实现了对hello队列的消费,消费操作为输出消息的字符串内容。
@Component
@RabbitListener(queues = "hello")
public class Receiver {
@RabbitHandler
public void process(String hello) {
System.out.println("Receiver : " + hello);
}
}
5.创建RabbitMQ的配置类RabbitConfig,用来配置队列、交换器、路由等高级信息。这里我们以入门为主,先以最小化的配置来定义,以完成一个基本的生产和消费过程。
@Configuration
public class RabbitConfig {
@Bean
public Queue helloQueue() {
return new Queue("hello");
}
}
6.创建应用主类:
@SpringBootApplication
public class HelloApplication {
public static void main(String[] args) {
SpringApplication.run(HelloApplication.class, args);
}
}
7.创建单元测试类,用来调用消息生产:
@RunWith(SpringJUnit4ClassRunner.class)
@SpringApplicationConfiguration(classes = HelloApplication.class)
public class HelloApplicationTests {
@Autowired
private Sender sender;
@Test
public void hello() throws Exception {
sender.send();
}
}
8.启动应用主类,从控制台中,我们看到如下内容,程序创建了一个访问127.0.0.1:5672中admin的连接。
o.s.a.r.c.CachingConnectionFactory : Created new connection: SimpleConnection@29836d32 [delegate=amqp://admin@127.0.0.1:5672/]
同时,我们通过RabbitMQ的控制面板,可以看到Connection和Channels中包含当前连接的条目。
9.运行单元测试类,我们可以看到控制台中输出下面的内容,消息被发送到了RabbitMQ Server的hello队列中。
Sender : hello Sun Sep 25 11:06:11 CST 2016
10.切换到应用主类的控制台,我们可以看到类似如下输出,消费者对hello队列的监听程序执行了,并输出了接受到的消息信息。
Receiver : hello Sun Sep 25 11:06:11 CST 2016
通过上面的示例,我们在Spring Boot应用中引入spring-boot-starter-amqp模块,进行简单配置就完成了对RabbitMQ的消息生产和消费的开发内容。
实际上RabbitMQ还可以支持发送对象:当然由于涉及到序列化和反序列化,该对象要实现Serilizable接口.HelloSender做出如下改写:
public void send() {
User user=new User(); //实现Serializable接口
user.setUsername("hlhdidi");
user.setPassword("123");
template.convertAndSend("queue",user);
}
HelloReceiver做出如下改写:
@RabbitListener(queues="queue") //监听器监听指定的Queue
public void process1(User user) { //用User作为参数
System.out.println("Receive1:"+user);
}
spring boot整合RabbitMQ(Direct模式)的更多相关文章
- Spring Boot (十三): Spring Boot 整合 RabbitMQ
1. 前言 RabbitMQ 是一个消息队列,说到消息队列,大家可能多多少少有听过,它主要的功能是用来实现应用服务的异步与解耦,同时也能起到削峰填谷.消息分发的作用. 消息队列在比较主要的一个作用是用 ...
- Spring Boot 整合 rabbitmq
一.消息中间件的应用场景 异步处理 场景:用户注册,信息写入数据库后,需要给用户发送注册成功的邮件,再发送注册成功的邮件. 1.同步调用:注册成功后,顺序执行发送邮件方法,发送短信方法,最后响应用户 ...
- Spring Boot整合Rabbitmq
Spring Boot应用中整合RabbitMQ,并实现一个简单的发送.接收消息的例子来对RabbitMQ有一个直观的感受和理解. 在Spring Boot中整合RabbitMQ是一件非常容易的事,因 ...
- spring boot 2.x 系列 —— spring boot 整合 RabbitMQ
文章目录 一. 项目结构说明 二.关键依赖 三.公共模块(rabbitmq-common) 四.服务消费者(rabbitmq-consumer) 4.1 消息消费者配置 4.2 使用注解@Rabbit ...
- spring boot 整合 RabbitMQ 错误
1.错误 org.springframework.beans.factory.BeanCreationException: Error creating bean with name 'org.spr ...
- spring boot整合RabbitMQ(Topic模式)
1.Topic交换器介绍 Topic Exchange 转发消息主要是根据通配符. 在这种交换机下,队列和交换机的绑定会定义一种路由模式,那么,通配符就要在这种路由模式和路由键之间匹配后交换机才能转发 ...
- spring boot整合RabbitMQ(Fanout模式)
1.Fanout Exchange介绍Fanout Exchange 消息广播的模式,不管路由键或者是路由模式,会把消息发给绑定给它的全部队列,如果配置了routing_key会被忽略. 如上图所示, ...
- Spring Boot整合RabbitMQ详细教程
原文:https://blog.csdn.net/qq_38455201/article/details/80308771 1.首先我们简单了解一下消息中间件的应用场景 异步处理 场景说明:用户注册后 ...
- spring boot 整合 RabbitMq (注解)
1.增加rabbitmq的依赖包 <!-- ampq 依赖包 --> <dependency> <groupId>org.springframework.boot& ...
随机推荐
- 'org.springframework.web.filter.CharacterEncodingFilter' is not assignable to 'javax.servlet.Filter,This inspection lets you spot the following problems that might occur in descriptors that are used t
1.jar包导入错误,因为maven下载的原因: 删除这样的包,然后让maven重新下载,问题就会解决
- 如何更改myecelipse、eclipse的Project Explorer的背景颜色
这个是我研究了很久发现的,因为myecelipse.eclipse本身是随着系统的颜色改变而改变的,windows系统都会随着系统改变而改变的,所以找了很多资料都没能改变它的背景色,今天发现了一个不错 ...
- HDU 1503 Advanced Fruits (LCS+DP+递归)
题意:给定两个字符串,让你求一个最短的字符串,并且这个字符串包含给定的两个. 析:看到这个题,我知道是DP,但是,不会啊...完全没有思路么,我就是个DP渣渣,一直不会做DP. 最后还是参考了一下题解 ...
- 4) Maven 安装
# ----------------------------------------------------------------------------# Maven2 Start Up Batc ...
- Freetype字体引擎分析与指南
Freetype字体引擎分析与指南,很不错的一篇教程,推荐!!
- 几个经典的数学库之一学习---VCGlib(2)
几个经典的数学库之一学习---VCGlib(2) 1. Optional Component(可选的组件) 有许多Vertex和Face的属性并不是一直都是必要的,如Face-Face的邻接关系.VC ...
- shell 脚本,将/etc/目录下所有的软链接文件输出
#!/bin/bash # cd /etc for a in *;do if [ -L $a ];then #如果文件存在,为软链接文件且指向的是文件,则返回真 echo $a fi done 测试:
- delphi_xe开发ios环境的安装与设置
http://wenku.baidu.com/link?url=NE3xJOZiLppdxCbXJX3W0vyLHv6uA_U8uamjx9NJIIcxnfuC2P9eWx3d6Xwco-ugS8G ...
- gdb用法
mickole@test:~/ctest/05gdb$ gdb simple //开始gdb调试 GNU gdb (Ubuntu/Linaro 7.4-2012.04-0ubuntu2.1) 7.4- ...
- MSSQL数据表生成模型
MSSQL数据表生成模型 http://pan.baidu.com/s/1mhBAapy