
CentOS7.5 搭建mycat1.6.6
1、环境及版本
操作系统: CentOS 7.5
MySQL:5.7.23
jdk:1.8.0_191
MyCat:1.6.6.1
cat /etc/centos-release

mysql -V

java -version

2、安装包准备
下载网站:http://dl.mycat.io/1.6.6/
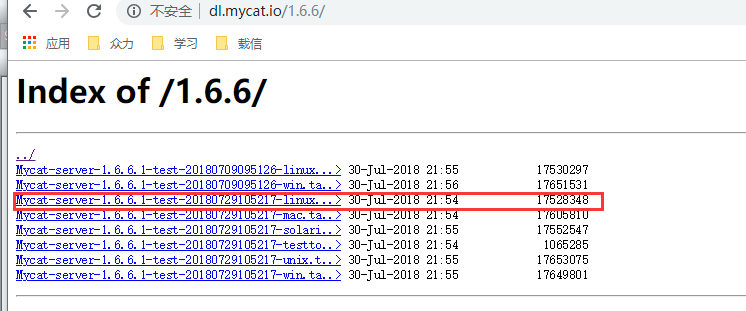
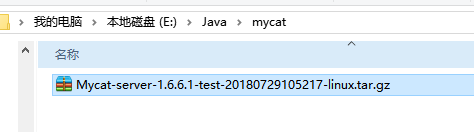
【2】上传至linux服务器:
mkdir /home/rhr/soft/mycat

cd /home/rhr/soft/mycat

rz
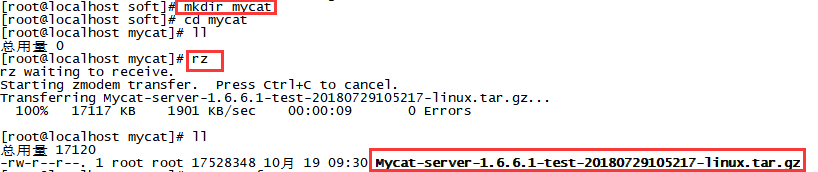
3、开始安装
【1】解压
tar -zxvf Mycat-server-1.6-RELEASE-20161028204710-linux.tar.gz
【2】安装tree(可选,使目录结构更好看)
yum -y install tree
查看tree:
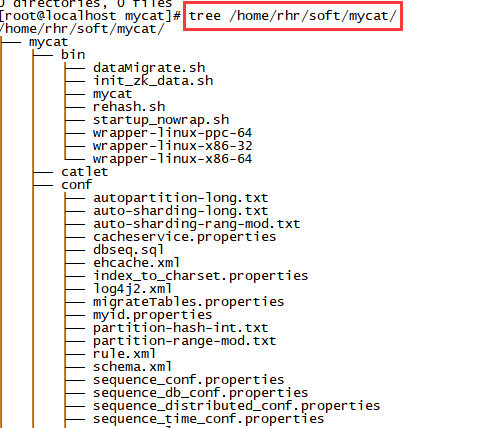
4、创建用户并修改配置文件
【1】为了更好的进入mycat,设置MYCAT_HOME的变量
vim /etc/profile
添加绿色部分:
export JAVA_HOME=/home/rhr/soft/jdk/jdk1.8.0_191

export MYCAT_HOME=/home/rhr/soft/mycat/mycat

export PATH=$JAVA_HOME/bin:$JAVA_HOME/jre/bin:/usr/local/mysql/bin:$MYCAT_HOME/bin:$PATH

使得变量生效
source /etc/profile
检查

【2】配置mycat文件
(1)修改server.xml
cd home/rhr/soft/mycat/mycat/conf

cp server.xml server_bak.xml

vim  server.xml
修改前:

修改后:
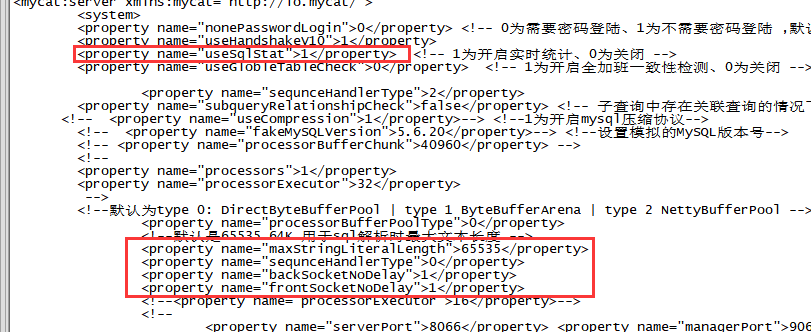
(2)修改schema.xml
1) 修改schema 标签
修改前:
    <schema name="TESTDB" checkSQLschema="false" sqlMaxLimit="100">

        <!-- auto sharding by id (long) -->

        <table name="travelrecord" dataNode="dn1,dn2,dn3" rule="auto-sharding-long" />

        <!-- global table is auto cloned to all defined data nodes ,so can join

                with any table whose sharding node is in the same data node -->

        <table name="company" primaryKey="ID" type="global" dataNode="dn1,dn2,dn3" />

        <table name="goods" primaryKey="ID" type="global" dataNode="dn1,dn2" />

        <!-- random sharding using mod sharind rule -->

        <table name="hotnews" primaryKey="ID" autoIncrement="true" dataNode="dn1,dn2,dn3" rule="mod-long" />

        <!-- <table name="dual" primaryKey="ID" dataNode="dnx,dnoracle2" type="global"

                needAddLimit="false"/> <table name="worker" primaryKey="ID" dataNode="jdbc_dn1,jdbc_dn2,jdbc_dn3" rule="mod-long" /> -->

        <table name="employee" primaryKey="ID" dataNode="dn1,dn2" rule="sharding-by-intfile" />

        <table name="customer" primaryKey="ID" dataNode="dn1,dn2" rule="sharding-by-intfile">

            <childTable name="orders" primaryKey="ID" joinKey="customer_id" parentKey="id">

                <childTable name="order_items" joinKey="order_id" parentKey="id" />

            </childTable>

            <childTable name="customer_addr" primaryKey="ID" joinKey="customer_id"  parentKey="id" />

        </table>

        <!-- <table name="oc_call" primaryKey="ID" dataNode="dn1$0-743" rule="latest-month-calldate" /> -->

    </schema>
修改后:
    <schema name="TESTDB" checkSQLschema="false" sqlMaxLimit="100">

        <!-- auto sharding by id (long) -->

    <table name="travelrecord" dataNode="dn1,dn2,dn3" rule="auto-sharding-long" />

    <!-- global table is auto cloned to all defined data nodes ,so can join

        with any table whose sharding node is in the same data node -->

    <table name="company" primaryKey="company_id" type="global" dataNode="dn1,dn2,dn3" />

    <table name="goods" primaryKey="goods_id" type="global" dataNode="dn1,dn2" />

    <!-- random sharding using mod sharind rule -->

    <table name="hotnews" primaryKey="hotnews_id" autoIncrement="true" dataNode="dn1,dn2,dn3" rule="mod-long" />

    <!-- <table name="dual" primaryKey="ID" dataNode="dnx,dnoracle2" type="global"

            needAddLimit="false"/> <table name="worker" primaryKey="ID" dataNode="jdbc_dn1,jdbc_dn2,jdbc_dn3" rule="mod-long" /> -->

    <table name="employee" primaryKey="employee_id" dataNode="dn1,dn2" rule="sharding-by-intfile" />

    <table name="customer" primaryKey="customer_id" dataNode="dn1,dn2" rule="sharding-by-murmur">

        <childTable name="orders" primaryKey="order_id" joinKey="customer_id" parentKey="customer_id">

            <childTable name="order_items" joinKey="order_id" parentKey="order_id" />

        </childTable>

        <childTable name="customer_addr" primaryKey="customer_addr_id" joinKey="customer_id"  parentKey="customer_id" />

    </table>

    <!-- <table name="oc_call" primaryKey="ID" dataNode="dn1$0-743" rule="latest-month-calldate" /> -->

    </schema>
2) 修改schema 标签
修改前
        <!-- can have multi write hosts -->

        <writeHost host="hostM1" url="localhost:3306" user="root" password="123">

            <!-- can have multi read hosts -->

            <readHost host="hostS2" url="localhost:3306" user="root" password="123" />

        </writeHost>

        <writeHost host="hostS1" url="localhost:3306" user="root" password="123" />

        <!-- <writeHost host="hostM2" url="localhost:3316" user="root" password="123456"/> -->
修改后:
    <!-- can have multi write hosts -->

    <writeHost host="hostM1" url="localhost:3306" user="root"  password="YYBrhr_2018">

        <!-- can have multi read hosts -->

        <!-- <readHost host="hostS2" url="localhost:3306" user="root" password="123" /> -->

    </writeHost>

    <!-- <writeHost host="hostS1" url="localhost:3306" user="root" password="123" /> -->

    <!-- <writeHost host="hostM2" url="localhost:3316" user="root" password="123456"/> -->

    </dataHost>
(3)修改role.xml
修改前:
<tableRule name="sharding-by-intfile">

        <rule>

            <columns>sharding_id</columns>

            <algorithm>hash-int</algorithm>

        </rule>

    </tableRule>

    <tableRule name="auto-sharding-long">

        <rule>

            <columns>id</columns>

            <algorithm>rang-long</algorithm>

        </rule>

    </tableRule>

    <tableRule name="mod-long">

        <rule>

            <columns>id</columns>

            <algorithm>mod-long</algorithm>

        </rule>

    </tableRule>

    <tableRule name="sharding-by-murmur">

        <rule>

            <columns>id</columns>

            <algorithm>murmur</algorithm>

        </rule>

    </tableRule>
修改后:
    <tableRule name="sharding-by-intfile">

        <rule>

            <columns>employee_id</columns>

            <algorithm>hash-int</algorithm>

        </rule>

    </tableRule>

    <tableRule name="auto-sharding-long">

        <rule>

            <columns>id</columns>

            <algorithm>rang-long</algorithm>

        </rule>

    </tableRule>

    <tableRule name="mod-long">

        <rule>

            <columns>hotnews_id</columns>

            <algorithm>mod-long</algorithm>

        </rule>

    </tableRule>

    <tableRule name="sharding-by-murmur">

        <rule>

            <columns>customer_id</columns>

            <algorithm>murmur</algorithm>

        </rule>

    </tableRule>
5、启动mycat并测试
【1】启动mycat
mycat start

mycat status
【2】测试
mysql -u root -p -P8066 -h 127.0.0.1
这里输入的密码,是在/home/rhr/soft/mycat/mycat/conf/server.xml里面看到的密码

这样就说明安装成功了,安装或者启动mycat之前

CentOS7.5 搭建mycat1.6.6的更多相关文章
- centos7 环境搭建
centos7 环境搭建 CentOS-7-x86_64-DVD-1511.iso vmware121. 安装 使用iso安装系统:2. 修改yum源到光盘 先把光盘C ...
- Kafka(二)CentOS7.5搭建Kafka2.11-1.1.0集群与简单测试
一.下载 下载地址: http://kafka.apache.org/downloads.html 我这里下载的是Scala 2.11对应的 kafka_2.11-1.1.0.tgz 二.kaf ...
- 在Centos7下搭建Socks5代理服务器
在Centos7下搭建Socks5代理服务器 http://blog.51cto.com/quliren/2052776 采用socks协议的代理服务器就是SOCKS服务器,是一种通用的代理服务器 ...
- 第四百零五节,centos7下搭建sentry错误日志服务器,接收python以及Django错误,
第四百零五节,centos7下搭建sentry错误日志服务器,接收python以及Django错误, 注意:版本,不然会报错 Docker >=1.11Compose >1.6.0 通过d ...
- Hyperledger超级账本在Centos7下搭建运行环境
超级账本(hyperledger)是Linux基金会于2015年发起的推进区块链数字技术和交易验证的开源项目,加入成员包括:荷兰银行(ABN AMRO).埃森哲(Accenture)等十几个不同利益体 ...
- git操作:在CentOS7上面搭建GitLab服务器
在这篇文章中将要讲解如何在CentOS7上面搭建本地的GitLab服务器. 一.安装并配置必要的依赖关系 首先要在CentOS系统上面安装所需的依赖:ssh.防火墙.postfix(用于邮件通知).w ...
- Storm(二)CentOS7.5搭建Storm1.2.2集群
一.Storm的下载 官网下载地址:http://storm.apache.org/downloads.html 这里下载最新的版本storm1.2.2,进入之后选择一个镜像下载 二.Storm伪分布 ...
- HBase(二)CentOS7.5搭建HBase1.2.6HA集群
一.安装前提 1.HBase 依赖于 HDFS 做底层的数据存储 2.HBase 依赖于 MapReduce 做数据计算 3.HBase 依赖于 ZooKeeper 做服务协调 4.HBase源码是j ...
- Spark(二)CentOS7.5搭建Spark2.3.1分布式集群
一 下载安装包 1 官方下载 官方下载地址:http://spark.apache.org/downloads.html 2 安装前提 Java8 安装成功 zookeeper 安 ...
随机推荐
- Unity-2017.2官方实例教程Roll-a-ball(一)
声明: 本文系转载,由于Unity版本不同,文中有一些小的改动,原文地址:http://www.jianshu.com/p/6e4b0435e30e Unity-2017.2官方实例教程Roll-a- ...
- 洛谷P1352——动规
题目:https://www.luogu.org/problemnew/show/P1352 代码如下: #include<iostream> #include<cstdio> ...
- poj3067Japan——树状数组查找逆序对
题目:http://poj.org/problem?id=3067 利用树状数组查找逆序对. 代码如下: #include<iostream> #include<cstdio> ...
- BOM——浏览器对象模型(Browser Object Model)
什么是BOM? BOM是Browser Object Model的缩写,简称浏览器对象模型 BOM提供了独立于内容而与浏览器窗口进行交互的对象 由于BOM主要用于管理窗口与窗口之间的通讯,因此其核心对 ...
- AR/VR-VR-Info-Micron-Insight:虚拟现实开辟心理健康新途径
ylbtech-AR/VR-VR-Info-Micron-Insight:虚拟现实开辟心理健康新途径 1.返回顶部 1. 虚拟现实开辟心理健康新途径 全国心理疾病联盟最近发表的一份报告揭示了惊人的统计 ...
- python list列表sort、sorted、reverse排序
列表排序:sort是修改原列表,sorted提供原列表的一个有序副本 li=[2,1,4,5,0]li.sort() #默认从小到大print li结果:[0, 1, 2, 4, 5] li=[2,1 ...
- opencvsharp BitmapSource图片截取问题
private BitmapSource GetUiImage(FrameworkElement ui) { RenderTargetBitmap bmp=new RenderTargetBitmap ...
- HDU - 6344 2018百度之星资格赛 1001调查问卷(状压dp)
调查问卷 Accepts: 1289 Submissions: 5642 Time Limit: 6500/6000 MS (Java/Others) Memory Limit: 262144 ...
- unity3d GUI字体设置
using System.Collections; using System.Collections.Generic; using UnityEngine; public class click001 ...
- C++11之lambda表达式解析
什么是Lanmbda? 简短函数,就地书写.常用于向函数(算法)传递函数参数. 语法 Lambda 表达式,[capture](paras)mutable->return type{statem ...