[Tensorflow] Object Detection API - build your training environment
一、前期准备
Prepare protoc
Download Protocol Buffers

Create folder: protoc and unzip it.
unsw@unsw-UX303UB$ ls

models  Others  protoc  train_data

unsw@unsw-UX303UB$ ls protoc/

bin  include  readme.txt

unsw@unsw-UX303UB$ ls protoc/bin/

protoc
Prepare model
Download model folder from tensorflow github.
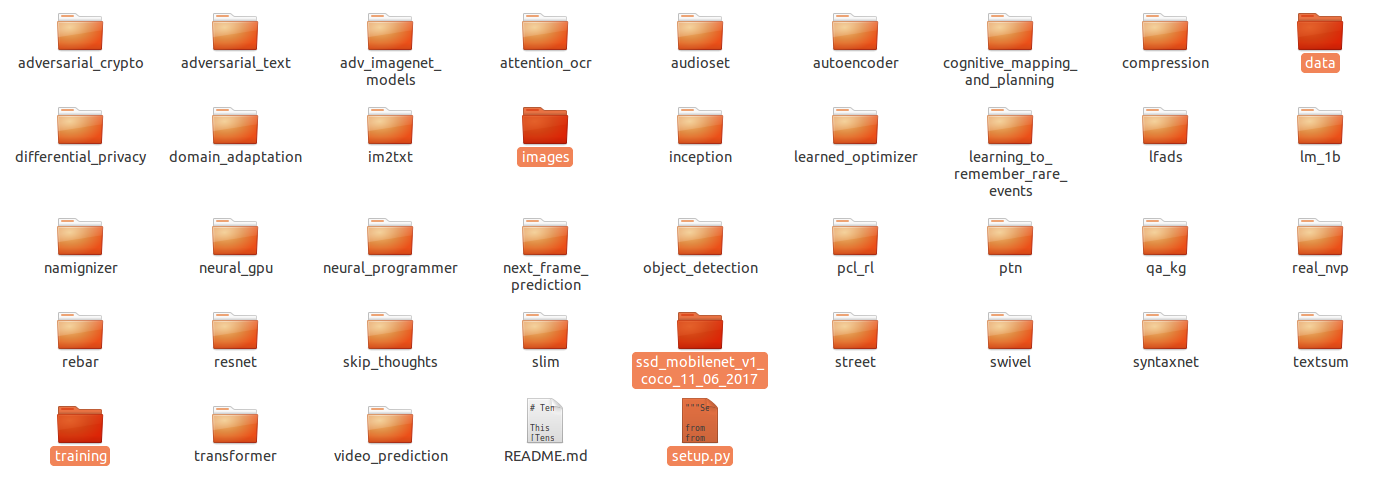
unsw@unsw-UX303UB$ git clone https://github.com/tensorflow/models.git
Cloning into 'models'...
remote: Counting objects: 7518, done.
remote: Compressing objects: 100% (5/5), done.
remote: Total 7518 (delta 0), reused 1 (delta 0), pack-reused 7513
Receiving objects: 100% (7518/7518), 157.87 MiB | 1.17 MiB/s, done.
Resolving deltas: 100% (4053/4053), done.
Checking connectivity... done. unsw@unsw-UX303UB$ ls
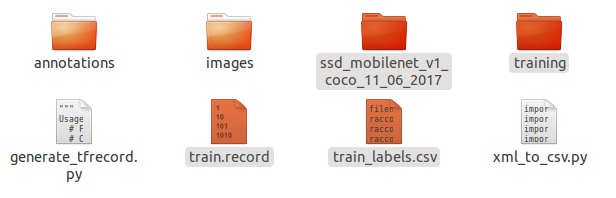
annotations images models Others raccoon_labels.csv xml_to_csv.py unsw@unsw-UX303UB$ ls models/
AUTHORS CONTRIBUTING.md LICENSE README.md tutorials
CODEOWNERS ISSUE_TEMPLATE.md official research WORKSPACE
Enter: models/research/
# Set python env.
$ export PYTHONPATH=/home/unsw/Dropbox/Programmer/1-python/Tensorflow/ssd_proj/models/research/slim::pwd:pwd/slim:$PYTHONPATH

$ python object_detection/builders/model_builder_test.py

.......

----------------------------------------------------------------------

Ran 7 tests in 0.022s

OK
Prepare train.record
Download: https://github.com/datitran/raccoon_dataset/blob/master/generate_tfrecord.py
"""

Usage:

  # From tensorflow/models/

  # Create train data:

  python generate_tfrecord.py --csv_input=data/train_labels.csv  --output_path=train.record

  # Create test data:

  python generate_tfrecord.py --csv_input=data/test_labels.csv  --output_path=test.record

"""

from __future__ import division

from __future__ import print_function

from __future__ import absolute_import

import os

import io

import pandas as pd

import tensorflow as tf

from PIL import Image

from object_detection.utils import dataset_util

from collections import namedtuple, OrderedDict

flags = tf.app.flags

flags.DEFINE_string('csv_input', '', 'Path to the CSV input')

flags.DEFINE_string('output_path', '', 'Path to output TFRecord')

FLAGS = flags.FLAGS

# TO-DO replace this with label map

def class_text_to_int(row_label):

    if row_label == 'raccoon':

        return 1

    else:

        None

def split(df, group):

    data = namedtuple('data', ['filename', 'object'])

    gb = df.groupby(group)

    return [data(filename, gb.get_group(x)) for filename, x in zip(gb.groups.keys(), gb.groups)]

def create_tf_example(group, path):

    with tf.gfile.GFile(os.path.join(path, '{}'.format(group.filename)), 'rb') as fid:

        encoded_jpg = fid.read()

    encoded_jpg_io = io.BytesIO(encoded_jpg)

    image = Image.open(encoded_jpg_io)

    width, height = image.size

    filename = group.filename.encode('utf8')

    image_format = b'jpg'

    xmins = []

    xmaxs = []

    ymins = []

    ymaxs = []

    classes_text = []

    classes = []

    for index, row in group.object.iterrows():

        xmins.append(row['xmin'] / width)

        xmaxs.append(row['xmax'] / width)

        ymins.append(row['ymin'] / height)

        ymaxs.append(row['ymax'] / height)

        classes_text.append(row['class'].encode('utf8'))

        classes.append(class_text_to_int(row['class']))

    tf_example = tf.train.Example(features=tf.train.Features(feature={

        'image/height': dataset_util.int64_feature(height),

        'image/width': dataset_util.int64_feature(width),

        'image/filename': dataset_util.bytes_feature(filename),

        'image/source_id': dataset_util.bytes_feature(filename),

        'image/encoded': dataset_util.bytes_feature(encoded_jpg),

        'image/format': dataset_util.bytes_feature(image_format),

        'image/object/bbox/xmin': dataset_util.float_list_feature(xmins),

        'image/object/bbox/xmax': dataset_util.float_list_feature(xmaxs),

        'image/object/bbox/ymin': dataset_util.float_list_feature(ymins),

        'image/object/bbox/ymax': dataset_util.float_list_feature(ymaxs),

        'image/object/class/text': dataset_util.bytes_list_feature(classes_text),

        'image/object/class/label': dataset_util.int64_list_feature(classes),

    }))

    return tf_example

def main(_):

    writer = tf.python_io.TFRecordWriter(FLAGS.output_path)

    path = os.path.join(os.getcwd(), 'images')

    examples = pd.read_csv(FLAGS.csv_input)

    grouped = split(examples, 'filename')

    for group in grouped:

        tf_example = create_tf_example(group, path)

        writer.write(tf_example.SerializeToString())

    writer.close()

    output_path = os.path.join(os.getcwd(), FLAGS.output_path)

    print('Successfully created the TFRecords: {}'.format(output_path))

if __name__ == '__main__':

    tf.app.run()
generate_tfrecord.py
NB: we will do everything in models/research/ where the env has been set well.
So, move data/images here for generate_tfrecord.py
unsw@unsw-UX303UB$ pwd

/home/unsw/Dropbox/Programmer/1-python/Tensorflow/ssd_proj/models/research

unsw@unsw-UX303UB$ python ../../generate_tfrecord.py --csv_input=../../data/raccoon_labels.csv  --output_path=../../data/train.record

Successfully created the TFRecords: /home/unsw/Programmer/1-python/Tensorflow/ssd_proj/models/research/../../data/train.record
Now, we have got train_labels.csv (name changed from raccoon_labels.csv) train.record.
tfrecord数据文件是一种将图像数据和标签统一存储的二进制文件,能更好的利用内存,在tensorflow中快速的复制,移动,读取,存储等。
Prepare pre-train model
Download pre-trained model: https://github.com/tensorflow/models/blob/master/research/object_detection/g3doc/detection_model_zoo.md
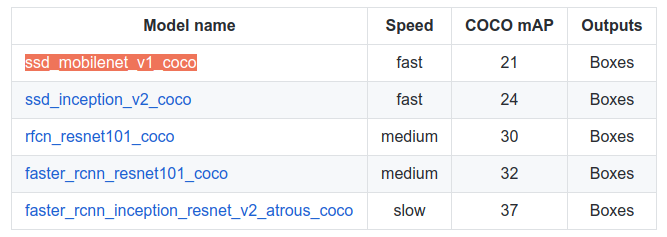
Download configure file for pre-trained model: https://github.com/tensorflow/models/tree/master/research/object_detection/samples/configs

This configure is already in our model folder:
unsw@unsw-UX303UB$ pwd

/home/unsw/Programmer/1-python/Tensorflow/ssd_proj/models/research/object_detection/samples/configs


unsw@unsw-UX303UB$ ls

faster_rcnn_inception_resnet_v2_atrous_coco.config  faster_rcnn_resnet101_voc07.config  faster_rcnn_resnet50_pets.config  ssd_inception_v2_pets.config

faster_rcnn_inception_resnet_v2_atrous_pets.config  faster_rcnn_resnet152_coco.config   rfcn_resnet101_coco.config        ssd_mobilenet_v1_coco.config

faster_rcnn_resnet101_coco.config                   faster_rcnn_resnet152_pets.config   rfcn_resnet101_pets.config        ssd_mobilenet_v1_pets.config

faster_rcnn_resnet101_pets.config                   faster_rcnn_resnet50_coco.config    ssd_inception_v2_coco.config
Configure based on your own data.
  1 # SSD with Mobilenet v1, configured for Oxford-IIIT Pets Dataset.

  2 # Users should configure the fine_tune_checkpoint field in the train config as

  3 # well as the label_map_path and input_path fields in the train_input_reader and

  4 # eval_input_reader. Search for "PATH_TO_BE_CONFIGURED" to find the fields that

  5 # should be configured.

  6

  7 model {

  8   ssd {

  9     num_classes: 1


158   fine_tune_checkpoint: "ssd_mobilenet_v1_coco_11_06_2017/model.ckpt"

159   from_detection_checkpoint: true

160   # Note: The below line limits the training process to 200K steps, which we

161   # empirically found to be sufficient enough to train the pets dataset. This

162   # effectively bypasses the learning rate schedule (the learning rate will

163   # never decay). Remove the below line to train indefinitely.

164   num_steps: 200000

165   data_augmentation_options {

166     random_horizontal_flip {

167     }

168   }

169   data_augmentation_options {

170     ssd_random_crop {

171     }

172   }

173 }

174

175 train_input_reader: {

176   tf_record_input_reader {

177     input_path: "data/train.record"

178   }

179   label_map_path: "data/object-detection.pbtxt"

180 }

181

182 eval_config: {

183   num_examples: 2000

184   # Note: The below line limits the evaluation process to 10 evaluations.

185   # Remove the below line to evaluate indefinitely.

186   max_evals: 10

187 }

188

189 eval_input_reader: {

190   tf_record_input_reader {

191     input_path: "data/test.record"

192   }

193   label_map_path: "data/object-detection.pbtxt"

194   shuffle: false

195   num_readers: 1

196 }
As above, we need to create object-detection.pbtxt as following:
item {

    id: 1

    name: 'raccoon'

}
二、开始训练
Prepare training
Move all configure files based on ssd_mobilenet_v1_pets.config as following:
training folder: object-detection.pbtxt and ssd_mobilenet_v1_pets.config.
data folder: train.record and train_labels.csv.
Training on the way
Start training.
python object_detection/train.py --logtostderr --train_dir=training/ --pipeline_config_path=training/ssd_mobilenet_v1_pets.config

INFO:tensorflow:Starting Session.

INFO:tensorflow:Saving checkpoint to path training/model.ckpt

INFO:tensorflow:Starting Queues.

INFO:tensorflow:global_step/sec: 0

INFO:tensorflow:Recording summary at step 0.

INFO:tensorflow:global step 1: loss = 14.5804 (33.780 sec/step)

INFO:tensorflow:global step 2: loss = 12.6232 (19.210 sec/step)

INFO:tensorflow:global step 3: loss = 12.0996 (17.102 sec/step)
Obviously, without GPU, life will be hard. GPU as following:
INFO:tensorflow:global step : loss = 15.2152 (9.041 sec/step)

INFO:tensorflow:global step : loss = 12.7308 (0.483 sec/step)

INFO:tensorflow:global step : loss = 11.9776 (0.450 sec/step)

INFO:tensorflow:global step : loss = 11.4102 (0.402 sec/step)

INFO:tensorflow:global step : loss = 10.8128 (0.427 sec/step)

INFO:tensorflow:global step : loss = 10.1892 (0.405 sec/step)

INFO:tensorflow:global step : loss = 9.2219 (0.396 sec/step)

INFO:tensorflow:global step : loss = 9.1491 (0.421 sec/step)

INFO:tensorflow:global step : loss = 8.5584 (0.400 sec/step)
[Tensorflow] Object Detection API - build your training environment的更多相关文章
- [Tensorflow] Object Detection API - prepare your training data
From: TensorFlow Object Detection API This chapter help you to train your own model to identify obje ...
- Install Tensorflow object detection API in Anaconda (Windows)
This blog is to explain how to install Tensorflow object detection API in Anaconda in Windows 10 as ...
- Tensorflow object detection API 搭建物体识别模型(三)
三.模型训练 1)错误一: 在桌面的目标检测文件夹中打开cmd,即在路径中输入cmd后按Enter键运行.在cmd中运行命令: python /your_path/models-master/rese ...
- 使用TensorFlow Object Detection API+Google ML Engine训练自己的手掌识别器
上次使用Google ML Engine跑了一下TensorFlow Object Detection API中的Quick Start(http://www.cnblogs.com/take-fet ...
- Tensorflow object detection API 搭建属于自己的物体识别模型
一.下载Tensorflow object detection API工程源码 网址:https://github.com/tensorflow/models,可通过Git下载,打开Git Bash, ...
- Tensorflow object detection API 搭建物体识别模型(四)
四.模型测试 1)下载文件 在已经阅读并且实践过前3篇文章的情况下,读者会有一些文件夹.因为每个读者的实际操作不同,则文件夹中的内容不同.为了保持本篇文章的独立性,制作了可以独立运行的文件夹目标检测. ...
- Tensorflow object detection API 搭建物体识别模型(二)
二.数据准备 1)下载图片 图片来源于ImageNet中的鲤鱼分类,下载地址:https://pan.baidu.com/s/1Ry0ywIXVInGxeHi3uu608g 提取码: wib3 在桌面 ...
- [Tensorflow] Object Detection API - predict through your exclusive model
开始预测 一.训练结果 From: Testing Custom Object Detector - TensorFlow Object Detection API Tutorial p.6 训练结果 ...
- TensorFlow object detection API应用
前一篇讲述了TensorFlow object detection API的安装与配置,现在我们尝试用这个API搭建自己的目标检测模型. 一.准备数据集 本篇旨在人脸识别,在百度图片上下载了120张张 ...
随机推荐
- 第一次打开app
//判断是不是第一次启动应用 if (![[NSUserDefaults standardUserDefaults] boolForKey:@"everLaunched"]) { ...
- java字符串反转
1.递归反转 public static String reverseString(String x) { if (x == null || x.length() < 2) return x; ...
- dos2unix详解
Linux命令之dos2unix - 将DOS格式文本文件转换成UNIX格式 dos2unix安装 首先说明dos2unix是将dos文本转换为unix文本,不是将gbk转换为utf8,跟文本的编码格 ...
- selenium之关于 chromedriver的安装和使用
转自:https://blog.csdn.net/d77808675/article/details/79016271 最近在学习爬虫,用到了selenium 环境:Windows,python3 但 ...
- ldconfig , ldd 与 LD_LIBRARY_PATH 之间的关系
#注意事项 64位的linux机器上的默共享库的查找路径为:/lib64 /usr/lib64.实测发现不会搜索/lib /usr/lib.而且以上的两个目录没有什么so文件./usr/local/l ...
- 微信小程序wx.switchTab传参问题
业务背景:从提问跳到列表需要刷新,以显示刚提交的数据. 但是官方文档 wx.switchTab 明确指明路径后是不能带参数的,怎么办? 网上有很多解决方案是:switchTab成功跳转后调用succe ...
- 如何将 Java 项目转换成 Maven 项目
本文内容 Java 项目 Maven 项目 Java 项目转换成 Maven 项目 本文主要介绍如何将 Java 项目转换成 Maven 项目.首先要明确的是,用 Maven 管理 Java 项目的确 ...
- Ubuntu下搭建tftp服务器最简单方法
今天开始调试ARM的板子,要通过tftp下载到板子上,所以又要配置tftp服务器,真的烦死了… (本人酷爱装系统,所以经常都要搞配置) 因为之前已经在Ubuntu下搭建过很多次tftp服务器了,但是一 ...
- oracle数据库将一列的值拼接成一行,并且各个值之间用逗号隔开
使用场景:把某一列值转换为逗号分隔的字符串 例子:比如查询所有的的表空间如下,现在要获得所有的表空间用逗号分隔的字符串(比如rman duplicate的时候skip表空间) SQL> sele ...
- plsql 操纵表数据的2种方式
1.情景展示 在plsql中,对表的操作(增.删.改.查),其实有2种方式,只是很多人都只会第一种方式罢了. 2.方式介绍 第1种方式:直接将值与sql写到一起 直接按F8运行即可. 第2种方式: ...