Elastic-Job开发指南(转)
原文地址:http://dangdangdotcom.github.io/elastic-job/post/1.x/user_guide/
开发指南
代码开发
作业类型
目前提供3种作业类型,分别是Simple, DataFlow和Script。
DataFlow类型用于处理数据流,它又提供2种作业类型,分别是ThroughputDataFlow和SequenceDataFlow。需要继承相应的抽象类。
Script类型用于处理脚本,可直接使用,无需编码。
方法参数shardingContext包含作业配置,分片和运行时信息。可通过getShardingTotalCount(), getShardingItems()等方法分别获取分片总数,运行在本作业服务器的分片序列号集合等。
Simple类型作业
Simple类型作业意为简单实现,未经任何封装的类型。需要继承AbstractSimpleElasticJob,该类只提供了一个方法用于覆盖,此方法将被定时执行。用于执行普通的定时任务,与Quartz原生接口相似,只是增加了弹性扩缩容和分片等功能。
public class MyElasticJob extends AbstractSimpleElasticJob {

    @Override

    public void process(JobExecutionMultipleShardingContext context) {

        // do something by sharding items

    }

}
ThroughputDataFlow类型作业
ThroughputDataFlow类型作业意为高吞吐的数据流作业。需要继承AbstractIndividualThroughputDataFlowElasticJob并可以指定返回值泛型,该类提供3个方法可覆盖,分别用于抓取数据,处理数据和指定是否流式处理数据。可以获取数据处理成功失败次数等辅助监控信息。如果流式处理数据,fetchData方法的返回值只有为null或长度为空时,作业才会停止执行,否则作业会一直运行下去;非流式处理数据则只会在每次作业执行过程中执行一次fetchData方法和processData方法,即完成本次作业。流式数据处理参照TbSchedule设计,适用于不间歇的数据处理。
作业执行时会将fetchData的数据传递给processData处理,其中processData得到的数据是通过多线程(线程池大小可配)拆分的。如果采用流式作业处理方式,建议processData处理数据后更新其状态,避免fetchData再次抓取到,从而使得作业永远不会停止。processData的返回值用于表示数据是否处理成功,抛出异常或者返回false将会在统计信息中归入失败次数,返回true则归入成功次数。
public class MyElasticJob extends AbstractIndividualThroughputDataFlowElasticJob<Foo> {

    @Override

    public List<Foo> fetchData(JobExecutionMultipleShardingContext context) {

        Map<Integer, String> offset = context.getOffsets();

        List<Foo> result = // get data from database by sharding items and by offset

        return result;

    }

    @Override

    public boolean processData(JobExecutionMultipleShardingContext context, Foo data) {

        // process data

        // ...

        // store offset

        for (int each : context.getShardingItems()) {

            updateOffset(each, "your offset, maybe id");

        }

        return true;

    }

}
SequenceDataFlow类型作业
SequenceDataFlow类型作业和ThroughputDataFlow作业类型极为相似,所不同的是ThroughputDataFlow作业类型可以将获取到的数据多线程处理,但不会保证多线程处理数据的顺序。如:从2个分片共获取到100条数据,第1个分片40条,第2个分片60条,配置为两个线程处理,则第1个线程处理前50条数据,第2个线程处理后50条数据,无视分片项;SequenceDataFlow类型作业则根据当前服务器所分配的分片项数量进行多线程处理,每个分片项使用同一线程处理,防止了同一分片的数据被多线程处理,从而导致的顺序问题。如:从2个分片共获取到100条数据,第1个分片40条,第2个分片60条,则系统自动分配两个线程处理,第1个线程处理第1个分片的40条数据,第2个线程处理第2个分片的60条数据。由于ThroughputDataFlow作业可以使用多于分片项的任意线程数处理,所以性能调优的可能会优于SequenceDataFlow作业。
public class MyElasticJob extends AbstractIndividualSequenceDataFlowElasticJob<Foo> {

    @Override

    public List<Foo> fetchData(JobExecutionSingleShardingContext context) {

        int offset = context.getOffset();

        List<Foo> result = // get data from database by sharding items and by offset

        return result;

    }

    @Override

    public boolean processData(JobExecutionSingleShardingContext context, Foo data) {

        // process data

        // ...

        // store offset

        updateOffset(context.getShardingItem(), "your offset, maybe id");

        return true;

    }

}
Script类型作业
Script类型作业意为脚本类型作业,支持shell,python,perl等所有类型脚本。只需通过控制台/代码配置scriptCommandLine即可。执行脚本路径可以包含参数,最后一个参数为作业运行时信息.
#!/bin/bash

echo sharding execution context is $*
作业运行时输出
sharding execution context is {"shardingItems":[0,1,2,3,4,5,6,7,8,9],"shardingItemParameters":{},"offsets":{},"jobName":"scriptElasticDemoJob","shardingTotalCount":10,"jobParameter":"","monitorExecution":true,"fetchDataCount":1}
批量处理
为了提高数据处理效率,数据流类型作业提供了批量处理数据的功能。之前逐条处理数据的两个抽象类分别是AbstractIndividualThroughputDataFlowElasticJob和AbstractIndividualSequenceDataFlowElasticJob,批量处理则使用另外两个接口AbstractBatchThroughputDataFlowElasticJob和AbstractBatchSequenceDataFlowElasticJob。不同之处在于processData方法的返回值从boolean类型变为int类型,用于表示一批数据处理的成功数量,第二个入参则转变为List数据集合。
异常处理
elastic-job在最上层接口提供了handleJobExecutionException方法,使用作业时可以覆盖此方法,并使用quartz提供的JobExecutionException控制异常后作业的声明周期。默认实现是直接将异常抛出。示例:
任务监听配置
可以通过配置多个任务监听器,在任务执行前和执行后执行监听的方法。监听器分为每台作业节点均执行和分布式场景中仅单一节点执行两种。
每台作业节点均执行的监听
若作业处理作业服务器的文件,处理完成后删除文件,可考虑使用每个节点均执行清理任务。此类型任务实现简单,且无需考虑全局分布式任务是否完成,请尽量使用此类型监听器。
步骤:
- 定义监听器
import com.dangdang.ddframe.job.api.JobExecutionMultipleShardingContext;

import com.dangdang.ddframe.job.api.listener.ElasticJobListener;

public class MyElasticJobListener implements ElasticJobListener {

    @Override

    public void beforeJobExecuted(final JobExecutionMultipleShardingContext shardingContext) {

        // do something ...

    }

    @Override

    public void afterJobExecuted(final JobExecutionMultipleShardingContext shardingContext) {

        // do something ...

    }

}
- 将监听器作为参数传入
JobScheduler
public class JobMain {

    public static void main(final String[] args) {

        new JobScheduler(regCenter, jobConfig, new MyElasticJobListener()).init();

    }

}
分布式场景中仅单一节点执行的监听
若作业处理数据库数据,处理完成后只需一个节点完成数据清理任务即可。此类型任务处理复杂,需同步分布式环境下作业的状态同步,提供了超时设置来避免作业不同步导致的死锁,请谨慎使用。
步骤:
- 定义监听器
import com.dangdang.ddframe.job.api.JobExecutionMultipleShardingContext;

import com.dangdang.ddframe.job.api.listener.AbstractDistributeOnceElasticJobListener;

public final class TestDistributeOnceElasticJobListener extends AbstractDistributeOnceElasticJobListener {

    public TestDistributeOnceElasticJobListener(final long startTimeoutMills, final long completeTimeoutMills) {

        super(startTimeoutMills, completeTimeoutMills);

    }

    @Override

    public void doBeforeJobExecutedAtLastStarted(final JobExecutionMultipleShardingContext shardingContext) {

        // do something ...

    }

    @Override

    public void doAfterJobExecutedAtLastCompleted(final JobExecutionMultipleShardingContext shardingContext) {

        // do something ...

    }

}
- 将监听器作为参数传入
JobScheduler
public class JobMain {

    public static void main(final String[] args) {

        long startTimeoutMills = 5000L;

        long completeTimeoutMills = 10000L;

        new JobScheduler(regCenter, jobConfig, new MyDistributeOnceElasticJobListener(startTimeoutMills, completeTimeoutMills)).init();

    }

}
作业配置
与Spring容器配合使用作业,可以将作业Bean配置为Spring Bean,可在作业中通过依赖注入使用Spring容器管理的数据源等对象。可用placeholder占位符从属性文件中取值。
Spring命名空间配置
<?xml version="1.0" encoding="UTF-8"?>
<beans xmlns="http://www.springframework.org/schema/beans"
xmlns:xsi="http://www.w3.org/2001/XMLSchema-instance"
xmlns:reg="http://www.dangdang.com/schema/ddframe/reg"
xmlns:job="http://www.dangdang.com/schema/ddframe/job"
xsi:schemaLocation="http://www.springframework.org/schema/beans
http://www.springframework.org/schema/beans/spring-beans.xsd
http://www.dangdang.com/schema/ddframe/reg
http://www.dangdang.com/schema/ddframe/reg/reg.xsd
http://www.dangdang.com/schema/ddframe/job
http://www.dangdang.com/schema/ddframe/job/job.xsd
">
<!--配置作业注册中心 -->
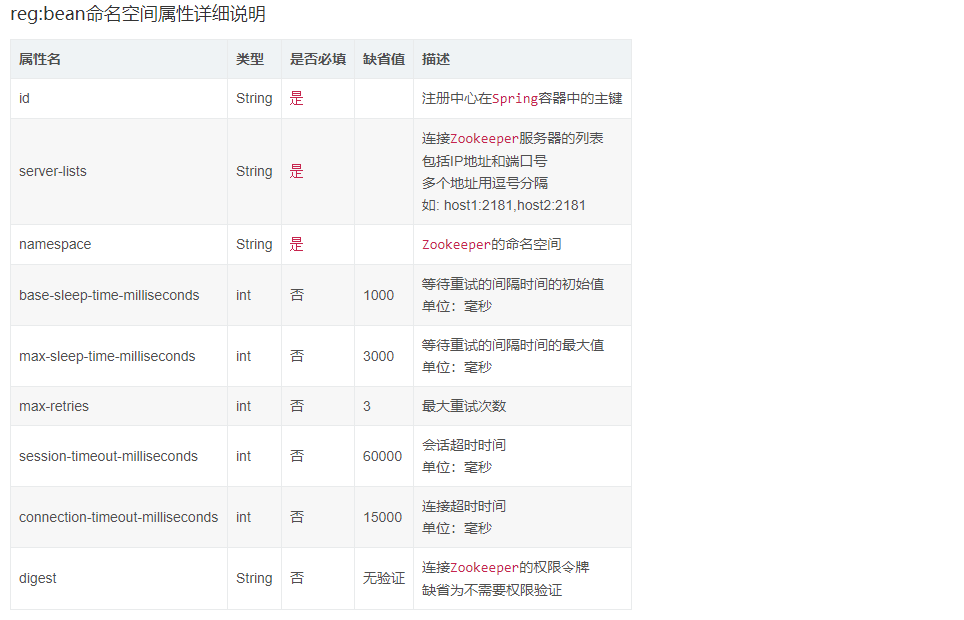
<reg:zookeeper id="regCenter" server-lists=" yourhost:2181" namespace="dd-job" base-sleep-time-milliseconds="1000" max-sleep-time-milliseconds="3000" max-retries="3" /> <!-- 配置简单作业-->
<job:simple id="simpleElasticJob" class="xxx.MySimpleElasticJob" registry-center-ref="regCenter" cron="0/10 * * * * ?" sharding-total-count="3" sharding-item-parameters="0=A,1=B,2=C" /> <!-- 配置数据流作业-->
<job:dataflow id="throughputDataFlow" class="xxx.MyThroughputDataFlowElasticJob" registry-center-ref="regCenter" cron="0/10 * * * * ?" sharding-total-count="3" sharding-item-parameters="0=A,1=B,2=C" process-count-interval-seconds="10" concurrent-data-process-thread-count="10" /> <!-- 配置脚本作业-->
<job:script id="scriptElasticJob" registry-center-ref="regCenter" cron="0/10 * * * * ?" sharding-total-count="3" sharding-item-parameters="0=A,1=B,2=C" script-command-line="/your/file/path/demo.sh" /> <!-- 配置带监听的简单作业-->
<job:simple id="listenerElasticJob" class="xxx.MySimpleListenerElasticJob" registry-center-ref="regCenter" cron="0/10 * * * * ?" sharding-total-count="3" sharding-item-parameters="0=A,1=B,2=C">
<job:listener class="xx.MySimpleJobListener"/>
<job:listener class="xx.MyOnceSimpleJobListener" started-timeout-milliseconds="1000" completed-timeout-milliseconds="2000" />
</job:simple>
</beans>
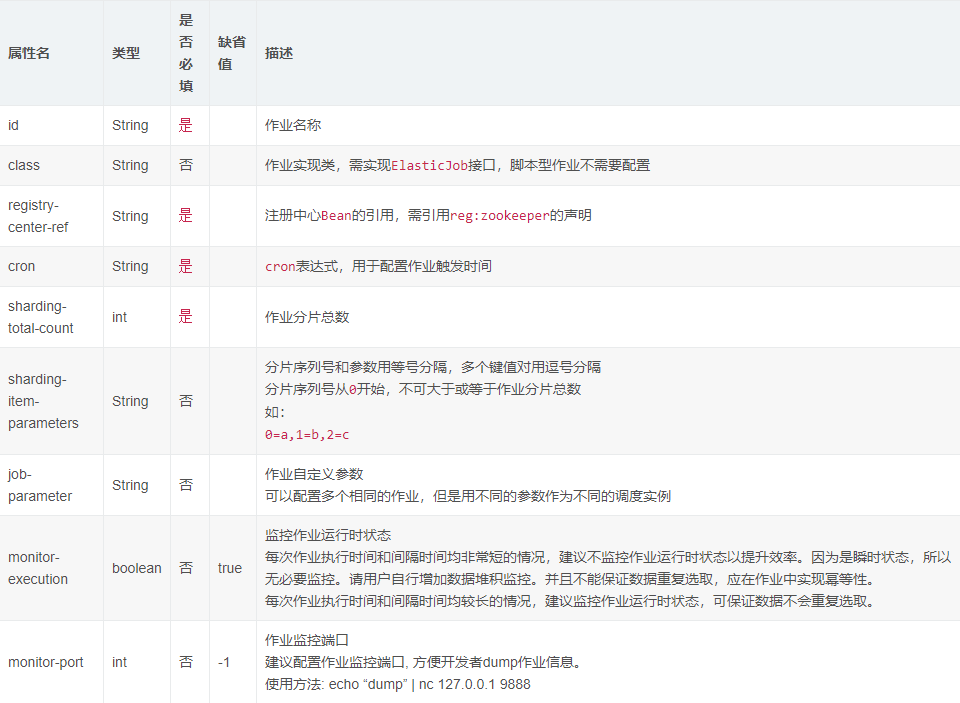
job:simple命名空间属性详细说明

job:dataflow命名空间属性详细说明
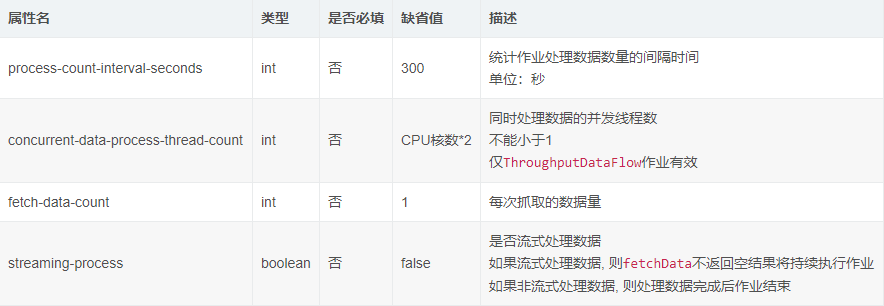
job:dataflow命名空间拥有job:simple命名空间的全部属性,以下仅列出特有属性
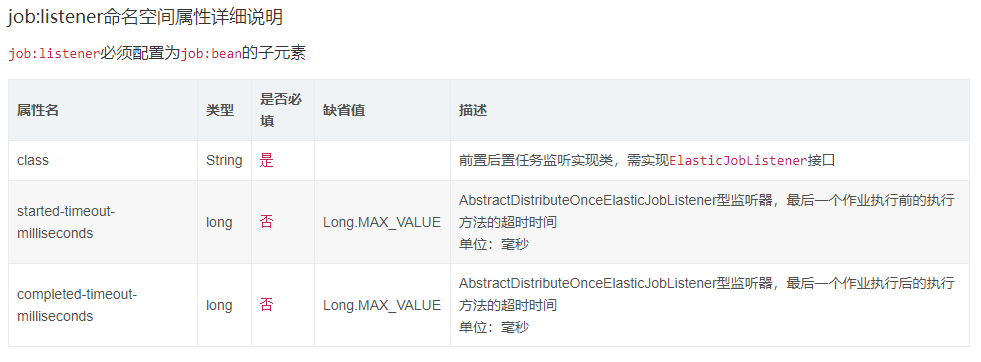
job:script命名空间属性详细说明,基本属性参照job:simple命名空间属性详细说明
job:script命名空间拥有job:simple命名空间的全部属性,以下仅列出特有属性

不使用Spring配置
如果不使用Spring框架,可以用如下方式启动作业。
import com.dangdang.ddframe.job.api.config.JobConfiguration;

import com.dangdang.ddframe.job.api.JobScheduler;

import com.dangdang.ddframe.reg.base.CoordinatorRegistryCenter;

import com.dangdang.ddframe.reg.zookeeper.ZookeeperConfiguration;

import com.dangdang.ddframe.reg.zookeeper.ZookeeperRegistryCenter;

import com.dangdang.example.elasticjob.core.job.SimpleJobDemo;

import com.dangdang.example.elasticjob.core.job.ThroughputDataFlowJobDemo;

import com.dangdang.example.elasticjob.core.job.SequenceDataFlowJobDemo;

import com.dangdang.ddframe.job.plugin.job.type.integrated.ScriptElasticJob;

public class JobDemo {

    // 定义Zookeeper注册中心配置对象

    private ZookeeperConfiguration zkConfig = new ZookeeperConfiguration("localhost:2181", "elastic-job-example", 1000, 3000, 3);

    // 定义Zookeeper注册中心

    private CoordinatorRegistryCenter regCenter = new ZookeeperRegistryCenter(zkConfig);

    // 定义简单作业配置对象

    private final SimpleJobConfiguration simpleJobConfig = JobConfigurationFactory.createSimpleJobConfigurationBuilder("simpleElasticDemoJob",

                    SimpleJobDemo.class, 10, "0/30 * * * * ?").build();

    // 定义高吞吐流式处理的数据流作业配置对象

    private final DataFlowJobConfiguration throughputJobConfig = JobConfigurationFactory.createDataFlowJobConfigurationBuilder("throughputDataFlowElasticDemoJob",

                    ThroughputDataFlowJobDemo.class, 10, "0/5 * * * * ?").streamingProcess(true).build();

    // 定义顺序的数据流作业配置对象

    private final DataFlowJobConfiguration sequenceJobConfig = JobConfigurationFactory.createDataFlowJobConfigurationBuilder("sequenceDataFlowElasticDemoJob",

                    SequenceDataFlowJobDemo.class, 10, "0/5 * * * * ?").build();

    // 定义脚本作业配置对象

    private final ScriptJobConfiguration scriptJobConfig = JobConfigurationFactory.createScriptJobConfigurationBuilder("scriptElasticDemoJob",

                    10, "0/5 * * * * ?", "test.sh").build();

    public static void main(final String[] args) {

        new JobDemo().init();

    }

    private void init() {

        // 连接注册中心

        regCenter.init();

        // 启动简单作业

        new JobScheduler(regCenter, simpleJobConfig).init();

        // 启动高吞吐流式处理的数据流作业

        new JobScheduler(regCenter, throughputJobConfig).init();

        // 启动顺序的数据流作业

        new JobScheduler(regCenter, sequenceJobConfig).init();

        // 启动脚本作业

        new JobScheduler(regCenter, scriptJobConfig).init();

    }

}
Elastic-Job开发指南(转)的更多相关文章
- ASP.NET Aries 开源开发框架:开发指南(一)
前言: 上周开源了Aries开发框架后,好多朋友都Download了源码,在运行过程里,有一些共性的问题会问到. 所以本篇打算写一下简单的开发指南,照顾一下不是太看的懂源码的同学,同时也会讲解一下框架 ...
- FreeMarker模板开发指南知识点梳理
freemarker是什么? 有什么用? 怎么用? (问得好,这些都是我想知道的问题) freemarker是什么? FreeMarker 是一款 模板引擎: 即一种基于模板和要改变的数据, 并用来生 ...
- Jetty使用教程(四:21-22)—Jetty开发指南
二十一.嵌入式开发 21.1 Jetty嵌入式开发HelloWorld 本章节将提供一些教程,通过Jetty API快速开发嵌入式代码 21.1.1 下载Jetty的jar包 Jetty目前已经把所有 ...
- JVM 平台上的各种语言的开发指南
JVM 平台上的各种语言的开发指南 为什么我们需要如此多的JVM语言? 在2013年你可以有50中JVM语言的选择来用于你的下一个项目.尽管你可以说出一大打的名字,你会准备为你的下一个项目选择一种新的 ...
- iOS原生地图开发指南续——大头针与自定义标注
iOS原生地图开发指南续——大头针与自定义标注 出自:http://www.sxt.cn/info-6042-u-7372.html 在上一篇博客中http://my.oschina.net/u/23 ...
- Angularjs中文版本开发指南发布
从本人开始在写关于Angularjs的文章开始,也算是见证了Angularjs在国内慢慢的火起来,如今的Angularjs正式如日中天.想知道为什么Angularjs会这么火,请移步angularjs ...
- nodejs开发指南读后感
nodejs开发指南读后感 阅读目录 使用nodejs创建http服务器; supervisor的使用及nodejs常见的调式代码命令了解; 了解Node核心模块; ejs模板引擎 Express 理 ...
- Libgdx 开发指南——目录
本系列文档选译自libgdx github项目 wiki : https://github.com/libgdx/libgdx/wiki 由于关于Libgdx的中文文档非常稀缺,因此在这里对官方Wik ...
- jQuery MiniUI 开发指南+API组件参考手册
jQuery MiniUI 开发指南 本文档将逐步的讲解jQuery MiniUI的方方面面,从此您将踏上jQuery MiniUI的深入探索之旅. 1.Hello M ...
- 《CSS3专业网页开发指南》笔记
书本:<CSS3专业网页开发指南>(the book of css3) Peter Gasston 著 李景媛 吴晓嘉 译 第1章: 1.box-sizing : IE8及以上版本 ...
随机推荐
- 2019icpc-徐州网络赛
B. hxc写的 AC code: #pragma GCC optimize(2) #include <cstdio> #include <queue> #include &l ...
- [转帖]龙芯服务器部署WEB服务的体验和详细步骤
龙芯服务器部署WEB服务的体验和详细步骤 2019年01月02日 18:40:34 weixin_40065369 阅读数 1733 版权声明:本文为博主原创文章,遵循CC 4.0 by-sa版权 ...
- Java--垃圾回收【转载】
一:垃圾回收机制的意义 java 语言中一个显著的特点就是引入了java回收机制,可以有效的防止内存泄露,有效的使用空闲的内存. 内存泄露:指该内存空间使用完毕后未回收,在不涉及复杂数据结构的一般情况 ...
- 西安区域赛 D.Miku and Generals 二分图+背包
Miku and Generals Describe "Miku is matchless in the world!" As everyone knows, Nakano Mik ...
- 剑指offer16:输入两个单调递增的链表,合成后的链表满足单调不减规则。
1 题目描述 输入两个单调递增的链表,输出两个链表合成后的链表,当然我们需要合成后的链表满足单调不减规则. 2 思路与方法 迭代法:两个链表中较小的头结点作为合并后头结点,之后依次合并两个链表中较小的 ...
- PHP max_input_var设为了1000导致post数组太多时无法接受后面的参数值
PHP max_input_var设为了1000导致post数组太多时无法接受后面的参数值 下午突然接到格力电话说无法批量设置门店任务,但是在测试环境下无法重现,测试环境下好好的. 然后登陆到生产环境 ...
- ThreadLocal使用场景,原理
ThreadLocal 1. 先说下 ThreadLocal不能解决多线程间共享数据,他是一个隔离多线程间共享数据的好帮手 2. ThreadLocal是本地线程共享数据 3. 他是以空间换时间 sy ...
- java中的exception stack有时候不输出的原因
有时候,我们在看java错误日志时,只看到一个java.lang.NullPointerException,却没有看到错误的栈,原因是启动时候有一项参数可以选择配置:OmitStackTraceInF ...
- 使用Harbor搭建Docker私有仓库
ip:192.168.0.145 环境设置 防火墙,selinux等,可以使用本章开头的那个shell脚本 其他主机的hosts文件也都添加上 ip hub.aaa.com windows系统的hos ...
- DateTime.TryParse 日期时间字符串验证
DateTime applicationDatetime = new DateTime(); bool applicationDate = DateTime.TryParse("2019-0 ...