【Spring Framework】Spring入门教程(二)基于xml配置对象容器
基于xml配置对象容器——xml 标签说明
alias标签
作用:为已配置的bean设置别名
--applicationContext.xml配置文件
<?xml version="1.0" encoding="UTF-8"?>

<beans xmlns="http://www.springframework.org/schema/beans"

       xmlns:xsi="http://www.w3.org/2001/XMLSchema-instance"

       xsi:schemaLocation="http://www.springframework.org/schema/beans

        http://www.springframework.org/schema/beans/spring-beans.xsd">

    <bean id="user" class="org.cjw.pojo.User" />

    <!--

        标签alias:为已配置的bean设置别名

            name属性:必要属性,代表为哪一个bena配置别名

                此属性的值为其他bean标签的id或name属性值

            alias属性:必要属性,代表新命名的别名是什么

    -->

    <alias name="user" alias="user1" />

</beans>
--测试代码
package org.cjw.pojo.test;

import org.cjw.pojo.User;

import org.junit.Test;

import org.springframework.context.support.ClassPathXmlApplicationContext;

public class UserTest {

    @Test

    public void testAlias() {

        ClassPathXmlApplicationContext context = new ClassPathXmlApplicationContext("applicationContext.xml");

        // 通过id获取User对象

        User user = context.getBean("user", User.class);

        System.out.println(user);

        System.out.println("-----------------");

        // 通过别名获取User对象

        User user2 = context.getBean("user1", User.class);

        System.out.println(user2);

    }

}
--测试结果

bean标签的配置
5.2.1. bean标签作用
用于声明一个类,在启动Spring框架的时候根据配置信息创建对象到Spring容器里面。
5.2.2. 属性说明
<?xml version="1.0" encoding="UTF-8"?>
<beans xmlns="http://www.springframework.org/schema/beans"
xmlns:xsi="http://www.w3.org/2001/XMLSchema-instance"
xsi:schemaLocation="http://www.springframework.org/schema/beans
http://www.springframework.org/schema/beans/spring-beans.xsd">
<!--
<bean>标签:用于声明一个类,在启动Spring框架的时候配置信息创建对象到spring容器里面去
name属性:设置对象名(唯一标识符),可以有多个名称,每一个名称用逗号隔开,如name1,name2
id属性:设置对象名(唯一标识符),功能和name一样,但是id只能有一个
class属性:用于指定对象对应的类名,用于反射创建对象
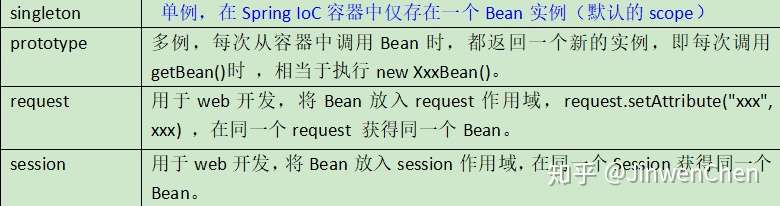
scope属性:用于设置对象的作用范围,可选参数如下:
*singleton:单例(默认)
对象出生:当程序加载配置文件创建容器时,创建
对象活着:只要容器还在,一直活着
对象死亡:应用停止,容器销毁,对象死亡
*propertype:多例(原型对象)
对象出生:当程序加载配置文件创建容器时,创建
对象活着:只要对象被使用,一直活着
对象死亡:对象长时间不用,会被java立即回收机制回收
*request:web项目中,Spring将创建的对象放在request作用域中
*session:web项目中,Spring将创建的对象放在session作用域中
-->
<bean id="customerServiceImpl" class="org.cjw.service.impl.CustomerServiceImpl" scope="singleton" />
</beans>
5.2.3. Bean作用范围
作用范围也可以说生命周期(bean能存活多久)
<bean id="" class="" scope="作用域"/>
在开发中主要使用 scope="singleton"、 scope="prototype"
对于MVC中的Action/Controller使用prototype类型,其他使用singleton
<?xml version="1.0" encoding="UTF-8"?>

<beans xmlns="http://www.springframework.org/schema/beans"

       xmlns:xsi="http://www.w3.org/2001/XMLSchema-instance"

       xsi:schemaLocation="http://www.springframework.org/schema/beans

        http://www.springframework.org/schema/beans/spring-beans.xsd">

    <!--

      <bean id="" class="" scope="作用域"/>

      scope : 配置当前bean的范围大小

      singleton: 单例 ,在Spring IoC容器中仅存在一个Bean实例 (默认的scope)

      prototype: 多例 ,每次从容器中调用Bean时,都返回一个新的实例,即每次调用getBean()时 ,相当于执行new XxxBean()

    -->

    <bean id="customerServiceImpl" class="org.cjw.service.impl.CustomerServiceImpl" scope="prototype" />

</beans>
在Web开发的三层架构中
Web:一般都是多例
Service:单例
DAO:单例
如果使用struct,那么会在表示层使用成员变量来接受前端发送过来的参数,此时如果表示层使用的是单例,那么会造成数据的错乱,所以表示层需要使用多例。
而现在springMVC已经不再使用成员变量来接受前端参数了,而是直接对应方法的参数,所以表示层可以使用单例,因为方法的参数是在程序运行过程中才会被赋值,所以不存在数据错乱的问题,因此可以使用单例。
单例和多例的使用判断准则:是否存在共享数据情况,如果有,使用多例,没有则单例。如果使用了单例还存在共享数据的情况,那么就需要使用锁来保证数据的正确性。
实例化Bean的四种方式
Spring创建对象的四种方式
5.3.1. 构造器实例化(无参数构造器),最标准,使用最多。
package org.cjw.pojo;

public class SomeBean1 {

    public SomeBean1() {

        System.out.println("SomeBean.SomeBean1()");

    }

}
--配置文件
<!-- ①构造器实例化(无参构造器),最标准、使用最多 -->

<bean id="someBean1"  class="org.cjw.pojo.SomeBean1"/>
5.3.2. 通过静态方法工厂创建(了解)
--bean、静态工厂类
SomeBean2、SomeBean2Factory

public class SomeBean2 {

    public SomeBean2() {

        System.out.println("SomeBean.SomeBean2()");

    }

}

public class SomeBean2Factory {

    public static SomeBean2 getSomeBean2() {

        System.out.println("执行静态工厂方法");

        return new SomeBean2();

    }

}
--静态工厂配置
<!-- ②.静态工厂方法实例化:解决系统遗留问题 -->

<bean id="someBean2" class="org.cjw.factory.SomeBean2Factory" factory-method="getSomeBean2" />
5.3.3. 通过实例工厂创建(了解)
--实体工厂
public class SomeBean3 {

    public SomeBean3() {

        System.out.println("SomeBean.SomeBean3()");

    }

}

public class SomeBean3Facotry {

    //实例工厂方法

    public SomeBean3 getSomeBean3() {

        System.out.println("执行实例工厂方法");

        return new SomeBean3();

    }

}
--配置方式
<!-- 1.配置工厂bean -->

<bean id="someBean3Factory" class="org.cjw.factory.SomeBean3Facotry"></bean>

<!-- 2.配置bena

    factory-bean : 创建bean的工厂对象对应的 id

    factory-method : 工厂bean中返回 bean对象的方法

 -->

<bean id="someBean3" factory-bean="someBean3Factory" factory-method="getSomeBean3"/>
5.3.4. 实现FactoryBean接口实例化:实例工厂变种(了解)
实现FactoryBean接口,MyBatis和Spring集成就是使用的这种方式。
此种方式,如果没有使用Bean对应的对象,Spring就不会自动创建,只有在使用的时候Spring才会创建对应的对象。
public class SomeBean4 {

    public SomeBean4() {

        System.out.println("SomeBean4.SomeBean4()");

    }

}

public class SomeBean4ObjectFactory implements FactoryBean<SomeBean4> {

    @Override

    public SomeBean4 getObject() throws Exception {

        SomeBean4 bean4 = new SomeBean4();

        return bean4;

    }

    @Override

    public Class<?> getObjectType() {

        return null;

    }

    @Override

    public boolean isSingleton() {

        return false;

    }

}
--配置方式
<!-- ④.实现FactoryBean接口实例化:实例工厂变种:集成其他框架使用:LocalSessionFactoryBean -->

<bean id="someBean4" class="org.cjw.factory.SomeBean4ObjectFactory" />
初始化和销毁方法
比如DataSource,SessionFactory最终都需要关闭资源:在Bean销毁之前,都要调用close方法.
<bean id="someBean" class="......"

   		init-method="该类中初始化方法名" destroy-method="该类中销毁方法名">

</bean>
init-method:bean生命周期初始化方法,对象创建后就进行调用
destroy-method:容器被销毁的时候,如果bean被容器管理,会调用该方法。
default-init-method:指定默认的初始化方法
分析原理:
如果bean的scope="prototype",那么容器只负责创建和初始化,它并不会被spring容器管理。交给用户自己调用。
<?xml version="1.0" encoding="UTF-8"?>

<beans xmlns="http://www.springframework.org/schema/beans"

       xmlns:xsi="http://www.w3.org/2001/XMLSchema-instance"

       xsi:schemaLocation="http://www.springframework.org/schema/beans

        http://www.springframework.org/schema/beans/spring-beans.xsd"

        default-init-method="init">

        <!--

            配置全局初始化方法,如果有100个bean中都有init方法,那么只要Spring容器一启动,bean对象一创建

            默认对象中只要有 init方法,都全部会执行:一般不建议使用

        -->

     <!--

       init-method : 配置初始化方法名

       destroy-method : 配置销毁方法名

    -->

    <bean id="someBean" class="org.cjw.pojo.SomeBean1" init-method="init" destroy-method="destory" />

</beans>
获得properties文件的值
Spring配置文件支持通过xxx.properties文件的Key获得对应的值。实现该功能是通过${Key}来获得Properties文件指定Key的Value值。
使用Spring读取配置文件必须导入新的命名空间(context)。
导入命名空间方法:将命名空间和约束重新拷贝一份,将对应的全部替换成 context,然后关联context本地schema约束。
<?xml version="1.0" encoding="UTF-8"?>

<beans xmlns="http://www.springframework.org/schema/beans"

       xmlns:xsi="http://www.w3.org/2001/XMLSchema-instance"

       xmlns:context="http://www.springframework.org/schema/context"

       xsi:schemaLocation="http://www.springframework.org/schema/beans

        http://www.springframework.org/schema/beans/spring-beans.xsd

        http://www.springframework.org/schema/context

        http://www.springframework.org/schema/context/spring-context.xsd">
使用Spring创建阿里巴巴 Druid连接池(读取配置文件)
7.1.1. 拷贝Mysql驱动包和druid连接池jar包到项目中

7.1.2. 创建 db.properites
jdbc.driverClassName=com.mysql.jdbc.Driver

jdbc.url=jdbc:mysql://localhost:3306/users

jdbc.username=root

jdbc.password=root

jdbc.maxActive=10
7.1.3. applicationContext.xml配置
<?xml version="1.0" encoding="UTF-8"?>

<beans xmlns="http://www.springframework.org/schema/beans"

       xmlns:xsi="http://www.w3.org/2001/XMLSchema-instance"

       xmlns:context="http://www.springframework.org/schema/context"

       xsi:schemaLocation="http://www.springframework.org/schema/beans

        http://www.springframework.org/schema/beans/spring-beans.xsd

        http://www.springframework.org/schema/context

        http://www.springframework.org/schema/context/spring-context.xsd">

    <!-- 读取classpath下的db.properties配置文件 -->

    <context:property-placeholder location="classpath:db.properties" />

    <!-- 配置数据源 -->

    <bean id="dataSource" class="com.alibaba.druid.pool.DruidDataSource">

        <property name="driverClassName" value="${jdbc.driverClassName}" />

        <property name="url" value="${jdbc.url}" />

        <property name="username" value="${jdbc.username}" />

        <property name="password" value="${jdbc.password}" />

        <property name="maxActive" value="${jdbc.maxActive}" />

    </bean>

</beans>
7.1.4. 测试代码
@Test
public void testAlias() {
try {
ClassPathXmlApplicationContext context = new ClassPathXmlApplicationContext("applicationContext.xml");
DataSource dataSource = context.getBean("dataSource", DataSource.class);
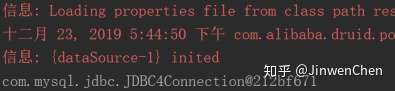
Connection connection = dataSource.getConnection();
System.out.println(connection);
} catch (SQLException e) {
e.printStackTrace();
}
}
7.1.5. 效果
综合案例-模拟注册功能
此功能重点在于将每一层对象的创建交给Spring管理,对象之间的依赖关系交给Spring来维护。
Dao层接口以及实现代码
public interface UserDao {

    public void insert(User user);

}

public class UserDaoImpl implements UserDao {

    @Override

    public void insert(User user) {

        System.out.println("注册功能Dao层方法执行了");

    }

}
Service层接口以及实现代码
public interface UserService {

    void insert(User user);

}

public class UserServiceImpl implements UserService {

    private UserDao userDao;

    public void setUserDao(UserDao userDao) {

        this.userDao = userDao;

    }

    @Override

    public void insert(User user) {

        System.out.println("注册功能Service层方法执行了");

        userDao.insert(user);

    }

}
Web表现层实现代码
package org.cjw.controller;

import org.cjw.pojo.User;

import org.cjw.service.UserService;

public class UserController {

    private UserService userService;

    public void setUserService(UserService userService) {

        this.userService = userService;

    }

    public void insert() {

        System.out.println("注册功能Controller层方法执行了");

        User user = new User();

        userService.insert(user);

    }

}
applicationContext.xml文件配置代码
(重点),一定要掌握每层的配置,和每层之间对象的依赖关系的维护
<?xml version="1.0" encoding="UTF-8"?>

<beans xmlns="http://www.springframework.org/schema/beans"

       xmlns:xsi="http://www.w3.org/2001/XMLSchema-instance"

       xsi:schemaLocation="http://www.springframework.org/schema/beans

        http://www.springframework.org/schema/beans/spring-beans.xsd">

    <bean id="userController" class="org.cjw.controller.UserController">

        <property name="userService" ref="userService" />

    </bean>

    <bean id="userService" class="org.cjw.service.impl.UserServiceImpl">

        <property name="userDao" ref="userDao" />

    </bean>

    <bean id="userDao" class="org.cjw.dao.impl.UserDaoImpl" />

</beans>
测试代码
@Test

public void testAlias() {

    ClassPathXmlApplicationContext context = new ClassPathXmlApplicationContext("applicationContext.xml");

    UserController userController = context.getBean("userController", UserController.class);

    userController.insert();

}
测试结果

小结
1. 基于xml和ClassPathXmlApplicationContext配置容器
2. Spring读取 .Properteis配置文件
3. 综合案例-模拟注册功能-使用Spring管理对象
【Spring Framework】Spring入门教程(二)基于xml配置对象容器的更多相关文章
- MyBatis入门程序(基于XML配置)
创建一个简单的MyBatis入门程序,实现对学生信息的增删改查功能(基于XML配置) 一.新建一个Java工程,导入MyBatis核心jar包.日志相关的jar包以及连接Oracle数据库所需驱动包, ...
- 使用Spring框架入门一:基于XML配置的IOC/DI的使用
一.Spring框架 1.方法一:逐项导入基础依赖包: spring-core.spring-beans.spring-context.spring-expression 2.方法二:最简洁的导入,直 ...
- 使用Spring框架入门三:基于XML配置的AOP的使用
一.引入Jar包 <!--测试1使用--> <dependency> <groupId>org.springframework</groupId> &l ...
- JAVA Spring 事物 ( 已转账为例 ) 基于 XML 配置,事务类型说明
< 1 > 配置文件 <?xml version="1.0" encoding="UTF-8"?> <beans xmlns=&q ...
- Spring学习之旅(七)基于XML配置与基于AspectJ注解配置的AOP编程比较
本篇博文用一个稍复杂点的案例来对比一下基于XML配置与基于AspectJ注解配置的AOP编程的不同. 相关引入包等Spring AOP编程准备,请参考小编的其他博文,这里不再赘述. 案例要求: 写一 ...
- Spring Boot 框架下使用MyBatis访问数据库之基于XML配置的方式
MyBatis 是一款优秀的持久层框架,它支持定制化 SQL.存储过程以及高级映射.MyBatis 避免了几乎所有的 JDBC 代码和手动设置参数以及获取结果集.MyBatis 可以使用简单的 XML ...
- 一步一步深入spring(6)--使用基于XML配置的spring实现的AOP
上节我们提到了使用基于注解实现的AOP,这节我们将用基于xml配置的方式来实现的AOP. 1.首先建立一个类,作为切面类,这个类主要用来实现注解中各种通知要实现的方法. package com.yan ...
- Spring声明式事务管理(基于XML方式实现)
--------------------siwuxie095 Spring 声明式事务管理(基于 XML 方式实现) 以转账为例 ...
- Unit03: Spring Web MVC简介 、 基于XML配置的MVC应用 、 基于注解配置的MVC应用
Unit03: Spring Web MVC简介 . 基于XML配置的MVC应用 . 基于注解配置的MVC应用 springmvc (1)springmvc是什么? 是一个mvc框架,用来简化基于mv ...
随机推荐
- Swift-Framework(一)访问资源文件
摘要 Framework 就是在 APP 应用中的一种封装功能的表现形式,虽然不能独立运行,但是也可以在它里面存放和访问图片.语音等资源文件,可算是麻雀虽小,五脏俱全. 毕竟不是 APP 工程,所以 ...
- 学习JS的第三天
一.逻辑分支(续) 1.三目运算符:条件运算符 a>b?c:d;表达式1?表达式2:表达式3; 根据表达式1执行的结果,来决定执行表达式2还是表达式3 表达式1结果是true执行表达式2,最终返 ...
- TLFS 内存分配算法详解
文章目录 1. DSA 背景介绍 1.1 mmheap 1.2 mmblk 2. TLFS 原理 2.1 存储结构 2.2 内存池初始化 2.3 free 2.4 malloc 参考资料 1. DSA ...
- mongo笔记
获取stats from pymongo import MongoClient client = MongoClient() db = client.test # print collection s ...
- Mybatis:插入数据返回自增主键
使用Mybatis作为工具连接MySQL,要求在插入数据之后返回自增主键 一开始也很迷惑,Mybatis使用insert之后,成功返回的是1,失败会报错或返回0,主键去哪找来 后来知道Mybatis可 ...
- Django笔记&教程 0-1 前言
Django 自学笔记兼学习教程第0章第1节--前言 点击查看教程总目录 1 最初的想法 自学Django已经有一段时间了,自认收获不少,学的还算可以,然而实际去做项目写代码的时候,很多用法记得不清, ...
- b站个人直播年报【大爽歌作】 介绍与演示
大家好,我是大爽,一个b站UP主兼主播. 最近做了一个b站直播个人年报,该年报为代码文件生成. 且代码已打包到一个可视化工具中(exe)只需两步就可以获得自己的专属年报. 代码已上传到我的github ...
- [hdu6995]Travel on Tree
问题即查询将其按照dfs序排序后,相邻两点(包括首尾)的距离和 考虑使用莫队+set维护,时间复杂度为$o(n\sqrt{n}\log n)$,无法通过 进一步的,注意到删除是可以用链表实现的,因此考 ...
- [loj3180]天桥
考虑将所有交点作为关键点来建图跑最短路,但图上的关键点数量最坏为$o(nm)$,需要优化 当$s=0$且$g=n-1$的部分分,有以下结论: 1.对于一段天桥$([l,r],y)$,不会从$(r,y) ...
- [源码解析] PyTorch 分布式(10)------DistributedDataParallel 之 Reducer静态架构
[源码解析] PyTorch 分布式(10)------DistributedDataParallel之Reducer静态架构 目录 [源码解析] PyTorch 分布式(10)------Distr ...