iOS 视图:重绘与UIScrollView(内容根据iOS编程编写)
我们继续之前的 Hypnosister 应用,当用户开始触摸的时候,圆形的颜色会改变。
首先,在 JXHypnosisView 头文件中声明一个属性,用来表示圆形的颜色。
#import "JXHypnosisView.h"

@interface JXHypnosisView ()

/** 颜色 */

@property (nonatomic,strong) UIColor * circleColor;

@end

@implementation JXHypnosisView

- (instancetype)initWithFrame:(CGRect)frame {

    self = [super initWithFrame:frame];

    if (self) {

        // 设置 JXHypnosisView 对象的背景颜色为透明

        self.backgroundColor = [UIColor clearColor];

    }

    return self;

}

- (void)drawRect:(CGRect)rect {

    CGRect bounds = self.bounds;

    // 根据bounds计算中心点

    CGPoint center;

    center.x = bounds.origin.x + bounds.size.width / 2.0;

    center.y = bounds.origin.y + bounds.size.height / 2.0;

    // 是最外层圆形成为视图的外接圆

    float maxRadius = hypotf(bounds.size.width, bounds.size.height) / 2.0;

    UIBezierPath * path = [[UIBezierPath alloc] init];

    for (float currentRadius = maxRadius; currentRadius > ; currentRadius -= ) {

        // 用来设置绘制起始位置

        [path moveToPoint:CGPointMake(center.x + currentRadius, center.y)];

        [path addArcWithCenter:center

                        radius:currentRadius

                    startAngle:0.0

                      endAngle:M_PI * 2.0

                     clockwise:YES];

    }

    // 设置线条宽度为 10 点

    path.lineWidth = ;

    // 设置绘制颜色为灰色

    [[UIColor lightGrayColor] setStroke];

    // 绘制路径

    [path stroke];

    // 创建UIImage对象

    UIImage * logoImage = [UIImage imageNamed:@"train"];

    // 绘制图像

    [logoImage drawInRect:bounds];

}

@end
加入的三行代码称为 JXHypnosisView 的类扩展。类扩展中声明一个颜色属性。
在 JXHypnosisView 实现文件中我们可以为颜色属性设置一个默认值
#import "JXHypnosisView.h"

@interface JXHypnosisView ()

/** 颜色 */

@property (nonatomic,strong) UIColor * circleColor;

@end

@implementation JXHypnosisView

- (instancetype)initWithFrame:(CGRect)frame {

    self = [super initWithFrame:frame];

    if (self) {

        // 设置 JXHypnosisView 对象的背景颜色为透明

        self.backgroundColor = [UIColor clearColor];

        self.circleColor = [UIColor lightGrayColor];

    }

    return self;

}

- (void)drawRect:(CGRect)rect {

    CGRect bounds = self.bounds;

    // 根据bounds计算中心点

    CGPoint center;

    center.x = bounds.origin.x + bounds.size.width / 2.0;

    center.y = bounds.origin.y + bounds.size.height / 2.0;

    // 是最外层圆形成为视图的外接圆

    float maxRadius = hypotf(bounds.size.width, bounds.size.height) / 2.0;

    UIBezierPath * path = [[UIBezierPath alloc] init];

    for (float currentRadius = maxRadius; currentRadius > ; currentRadius -= ) {

        // 用来设置绘制起始位置

        [path moveToPoint:CGPointMake(center.x + currentRadius, center.y)];

        [path addArcWithCenter:center

                        radius:currentRadius

                    startAngle:0.0

                      endAngle:M_PI * 2.0

                     clockwise:YES];

    }

    // 设置线条宽度为 10 点

    path.lineWidth = ;

    // 设置绘制颜色为灰色

    [[UIColor lightGrayColor] setStroke];

    // 绘制路径

    [path stroke];

    // 创建UIImage对象

    UIImage * logoImage = [UIImage imageNamed:@"train"];

    // 绘制图像

    [logoImage drawInRect:bounds];

}

@end
在 drawRect: 方法中修改设置线条颜色的代码。使用 circleColor 作为线条颜色
#import "JXHypnosisView.h"

@interface JXHypnosisView ()

/** 颜色 */

@property (nonatomic,strong) UIColor * circleColor;

@end

@implementation JXHypnosisView

- (instancetype)initWithFrame:(CGRect)frame {

    self = [super initWithFrame:frame];

    if (self) {

        // 设置 JXHypnosisView 对象的背景颜色为透明

        self.backgroundColor = [UIColor clearColor];

        self.circleColor = [UIColor lightGrayColor];

    }

    return self;

}

- (void)drawRect:(CGRect)rect {

    CGRect bounds = self.bounds;

    // 根据bounds计算中心点

    CGPoint center;

    center.x = bounds.origin.x + bounds.size.width / 2.0;

    center.y = bounds.origin.y + bounds.size.height / 2.0;

    // 是最外层圆形成为视图的外接圆

    float maxRadius = hypotf(bounds.size.width, bounds.size.height) / 2.0;

    UIBezierPath * path = [[UIBezierPath alloc] init];

    for (float currentRadius = maxRadius; currentRadius > ; currentRadius -= ) {

        // 用来设置绘制起始位置

        [path moveToPoint:CGPointMake(center.x + currentRadius, center.y)];

        [path addArcWithCenter:center

                        radius:currentRadius

                    startAngle:0.0

                      endAngle:M_PI * 2.0

                     clockwise:YES];

    }

    // 设置线条宽度为 10 点

    path.lineWidth = ;

    // 设置绘制颜色为灰色

    [[UIColor lightGrayColor] setStroke];

    [self.circleColor setStroke];

    // 绘制路径

    [path stroke];

    // 创建UIImage对象

    UIImage * logoImage = [UIImage imageNamed:@"train"];

    // 绘制图像

    [logoImage drawInRect:bounds];

}

@end
构建并运行,结果应该跟之前一样。下一步我们来编写视图被触摸的时候改变圆形颜色的代码:
当用户触摸的时候会收到一个方法 touchesBegan:(NSSet<UITouch *> *)touches withEvent:(UIEvent *)event ,现在我们只需要将之覆盖
#import "JXHypnosisView.h"

@interface JXHypnosisView ()

/** 颜色 */

@property (nonatomic,strong) UIColor * circleColor;

@end

@implementation JXHypnosisView

- (instancetype)initWithFrame:(CGRect)frame {

    self = [super initWithFrame:frame];

    if (self) {

        // 设置 JXHypnosisView 对象的背景颜色为透明

        self.backgroundColor = [UIColor clearColor];

        self.circleColor = [UIColor lightGrayColor];

    }

    return self;

}

- (void)drawRect:(CGRect)rect {

    CGRect bounds = self.bounds;

    // 根据bounds计算中心点

    CGPoint center;

    center.x = bounds.origin.x + bounds.size.width / 2.0;

    center.y = bounds.origin.y + bounds.size.height / 2.0;

    // 是最外层圆形成为视图的外接圆

    float maxRadius = hypotf(bounds.size.width, bounds.size.height) / 2.0;

    UIBezierPath * path = [[UIBezierPath alloc] init];

    for (float currentRadius = maxRadius; currentRadius > ; currentRadius -= ) {

        // 用来设置绘制起始位置

        [path moveToPoint:CGPointMake(center.x + currentRadius, center.y)];

        [path addArcWithCenter:center

                        radius:currentRadius

                    startAngle:0.0

                      endAngle:M_PI * 2.0

                     clockwise:YES];

    }

    // 设置线条宽度为 10 点

    path.lineWidth = ;

    // 设置绘制颜色为灰色

    [[UIColor lightGrayColor] setStroke];

    [self.circleColor setStroke];

    // 绘制路径

    [path stroke];

    // 创建UIImage对象

    UIImage * logoImage = [UIImage imageNamed:@"train"];

    // 绘制图像

    [logoImage drawInRect:bounds];

}

- (void)touchesBegan:(NSSet<UITouch *> *)touches withEvent:(UIEvent *)event {

    // 取三个 0~1 之间的数字

    float red = (arc4random() % ) /100.0;

    float green = (arc4random() % ) /100.0;

    float blue = (arc4random() % ) /100.0;

    UIColor * randomColor = [UIColor colorWithRed:red

                                            green:green

                                             blue:blue

                                            alpha:1.0];

    self.circleColor = randomColor;

}

@end
构建并运行,我们发现好像程序并没有改变任何颜色,这是因为 JXHypnosisView 并没有重绘自己。
- 运行循环和重绘视图
iOS应用启动时会开始一个运行循环(run loop).运行循环的工作是监听事件,例如触摸,当事件发生时,运行循环就会为相应的事件找到合适的处理方法。这些处理方法会调用其他方法而这些其他方法就又会调用更多其他方法。这样子,只有当这些所有方法执行完毕的时候,控制权才会再次回到运行循环。
当应用将控制权交还给运行循环时,运行循环会首先检查是否有等待重绘的视图(即在当前循环收到过 setNeedsDisplay 消息的视图),然后向所有等待重绘的视图发送 drawRect: 消息,最后视图层次结构中所有视图的图层会再次组合成一幅完整的图像并绘制到屏幕上。
iOS做了两个方面优化来保证用户界面的流畅性---不重绘显示的内容没有改变的视图;在每次事件处理中期中只发送一次 drawRect 消息。在事件处理周期中,视图的属性可能会发生多次改变,如果视图在每次属性改变的时候都要重绘自己,就会减慢界面的响应速度。想法,iOS会在运行循环的最后阶段集中处理所有需要重绘的视图,尤其是对于属性发生多次改变的视图,在每次事件处理周期中只重绘一次。
在本应用中,首先可以肯定的是,我们的触摸处理的方法已经正确捕获了触摸事件,但是虽然运行循环在执行完 touchesBegan:(NSSet<UITouch *> *)touches withEvent:(UIEvent *)event 后再次获得了控制权,但是并没有向 JXHypnosisView 发送 drawRect 消息。
为了标记视图需要重绘,必须向其发送 setNeedsDisplay 消息。iOS SDK 中提供的视图对象会自动在显示的内容发生改变时向自身发送 setNeedsDisplay 消息,以UILabel 对象为例,在某个 UILabel 对象收到 setText:消息后,就会将自身标记为要重绘(因为其所显示的文字内容改变了,所以必须将自己重绘到图层上)。而对自定义的 UIView 子类,必须手动向其发送 setNeedsDisplay 消息。
在 JXHypnosisView.m 中,为 circleColor 属性实现自定义的存方法,当 circleColor 改变时,向视图发送 setNeedsDisplay 消息
#import "JXHypnosisView.h"

@interface JXHypnosisView ()

/** 颜色 */

@property (nonatomic,strong) UIColor * circleColor;

@end

@implementation JXHypnosisView

- (instancetype)initWithFrame:(CGRect)frame {

    self = [super initWithFrame:frame];

    if (self) {

        // 设置 JXHypnosisView 对象的背景颜色为透明

        self.backgroundColor = [UIColor clearColor];

        self.circleColor = [UIColor lightGrayColor];

    }

    return self;

}

- (void)drawRect:(CGRect)rect {

    CGRect bounds = self.bounds;

    // 根据bounds计算中心点

    CGPoint center;

    center.x = bounds.origin.x + bounds.size.width / 2.0;

    center.y = bounds.origin.y + bounds.size.height / 2.0;

    // 是最外层圆形成为视图的外接圆

    float maxRadius = hypotf(bounds.size.width, bounds.size.height) / 2.0;

    UIBezierPath * path = [[UIBezierPath alloc] init];

    for (float currentRadius = maxRadius; currentRadius > ; currentRadius -= ) {

        // 用来设置绘制起始位置

        [path moveToPoint:CGPointMake(center.x + currentRadius, center.y)];

        [path addArcWithCenter:center

                        radius:currentRadius

                    startAngle:0.0

                      endAngle:M_PI * 2.0

                     clockwise:YES];

    }

    // 设置线条宽度为 10 点

    path.lineWidth = ;

    // 设置绘制颜色为灰色

    [[UIColor lightGrayColor] setStroke];

    [self.circleColor setStroke];

    // 绘制路径

    [path stroke];

    // 创建UIImage对象

    UIImage * logoImage = [UIImage imageNamed:@"train"];

    // 绘制图像

    [logoImage drawInRect:bounds];

}

- (void)touchesBegan:(NSSet<UITouch *> *)touches withEvent:(UIEvent *)event {

    // 取三个 0~1 之间的数字

    float red = (arc4random() % ) /100.0;

    float green = (arc4random() % ) /100.0;

    float blue = (arc4random() % ) /100.0;

    UIColor * randomColor = [UIColor colorWithRed:red

                                            green:green

                                             blue:blue

                                            alpha:1.0];

    self.circleColor = randomColor;

}

// 为属性实现自定义的存方法

- (void)setCircleColor:(UIColor *)circleColor {

    _circleColor = circleColor;

    [self setNeedsDisplay];

}

@end
再次构建运行,就可以实现我们的需求了。
还有一种优化方法:只重绘视图的某一区域。可以通过向视图发送 setNeedsDisplayInRect: 消息标记视图的某一区域要重绘。当视图收到 drawRect 消息时, setNeedsDisplayInRect: 会将 CGRect 类型的参数传递给 drawRect: 重绘视图的指定区域。但是通常我们不推荐这样做。
- 类扩展
现在我们讨论将 circleColor 属性生命在 JXHypnosisView 的类扩展中和声明在头文件中的区别。
头文件是一个类的 “用户手册” ,其他类可以可以通过头文件知道该类的工能和使用方法。使用头文件的目的是向其他类公开该类声明的属性和方法。也就是说头文件中声明的属性和方法对其他类是可见的。
但是,并不是每一个属性或者方法都要想其他类公开。只会在类的内部使用的属性和方法应当声明在类扩展中。circleColor 属性只会被 JXHypnosisView 使用,其他类不需要使用该属性,因此会被声明在类扩展中。
子类同样无法访问父类在理扩展中声明的属性和方法。有时候需要让其他开发者了解类的某些内部属性和方法,以便更好的理解类的工作原理和使用方法。可以在另一个文件中声明类扩展,并将该文件导入类的实现文件中。
- 使用 UIScrollView
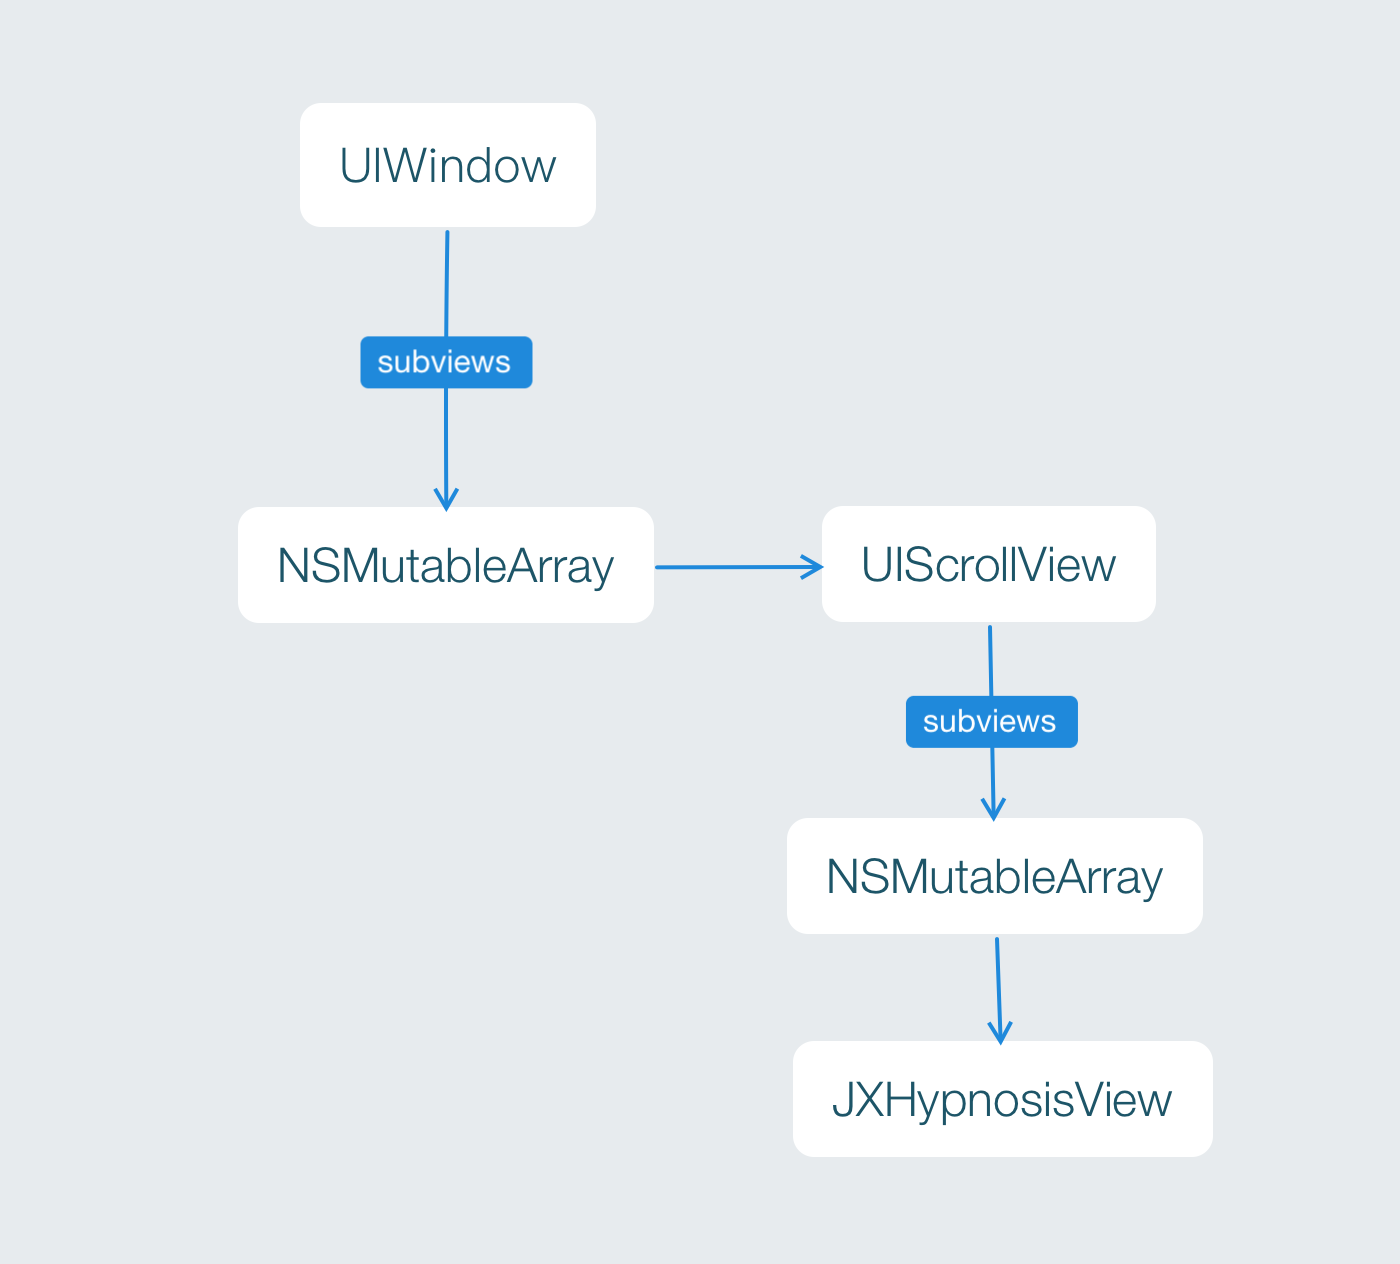
接下来我们继续为 Hypnosister 应用添加一个 UIScrollView 对象,使其成为应用窗口的子视图,然后再将 JXHypnosisView 作为子视图加入 UIScrollView 对象。个对象之间的关系如图
通常情况下,UIScrollView 对象适用于那些尺寸大于屏幕的视图。当某个视图是 UIScrollView 对象的子视图的时候,该对象会画出该视图的某块区域(形状为矩形)。当用户按住这块矩形区域并拖动的时候,UIScrollView 对昂会改变该矩形所显示的子视图区域。我们可以将 UIScrollView 对象看成是镜头,而其子视图是拍摄的场景。这里移动的是 “镜头” ,而不是 “景观”。 UIScrollView 对象的尺寸就是这个 “镜头”的尺寸,而其能够拍摄的范围是由其属性 contentsize 决定的。通常情况下 contentsize 的数值就是子视图的尺寸。
UIScrollView 是 UIView 的子类,同样可以使用 initWithFrame 消息初始化,还可以将其作为子视图添加到别的视图中。
在 ViewController.m 中,创建一个有着超大尺寸的 JXHypnosisView 对象,并将其加入到一个 UIScrollView 对象,然后将这个对象添加到视图上。
#import "ViewController.h"

#import "JXHypnosisView.h"

@interface ViewController ()

@end

@implementation ViewController

- (void)viewDidLoad {

    [super viewDidLoad];

    // 创建 CGRect 结构

  CGRect rect = CGRectMake(100, 200, 200, 300);

    // 创建视图

    JXHypnosisView * firstView = [[JXHypnosisView alloc] initWithFrame:rect];

    // 创建两个 CGRect 结构分别作为 UIScrollView 对象和 JXHypnosisView 对象的 frame

    CGRect screenRect = self.view.bounds;

    CGRect bigRect = screenRect;

    bigRect.size.width *= 2.0;

    bigRect.size.height *= 2.0;

    // 创建一个 UIScrollView 对象,将其尺寸设置为当前视图窗口大小

    UIScrollView * scrollView = [[UIScrollView alloc] initWithFrame:screenRect];

    [self.view addSubview:scrollView];

    // 创建一个有着超级大尺寸的 JXHypnosisView 对象并将其加入 UIScrollView 对象

    JXHypnosisView * hypnosisView = [[JXHypnosisView alloc] initWithFrame:bigRect];

    [scrollView addSubview:hypnosisView];

    // 告诉 UIScrollView 对象 “取景”范围有多大

    scrollView.contentSize = bigRect.size;

    // 将视图添加到控制器View上

    [self.view addSubview:firstView];

}

@end
构建并运行,可以上,下,左右来拖动查看超大的尺寸
拖动与分页
UIScrollView 对象还可以滑动显示所有加入 UIScrollView 对象的子视图
在 ViewController.m 中,将 JXHypnosisView 对象的尺寸改回与屏幕的尺寸相同,然后再创建一个 JXHypnosisView 对象,将其尺寸也设置为与屏幕尺寸相同并加入 UIScrollView 对象。此外,还要将 UIScrollView 对象的 contentSize 的宽度设置为屏幕宽度的2倍,高度不变
#import "ViewController.h"

#import "JXHypnosisView.h"

@interface ViewController ()

@end

@implementation ViewController

- (void)viewDidLoad {

    [super viewDidLoad];

    // 创建两个 CGRect 结构分别作为 UIScrollView 对象和 JXHypnosisView 对象的 frame

    CGRect screenRect = self.view.bounds;

    CGRect bigRect = screenRect;

    bigRect.size.width *= 2.0;

    bigRect.size.height *= 2.0;

    // 创建一个 UIScrollView 对象,将其尺寸设置为当前视图窗口大小

    UIScrollView * scrollView = [[UIScrollView alloc] initWithFrame:screenRect];

    [self.view addSubview:scrollView];

    // 创建一个有着超级大尺寸的 JXHypnosisView 对象并将其加入 UIScrollView 对象

    JXHypnosisView * hypnosisView = [[JXHypnosisView alloc] initWithFrame:bigRect];

    [scrollView addSubview:hypnosisView];

    // 创建一个大小与屏幕相同的 JXHypnosisView 对象并将其加入 UIScrollView 对象

    JXHypnosisView * hypnosisView = [[JXHypnosisView alloc] initWithFrame:screenRect];

    [scrollView addSubview:hypnosisView];

    // 创建第二个大小与屏幕相同的 JXHypnosisView 对象并放置在第一个 JXHypnosisView 对象的右侧,使其刚好移出到屏幕外

    screenRect.origin.x += screenRect.size.width;

    JXHypnosisView * anotherView = [[JXHypnosisView alloc] initWithFrame:screenRect];

    [scrollView addSubview:anotherView];

    // 告诉 UIScrollView 对象 “取景”范围有多大

    scrollView.contentSize = bigRect.size;

}

@end
构建并运行,拖动屏幕会发现有两个 JXHypnosisView 对象
iOS 视图:重绘与UIScrollView(内容根据iOS编程编写)的更多相关文章
- Android视图重绘,使用invalidate还是requestLayout
概述 在我们在进行自定义View的相关开发中,当我们更改了当前View的状态,比如大小,位置等,我们需要重新刷新整个界面,保证显示最新的状态.在Android中,让当前的视图重绘有两种方式,inval ...
- iOS - 布局重绘机制相关方法的研究
iOS View布局重绘机制相关方法 布局 - (void)layoutSubviews - (void)layoutIfNeeded- (void)setNeedsLayout —————————— ...
- iOS之 重绘机制
最近在看Core Animation , 今天来谈谈CALayer 和 UIView 中的重绘的一些认识: 我们都知道UIView里面有个成员layer,利用这个这个layer我们可以设置一些圆角,阴 ...
- Onpaint()函数中绘图出现问题:当多次进入onpaint()发现次数达到一定程度就会出现窗口不能再重绘导致窗口内容损坏的现象
我在一个按钮中调用sendmessage(wm_paint,0,0)达到36以上时,当最小化窗口然后再恢复就会发现窗口出现错误信息,而且窗口界面内容混乱不完整.原来以为是使用sleep()函数导致的问 ...
- iOS 委托与文本输入(内容根据iOS编程编写)
文本框(UITextField) 本章节继续编辑 JXHypnoNerd .文件地址 . 首先我们继续编辑 JXHypnosisViewController.m 修改 loadView 方法,向 ...
- iOS 触摸事件与UIResponder(内容根据iOS编程编写)
触摸事件 因为 UIView 是 UIResponder 的子类,所以覆盖以下四个方法就可以处理四种不同的触摸事件: 1. 一根手指或多根手指触摸屏幕 - (void)touchesBegan:(N ...
- iOS通过ARC管理内存(内容根据iOS编程编写)
栈 当程序执行某个方法(或函数)时,会从内存中一个叫栈的区域分配一块内存空间,这块内存空间我们叫帧.帧负责保护程序在方法内声明的变量的值.在方法内声明的变量我们称之为局部变量. 当我们的程序开始启动, ...
- iOS之UI--Quartz2D的入门应用--重绘下载圆形进度条
*:first-child { margin-top: 0 !important; } body > *:last-child { margin-bottom: 0 !important; } ...
- 关于DOM的操作以及性能优化问题-重绘重排
写在前面: 大家都知道DOM的操作很昂贵. 然后贵在什么地方呢? 一.访问DOM元素 二.修改DOM引起的重绘重排 一.访问DOM 像书上的比喻:把DOM和JavaScript(这里指ECMScri ...
随机推荐
- 关于Java8函数式编程你需要了解的几点
函数式编程与面向对象的设计方法在思路和手段上都各有千秋,在这里,我将简要介绍一下函数式编程与面向对象相比的一些特点和差异. 函数作为一等公民 在理解函数作为一等公民这句话时,让我们先来看一下一种非常常 ...
- XCod5 SVN
近日开始学习IOS开发, 涉及版本管理问题,老大说要使用SVN, 在Windows系统中使用SVN的经验使得俺以为需要首先安装SVN,然后再配置等等, 殊不知XCode5中已经内置了SVN, 在百度一 ...
- 谈asch系统的共识机制与容错性
本文章出自:http://blog.asch.so/,转载请注明出处. 0 前言 我曾分析了DPOS算法的漏洞并且模拟了一个简单的攻击的方法,然后实现了一个简化的PBFT算法模型试图去修复该漏洞,并且 ...
- MSBuild的简单介绍与使用
MSBuild 是 Microsoft 和 Visual Studio的生成系统.它不仅仅是一个构造工具,应该称之为拥有相当强大扩展能力的自动化平台.MSBuild平台的主要涉及到三部分:执行引擎.构 ...
- io.js入门(三)—— 所支持的ES6(下)
(接上篇) 标准ES6特性 6. 新的String方法/New String methods 7. 符号/Symbols 8. 字符串模板/Template strings 新的String方法/Ne ...
- 那些证书相关的玩意儿(SSL,X.509,PEM,DER,CRT,CER,KEY,CSR,P12等)
之前没接触过证书加密的话,对证书相关的这些概念真是感觉挺棘手的,因为一下子来了一大堆新名词,看起来像是另一个领域的东西,而不是我们所熟悉的编程领域的那些东西,起码我个人感觉如此,且很长时间都没怎么搞懂 ...
- Spring:源码解读Spring IOC原理
Spring IOC设计原理解析:本文乃学习整理参考而来 一. 什么是Ioc/DI? 二. Spring IOC体系结构 (1) BeanFactory (2) BeanDefinition 三. I ...
- JBoss AS
即 JBoss Application Server - JBoss Community The JBoss AS community project has been renamed to the ...
- Android开发学习之路-Android N新特性-多窗口模式
我们都知道,在最新的Android N系统中,加入了一个新的功能,就是多窗口模式.多窗口模式允许我们在屏幕上显示两个窗口,每个窗口显示的内容不同,也就是说,我们可以一遍看电视剧,一边聊微信. 这里我们 ...
- iOS中怎么存储照片到自定义相册
在市场上主流App中,大多数App都具有存储图片到自己App的相册中.苹果提供的方法只能存储图片到系统相册,下面讲一下怎么实现: 实现思路: 1.对系统相册进行操作的前提必须导入#import &l ...