
(原)Ubuntu16中安装cuda toolkit
转载请注明出处:
http://www.cnblogs.com/darkknightzh/p/5655957.html
参考网址:
http://unix.stackexchange.com/questions/38560/gpu-usage-monitoring-cuda
http://blog.csdn.net/revolver/article/details/49682131
一 在终端中直接安装
说明:由于nvidia并未给出ubuntu16上面的cuda toolkit,本文方法不一定可行,我这边安装成功,感觉完全是瞎猫碰死耗子了。。。不过没有安装sample,只是其他程序可以使用显卡了。
1. 第一个网址,使用
sudo apt-get install nvidia-cuda-toolkit
安装cuda toolkit,要看网速,下载很慢。还有,网址中说重启ubuntu有问题(I can't log in to my computer and end up in infinite login screen)。我这边安装了之后,正常登陆了,没有出现问题。
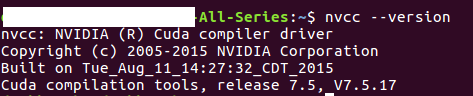
2. 安装完之后的信息:
装的是7.5.17,不是最新的7.5.18,但是能用就行。
3. 第二个网址中qed给出了在终端中持续显示GPU当前的使用率(仅限nvidia的显卡):
nvidia-smi -l 1
结果:
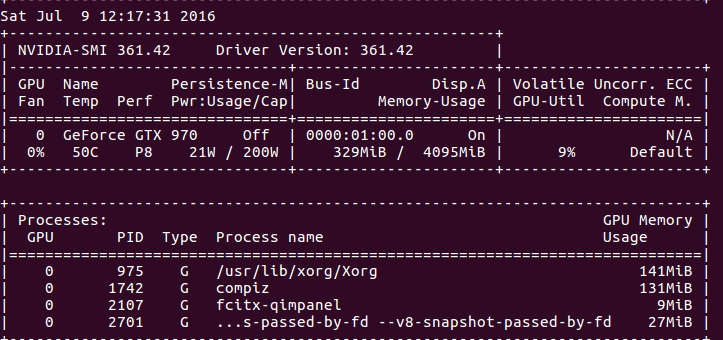
说明:上面的命令貌似要显卡支持才行。也可以使用Jonathan提供的命令(目前没测试):
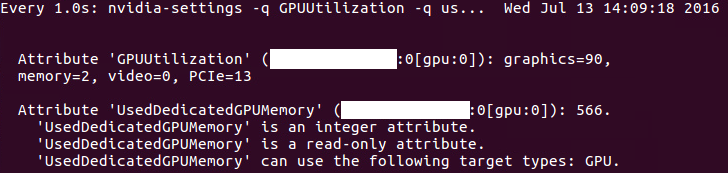
watch -n0. "nvidia-settings -q GPUUtilization -q useddedicatedgpumemory"
160713说明:a. 这条命令显示信息如下:
b. 其实这条命令就是在终端中显示‘NVIDIA X serve settings’中的一些信息,如下(NVIDIA X serve settings位置为/usr/share/applications,也可以直接打开该软件查看):
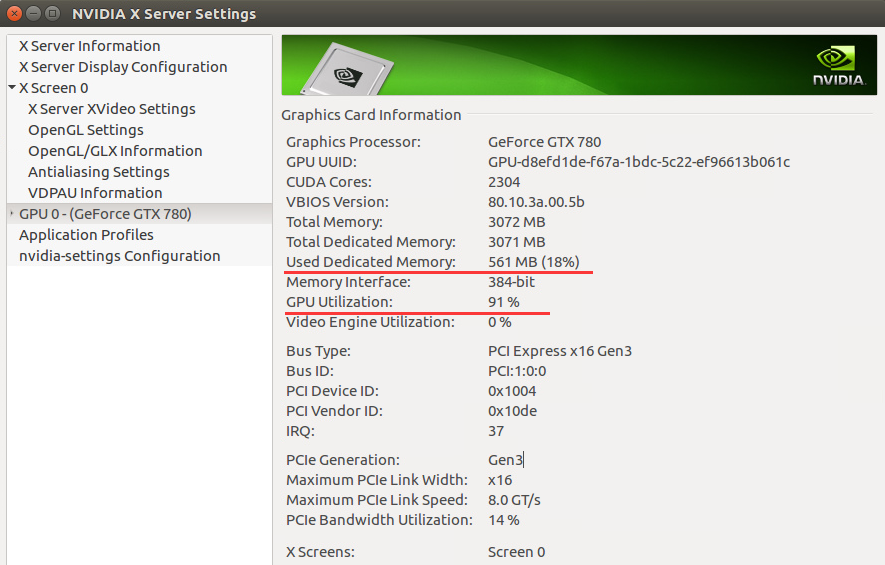
c. 由于这张图使用的GPU和之前使用的GPU不一样,因而参数不一致(比如显存)。
4. 安装完cuda之后,安装cutorch,之后安装cunn,都安装成功。使用GPU的程序也能正常运行。
5. 第三个参考网址中给出了测试程序,本处稍微进行了修改,打印出来每次循环执行的时间(CPU版本和GPU版本代码实际上差不多):
① CPU版本:
require 'torch'

require 'nn'

require 'optim'

--require 'cunn'

--require 'cutorch'

mnist = require 'mnist'

fullset = mnist.traindataset()

testset = mnist.testdataset()

trainset = {

    size = ,

    data = fullset.data[{{,}}]:double(),

    label = fullset.label[{{,}}]

}

validationset = {

    size = ,

    data = fullset.data[{{,}}]:double(),

    label = fullset.label[{{,}}]

}

trainset.data = trainset.data - trainset.data:mean()

validationset.data = validationset.data - validationset.data:mean()

model = nn.Sequential()

model:add(nn.Reshape(, , ))

model:add(nn.MulConstant(/256.0*3.2))

model:add(nn.SpatialConvolutionMM(, , , , , , , ))

model:add(nn.SpatialMaxPooling(,  , , , , ))

model:add(nn.SpatialConvolutionMM(, , , , , , , ))

model:add(nn.SpatialMaxPooling(,  , , , , ))

model:add(nn.Reshape(**))

model:add(nn.Linear(**, ))

model:add(nn.ReLU())

model:add(nn.Linear(, ))

model:add(nn.LogSoftMax())

model = require('weight-init')(model, 'xavier')

criterion = nn.ClassNLLCriterion()

--model = model:cuda()

--criterion = criterion:cuda()

--trainset.data = trainset.data:cuda()

--trainset.label = trainset.label:cuda()

--validationset.data = validationset.data:cuda()

--validationset.label = validationset.label:cuda()--[[]]

sgd_params = {

   learningRate = 1e-2,

   learningRateDecay = 1e-4,

   weightDecay = 1e-3,

   momentum = 1e-4

}

x, dl_dx = model:getParameters()

step = function(batch_size)

    local current_loss =

    local count =

    local shuffle = torch.randperm(trainset.size)

    batch_size = batch_size or

    for t = ,trainset.size,batch_size do

        -- setup inputs and targets for this mini-batch

        local size = math.min(t + batch_size - , trainset.size) - t

        local inputs = torch.Tensor(size, , )--:cuda()

        local targets = torch.Tensor(size)--:cuda()

        for i = ,size do

            local input = trainset.data[shuffle[i+t]]

            local target = trainset.label[shuffle[i+t]]

            -- if target == 0 then target = 10 end

            inputs[i] = input

            targets[i] = target

        end

        targets:add()

        local feval = function(x_new)

            -- reset data

            if x ~= x_new then x:copy(x_new) end

            dl_dx:zero()

            -- perform mini-batch gradient descent

            local loss = criterion:forward(model:forward(inputs), targets)

            model:backward(inputs, criterion:backward(model.output, targets))

            return loss, dl_dx

        end

        _, fs = optim.sgd(feval, x, sgd_params)

        -- fs is a table containing value of the loss function

        -- (just 1 value for the SGD optimization)

        count = count +

        current_loss = current_loss + fs[]

    end

    -- normalize loss

    return current_loss / count

end

eval = function(dataset, batch_size)

    local count =

    batch_size = batch_size or

    for i = ,dataset.size,batch_size do

        local size = math.min(i + batch_size - , dataset.size) - i

        local inputs = dataset.data[{{i,i+size-}}]--:cuda()

        local targets = dataset.label[{{i,i+size-}}]:long()--:cuda()

        local outputs = model:forward(inputs)

        local _, indices = torch.max(outputs, )

        indices:add(-)

        local guessed_right = indices:eq(targets):sum()

        count = count + guessed_right

    end

    return count / dataset.size

end

max_iters =

do

    local last_accuracy =

    local decreasing =

    local threshold =  -- how many deacreasing epochs we allow

    for i = ,max_iters do

        timer = torch.Timer()

        local loss = step()

        print(string.format('Epoch: %d Current loss: %4f', i, loss))

        local accuracy = eval(validationset)

        print(string.format('Accuracy on the validation set: %4f', accuracy))

        if accuracy < last_accuracy then

            if decreasing > threshold then break end

            decreasing = decreasing +

        else

            decreasing =

        end

        last_accuracy = accuracy

        print('Time elapsed: ' .. i .. 'iter: ' .. timer:time().real .. ' seconds')

    end

end

testset.data = testset.data:double()

eval(testset)
② GPU版本:
 require 'torch'

 require 'nn'

 require 'optim'

 require 'cunn'

 require 'cutorch'

 mnist = require 'mnist'

 fullset = mnist.traindataset()

 testset = mnist.testdataset()

 trainset = {

     size = ,

     data = fullset.data[{{,}}]:double(),

     label = fullset.label[{{,}}]

 }

 validationset = {

     size = ,

     data = fullset.data[{{,}}]:double(),

     label = fullset.label[{{,}}]

 }

 trainset.data = trainset.data - trainset.data:mean()

 validationset.data = validationset.data - validationset.data:mean()

 model = nn.Sequential()

 model:add(nn.Reshape(, , ))

 model:add(nn.MulConstant(/256.0*3.2))

 model:add(nn.SpatialConvolutionMM(, , , , , , , ))

 model:add(nn.SpatialMaxPooling(,  , , , , ))

 model:add(nn.SpatialConvolutionMM(, , , , , , , ))

 model:add(nn.SpatialMaxPooling(,  , , , , ))

 model:add(nn.Reshape(**))

 model:add(nn.Linear(**, ))

 model:add(nn.ReLU())

 model:add(nn.Linear(, ))

 model:add(nn.LogSoftMax())

 model = require('weight-init')(model, 'xavier')

 criterion = nn.ClassNLLCriterion()

 model = model:cuda()

 criterion = criterion:cuda()

 trainset.data = trainset.data:cuda()

 trainset.label = trainset.label:cuda()

 validationset.data = validationset.data:cuda()

 validationset.label = validationset.label:cuda()--[[]]

 sgd_params = {

    learningRate = 1e-2,

    learningRateDecay = 1e-4,

    weightDecay = 1e-3,

    momentum = 1e-4

 }

 x, dl_dx = model:getParameters()

 step = function(batch_size)

     local current_loss =

     local count =

     local shuffle = torch.randperm(trainset.size)

     batch_size = batch_size or

     for t = ,trainset.size,batch_size do

         -- setup inputs and targets for this mini-batch

         local size = math.min(t + batch_size - , trainset.size) - t

         local inputs = torch.Tensor(size, , ):cuda()

         local targets = torch.Tensor(size):cuda()

         for i = ,size do

             local input = trainset.data[shuffle[i+t]]

             local target = trainset.label[shuffle[i+t]]

             -- if target == 0 then target = 10 end

             inputs[i] = input

             targets[i] = target

         end

         targets:add()

         local feval = function(x_new)

             -- reset data

             if x ~= x_new then x:copy(x_new) end

             dl_dx:zero()

             -- perform mini-batch gradient descent

             local loss = criterion:forward(model:forward(inputs), targets)

             model:backward(inputs, criterion:backward(model.output, targets))

             return loss, dl_dx

         end

         _, fs = optim.sgd(feval, x, sgd_params)

         -- fs is a table containing value of the loss function

         -- (just 1 value for the SGD optimization)

         count = count +

         current_loss = current_loss + fs[]

     end

     -- normalize loss

     return current_loss / count

 end

 eval = function(dataset, batch_size)

     local count =

     batch_size = batch_size or

     for i = ,dataset.size,batch_size do

         local size = math.min(i + batch_size - , dataset.size) - i

         local inputs = dataset.data[{{i,i+size-}}]:cuda()

         local targets = dataset.label[{{i,i+size-}}]:long():cuda()

         local outputs = model:forward(inputs)

         local _, indices = torch.max(outputs, )

         indices:add(-)

         local guessed_right = indices:eq(targets):sum()

         count = count + guessed_right

     end

     return count / dataset.size

 end

 max_iters =

 do

     local last_accuracy =

     local decreasing =

     local threshold =  -- how many deacreasing epochs we allow

     for i = ,max_iters do

         timer = torch.Timer()

         local loss = step()

         print(string.format('Epoch: %d Current loss: %4f', i, loss))

         local accuracy = eval(validationset)

         print(string.format('Accuracy on the validation set: %4f', accuracy))

         if accuracy < last_accuracy then

             if decreasing > threshold then break end

             decreasing = decreasing +

         else

             decreasing =

         end

         last_accuracy = accuracy

         print('Time elapsed: ' .. i .. 'iter: ' .. timer:time().real .. ' seconds')

     end

 end

 testset.data = testset.data:double()

 eval(testset)
==================================================================================
17012更新:
今天重新试了一下上面的程序,提示下面的错误:
Epoch: 1 Current loss: 0.652170

/home/XXX/torch/install/bin/luajit: testGPU.lua:113: invalid arguments: CudaLongTensor CudaTensor

expected arguments: [*CudaByteTensor*] CudaLongTensor long | *CudaLongTensor* CudaLongTensor long | [*CudaByteTensor*] CudaLongTensor CudaLongTensor | *CudaLongTensor* CudaLongTensor CudaLongTensor

stack traceback:

	[C]: in function 'eq'

	testGPU.lua:113: in function 'eval'

	testGPU.lua:131: in main chunk

	[C]: in function 'dofile'

	...gram/torch/install/lib/luarocks/rocks/trepl/scm-1/bin/th:150: in main chunk

	[C]: at 0x00405d50
在GPU代码第113行加上下面一句话,就可以成功运行了:
indices=indices:cuda()
真是见鬼了。。。
170121更新结束
==================================================================================
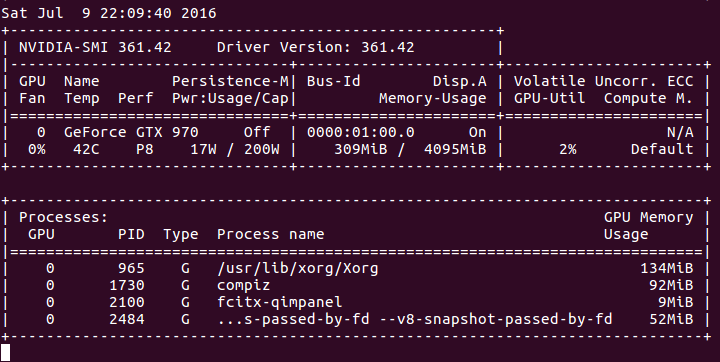
6. CPU和GPU使用率
① CPU版本
CPU情况:

GPU情况:
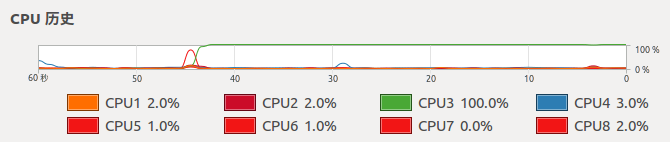
② GPU版本
CPU情况:
GPU情况:
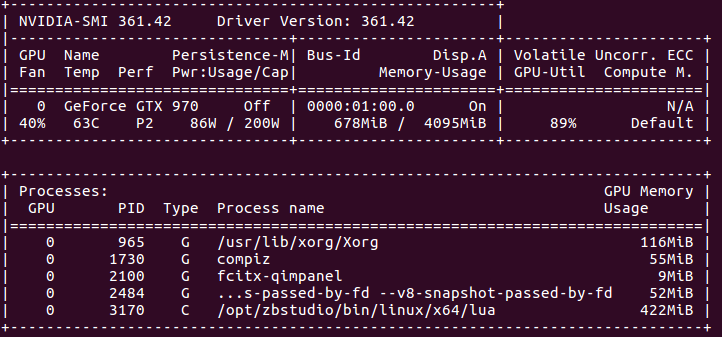
7. 可以看出,CPU版本的程序,CPU全部使用上了,GPU则基本没用。GPU版本,只有一个核心(线程)的CPU完全是用上了,其他的则在围观。。。而GPU使用率已经很高了。
8. 时间比较
CPU版本:
Epoch:  Current loss: 0.619644

Accuracy on the validation set: 0.924800

Time elapsed: 1iter: 895.69850516319 seconds

Epoch:  Current loss: 0.225129

Accuracy on the validation set: 0.949000

Time elapsed: 2iter: 914.15352702141 seconds
GPU版本:
Epoch:  Current loss: 0.687380

Accuracy on the validation set: 0.925300

Time elapsed: 1iter: 14.031280994415 seconds

Epoch:  Current loss: 0.231011

Accuracy on the validation set: 0.944000

Time elapsed: 2iter: 13.848378896713 seconds

Epoch:  Current loss: 0.167991

Accuracy on the validation set: 0.959800

Time elapsed: 3iter: 14.071791887283 seconds

Epoch:  Current loss: 0.135209

Accuracy on the validation set: 0.963700

Time elapsed: 4iter: 14.238609790802 seconds

Epoch:  Current loss: 0.113471

Accuracy on the validation set: 0.966800

Time elapsed: 5iter: 14.328102111816 seconds
说明:① CPU为4790K@4.4GHZ(8线程全开时,应该没有这么高的主频,具体多少没注意);GPU为nvidia GTX 970。
② 由于CPU版本的执行时间实在太长,我都怀疑程序是否有问题了。。。但是看着CPU一直100%的全力工作,又不忍心暂停。直到第一次循环结束,用了将近900s,才意识到,原来程序应该木有错误。。。等第二次循环结束,就直接停止测试了。。。GPU版本的程序,每次循环则只用14s,时间上差距。。。额,使用CPU执行时间是GPU执行时间的64倍。。。
160727更新:
用了780和k80测试了一下,780要用18s迭代一次epoch,k80。。。额,迭代一次要23s(使用一个核心)。当然,只针对我这里的程序是这个结果,其他的,不太清楚。
============================================================================================
170121更新
使用笔记本的1060显卡测试了一下上面的程序,迭代一次用时10s(不保证其他条件完全一致,目前使用的是cuda8.0),不过即便是移动端的1060(虽说10系列移动端已经没有m标志了,但是参数和桌面版还是不完全一样),也还是比桌面版的970要强一点。
170121更新结束
============================================================================================
170505更新
重新配置了torch,使用1080Ti的显卡。但是测试上面的程序,迭代一次用时9s(不保证其他条件完全一致,目前使用的是cuda8.0)。理论上1080Ti比1060性能强一倍应该是有的,但是上面的程序迭代时,差距没有体现出来。累觉不爱。。。/(ㄒoㄒ)/~~
170505更新结束
============================================================================================
170613更新
使用tensorflow进行训练,同样的程序,迭代一次,k80单核要1.2s多,1080Ti要0.36s。性能差距体现出来了。之前性能差距无法体现出来的原因是,上面的测试程序过于简单(和程序有关,和torch及tensorflow无关。如果torch上复杂的程序,这两个卡性能差距也差不多这样),不能完全发挥1080Ti的性能(不清楚上面的程序,k80是否完全发挥出来了)。新的测试程序,1080Ti和K80的GPU utilization基本上都是在90%——100%,这种情况下,才能真正考验这两个显卡的性能差距。
170613更新结束
============================================================================================
二 在官网下载安装
170121更新
https://developer.nvidia.com/cuda-downloads中可以下载cuda。
1. 若下载deb文件
然后使用如下命令安装:
sudo dpkg -i cuda-repo-ubuntu1604---local_8.0.44-1_amd64.deb

sudo apt-get update

sudo apt-get install cuda
之后编辑.bashrc:
gedit .bashrc
输入:
export PATH=/usr/local/cuda-8.0/bin:$PATH

export LD_LIBRARY_PATH=/usr/local/cuda-8.0/bin/lib64:$LD_LIBRARY_PATH
之后终端中输入:
source ~/.bashrc
之后再输入:
nvcc --version

2. 若下载run文件
终端中输入:
sudo sh cuda_8.0.61_375.26_linux.run
之后按照说明安装即可(没用过这种方式,因而不确定是否需要添加PATH变量。如果不能识别nvcc,添加PATH变量之后,source ~/.bashrc即可)。
170121更新结束
============================================================================================
(原)Ubuntu16中安装cuda toolkit的更多相关文章
- Anaconda--在虚拟环境中安装CUDA and cudnn
在conda虚拟环境中安装CUDAconda install cudatoolkit=8.0 -c https://mirrors.tuna.tsinghua.edu.cn/anaconda/pkgs ...
- (原)ubuntu16中安装moses
转载请注明出处: http://www.cnblogs.com/darkknightzh/p/5653186.html 在ubuntu14中,可以使用下面的语句安装moses: luarocks in ...
- (原)Ubuntu16中安装nvidia的显卡驱动
转载请注明出处: http://www.cnblogs.com/darkknightzh/p/5638185.html part1 直接在“软件和更新-附加驱动”里面设置 安装完ubuntu16后,显 ...
- Ubuntu18.04中安装cuda的记录
一.参考: https://blog.csdn.net/QLULIBIN/article/details/78714596 https://www.jianshu.com/p/00c37b09f0f3 ...
- OpenSuse13.2安装CUDA Toolkit 7.5
此次安装过程有点曲折,不过最后还是能成功安装,由于没细细看官方的安装文档,导致花了很多时间安装,希望此文能让想装CUDA的同学少走点弯路 1.NVIDIA Driver是否要装 刚开始要装CUDA时, ...
- (原)Ubuntu16 中安装torch版的cudnn
转载请注明出处: http://www.cnblogs.com/darkknightzh/p/5668471.html 参考网址: https://devtalk.nvidia.com/default ...
- (原)ubuntu14及ubuntu16中安装docker
转载请注明出处: http://www.cnblogs.com/darkknightzh/p/5653739.html 参考网址: http://blog.csdn.net/yangzhenping/ ...
- (原+转)ubuntu16中安装opencv2.4.11
转载请注明出处: http://www.cnblogs.com/darkknightzh/p/5638117.html 参考网址: http://www.cnblogs.com/jeakon/arch ...
- (原+转)ubuntu16中安装opencv2.4.11(2.4.13)
转载请注明出处: http://www.cnblogs.com/darkknightzh/p/5638117.html 参考网址: http://www.cnblogs.com/jeakon/arch ...
随机推荐
- (转)用Eclipse编译你的ROS程序
原地址: http://blog.csdn.net/sujun3304/article/details/18572017 好了,理解了系统各个组件的含义后,还是直接进入程序真刀真枪的从实践中学习吧! ...
- hibernate集合映射inverse和cascade详解
hibernate集合映射inverse和cascade详解 1.到底在哪用cascade="..."? cascade属性并不是多对多关系一定要用的,有了它只是让我们在插入或 ...
- js给div动态添加控件,然后给这个控件动态添加事件
<%@ Page Language="C#" AutoEventWireup="true" CodeBehind="WebForm1.aspx. ...
- Keil C51 详细设置
一.target名更改 打开Keil后,左侧Project Workspace中的target可改,方法:右击Target——Manage Compnents——双击待修改项即可,若要添加,使用对话框 ...
- Linux/UNIX环境下Oracle数据库多实例开机启动脚本(转)
操作系统平台:RHEL 5Shell环境:BashOracle:10g2 功能描述:开机时自动切换到oracle用户下,启动oracle的多个实例.并记录数据库的启动情况到自定义的日志文件中. #!/ ...
- 11g Rac 切换
<pre name="code" class="sql">[grid@devrac1 ~]$ crsctl status res -t ------ ...
- Javascript或jQuery方法产生任意随机整数
方法1:javascritp方法 1 2 3 4 5 6 //随机数 function diu_Randomize(b,e){ if(!b && b!=0 || ! ...
- Visual Assist X在Windows 8.1下出现中文乱码的解决方法
这主要是输入法造成的,我的输入法中有US.中文.搜狗输入法三个输入法:通过搜狗输入法管理器把“中文”去掉,或者通过语言首选项把“中文”去掉就不会在出现乱码. 这个办法的思路来自于http://www. ...
- HDOJ-1013 Digital Roots
http://acm.hdu.edu.cn/showproblem.php?pid=1013 1.给出一个整数,求每一位上的数字之和 2.若求出的和大于1位,则对该和继续执行第1步,直至和的位数为1 ...
- Ajax长连接
所谓的长连接,就是不断去发送请求,把请求阻塞在服务器端,每次超过请求时间就去重新发送请求,保持连接,随时获取服务器端的响应的数据 项目案例: function connection(){ ...