hexo搭建博客系列(三)美化主题
文章目录
- 其他搭建
- 1. 添加博客图标
- 2. 鼠标点击特效(二选一)
- 3. 设置头像
- 4. 侧边栏社交小图标设置
- 5. 文章末尾的标签图标修改
- 6. 访问量统计
- 7. 添加站内搜索
- 8. 启动阅读更多按钮
- 9. 文章顶置(二选一,看看哪种简单)
- 10. 在文章底部增加版权信息
- 11. 添加打赏
- 12. 文章加密访问
- 13. 启动代码复制按钮
- 14. 在Footer添加站点运行时间
- 15. 实现文章统计功能
- 16. 修改博文目录
- 17. RSS订阅(非必要)
- 18. GitHub Fork Me
- 19. bookmark
- 20. 添加lazyload(跟后面的图片点击全屏看不能共存)
- 21. 显示当前浏览进度(两者可共存)
- 22. Footer / 页脚设置
- 23. 添加Valine评论
- 24. Vline邮箱评论通知
- 25. Valine 头像设置
- 26. 添加文章阅读次数
- 27. Url 持久化
- 28. nofollow 标签的使用
- 29. 取消“文章目录”的自动编号
- 30. 背景(不要共存)
- 31. 浏览器网页标题恶搞(转,有贴转载地址)
- 32. 一些样式
- 33. 一些修改
其他搭建
请先观看前几篇博客
hexo4快速搭建博客(一)快速搭建一个博客
hexo4快速搭建博客(二)更换主题
其他博文:
hexo4快速搭建博客(四)写作技巧包含图床和自动变图床的插件
hexo4搭建博客系列(五)优化博客(无坑) 部署到阿里云
hexo4搭建博客系列(六)百度,必应,谷歌收录(无坑)
然后下面这篇博文的美化几乎很全,我自己也在用,如果有错评论指出,写得多自己脑子乱乱的。
我用的版本是 hexo4.0 + NexT7.6版本。我的个人博客
1. 添加博客图标
如:
在主题目录下_config.yml文件查询 favicon,只需要修改前两个:small和medium,图片的像素得为16像素和32像素
favicon:
  small: /images/favicon-16x16-next.png
  medium: /images/favicon-32x32-next.png
  apple_touch_icon: /images/apple-touch-icon-next.png
  safari_pinned_tab: /images/logo.svg
  #android_manifest: /images/manifest.json
  #ms_browserconfig: /images/browserconfig.xml
你可以看到这两个属性的值,/images其实完整的路径为:themes/next/source/images 这条路径来定位的。
也可以定义外部URI。
可以去图标素材:iconfont,easyicon。中下载16x16和32x32大小的PNG格式图片,然后放到themes/next/source/images下。
可以得出,要在主题某处添加什么图片都可以放在这个目录下。
2. 鼠标点击特效(二选一)
2.1 红心特效
刚刚说了主题图片可以放在themes\next\source\images,而themes\next\source有一个js文件,我们在themes\next\source\js\src(如果没有就自己创建) 下新建文件clicklove.js,然后把下面的代码copy到该文件中。
!function(e,t,a){function n(){c(".heart{width: 10px;height: 10px;position: fixed;background: #f00;transform: rotate(45deg);-webkit-transform: rotate(45deg);-moz-transform: rotate(45deg);}.heart:after,.heart:before{content: '';width: inherit;height: inherit;background: inherit;border-radius: 50%;-webkit-border-radius: 50%;-moz-border-radius: 50%;position: fixed;}.heart:after{top: -5px;}.heart:before{left: -5px;}"),o(),r()}function r(){for(var e=0;e<d.length;e++)d[e].alpha<=0?(t.body.removeChild(d[e].el),d.splice(e,1)):(d[e].y--,d[e].scale+=.004,d[e].alpha-=.013,d[e].el.style.cssText="left:"+d[e].x+"px;top:"+d[e].y+"px;opacity:"+d[e].alpha+";transform:scale("+d[e].scale+","+d[e].scale+") rotate(45deg);background:"+d[e].color+";z-index:99999");requestAnimationFrame(r)}function o(){var t="function"==typeof e.onclick&&e.onclick;e.onclick=function(e){t&&t(),i(e)}}function i(e){var a=t.createElement("div");a.className="heart",d.push({el:a,x:e.clientX-5,y:e.clientY-5,scale:1,alpha:1,color:s()}),t.body.appendChild(a)}function c(e){var a=t.createElement("style");a.type="text/css";try{a.appendChild(t.createTextNode(e))}catch(t){a.styleSheet.cssText=e}t.getElementsByTagName("head")[0].appendChild(a)}function s(){return"rgb("+~~(255*Math.random())+","+~~(255*Math.random())+","+~~(255*Math.random())+")"}var d=[];e.requestAnimationFrame=function(){return e.requestAnimationFrame||e.webkitRequestAnimationFrame||e.mozRequestAnimationFrame||e.oRequestAnimationFrame||e.msRequestAnimationFrame||function(e){setTimeout(e,1e3/60)}}(),n()}(window,document);
然后在\themes\next\layout_layout.swig文件末尾添加:
<!-- 页面点击小红心 -->
<script type="text/javascript" src="/js/src/clicklove.js"></script>
2.2 爆炸烟花
在themes\next\source\js\src(如果没有就自己创建) 下新建文件firework.js,然后把下面的代码copy到该文件中。
"use strict";function updateCoords(e){pointerX=(e.clientX||e.touches[0].clientX)-canvasEl.getBoundingClientRect().left,pointerY=e.clientY||e.touches[0].clientY-canvasEl.getBoundingClientRect().top}function setParticuleDirection(e){var t=anime.random(0,360)*Math.PI/180,a=anime.random(50,180),n=[-1,1][anime.random(0,1)]*a;return{x:e.x+n*Math.cos(t),y:e.y+n*Math.sin(t)}}function createParticule(e,t){var a={};return a.x=e,a.y=t,a.color=colors[anime.random(0,colors.length-1)],a.radius=anime.random(16,32),a.endPos=setParticuleDirection(a),a.draw=function(){ctx.beginPath(),ctx.arc(a.x,a.y,a.radius,0,2*Math.PI,!0),ctx.fillStyle=a.color,ctx.fill()},a}function createCircle(e,t){var a={};return a.x=e,a.y=t,a.color="#F00",a.radius=0.1,a.alpha=0.5,a.lineWidth=6,a.draw=function(){ctx.globalAlpha=a.alpha,ctx.beginPath(),ctx.arc(a.x,a.y,a.radius,0,2*Math.PI,!0),ctx.lineWidth=a.lineWidth,ctx.strokeStyle=a.color,ctx.stroke(),ctx.globalAlpha=1},a}function renderParticule(e){for(var t=0;t<e.animatables.length;t++){e.animatables[t].target.draw()}}function animateParticules(e,t){for(var a=createCircle(e,t),n=[],i=0;i<numberOfParticules;i++){n.push(createParticule(e,t))}anime.timeline().add({targets:n,x:function(e){return e.endPos.x},y:function(e){return e.endPos.y},radius:0.1,duration:anime.random(1200,1800),easing:"easeOutExpo",update:renderParticule}).add({targets:a,radius:anime.random(80,160),lineWidth:0,alpha:{value:0,easing:"linear",duration:anime.random(600,800)},duration:anime.random(1200,1800),easing:"easeOutExpo",update:renderParticule,offset:0})}function debounce(e,t){var a;return function(){var n=this,i=arguments;clearTimeout(a),a=setTimeout(function(){e.apply(n,i)},t)}}var canvasEl=document.querySelector(".fireworks");if(canvasEl){var ctx=canvasEl.getContext("2d"),numberOfParticules=30,pointerX=0,pointerY=0,tap="mousedown",colors=["#FF1461","#18FF92","#5A87FF","#FBF38C"],setCanvasSize=debounce(function(){canvasEl.width=2*window.innerWidth,canvasEl.height=2*window.innerHeight,canvasEl.style.width=window.innerWidth+"px",canvasEl.style.height=window.innerHeight+"px",canvasEl.getContext("2d").scale(2,2)},500),render=anime({duration:1/0,update:function(){ctx.clearRect(0,0,canvasEl.width,canvasEl.height)}});document.addEventListener(tap,function(e){"sidebar"!==e.target.id&&"toggle-sidebar"!==e.target.id&&"A"!==e.target.nodeName&&"IMG"!==e.target.nodeName&&(render.play(),updateCoords(e),animateParticules(pointerX,pointerY))},!1),setCanvasSize(),window.addEventListener("resize",setCanvasSize,!1)}"use strict";function updateCoords(e){pointerX=(e.clientX||e.touches[0].clientX)-canvasEl.getBoundingClientRect().left,pointerY=e.clientY||e.touches[0].clientY-canvasEl.getBoundingClientRect().top}function setParticuleDirection(e){var t=anime.random(0,360)*Math.PI/180,a=anime.random(50,180),n=[-1,1][anime.random(0,1)]*a;return{x:e.x+n*Math.cos(t),y:e.y+n*Math.sin(t)}}function createParticule(e,t){var a={};return a.x=e,a.y=t,a.color=colors[anime.random(0,colors.length-1)],a.radius=anime.random(16,32),a.endPos=setParticuleDirection(a),a.draw=function(){ctx.beginPath(),ctx.arc(a.x,a.y,a.radius,0,2*Math.PI,!0),ctx.fillStyle=a.color,ctx.fill()},a}function createCircle(e,t){var a={};return a.x=e,a.y=t,a.color="#F00",a.radius=0.1,a.alpha=0.5,a.lineWidth=6,a.draw=function(){ctx.globalAlpha=a.alpha,ctx.beginPath(),ctx.arc(a.x,a.y,a.radius,0,2*Math.PI,!0),ctx.lineWidth=a.lineWidth,ctx.strokeStyle=a.color,ctx.stroke(),ctx.globalAlpha=1},a}function renderParticule(e){for(var t=0;t<e.animatables.length;t++){e.animatables[t].target.draw()}}function animateParticules(e,t){for(var a=createCircle(e,t),n=[],i=0;i<numberOfParticules;i++){n.push(createParticule(e,t))}anime.timeline().add({targets:n,x:function(e){return e.endPos.x},y:function(e){return e.endPos.y},radius:0.1,duration:anime.random(1200,1800),easing:"easeOutExpo",update:renderParticule}).add({targets:a,radius:anime.random(80,160),lineWidth:0,alpha:{value:0,easing:"linear",duration:anime.random(600,800)},duration:anime.random(1200,1800),easing:"easeOutExpo",update:renderParticule,offset:0})}function debounce(e,t){var a;return function(){var n=this,i=arguments;clearTimeout(a),a=setTimeout(function(){e.apply(n,i)},t)}}var canvasEl=document.querySelector(".fireworks");if(canvasEl){var ctx=canvasEl.getContext("2d"),numberOfParticules=30,pointerX=0,pointerY=0,tap="mousedown",colors=["#FF1461","#18FF92","#5A87FF","#FBF38C"],setCanvasSize=debounce(function(){canvasEl.width=2*window.innerWidth,canvasEl.height=2*window.innerHeight,canvasEl.style.width=window.innerWidth+"px",canvasEl.style.height=window.innerHeight+"px",canvasEl.getContext("2d").scale(2,2)},500),render=anime({duration:1/0,update:function(){ctx.clearRect(0,0,canvasEl.width,canvasEl.height)}});document.addEventListener(tap,function(e){"sidebar"!==e.target.id&&"toggle-sidebar"!==e.target.id&&"A"!==e.target.nodeName&&"IMG"!==e.target.nodeName&&(render.play(),updateCoords(e),animateParticules(pointerX,pointerY))},!1),setCanvasSize(),window.addEventListener("resize",setCanvasSize,!1)};
然后在\themes\next\layout_layout.swig文件末尾添加:
<!-- 爆炸烟花 -->
<canvas class="fireworks" style="position: fixed;left: 0;top: 0;z-index: 1; pointer-events: none;" ></canvas>
<script type="text/javascript" src="//cdn.bootcss.com/animejs/2.2.0/anime.min.js"></script>
<script type="text/javascript" src="/js/src/firework.js"></script>
3. 设置头像
在主题目录(themes/next/)中的_config.yml,查找 avatar
# Sidebar Avatar
avatar:
  # Replace the default image and set the url here.
  # 把你要的头像文件名字改为avatar并放到相应路径下,如果后缀不同,则在这里改后缀,不要改图片后缀
  url: /images/avatar.jpg
  # If true, the avatar will be dispalyed in circle.
  rounded: true
  # If true, the avatar will be rotated with the cursor.
  rotated: true
4. 侧边栏社交小图标设置
在主题目录打开_config.yml,查询 social
social:
  GitHub: https://github.com/magicflung || github
  #E-Mail: mailto:yourname@gmail.com || envelope
  #Weibo: https://weibo.com/yourname || weibo
  #Google: https://plus.google.com/yourname || google
  #Twitter: https://twitter.com/yourname || twitter
  #FB Page: https://www.facebook.com/yourname || facebook
  #StackOverflow: https://stackoverflow.com/yourname || stack-overflow
  #YouTube: https://youtube.com/yourname || youtube
  #Instagram: https://instagram.com/yourname || instagram
  #Skype: skype:yourname?call|chat || skype
  #RSS: /atom.xml || rss
然后启动你想要的,并修改成自己的路径。目前只有这些。
5. 文章末尾的标签图标修改
默认是 带“#”,可以把它换成图标。还是主题目录打开_config.yml中查询 tag_icon
# Use icon instead of the symbol # to indicate the tag at the bottom of the post
tag_icon: true
效果:
6. 访问量统计
在主题目录打开_config.yml,查询 busuanzi
# Show Views / Visitors of the website / page with busuanzi.
# Get more information on http://ibruce.info/2015/04/04/busuanzi
busuanzi_count:
  enable: true # 是否开启访问量统计
  total_visitors: false # 本站访客数
  total_visitors_icon: user
  total_views: true # 本站总访问量
  total_views_icon: eye
  post_views: false # 文章访问量,但我不喜欢用这个,因为在我的网站首页不会显示每篇博文的访问量,而是得点进博文,我用别的来统计,待会会说
  post_views_icon: eye
但是我当时配置时失效,我百度一下,找到解决方案,原来是不蒜子使用的七牛的域名被强制过期。。
在/themes/next/layout/_third-party/statistics中的busuanzi-counter.swig中,看最前面,如图:
我是改了的,你把src中的改为:
https://busuanzi.ibruce.info/busuanzi/2.3/busuanzi.pure.mini.js
在主题目录的/themes/next/layout/_partials/footer.swig,在最后添加上下面这条,可以自己修改显示的位置。我忘记了是不是本来就有配,并且是否有下面代码的第一条,如果有则在里面添加。没用就直接复制下面的。
{%- if theme.footer.powered.enable %}
  <span id="busuanzi_container_site_pv">
    本站总访问量<span class="busuanzi-value" id="busuanzi_value_site_pv"></span>次
  </span>
{%- endif %}
注意:本地测试的访问量刚开始会很大不正常,但是部署后是正常的,这点不用理。
7. 添加站内搜索
在站内按照搜索,站点目录打开Git Bash,输入:
sudo npm install hexo-generator-search --save
然后在站点目录的_config.yml文件把下面代码添加进去,不用修改。我测试过可以不配置下面的代码,插件默认只索引文章(post),要想页面(page)也能被检索,则把path的值改为all。
具体可参考官方:hexo-generator-search
# 搜索
search:
  path: search.xml
  field: post
  format: html
  limit: 10000
最后在主题目录的_config.yml文件,查询 local_search
# Local Search
# Dependencies: https://github.com/theme-next/hexo-generator-searchdb
local_search:
  enable: true # 开启站内搜索
  # 如果自动,则通过更改输入触发搜索。
  # 如果是手动,则按回车键或搜索按钮触发搜索。
  trigger: auto
  # 显示每篇文章的前n个结果,通过设置-1显示所有结果
  top_n_per_article: 1
  # 将html字符串转换为可读字符串。
  unescape: false
  # 加载页面时预加载搜索数据。
  preload: false
8. 启动阅读更多按钮
在主题目录的_config.yml中,查询:read_more_btn
# Read more button
# If true, the read more button will be displayed in excerpt section.
read_more_btn: true # 启动
效果:
这里需要额外说一下,必须在每篇博文的最前面有一堆默认键值对代码那里,添加上一个键: description,
然后冒号: :,然后再空格,添加上自己的小文段。
但是每次都得自己加太麻烦了,所以在站点目录下的scaffolds文件中有个post文件,这个文件就是博文模板,点开就可以添加每篇博文的通用信息。我的如下:
---
title: {{ title }}
date: {{ date }}
tags:
categories:
copyright: true
top:
description:
---
9. 文章顶置(二选一,看看哪种简单)
9.1 方法一
在站点目录的 node_modules/hexo-generator-index/lib/generator.js 中,把改文件的代码全改成
'use strict';
var pagination = require('hexo-pagination');
module.exports = function(locals){
  var config = this.config;
  var posts = locals.posts;
    posts.data = posts.data.sort(function(a, b) {
        if(a.top && b.top) { // 两篇文章top都有定义
            if(a.top == b.top) return b.date - a.date; // 若top值一样则按照文章日期降序排
            else return b.top - a.top; // 否则按照top值降序排
        }
        else if(a.top && !b.top) { // 以下是只有一篇文章top有定义,那么将有top的排在前面(这里用异或操作居然不行233)
            return -1;
        }
        else if(!a.top && b.top) {
            return 1;
        }
        else return b.date - a.date; // 都没定义按照文章日期降序排
    });
  var paginationDir = config.pagination_dir || 'page';
  return pagination('', posts, {
    perPage: config.index_generator.per_page,
    layout: ['index', 'archive'],
    format: paginationDir + '/%d/',
    data: {
      __index: true
    }
  });
};
然后可以在博文模板post中加个top键,值为整数,并且值为大越靠前。
9.2 方法二
在站点目录下打开Git Bash,先把原先的顶置插件卸载了,然后再装上hexo-generator-index-pin-top,输入:
npm uninstall hexo-generator-index --save
npm install hexo-generator-index-pin-top --save
然后可以在博文模板post中加个top键,值为整数,并且值为大越靠前。
这种方法就不用去修改js文件。
最后,两种都可以用的,就是在顶置博文时,没用一个顶置图标感觉有点怪怪的,所以可以加个图标。在主题目录中的themes\next\layout\_macro的post文件,打开查询第一个:post-meta。
<div class="post-meta">
然后这个div的下一行添加上:
{% if post.top %}
	<i class="fa fa-thumb-tack"></i>
	<font color=7D26CD>置顶</font>
	<span class="post-meta-divider">|</span>
{% endif %}
效果:
10. 在文章底部增加版权信息
10.1 方式一
最简单,在主题目录的_config.yml查询 creative_commons
# Creative Commons 4.0 International License.
# See: https://creativecommons.org/share-your-work/licensing-types-examples
# Available values of license: by | by-nc | by-nc-nd | by-nc-sa | by-nd | by-sa | zero
# You can set a language value if you prefer a translated version of CC license, e.g. deed.zh
# CC licenses are available in 39 languages, you can find the specific and correct abbreviation you need on https://creativecommons.org
creative_commons:
  license: by-nc-sa
  sidebar: false
  post: true # 开启
  language:
但是这种如何改变样式我没研究,我喜欢下面的方式,毕竟还可以自己加上样式、文字等。
10.2 方式二(比较麻烦,但是好看)
我用网上的直接复制的代码,但是在这段代码中的sweetalert外部链接不知道咋了,访问超时,导致我的博文访问一篇文章贼慢,我以为是哪里出错。**这也是一个启示:如果博文突然变得慢,打开web工具检查一下那些加载过慢,考虑是否要删去,或者是哪里出错。**如下图:11s的加载。
所以出错就是在这一句:
<script src="https://unpkg.com/sweetalert/dist/sweetalert.min.js"></script>
我下载一个本地的js,然后自己改成本地连接就好了。
点击下载,然后解压,把sweetalert.min.js文件放到themes\next\source\js中,
在themes\next\layout_macro中新建一个 my-copyright.swig文件,并添加:
  {% if page.copyright %}
<div class="my_post_copyright">
  <script src="//cdn.bootcss.com/clipboard.js/1.5.10/clipboard.min.js"></script>

  <script src="https://cdn.bootcss.com/jquery/2.0.0/jquery.min.js"></script>
   <!-- JS库 sweetalert 引用本地路径 -->
  <script src="/js/sweetalert.min.js"></script>
  <p><span>文章作者:</span><a href="/" title="访问 {{ theme.author }} 的个人博客">{{ theme.author }}</a></p>
  <p><span>发布时间:</span>{{ page.date.format("YYYY年MM月DD日 - HH:MM") }}</p>
  <p><span>原始链接:</span><a href="{{ url_for(page.path) }}" title="{{ page.title }}">{{ page.permalink }}</a>
    <span class="copy-path"  title="点击复制文章链接"><i class="fa fa-clipboard" data-clipboard-text="{{ page.permalink }}"  aria-label="复制成功!"></i></span>
  </p>
  <p><span>许可协议:</span> 转载请保留原文链接及作者。</p>
</div>
<script>
    var clipboard = new Clipboard('.fa-clipboard');
      $(".fa-clipboard").click(function(){
      clipboard.on('success', function(){
        swal({
          title: "",
          text: '复制成功',
          icon: "success",
          showConfirmButton: true
          });
        });
    });
</script>
{% endif %}
然后在themes\next\source\css_common\components\post中新建my-post-copyright.styl 文件,添加上我们的版权样式。
\6.png).my_post_copyright {
width: 85%;
max-width: 45em;
margin: 2.8em auto 0;
padding: 0.5em 1.0em;
border: 1px solid #d3d3d3;
font-size: 0.93rem;
line-height: 1.6em;
word-break: break-all;
background: rgba(255,255,255,0.4);
}
.my_post_copyright p{margin:0;}
.my_post_copyright span {
display: inline-block;
width: 5.2em;
color: #b5b5b5;
font-weight: bold;
}
.my_post_copyright .raw {
margin-left: 1em;
width: 5em;
}
.my_post_copyright a {
color: #808080;
border-bottom:0;
}
.my_post_copyright a:hover {
color: #a3d2a3;
text-decoration: underline;
}
.my_post_copyright:hover .fa-clipboard {
color: #000;
}
.my_post_copyright .post-url:hover {
font-weight: normal;
}
.my_post_copyright .copy-path {
margin-left: 1em;
width: 1em;
+mobile(){display:none;}
}
.my_post_copyright .copy-path:hover {
color: #808080;
cursor: pointer;
}
然后在themes/next/layout/_macro/post.swig中,搜索 END POST BODY,然后再下一行添加:
<div>
{% if not is_index %}
{% include 'my-copyright.swig' %}
{% endif %}
</div>/6.png)
然后回到站点目录下的scaffolds文件中有个post文件,添加copyright: true。也就是我上面那图,这就会在每篇博文下添加版权信息,也方便别人复制你的url。
11. 添加打赏
在主题文件的_config.yml,查询:reward
# Reward (Donate)
# Front-matter variable (unsupport animation).
reward_settings:
  # If true, reward will be displayed in every article by default.
  enable: true # 开启打赏
  animation: true # 开启动画抖动,可以自己试试
  #comment: Donate comment here.

reward:
  wechatpay: /images/wechatpay.jpg # 放微信的收款码
  alipay: /images/alipay.jpg # 放支付宝的收款码
  #bitcoin: /images/bitcoin.png
12. 文章加密访问
我不推荐用,毕竟只是前端校验而已。虽然一般人破不出。
13. 启动代码复制按钮
打开主题目录的_config.yml,查询 copy_button。
codeblock:
  # Code Highlight theme
  # Available values: normal | night | night eighties | night blue | night bright | solarized | solarized dark | galactic
  # See: https://github.com/chriskempson/tomorrow-theme
  highlight_theme: normal
  # Add copy button on codeblock
  copy_button:
    enable: true # 开启代码复制按钮
    # Show text copy result.
    show_result: true
    # Available values: default | flat | mac
    style: mac # 代码框样式,我喜欢用mac的,上面有三个选择都可以试试
14. 在Footer添加站点运行时间
在主题目录的/themes/next/layout/_partials/footer.swig中找到下面这句。
{%- if theme.footer.theme.enable %}
然后在这句的下面添加:
<div id="days"></div>
	</script>
	<script language="javascript">
	function show_date_time(){
	window.setTimeout("show_date_time()", 1000);
	BirthDay=new Date("11/29/2019 20:00:00");
	today=new Date();
	timeold=(today.getTime()-BirthDay.getTime());
	sectimeold=timeold/1000
	secondsold=Math.floor(sectimeold);
	msPerDay=24*60*60*1000
	e_daysold=timeold/msPerDay
	daysold=Math.floor(e_daysold);
	e_hrsold=(e_daysold-daysold)*24;
	hrsold=setzero(Math.floor(e_hrsold));
	e_minsold=(e_hrsold-hrsold)*60;
	minsold=setzero(Math.floor((e_hrsold-hrsold)*60));
	seconds=setzero(Math.floor((e_minsold-minsold)*60));
	document.getElementById('days').innerHTML="已运行"+daysold+"天"+hrsold+"时"+minsold+"分"+seconds+"秒";
	}
	function setzero(i){
	if (i<10)
	{i="0" + i};
	return i;
	}
	show_date_time();
	</script>
在这条语句里面我把原先的代码都注释了,不想用。为了怕说不清,贴图:
15. 实现文章统计功能
安装一个 hexo-symbols-count-time插件,可以统计字数和阅读分钟数,
npm install hexo-symbols-count-time --save
然后在站点目录的config.yml最后添加:
symbols_count_time:
symbols: true # 文章字数统计
time: true # 文章阅读时长
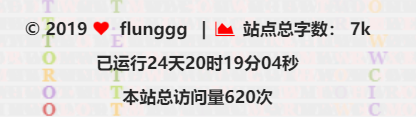
total_symbols: true # 站点总字数统计
total_time: true # 站点总阅读时长
exclude_codeblock: false # 排除代码字数统计
不喜欢的可以使用false让它不启动。并且文章字数统计时,他是连空格,标点符号等都统计了,可能会导致文章的字数会不正确,偏大。
效果:
16. 修改博文目录
在主题目录的_config.yml 查询 toc
# 侧边栏中的目录
# Front-matter variable (unsupport wrap expand_all).
toc:
  enable: true # 是否启动博文目标
  # 自动将列表号添加到目录。
  number: false
  # 如果为true,则如果标题宽度大于边栏宽度,则所有单词都将放在下一行。width.
  wrap: false
  # 如果为true,则将显示帖子中所有级别的TOC,而不是其中激活的部分。
  expand_all: false
  # 生成的子标题的最大深度。
  max_depth: 6
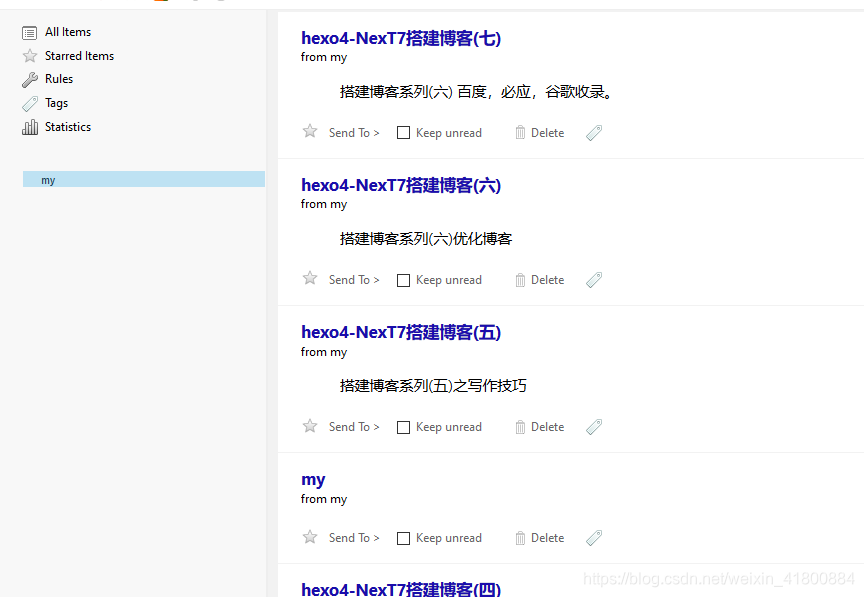
17. RSS订阅(非必要)
原因:RSS订阅可以对文章内容进行订阅。如下:就不必每次去收藏夹找该博客网站
首先在站点目录下打开Git Bash 安装
npm install hexo-generator-feed --save
然后打开站点目录的_config.yml在后面添加:
# RSS
plugins: hexo-generate-feed
然后在站点目录的_config.yml 查找 RSS
然后把它的注释去掉,即开启,并且不用去创建该页面,会自动生成
RSS: /atom.xml || rss
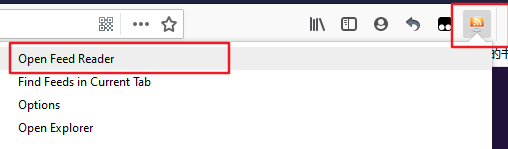
然后部署到网站就可以看到,但是我们点开时是一堆代码,我们需要安装一个RSS阅读器的插件,在浏览器搜索
RSS,谷歌商城一般登不上,登得上一样查RSS就行,那在火狐的附加工具搜,第一个就是下面这个:
安装这个,使用方法:

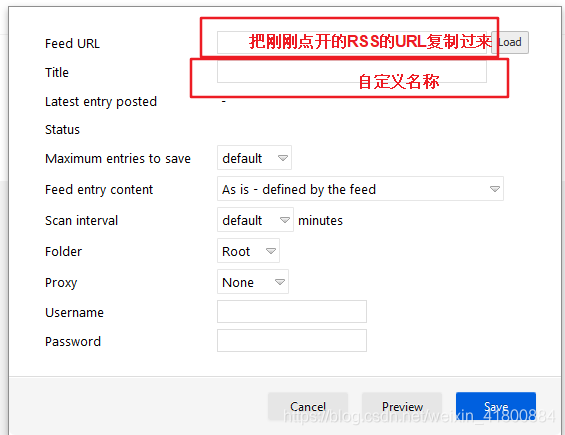
RSS的URL就是我们点开后一堆代码的上面的URL,比如我的是:
https://flunggg.cn/atom.xml
18. GitHub Fork Me
这个可以在我们的网站右上角出现一个到GitHub的跳转按钮,其实也跟侧边栏那个社交小图标差不多功能
在主题目录的_config.yml查询 github_banner
# `Follow me on GitHub` banner in the top-right corner.
github_banner:
  enable: true # 开启
  permalink: https://github.com/magicflung # 把它改为你的github首页
  title: Follow me on GitHub
19. bookmark
Bookmark是一个插件,允许用户保存他们的阅读进度。用户只需单击页面左上角的书签图标即可保存滚动位置。当他们下次访问您的博客时,他们可以自动恢复每个页面的最后滚动位置。
在主题目录的_config.yml查询 bookmark
bookmark:
  enable: true # 开启
  # Customize the color of the bookmark.
  color: "#836FFF" # 自定义颜色
  # If auto, save the reading progress when closing the page or clicking the bookmark-icon.
  # If manual, only save it by clicking the bookmark-icon.
  save: auto # 会自动保存阅读进度
效果:

20. 添加lazyload(跟后面的图片点击全屏看不能共存)
对于图片进行延迟加载,访问到图片位置时才去请求图片资源,这样可以提高博客的访问速度,节省流量。下面一整条都复制。
npm install --save lozad
然后在你的主题目录的配置文件 _config.yml 中,查询 lazyload
# Vanilla JavaScript plugin for lazyloading images.
# For more information: https://github.com/ApoorvSaxena/lozad.js
lazyload: true # 开启
21. 显示当前浏览进度(两者可共存)
21.1 方式一
在主题目录的_config.yml查询scrollpercent,默认为false,改为true
back2top:
  enable: true
  # Back to top in sidebar.
  sidebar: false
  # Scroll percent label in b2t button.
  scrollpercent: true # 开启
21.2 方式二
在主题目录的_config.yml查询reading_progress
# Reading progress bar
reading_progress:
  enable: true # 开启
  # Available values: top | bottom
  position: top # top会出现在页面最顶部,bottom会出现在那里
  color: "#836FFF" # 可修改颜色
  height: 3px
22. Footer / 页脚设置
在主题目录的_config.yml 查询 footer
footer:
  # Specify the date when the site was setup. If not defined, current year will be used.
  #since: 2019

  # Icon between year and copyright info.
  icon:
    # Icon name in Font Awesome. See: https://fontawesome.com/v4.7.0/icons/
    # `heart` is recommended with animation in red (#ff0000).
    name: heart # 可以修改图片,可以去 https://fontawesome.com/v4.7.0/icons/ 找
    # If you want to animate the icon, set it to true.
    animated: true
    # Change the color of icon, using Hex Code.
    color: "#F5F5F5" # 图标颜色

  # If not defined, `author` from Hexo `_config.yml` will be used.
  copyright:

  # Powered by Hexo 字样,不喜欢可以设置为 false
  powered:
    # Hexo link (Powered by Hexo).
    enable: true
    # Version info of Hexo after Hexo link (vX.X.X).
    version: true

  # 主题字样,不喜欢可以 false
  theme:
    # Theme & scheme info link (Theme - NexT.scheme).
    enable: true
    # Version info of NexT after scheme info (vX.X.X).
    version: true

  # 备案信息,如果网站有备案号,可以在这里填写备案号
  # Beian ICP and gongan information for Chinese users. See: http://www.beian.miit.gov.cn, http://www.beian.gov.cn
  beian:
    enable: false
    icp:
    # The digit in the num of gongan beian.
    gongan_id:
    # The full num of gongan beian.
    gongan_num:
    # The icon for gongan beian. See: http://www.beian.gov.cn/portal/download
    gongan_icon_url:
然后还可以在 themes\next\layout_partials的footer.swig里修改,这个我在前面的Footer添加运行时间有说,在这个文件可以修改他们的位置,也可以手动去掉或添加某些东西。如我的:
23. 添加Valine评论
评论系统有很多种,只能选一种。
我自己喜欢用不登录评论,也就是偶尔有人要说一下,但是发现还得登录。这个评论系统就是Valine,下面是教程:
23.1. 注册LeanCloud
点击LeanCloud,去注册一个账号,点右上角的控制台就会跳到注册。这里有分为国内和国际版,国内的在2019-10-1之后需要自定义已备案域名才能继续提供服务了,觉得麻烦的同学可以移步去国际版LeanCloud国际版。
23.2. 创建应用
注册好之后,进行实名验证、邮箱验证等等。
点击创建应用,输入名称,然后直接创建。
23.3. 设置Web安全域名,填入自己的域名
目的是:为了数据安全。
打开应用,点击 设置 -> 安全中心。看下面,把能访问到你网站的URL全写进去。
23.4. 获取APP ID 和 APP Key
如下打开:
然后在主题目录的_config.yml 文件查询 valine,然后把上面的两个复制进去
# Valine
# For more information: https://valine.js.org, https://github.com/xCss/Valine
valine:
  enable: true # 开启
  appid:  # 添加你的appid
  appkey: # 添加你的appkey
  notify: false # Mail notifier
  verify: false # Verification code
  placeholder: Just go go # Comment box placeholder
  avatar: monsterid # Gravatar style
  guest_info: nick,mail,link # Custom comment header
  pageSize: 10 # Pagination size
  language: # Language, available values: en, zh-cn
  visitor: true # Article reading statistic
  comment_count: true # If false, comment count will only be displayed in post page, not in home page
  recordIP: false # Whether to record the commenter IP
  serverURLs: # When the custom domain name is enabled, fill it in here (it will be detected automatically by default, no need to fill in)
  #post_meta_order: 0
  avatar_cdn: https://www.gravatar.com/avatar/
效果图是这样的:
不过上面的 网址(http://) 我觉得没什么用,就把它去掉了,打开themes\next\layout_third-party\comments中的valine.swig文件,删掉第三个,我的已经删了:
也可以选择Gitalk评论系统,这个我就不说了。要的自己百度。
24. Vline邮箱评论通知
每当有人在博文下面评论我们的博文,我们就可以使用这个插件通过邮箱知道。
下面这款插件是新款,有几个优点:
- 完善的邮件通知,自定义 SMTP 发件频率和内容不再受限
- 基于 Akismet 的垃圾评论自动标注和过滤
- 评论管理,避免直接操作数据库
效果:
1.我们还是要借助Leancloud,打开刚刚我们创建的应用,如图:修改右边的边框内容。这是配置回复模板。
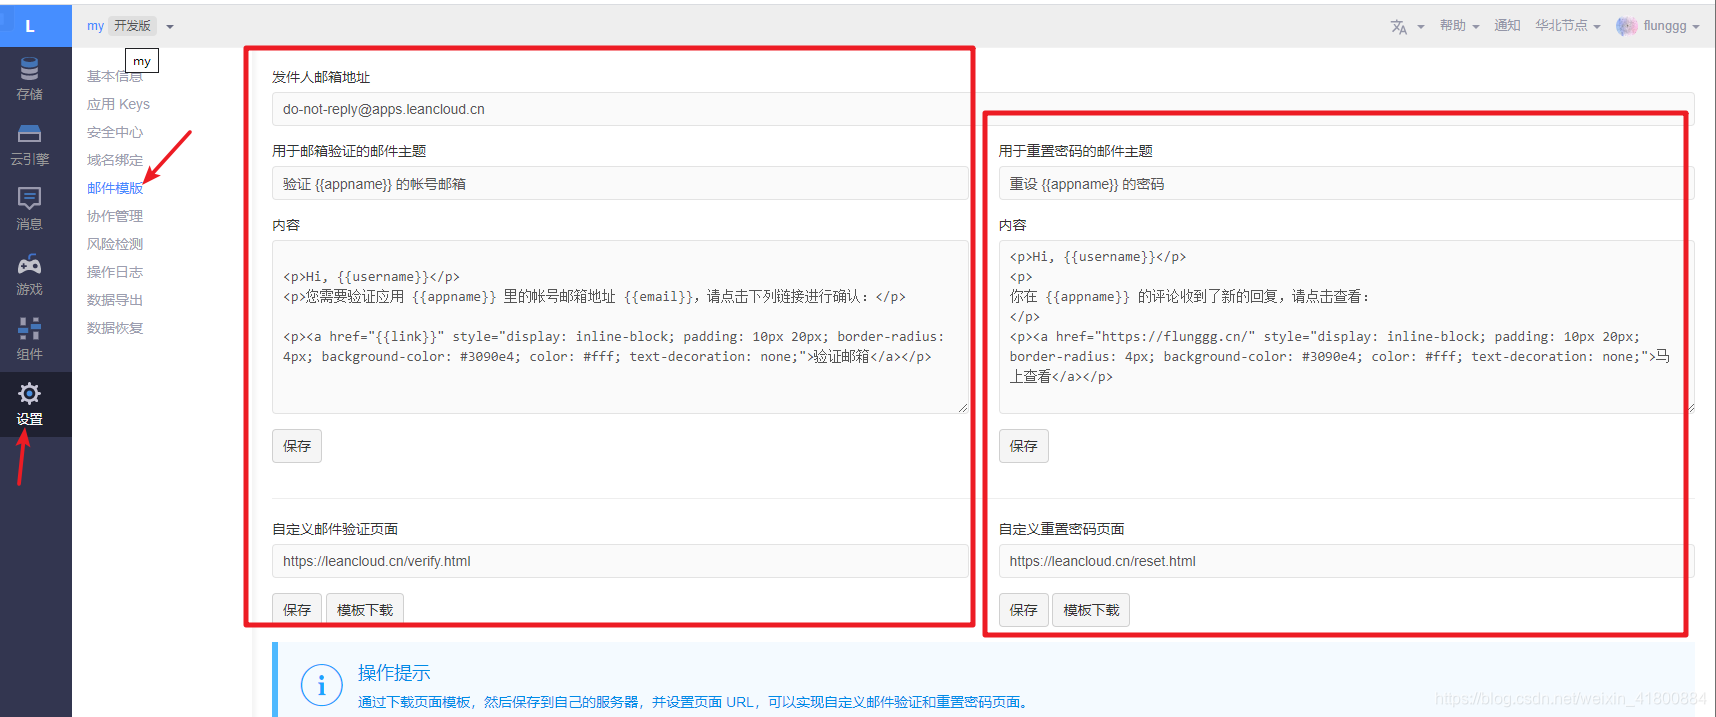
注:请注意修改链接为你的
博客或者网站首页。
<p>Hi, {{username}}</p>
<p>
你在 {{appname}} 的评论收到了新的回复,请点击查看:
</p>
<p><a href="你的网址首页链接" style="display: inline-block; padding: 10px 20px; border-radius: 4px; background-color: #3090e4; color: #fff; text-decoration: none;">马上查看</a></p>
2.还是在Leancloud中,打开 云引擎 -》设置,把下面代码复制进去:
https://github.com/DesertsP/Valine-Admin.git
然后还是在这,点击 部署,如图:
上面的图我用别人的,因为我自己点开就是下面的图:
然后等待部署完,比较久。
3.然后还是回到 云引擎 -》 设置 中,如图:找到 自定义环境变量
需要配置信息:
| 变量名 | 实例 | 说明 |
|---|---|---|
| SITE_NAME | flunggg | 【必填】网站名称 |
| SITE_URL | https://flunggg.cn/ | 网站地址 |
| SMTP_HOST | smtp.qq.com | QQ邮箱为这个,其他的自己查 |
| SMTP_PORT | 465 | Https的邮件端口 |
| SMTP_USER | xxxxx@qq.com | 这里填写QQ邮箱,然后有人评论就会发送到我们这个邮箱里 |
| SMTP_PASS | 这里添加邮箱申请的SMTP密码 | |
| SENDER_NAME | xxx博客–评论提醒 | 发送邮件的昵称 |
| SENDER_EMAIL | 发送人邮箱,同上面的QQ邮箱一致就行 | |
| ADMIN_URL | 管理评论后台,这个待会说 |
4.如何申请SMTP,直接看图,我用的是qq邮箱,你要用别的得去查。开启后把STMP密码复制到这。
5.设置二级域名后你可以访问评论管理后台。还是在这里的下面找到 Web主机域名
现在好像已经是默认给你一个,不能改的,然后把这个域名复制到上面环境变量的ADMIN_URL。
我们还需要密码,用户名,需要在这里设置,只需要填写 email、password、username,这三个字段即可,使用 username 或 email 登陆即可。
然后重启下实例
最后访问域名,输入我们刚刚的username或者email,登录。就可以管理我们的评论区啦。
LeanCloud 休眠策略
免费版的 LeanCloud 容器,是有强制性休眠策略的,不能 24 小时运行:
- 每天必须休眠 6 个小时
- 30 分钟内没有外部请求,则休眠。
- 休眠后如果有新的外部请求实例则马上启动(但激活时发送邮件会失败)。
分析了一下上方的策略,如果不想付费的话,最佳使用方案就设置定时器,每天 7 - 23 点每 20 分钟访问一次,这样可以保持每天的绝大多数时间邮件服务是正常的。
25. Valine 头像设置
我们可以修改评论的头像,路人的头像有下面几种,默认为第一种
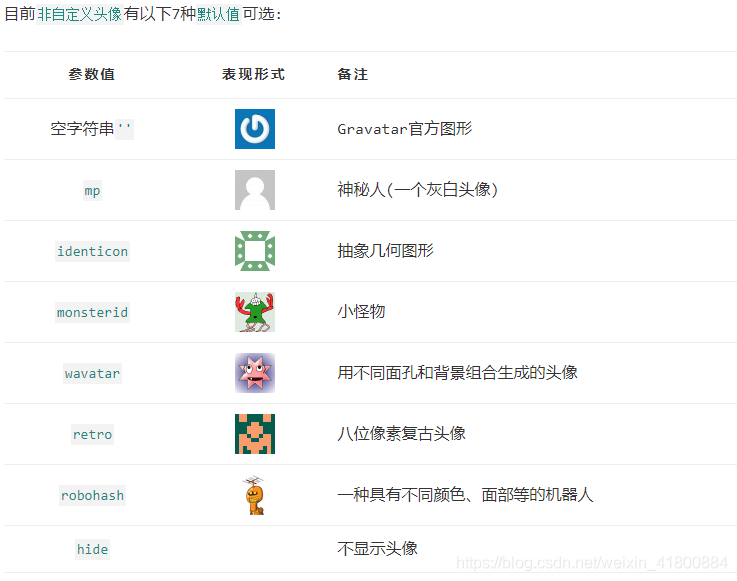
在主题目录的_config.yml文件查找:valine 中,找到avatar,然后就可以修改上面的图标
# Valine
# For more information: https://valine.js.org, https://github.com/xCss/Valine
valine:
  ...
  avatar: monsterid # Gravatar style
  ...
如果你修改了头像后发现没有更新,请不要慌张,因为
gravatar.cat.net有七天的缓存期,安静的等待吧
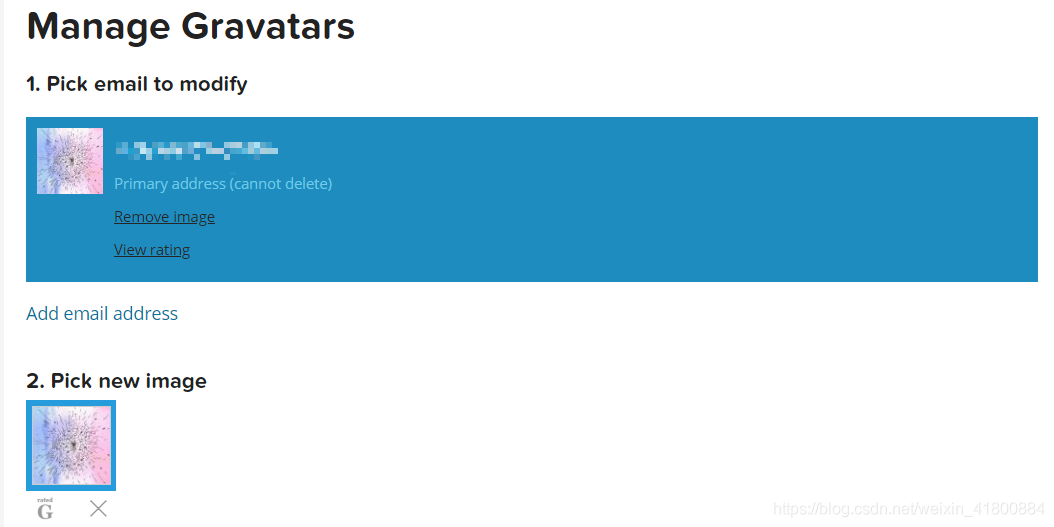
然后还可以设置自己的自定义头像,登录 gravatar,注册账号并设置头像,然后在valine评论时,输入我们刚刚注册的邮箱,会显示出我们自定义的头像。我的设置如下:
26. 添加文章阅读次数
这个还是得借助Leancloud 。
在主题目录的_config.yml 查询 leancloud_visitors
\23.png)# Show number of visitors of each article.
# You can visit https://leancloud.cn to get AppID and AppKey.
# AppID and AppKey are recommended to be the same as valine's for counter compatibility.
# Do not enable both `valine.visitor` and `leancloud_visitors`.
leancloud_visitors:
enable: true # 开启
app_id: # 填入你的Leancloud的appId
app_key: # 填入你的Leancloud的appKey
# Dependencies: https://github.com/theme-next/hexo-leancloud-counter-security
# If you don't care about security in leancloud counter and just want to use it directly
# (without hexo-leancloud-counter-security plugin), set `security` to `false`.
security: false # 默认
betterPerformance: false # 默认
点击刚刚创建的应用(评论那个),点击设置->应用Keys中的Id和Key。复制粘贴到上面那个地方。然后在该应用,有一个叫 存储,点开,然后看到创建Class,创建一个Counter就行。
27. Url 持久化
我们可以发现 hexo 默认生成的文章地址路径是 【网站名称/年/月/日/文章名称】。
这种链接对搜索爬虫是很不友好的,它的 url 结构超过了三层,太深了。
下面我推荐安装 hexo-abbrlink 插件:
npm install hexo-abbrlink --save
然后在站点目录下,查询 permalink
# URL
## If your site is put in a subdirectory, set url as 'http://yoursite.com/child' and root as '/child/'
url: https://flunggg.cn/  # 这里我填写我自己的域名,没有域名的先别动
root: /
permalink: archives/:abbrlink.html # 该这个
abbrlink:
  alg: crc32  # 算法:crc16(default) and crc32
  rep: hex    # 进制:dec(default) and hex
效果:

28. nofollow 标签的使用
减少出站链接能够有效防止权重分散。简单的说就是,如果A网页上有一个链接指向B网页,但A网页给这个链接加上了 rel=“nofollow” 标注,则搜索引擎不把A网页计算入B网页的反向链接。搜索引擎看到这个标签就可能减少或完全取消链接的投票权重。(百度百科)
安装插件:
npm install hexo-autonofollow --save
然后在站点目录下的_config.yml添加
# 外部链接优化
nofollow:
    enable: true
    exclude:     # 例外的链接,可将友情链接放置此处
    - 'yousite'
这样,例外的链接将不会被加上 nofollow 属性。
29. 取消“文章目录”的自动编号
在主题目录下的_config.yml,搜索 toc
toc:
  enable: true
  # Automatically add list number to toc.
  number: false # 取消自动编号
  # If true, all words will placed on next lines if header width longer then sidebar width.
  wrap: true
  # If true, all level of TOC in a post will be displayed, rather than the activated part of it.
  expand_all: false
  # Maximum heading depth of generated toc.
  max_depth: 6
30. 背景(不要共存)
30.1 雨代码(就是我当前用的这样)
重头戏来了,我第一次发现这个也是惊喜一番。
在主题目录下的themes\next\source\js\src中新建一个名为DigitalRain.js文件。然后添加如下代码:
window.onload = function(){
    //获取画布对象
    var canvas = document.getElementById("canvas");
    //获取画布的上下文
    var context =canvas.getContext("2d");
    var s = window.screen;
    var W = canvas.width = s.width;
    var H = canvas.height;
    //获取浏览器屏幕的宽度和高度
    //var W = window.innerWidth;
    //var H = window.innerHeight;
    //设置canvas的宽度和高度
    canvas.width = W;
    canvas.height = H;
    //每个文字的字体大小
    var fontSize = 12;
    //计算列
    var colunms = Math.floor(W /fontSize);
    //记录每列文字的y轴坐标
    var drops = [];
    //给每一个文字初始化一个起始点的位置
    for(var i=0;i<colunms;i++){
        drops.push(0);
    }
    //运动的文字
    var str ="WELCOME TO WWW.ITRHX.COM";
    //4:fillText(str,x,y);原理就是去更改y的坐标位置
    //绘画的函数
    function draw(){
        context.fillStyle = "rgba(238,238,238,.08)";//遮盖层
        context.fillRect(0,0,W,H);
        //给字体设置样式
        context.font = "600 "+fontSize+"px  Georgia";
        //给字体添加颜色
        context.fillStyle = ["#33B5E5", "#0099CC", "#AA66CC", "#9933CC", "#99CC00", "#669900", "#FFBB33", "#FF8800", "#FF4444", "#CC0000"][parseInt(Math.random() * 10)];//randColor();可以rgb,hsl, 标准色,十六进制颜色
        //写入画布中
        for(var i=0;i<colunms;i++){
            var index = Math.floor(Math.random() * str.length);
            var x = i*fontSize;
            var y = drops[i] *fontSize;
            context.fillText(str[index],x,y);
            //如果要改变时间,肯定就是改变每次他的起点
            if(y >= canvas.height && Math.random() > 0.99){
                drops[i] = 0;
            }
            drops[i]++;
        }
    };
    function randColor(){//随机颜色
        var r = Math.floor(Math.random() * 256);
        var g = Math.floor(Math.random() * 256);
        var b = Math.floor(Math.random() * 256);
        return "rgb("+r+","+g+","+b+")";
    }
    draw();
    setInterval(draw,35);
};
然后在主题目录themes\next\layout下的_layout.swig文件中,在</html>上添加如下代码:
<!-- 数字雨 -->
<canvas id="canvas" width="1440" height="900" ></canvas>
<script type="text/javascript" src="/js/DigitalRain.js"></script>
并且,在主题目录的配置文件_config.yml中查找 custom_file_path
# Define custom file paths.
# Create your custom files in site directory `source/_data` and uncomment needed files below.
custom_file_path:
  #head: source/_data/head.swig
  #header: source/_data/header.swig
  #sidebar: source/_data/sidebar.swig
  #postMeta: source/_data/post-meta.swig
  #postBodyEnd: source/_data/post-body-end.swig
  #footer: source/_data/footer.swig
  #bodyEnd: source/_data/body-end.swig
  #variable: source/_data/variables.styl
  mixin: source/_data/mixins.styl
  style: source/_data/styles.styl
这些文件可以自定义css,只需要开启(把#去掉)就行。然后根据路径创建该文件,或者可以自定义文件路径然后去创建。我在source/_data/styles.styl中添加如下代码:
canvas {
  position: fixed;
  right: 0px;
  bottom: 0px;
  min-width: 100%;
  min-height: 100%;
  height: auto;
  width: auto;
  z-index: -1;
}
30.2 自定义背景图
像上面那样,去开启一个css文件路径,然后添加代码:
// 添加背景图片
body {
  background: url(/images/background.jpg); // 你给的背景图
  -moz-background-size:100% 100%;
  -webkit-background-size:100% 100%;
  top: 0;
  left: 0;
  z-index: -2;
  background-repeat: no-repeat;
  background-attachment: fixed;
  background-position: 50% 50%;
  background-size: cover;
}
30.3 其他背景
其他背景都可以在主题目录配置文件_config.yml ,查询 canvas_nest和canvas_ribbon,我就不说了,具体参考官方:Canvas-nest,Canvas-ribbon。得先安装才能开启。
31. 浏览器网页标题恶搞(转,有贴转载地址)
效果:
当用户访问你的博客时点击到了其他网页,我们可以恶搞一下网页标题,呼唤用户回来,首先在目录 \Hexo\themes\hexo-theme-spfk\source\js 下新建一个 FunnyTitle.js 文件,在里面填写如下代码:
<!--浏览器搞笑标题-->
 var OriginTitle = document.title;
 var titleTime;
 document.addEventListener('visibilitychange', function () {
     if (document.hidden) {
         $('[rel="icon"]').attr('href', "/img/trhx2.png");
         document.title = 'ヽ(●-`Д´-)ノ你丑你就走!';
         clearTimeout(titleTime);
     }
     else {
         $('[rel="icon"]').attr('href', "/img/trhx2.png");
         document.title = 'ヾ(Ő∀Ő3)ノ你帅就回来!' + OriginTitle;
         titleTime = setTimeout(function () {
             document.title = OriginTitle;
         }, 2000);
     }
 });
然后在主题目录themes\next\layout下的_layout.swig文件中,在</html>上添加如下代码:
<!--浏览器搞笑标题-->
<script type="text/javascript" src="/js/src/FunnyTitle.js"></script>
32. 一些样式
还是刚刚的主题目录的配置文件_config.yml中查找 custom_file_path
# Define custom file paths.
# Create your custom files in site directory `source/_data` and uncomment needed files below.
custom_file_path:
  #head: source/_data/head.swig
  #header: source/_data/header.swig
  #sidebar: source/_data/sidebar.swig
  #postMeta: source/_data/post-meta.swig
  #postBodyEnd: source/_data/post-body-end.swig
  #footer: source/_data/footer.swig
  #bodyEnd: source/_data/body-end.swig
  #variable: source/_data/variables.styl
  mixin: source/_data/mixins.styl
  style: source/_data/styles.styl
在source/_data/styles.styl中添加如下代码:下面的属性都可以在自己的网站按F12来查看要修改哪里,这应该不用我废话了。我的CSS都是复制别人的,自己不会CSS。
// 文章之间的分割线
.posts-expand .post-eof {
  margin: 4em auto 4em;
  background: white;
}
// 标题栏
.site-meta {
// 这些自定义添加
}
// 底部文字
.footer-inner {
  font-size: 17px;
  color:  #262626;
  font-family: 'EB Garamond',"Noto Serif SC",sans-serif;
  font-weight: bold;
}
.fa-heart {
  color: red;
}
.post-meta-item-icon {
  color: red;
}
.footer {
// 这些自定义添加
}
// 修改主体透明度
.main-inner {
  background: #000;
  opacity: 0.90;
  padding-right: 3px;
  padding-left: 3px;
}
//主页文章添加阴影效果
.post {
  margin-top: 30px;
  margin-bottom: 30px;
  padding: 25px;
  -webkit-box-shadow: 0 0 5px rgba(202, 203, 203, .5);
  -moz-box-shadow: 0 0 5px rgba(202, 203, 204, .5);
}
// 移动端
@media (max-width: 767px) {
  .post-block {
    padding-right:10px;
  }
  .posts-expand .post-eof {
    margin: 4em auto 4em;
    background: white;
  }
}
33. 一些修改
比如,默认这里是很长的,我现在是改了,太长会导致手机端显示不好,所以可以改
- 电脑端:
- 手机端:
在主题目录themes\next\layout\_macro的post.swig中修改。主要是加个换行。
搜索:if theme.leancloud_visitors.enable 。然后在这上面添加如下代码:
{#添加换行#}
<br>
有帮助的请给我点个赞
参考:
hexo搭建博客系列(三)美化主题的更多相关文章
- 手把手教从零开始在GitHub上使用Hexo搭建博客教程(三)-使用Travis自动部署Hexo(1)
前言 前面两篇文章介绍了在github上使用hexo搭建博客的基本环境和hexo相关参数设置等. 基于目前,博客基本上是可以完美运行了. 但是,有一点是不太好,就是源码同步问题,如果在不同的电脑上写文 ...
- Hugo hexo 搭建博客系列1:自己的服务器
hexo jekyll https://hexo.io/zh-cn/ http://theme-next.iissnan.com/getting-started.html Hexo 是高效的静态站点生 ...
- hexo零基础搭建博客系列(一)
关于其他搭建 [hexo4快速搭建博客(二)更换主题](https://blog.csdn.net/weixin_41800884/article/details/103750634)[hexo4快速 ...
- 基于Hexo搭建博客并部署到Github Pages
基于Hexo搭建博客并部署到Github Pages 之前在简书上写东西,觉得自己还是太浮躁.本来打算用Flask自己写一个,以为是微框架就比较简单,naive.HTML.CSS.JS等都要学啊,我几 ...
- 手把手教从零开始在GitHub上使用Hexo搭建博客教程(二)-Hexo参数设置
前言 前文手把手教从零开始在GitHub上使用Hexo搭建博客教程(一)-附GitHub注册及配置介绍了github注册.git相关设置以及hexo基本操作. 本文主要介绍一下hexo的常用参数设置. ...
- 利用hexo搭建博客
利用Hexo搭建博客 以前用Octopress搭过博客,折腾了好久才弄出来,当时看到那巨难看的默认主题,繁琐的操作,一点写东西的欲望都没了. 一次逛微博,看见了Hexo.尝试了一下,真的很好用哦. 下 ...
- 使用github+hexo搭建博客笔记
听说github上可以搭博客,而且不用自己提供空间和维护,哈哈哈 作为一名程序猿,github搭博客对我有种神奇的吸引力,赶紧动手试一试 关于如何使用hexo搭建博客网上好的教程多如牛毛,而且这篇博客 ...
- 手把手教从零开始在GitHub上使用Hexo搭建博客教程(四)-使用Travis自动部署Hexo(2)
前言 前面一篇文章介绍了Travis自动部署Hexo的常规使用教程,也是个人比较推荐的方法. 前文最后也提到了在Windows系统中可能会有一些小问题,为了在Windows系统中也可以实现使用Trav ...
- 手把手教从零开始在GitHub上使用Hexo搭建博客教程(一)-附GitHub注册及配置
前言 有朋友问了我关于博客系统搭建相关的问题,由于是做开发相关的工作,我给他推荐的是使用github的gh-pages服务搭建个人博客. 推荐理由: 免费:github提供gh-pages服务是免费的 ...
随机推荐
- Asp.net MVC中如何获取控制器的名称
如果在代码中 当前controller.action的获取RouteData.Route.GetRouteData(this.HttpContext).Values["controller& ...
- H3C 局域网与OSI参考模型
- Laravel 修改默认日志文件名称和位置
修改默认日志位置 我们平常的开发中可能一直把laravel的日志文件放在默认位置不会有什么影响,但如果我们的项目上线时是全量部署,每次部署都是git中最新的代码,那这个时候每次都会清空我们的日志,显示 ...
- data-属性的作用
data-用于存储页面或应用程序的私有自定义数据,赋予我们在所有HTML元素上嵌入自定义data属性的能力,存储的数据能被页面的JS利用,以创建更好的用户体验. <div id="bo ...
- BraveOS正式版发布,希望大家下载使用
废话不多说,直接贴图才是王道 这里是DOS系统+默认官方(Platform系统) 下载地址:http://pan.baidu.com/s/1eQINwx8 (引导进Platform系统后,默认管理员帐 ...
- 2013年NOIP普及组复赛题解
题目涉及算法: 计数问题:枚举: 表达式求值:栈: 小朋友的数字:动态规划: 车站分级:最长路. 计数问题 题目链接:https://www.luogu.org/problem/P1980 因为数据量 ...
- H3C PAP验证配置示例
- Ant Design的Form组件中FormItem名称相同引起的问题
1.问题描述 在使用Antd组件Form表单的过程中,会出现FormItem同名的情况,此时要特别注意同名引起的表单行为异常问题,主要表现在以下方面: (1)同名表单项的值共享,并且其中一个的值改变, ...
- Spring Data Jpa一对多单向映射
/** @author StormMaybin @date 2017-01-17 */ 生命不息,奋斗不止! 一对多映射关系 在JPA中,用@OneToMany来标识一对多的关系.实现一对多的单向关联 ...
- Python--day39--进程池的回调函数callback
运行结果: