[转]vue router基本使用
第一步:安装 cnpm install vue-router --save
路由配置基本语法
router下index.js引入
import Vue from "vue";

import Router from "vue-router";

import HelloWorld from "@/components/HelloWorld";

按需引入  底下会写到懒加载路由
export default new Router({

  routers: [{

    path: "router",

    component: '',

    meta: {}

    children: [{

        path: 'router1',

        component: Router1

      },

      {

        path: 'router2',

        component: Router2

      }

    ]

  }]

})

在main.js中
import router from './router' //引入

//使用

new Vue({

  el: '#app',

  router,

  store,

  components: {

    App

  },

  template: '<App/>'

})
正式入代码环节~
组件:
<template>

  <div class="router">

    <h3>路由基本使用</h3>

  </div>

</template>

<script>

export default {

  name: "router",

  data() {

    return {};

  }

};

</script>

<style scoped>

</style>
路由index.js:
import Vue from "vue";

import Router from "vue-router";

//组件

import router from "@/components/router";

Vue.use(Router);

export default new Router({

  routes: [{

    path: "/router",

    component: router,

  }]

});
路由的跳转
使用标签router-link 通过to绑定到上面
<router-link to="/lifeCycle">生命周期</router-link>   直接复制

<router-link :to="vuex">vuex</router-link>           给变量

data() {

    return {

      vuex: "/vuex",

    };

  }
定义子路由
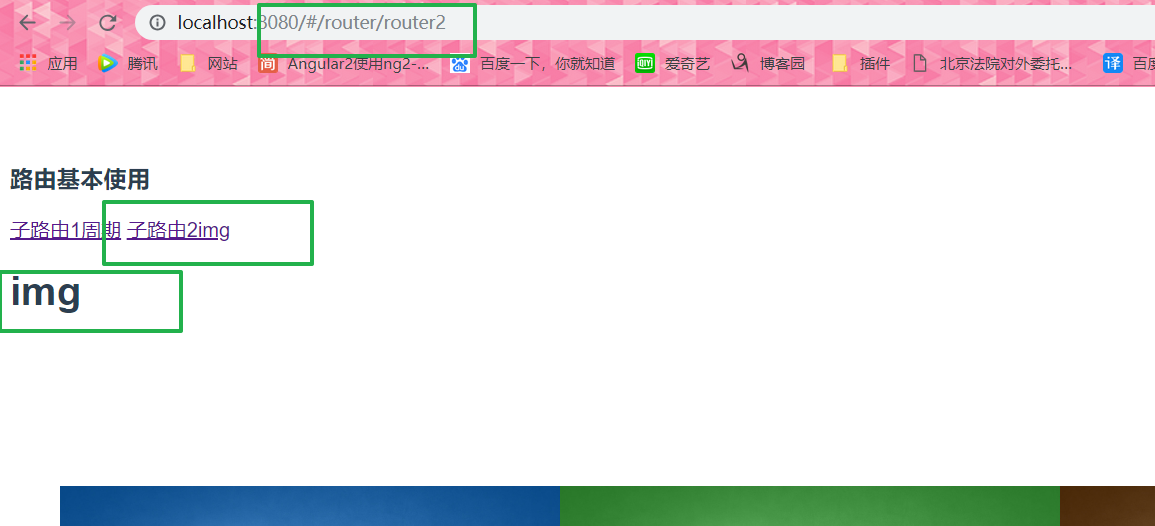
<router-link to="/router/router1">子路由1周期</router-link>
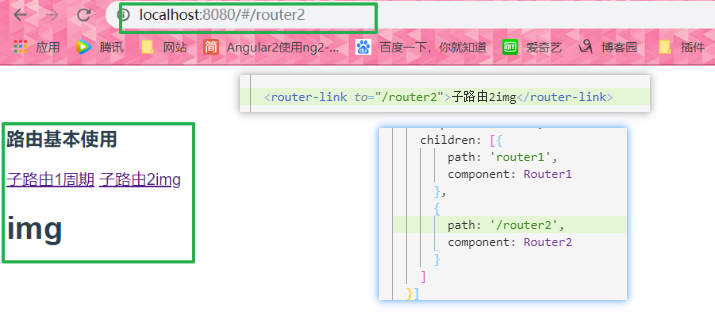
<router-link to="/router2">子路由2img</router-link>
<router-view></router-view>
routes: [{

    path: "/router",

    component: router,

    children: [{

        path: 'router1',

        component: Router1

      },

      {

        path: 'router2',

        component: Router2

      }

    ]

  }]

子路由中不用加'/' 如果加了就是从根路径跳转
路由传递参数
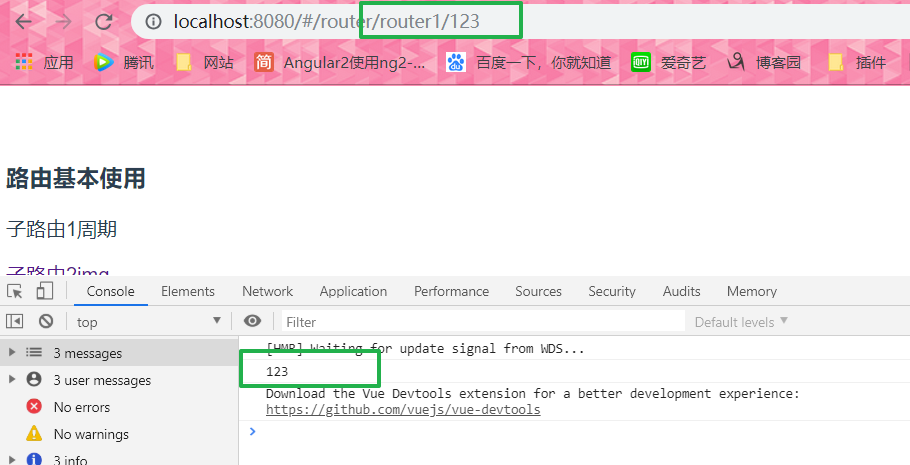
1.路由中配置 获取: this.$route.params.id
直接写:
  <router-link to="/router/router2/11111">子路由2img</router-link>      路由中一定别忘记了 path: 'router2/:名字',
<p @click="getDescribe('123')">子路由1周期</p>

  methods: {

    getDescribe(id) {

      this.$router.push({

        path: `/router/router1/${id}`

      });

    }

  },

  mounted() {

    console.log(this.$route.params.id);

  }
2.params 获取: this.$route.params.id
    <p @click="getDescribe('222222')">子路由1周期</p>

    methods: {

    getDescribe(id) {

      this.$router.push({

        name: "router1",

        params: {

          id: id

        }

      });

    }

  },

  mounted() {

    console.log(this.$route.params.id);

  }
可以看见 地址栏参数不显示 与query相反
 children: [{

        path: 'router1/:id',

        name: "router1",       //通过name值 params

        component: Router1

      },

      {

        path: 'router2',

        component: Router2

      }

    ]
3.query 获取: this.$route.query.id
直接写:
<p @click="getDescribe('6666')">子路由1周期</p>
methods: {
getDescribe(id) {
this.$router.push({
path: "/router/router1",
query: {
id: id
}
});
}
}
//子组件
mounted: function() {
console.log(this.$route.query.id);
}
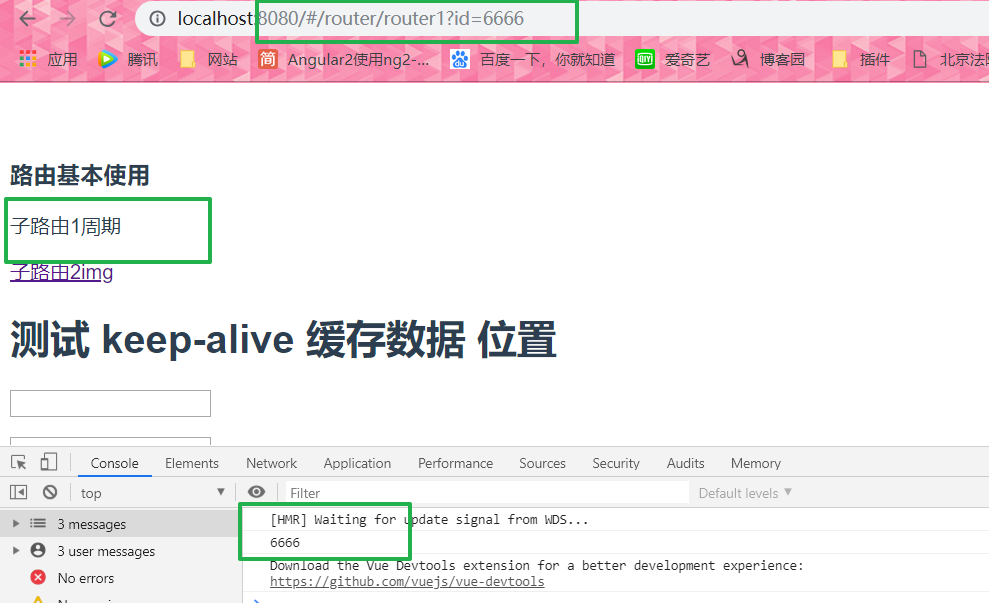 注意看 现在的地址栏和上面两种方式不同 ?=
上面例举了三种跳转传参 第一路由配置 第二params 第三query 注意获取的时候是$route 没有 r
下面三种跳转的方法与区别:push replace go
router.go(n)

这个方法的参数是一个整数, 意思是在 history 记录中向前或者后退多少步, 类似 window.history.go(n)
methods:{

    next(){

        this.$router.go(1);  //前进

    },

    prevent(){

        this.$router.go(-1);  //后退

    }

}
router.push(location)

想要导航到不同的 URL, 则使用 router.push 方法。 这个方法会向 history 栈添加一个新的记录, 所以, 当用户点击浏览器后退按钮时, 则回到之前的 URL。

router.replace(location)

跟 router.push 很像, 唯一的不同就是, 它不会向 history 添加新记录, 而是替换掉当前的 history 记录。是当前一次哦~
路由的别名和重定向
别名:alias
/a 的别名是 /b,意味着,当用户访问 /b 时,URL 会保持为 /b,但是路由匹配则为 /a,就像用户访问 /a 一样
export default new Router({

  routes: [{

    path: "/",

    alias: '/router',

    component: router,

  }]

});
重定向:redirect
“重定向”的意思是,当用户访问 /a时,URL 将会被替换成 /b,然后匹配路由为 /b
export default new Router({

  routes: [{

    path: "/",

    alias: '/router',

    component: router,

    redirect: '/watch'

  }, {

    path: "/watch",

    component: watch,

  }]

});
router懒加载
export default new Router({

  routes: [{

    path: "/",

    alias: '/router',

    component: (resolve) => require(['@/components/router.vue'], resolve),

    children: [{

        path: 'router1/:id',

        name: "router1",

        component: Router1

      },

      {

        path: 'router2/:cy',

        component: Router2

      }

    ]

  }, {

    path: "/watch",

    component: (resolve) => require(['@/components/watch.vue'], resolve),

  }]

});
路由守卫钩子
beforeRouteEnter (to, from, next) {

    // 在渲染该组件的对应路由被 confirm 前调用

    // 不!能!获取组件实例 `this`

    // 因为当守卫执行前,组件实例还没被创建
    next(vm => {
// 通过 `vm` 访问组件实例} beforeRouteUpdate (to, from, next) {
})
// 在当前路由改变,但是该组件被复用时调用
// 举例来说,对于一个带有动态参数的路径 /foo/:id,在 /foo/1 和 /foo/2 之间跳转的时候,
// 由于会渲染同样的 Foo 组件,因此组件实例会被复用。而这个钩子就会在这个情况下被调用。
// 可以访问组件实例 `this`
next();
} beforeRouteLeave (to, from, next) {
// 导航离开该组件的对应路由时调用
// 可以访问组件实例 `this`
next()
}

路由就告一段落了~~~~~~~~~~~~by~~~
---------------------
作者:love编程的小可爱
来源:CNBLOGS
原文:https://www.cnblogs.com/chen-yi-yi/p/11151941.html
版权声明:本文为作者原创文章,转载请附上博文链接!
内容解析By:CSDN,CNBLOG博客文章一键转载插件
[转]vue router基本使用的更多相关文章
- Vue 2.0 + Vue Router + Vuex
用 Vue.js 2.x 与相配套的 Vue Router.Vuex 搭建了一个最基本的后台管理系统的骨架. 当然先要安装 node.js(包括了 npm).vue-cli 项目结构如图所示: ass ...
- vue router 只需要这么几步
<!DOCTYPE html><html lang="en"><head> <meta charset="UTF-8" ...
- Vue.js 2.x笔记:路由Vue Router(6)
1. Vue Router简介与安装 1.1 Vue Router简介 Vue Router 是 Vue.js 官方的路由管理器.它和 Vue.js 的核心深度集成,构建单页面应用. Vue Rout ...
- Vue Router学习笔记
前端的路由:一个地址对应一个组件 Vue Router中文文档 一.路由基本使用 第1步:导入Vue Router: <script src="https://unpkg.com/vu ...
- vue router.push(),router.replace(),router.go()和router.replace后需要返回两次的问题
转载:https://www.cnblogs.com/lwwen/p/7245083.html https://blog.csdn.net/qq_15385627/article/details/83 ...
- 前端MVC Vue2学习总结(八)——Vue Router路由、Vuex状态管理、Element-UI
一.Vue Router路由 二.Vuex状态管理 三.Element-UI Element-UI是饿了么前端团队推出的一款基于Vue.js 2.0 的桌面端UI框架,手机端有对应框架是 Mint U ...
- 深入浅出的webpack4构建工具---webpack+vue+router 按需加载页面(十五)
1. 为什么需要按需加载? 对于vue单页应用来讲,我们常见的做法把页面上所有的代码都打包到一个bundle.js文件内,但是随着项目越来越大,文件越来越多的情况下,那么bundle.js文件也会越来 ...
- 深入浅出的webpack构建工具--webpack4+vue+router项目架构(十四)
阅读目录 一:vue-router是什么? 二:vue-router的实现原理 三:vue-router使用及代码配置 四:理解vue设置路由导航的两种方法. 五:理解动态路由和命名视图 六:理解嵌套 ...
- python 全栈开发,Day91(Vue实例的生命周期,组件间通信之中央事件总线bus,Vue Router,vue-cli 工具)
昨日内容回顾 0. 组件注意事项!!! data属性必须是一个函数! 1. 注册全局组件 Vue.component('组件名',{ template: `` }) var app = new Vue ...
- vue router 跳转到新的窗口方法
在CreateSendView2.vue 组件中的方法定义点击事件,vue router 跳转新的窗口通过采用如下的方法可以实现传递参数跳转相应的页面goEditor: function (index ...
随机推荐
- 常用css3属性
总结一下在工作用常用到的属性设置 1.设置文本的可选择性 -webkit-user-select:none/text 2.设置背景的绘制区域 background-clip:border-box/pa ...
- 牛人也得看的CSS常识
1.不要使用过小的图片做背景平铺.这就是为何很多人都不用 1px 的原因,这才知晓. 宽高 1px 的图片平铺出一个宽高 200px 的区域,需要 200*200=40, 000 次,占用资源. 2. ...
- HTML小技巧:按钮中的文字换行 .
一般按钮的文字都是一行的.但是有的时候画面需要按钮中的文字换行. 刚开始有个开发人员说没法实现.\r\n 都用过了没有效果.其实google这个老师是非常强大的. 直接换行的方法:<input ...
- laravel之文件上传
laravel框架中的文件上传我们应该如何实现此功能呢? 之前也是没有使用过laravel的文件上传功能,后来在网上找到一些教程,五花八门.让我看起来有点头疼. 有时候找到测试浪费好长时间最后还是出不 ...
- Jeff Dean 光辉事迹
这是Google 2007年的愚人节笑话,罗列了很多Jeff Dean的“光辉事迹”.大名鼎鼎的Jeff Dean想必不用我介绍了.……好吧,还是介绍一下,Jeff Dean是Google最早的一批员 ...
- Directx教程(27) 简单的光照模型(6)
原文:Directx教程(27) 简单的光照模型(6) 从myTutorialD3D11_15到myTutorialD3D11_19的工程中,我们都只有一个光源,光源的位置在LightCla ...
- yum install mysql-devel
linux系统在装mysql相关的包时要先装mysql-deval,这个包包含mysql的相关配置和环境组件 执行yum install mysql-deval
- keystone同步数据库的时候提示error
keystone 在同步的时候报出以下错误: su -s /bin/sh -c "keystone-manage db_sync" keystone CRITICAL keysto ...
- python系列之(5)PyMySQL的使用
简介 PyMySQL是在 Python3.x 版本中用于连接 MySQL 服务器的一个库,Python2中是使用mysqldb. 安装 pip3 install pymysql 创建连接 #!/usr ...
- QT_OPENGL-------- 5.model
在qt中实现opengl obj模型导入: main.cpp #include<GL/glew.h> #include <GLFW/glfw3.h> #include<s ...