pyautogui介绍
https://pyautogui.readthedocs.io/en/latest/introduction.html
Introduction
Purpose
The purpose of PyAutoGUI is to provide a cross-platform Python module for GUI automation for human beings. The API is designed to be as simple as possible with sensible defaults.
For example, here is the complete code to move the mouse to the middle of the screen on Windows, OS X, and Linux:
>>> import pyautogui

>>> screenWidth, screenHeight = pyautogui.size()

>>> pyautogui.moveTo(screenWidth / 2, screenHeight / 2)
And that is all.
PyAutoGUI can simulate moving the mouse, clicking the mouse, dragging with the mouse, pressing keys, pressing and holding keys, and pressing keyboard hotkey combinations.
Examples
>>> import pyautogui

>>> screenWidth, screenHeight = pyautogui.size()

>>> currentMouseX, currentMouseY = pyautogui.position()

>>> pyautogui.moveTo(100, 150)

>>> pyautogui.click()

>>> pyautogui.moveRel(None, 10)  # move mouse 10 pixels down

>>> pyautogui.doubleClick()

>>> pyautogui.moveTo(500, 500, duration=2, tween=pyautogui.easeInOutQuad)  # use tweening/easing function to move mouse over 2 seconds.

>>> pyautogui.typewrite('Hello world!', interval=0.25)  # type with quarter-second pause in between each key

>>> pyautogui.press('esc')

>>> pyautogui.keyDown('shift')

>>> pyautogui.press(['left', 'left', 'left', 'left', 'left', 'left'])

>>> pyautogui.keyUp('shift')

>>> pyautogui.hotkey('ctrl', 'c')
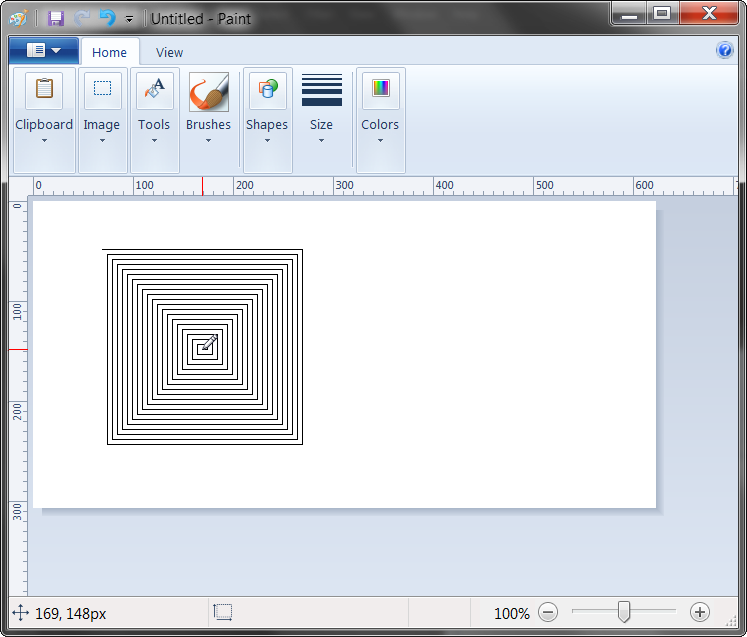
This example drags the mouse in a square spiral shape in MS Paint (or any graphics drawing program):
>>> distance = 200

>>> while distance > 0:

        pyautogui.dragRel(distance, 0, duration=0.5)   # move right

        distance -= 5

        pyautogui.dragRel(0, distance, duration=0.5)   # move down

        pyautogui.dragRel(-distance, 0, duration=0.5)  # move left

        distance -= 5

        pyautogui.dragRel(0, -distance, duration=0.5)  # move up
Dependencies
On Windows, PyAutoGUI has no dependencies (other than Pillow and some other modules, which are installed by pip along with PyAutoGUI). It does not need the pywin32 module installed since it uses Python’s own ctypes module.
On OS X, PyAutoGUI requires PyObjC installed for the AppKit and Quartz modules. The module names on PyPI to install are pyobjc-core and pyobjc (in that order).
On Linux, PyAutoGUI requires python-xlib (for Python 2) or python3-Xlib (for Python 3) module installed.
Fail-Safes
Like the enchanted brooms from the Sorcerer’s Apprentice programmed to keep filling (and then overfilling) the bath with water, your program could get out of control (even though it is following your instructions) and need to be stopped. This can be difficult to do if the mouse is moving around on its own, preventing you from clicking on the program’s window to close it down.
As a safety feature, a fail-safe feature is enabled by default. When pyautogui.FAILSAFE = TruePyAutoGUI functions will raise a pyautogui.FailSafeException if the mouse cursor is in the upper left corner of the screen. If you lose control and need to stop the current PyAutoGUI function, keep moving the mouse cursor up and to the left. To disable this feature, set FAILSAFE to False:
>>> import pyautogui

>>> pyautogui.FAILSAFE = False # disables the fail-safe
You can add delays after all of PyAutoGUI’s functions by setting the pyautogui.PAUSE variable to a float or integer value of the number of seconds to pause. By default, the pause is set to 0.1 seconds. This can be helpful when interacting with other applications so that PyAutoGUI doesn’t move too fast for them. For example:
>>> import pyautogui

>>> pyautogui.PAUSE = 2.5

>>> pyautogui.moveTo(100, 100); pyautogui.click()   # there will be a two and a half second pause after moving and another after the click
All PyAutoGUI functions will block until they complete. (It is on the roadmap to add an optional non-blocking way to call these functions.)
It is advised to use FAILSAFE along with setting PAUSE.
pyautogui介绍的更多相关文章
- PyAutoGUI 简介
转载来自: https://muxuezi.github.io/posts/doc-pyautogui.html http://blog.topspeedsnail.com/archives/5373 ...
- PyAutoGUI使用
PyAutoGUI是一个纯Python的GUI自动化工具,其目的是可以用程序自动控制鼠标和键盘操作,利用它可以实现自动化任务,再也不用担心有重复枯燥的任务了. 安装: pip install pyau ...
- 可以用py库: pyautogui (自动测试模块,模拟鼠标、键盘动作)来代替pyuserinput
PyAutoGUI 是一个人性化的跨平台 GUI 自动测试模块 pyUserInput模块安装前需要安装pywin32和pyHook模块.(想要装的看https://www.cnblogs.com/m ...
- py库: pyautogui (自动测试模块,模拟鼠标、键盘动作)
PyAutoGUI 是一个人性化的跨平台 GUI 自动测试模块 pyautogui 库 2017-10-4 pip install pyautogui python pip.exe install p ...
- Python之Pyautogui模块20180125《PYTHON快速上手让繁琐的工作自动化》18章
复习 PyAutoGUI 的函数本章介绍了许多不同函数,下面是快速的汇总参考:moveTo(x,y)将鼠标移动到指定的 x.y 坐标.moveRel (xOffset,yOffset)相对于当前位置移 ...
- pyautogui 模块学习
在日常实施中,我们用控件对大部分的网页和客户端都能进行拾取操作.但是仍有一小部分的应用无法进行操作.这里我常用到 pyautogui 这个模块.下面做个分享. Python 的 pyautogui 模 ...
- 详解pyautogui模块
一.安装 pip install pyautogui 或者 pip install -i https://pypi.tuna.tsinghua.edu.cn/simple pyautogui 二.全 ...
- CSS3 background-image背景图片相关介绍
这里将会介绍如何通过background-image设置背景图片,以及背景图片的平铺.拉伸.偏移.设置大小等操作. 1. 背景图片样式分类 CSS中设置元素背景图片及其背景图片样式的属性主要以下几个: ...
- MySQL高级知识- MySQL的架构介绍
[TOC] 1.MySQL 简介 概述 MySQL是一个关系型数据库管理系统,由瑞典MySQL AB公司开发,目前属于Oracle公司. MySQL是一种关联数据库管理系统,将数据保存在不同的表中,而 ...
随机推荐
- Linux 内核 标准 PCI 配置寄存器
一些 PCI 配置寄存器是要求的, 一些是可选的. 每个 PCI 设备必须包含有意 义的值在被要求的寄存器中, 而可选寄存器的内容依赖外设的实际功能. 可选的字段不被 使用, 除非被要求的字段的内容指 ...
- sqlyog提示:没有执行查询。请在 SQL 窗口中输入查询或将光标放在一个查询上。
以下内容纯属猜测: sqlyog 在执行输入的sql语句时,对已经执行过的语句,是不会再执行的,所以出现这个问题,很可能是sql语句没有修改,就试图执行第二遍.
- wpf passwobox 添加水印
之前有做过wpf texbox添加水印,这个并不难 重写一下样式就可以了,今天用到了passwordbox 添加水印的时候 发现还是有点难度的. 这个难度就在于如何去取password的长度来控制水印 ...
- Vijos1035 贪婪的送礼者 [map的应用]
1.题意:一群人之间每人准备了一些钱互相送(你们好无聊(⊙o⊙)…),数据给出了每人准备的金额与送出的对象,且保证送给每人的金额是平均的,最后要求出每个人收到的比送出的钱多的数目. 2.分析:模拟题, ...
- 【Spring Cloud 源码解读】之 【这也太神奇了,RestTemplate加上一个@LoadBalanced注解就能实现负载均衡!】
前提概要: 前天,有个前端大佬问了我两个问题:为啥不引入Ribbon依赖就能使用Ribbon?为啥RestTemplate加上@LoadBalanced注解就能负载均衡了?我也表示很疑惑,而我自己其实 ...
- 多线程之美7一ReentrantReadWriteLock源码分析
目录 前言 在多线程环境下,为了保证线程安全, 我们通常会对共享资源加锁操作,我们常用Synchronized关键字或者ReentrantLock 来实现,这两者加锁方式都是排他锁,即同一时刻最多允许 ...
- vue项目创建步骤 和 路由router知识点
菜单快捷导航: vue项目创建 vue路由router知识点(路径参数.查询参数.命名路由.嵌套路由.命名视图.hash/history模式) 1.创建一个vue项目步骤 (windows环境下).创 ...
- 【题解】BZOJ4548 小奇的糖果(树状数组)
[题解]BZOJ4548 小奇的糖果(树状数组) 说在前面:我有个同学叫小奇,他有一个朋友叫达达,达达特爱地理和旅游,初中经常AK地理,好怀恋和他已经达达一起到当时初中附近许多楼盘的顶楼逛的时光... ...
- 【题解】歌唱王国(概率生成函数+KMP)+伦讲的求方差
[题解]歌唱王国(概率生成函数+KMP)+伦讲的求方差 生成函数的本质是什么呀!为什么和It-st一样神 设\(f_i\)表示填了\(i\)个时候停下来的概率,\(g_i\)是填了\(i\)个的时候不 ...
- $Noip2018/Luogu5021$ 赛道修建 二分+树形
$Luogu$ $Sol$ 一直以为是每个点只能经过一次没想到居然是每条边只能经过一次$....$ 首先其实这题$55$分的部分分真的很好写啊,分别是链,数的直径和菊花图,这里就不详细说了. 使得修建 ...