
初试PyOpenGL一 (Python+OpenGL)
很早就一直想学Python,看到一些书都有介绍,不管是做为游戏的脚本语言,还是做为开发项目的主要语言都有提及(最主要的CUDA都开始支持Python,CUDA后面一定要学),做为先熟悉一下Python,本文用PyOpenGL实现一些基本的显示效果,一个网格,一个球体,加一个能切换第一与第三人称的摄像机。
PyOpenGL是一个用Python实现的多平台的OpenGL的API,为了学习Python与PyOpengl,本文也是用的Python,而不是.net版本的IronPython.
先看一下,相关环境的搭建:
首先我们需要下载Python: http://www.python.org/getit/
然后是PyOpenGL库:https://pypi.python.org/pypi/PyOpenGL
和PyOpenGL库常连在一起用的二个库,一个库numpy,提供常用的科学计算包含矩阵运算,数组转换与序列化,还有一个是3D常用的图片处理库:Python Imaging Library (PIL)。
numpy下载:http://sourceforge.net/projects/numpy/files/ 简介:http://sebug.net/paper/books/scipydoc/numpy_intro.html
Python Imaging Library (PIL)下载:http://www.pythonware.com/products/pil/
当上面环境安装完成后,我们先来实现一个基本的球体VBO实现,代码请参考前面的WebGL 利用FBO完成立方体贴图中的球的代码:
 #common.py

 import math

 from OpenGL.GL import *

 from OpenGL.arrays import vbo

 from OpenGL.GLU import *

 from OpenGL.GLUT import *

 #import OpenGL.GLUT as glut

 import numpy as ny

 #Python Imaging Library (PIL)

 class common:

     bCreate = False

 #球的实现

 class sphere(common):

     def __init__(this,rigns,segments,radius):

         this.rigns = rigns

         this.segments = segments

         this.radius = radius

     def createVAO(this):

         vdata = []

         vindex = []

         for y in range(this.rigns):

             phi = (float(y) / (this.rigns - 1)) * math.pi

             for x in range(this.segments):

                 theta = (float(x) / float(this.segments - 1)) * 2 * math.pi

                 vdata.append(this.radius * math.sin(phi) * math.cos(theta))

                 vdata.append(this.radius * math.cos(phi))

                 vdata.append(this.radius * math.sin(phi) * math.sin(theta))

                 vdata.append(math.sin(phi) * math.cos(theta))

                 vdata.append(math.cos(phi))

                 vdata.append(math.sin(phi) * math.sin(theta))

         for y in range(this.rigns - 1):

             for x in range(this.segments - 1):

                 vindex.append((y + 0) * this.segments + x)

                 vindex.append((y + 1) * this.segments + x)

                 vindex.append((y + 1) * this.segments + x + 1)

                 vindex.append((y + 1) * this.segments + x + 1)

                 vindex.append((y + 0) * this.segments + x + 1)

                 vindex.append((y + 0) * this.segments + x)

         #this.vboID = glGenBuffers(1)

         #glBindBuffer(GL_ARRAY_BUFFER,this.vboID)

         #glBufferData (GL_ARRAY_BUFFER, len(vdata)*4, vdata, GL_STATIC_DRAW)

         #this.eboID = glGenBuffers(1)

         #glBindBuffer(GL_ELEMENT_ARRAY_BUFFER,this.eboID)

         #glBufferData (GL_ELEMENT_ARRAY_BUFFER, len(vIndex)*4, vIndex,

         #GL_STATIC_DRAW)

         this.vbo = vbo.VBO(ny.array(vdata,'f'))

         this.ebo = vbo.VBO(ny.array(vindex,'H'),target = GL_ELEMENT_ARRAY_BUFFER)

         this.vboLength = this.segments * this.rigns

         this.eboLength = len(vindex)

         this.bCreate = True

     def drawShader(this,vi,ni,ei):

         if this.bCreate == False:

             this.createVAO()

         #glBindBuffer(GL_ARRAY_BUFFER,this.vboID)

         #glVertexAttribPointer(vi,3,GL_FLOAT,False,24,0)

         #glEnableVertexAttribArray(vi)

         #glVertexAttribPointer(ni,3,GL_FLOAT,False,24,12)

         #glEnableVertexAttribArray(ni)

         #glBindBuffer(GL_ELEMENT_ARRAY_BUFFER,this.eboID)

         #glDrawElements(GL_TRIANGLES,this.eboLength,GL_UNSIGNED_INT,0)

         this.vbo.bind()

     def draw(this):

         if this.bCreate == False:

             this.createVAO()

         #glBindBuffer(GL_ARRAY_BUFFER,this.vboID)

         #glInterleavedArrays(GL_N3F_V3F,0,None)

         #glBindBuffer(GL_ELEMENT_ARRAY_BUFFER,this.eboID)

         #glDrawElements(GL_TRIANGLES,this.eboLength,GL_UNSIGNED_INT,None)

         this.vbo.bind()

         glInterleavedArrays(GL_N3F_V3F,0,None)

         this.ebo.bind()

         glDrawElements(GL_TRIANGLES,this.eboLength,GL_UNSIGNED_SHORT,None)
球
这段代码画球,不同于我最开始用的每个三角形分成四个三角形的代码,基本思想是和地球仪上的经纬线一样,画出经纬线的点(顶点位置),然后有顺序的连接在一起(顶点索引)就可以了。
这里先说下python,和我之前接触的语言来看,我发现这个出乎意料的最和F#比较接近,虽然他们一个是动态语言,一个是静态语言,但是他们首先都是强类型语言,并且都支持多范式(对象式,过程式,函数式),同做为强类型语言,默认都不需要声明类型,不知Python是否和F#一样,是用的类型推导,有个比较明显的地方和F#一样的地方就是,在这里def __init__(this,rigns,segments,radius),首先righs,segments,radius开始鼠标移上去都是unknow type,但是在别的地方调用common.sphere(16,16,1)后,他就能推断出righs,segments,radius都为int.并且和F#一样,声明类的方法时,都需要带一个表示自己的参数,且都和C#不一样(限定this)可以自定义这个参数的名称.当然还有最大的共同点,他们都是用缩进来控制语言块(满分),现在写C#代码有些不爽的地方就是缩进。基于以上这些,写python感觉很亲切,也很爽,和F#一样,能写出很简洁的代码,相信一个学习过F#的人来写python,肯定也有此类感觉。当然python做为动态语言,比F#,C#来说,开发效率更高,比如,在上面一段中,this.vboLength = this.segments * this.rigns,这里直接动态声明一个属性vboLength,而不需要和F#与C#一样来先声明一个这样的属性,当然,net4.0中的DLR来说,也是能实现这种效果,但是用起来感觉就不一样了。
大家如果有兴趣了解各编程语言,强烈推荐郑晖大神的冒号课堂系列文章 第一篇冒号课堂§1.1:开班发言
下面是网格的代码,代码也可以参考前面柏林噪声实践(一) 海波,一样是生成网格上所有的x,z点,然后组织索引,看代码:
 class plane(common):

     def __init__(this,xres,yres,xscale,yscale):

         this.xr,this.yr,this.xc,this.yc = xres - 1,yres - 1,xscale,yscale

     def createVAO(this):

         helfx = this.xr * this.xc * 0.5

         helfy = this.yr * this.yc * 0.5

         vdata = []

         vindex = []

         for y in range(this.yr):

             for x in range(this.xr):

                 vdata.append(this.xc * float(x) - helfx)

                 vdata.append(0.)

                 vdata.append(this.yc * float(y) - helfy)

         for y in range(this.yr - 1):

             for x in range(this.xr - 1):

                 vindex.append((y + 0) * this.xr + x)

                 vindex.append((y + 1) * this.xr + x)

                 vindex.append((y + 0) * this.xr + x + 1)

                 vindex.append((y + 0) * this.xr + x + 1)

                 vindex.append((y + 1) * this.xr + x)

                 vindex.append((y + 1) * this.xr + x + 1)

         print len(vdata),len(vindex)

         this.vbo = vbo.VBO(ny.array(vdata,'f'))

         this.ebo = vbo.VBO(ny.array(vindex,'H'),target = GL_ELEMENT_ARRAY_BUFFER)

         this.eboLength = len(vindex)

         this.bCreate = True

     def draw(this):

         if this.bCreate == False:

             this.createVAO()

         this.vbo.bind()

         glInterleavedArrays(GL_V3F,0,None)

         this.ebo.bind()

         glDrawElements(GL_TRIANGLES,this.eboLength,GL_UNSIGNED_SHORT,None)
网络
哈哈,大家发现了,我都是把以前写的javascripe,F#代码拿来改写的,毕竟我也只是一个python新手,把别的语言拿来改写我认为是最快熟悉一门语言的方法。同样,下面第一,第三人称漫游代码也是我前面Opengl绘制我们的小屋(四)第三人称漫游,Opengl绘制我们的小屋(二)第一人称漫游里的代码改写的,具体思路请转至这二篇文章。
 class camera:

     origin = [0.0,0.0,0.0]

     length = 1.

     yangle = 0.

     zangle = 0.

     __bthree = False

     def __init__(this):

         this.mouselocation = [0.0,0.0]

         this.offest = 0.01

         this.zangle = 0. if not this.__bthree else math.pi

     def setthree(this,value):

         this.__bthree = value

         this.zangle = this.zangle + math.pi

         this.yangle = -this.yangle

     def eye(this):

         return this.origin if not this.__bthree else this.direction()

     def target(this):

         return this.origin if this.__bthree else this.direction()

     def direction(this):

         if this.zangle > math.pi * 2.0 :

             this.zangle < - this.zangle - math.pi * 2.0

         elif this.zangle < 0. :

             this.zangle < - this.zangle + math.pi * 2.0

         len = 1. if not this.__bthree else this.length if 0. else 1.

         xy = math.cos(this.yangle) * len

         x = this.origin[0] + xy * math.sin(this.zangle)

         y = this.origin[1] + len * math.sin(this.yangle)

         z = this.origin[2] + xy * math.cos(this.zangle)

         return [x,y,z]

     def move(this,x,y,z):

         sinz,cosz = math.sin(this.zangle),math.cos(this.zangle)

         xstep,zstep = x * cosz + z * sinz,z * cosz - x * sinz

         if this.__bthree :

             xstep = -xstep

             zstep = -zstep

         this.origin = [this.origin[0] + xstep,this.origin[1] + y,this.origin[2] + zstep]

     def rotate(this,z,y):

         this.zangle,this.yangle = this.zangle - z,this.yangle + y if not this.__bthree else -y

     def setLookat(this):

         ve,vt = this.eye(),this.target()

         #print ve,vt

         glLoadIdentity()

         gluLookAt(ve[0],ve[1],ve[2],vt[0],vt[1],vt[2],0.0,1.0,0.0)

     def keypress(this,key, x, y):

         if key in ('e', 'E'):

             this.move(0.,0.,1 * this.offest)

         if key in ('f', 'F'):

             this.move(1 * this.offest,0.,0.)

         if key in ('s', 'S'):

             this.move(-1 * this.offest,0.,0.)

         if key in ('d', 'D'):

             this.move(0.,0.,-1 * this.offest)

         if key in ('w', 'W'):

             this.move(0.,1 * this.offest,0.)

         if key in ('r', 'R'):

             this.move(0.,-1 * this.offest,0.)

         if key in ('v', 'V'):

             #this.__bthree = not this.__bthree

             this.setthree(not this.__bthree)

         if key == GLUT_KEY_UP:

             this.offest = this.offest + 0.1

         if key == GLUT_KEY_DOWN:

             this.offest = this.offest - 0.1

     def mouse(this,x,y):

         rx = (x - this.mouselocation[0]) * this.offest * 0.1

         ry = (y - this.mouselocation[1]) * this.offest * -0.1

         this.rotate(rx,ry)

         print x,y

         this.mouselocation = [x,y]
摄像机漫游
代码很简单,当然,做为一个类来说,其实setLookat,keypress,mouse这三个方法应该分离出去的,不过用了使用方便,也便于放在一起理解。其中keypress与mouse实现键盘启用常用的基本漫游,其中EDSF前后左右移动,WR分别向上与向下,鼠标右键加移动鼠标控制方向,V切换第一人称与第三人称。UP与DOWN切换前面操作的移动幅度。其中len = 1. if not this.__bthree else this.length if 0. else 1.这个解释下,在不是第三人称漫游下,长度为1,否则在第三人称漫游下,长度取length的长度,如果length为0,则取1的长度.其实就是相当二个三元运算符,但是感觉理解起来更方便.
下面来看具体调用并显示的代码:
 from OpenGL.GL import *

 from OpenGL.GLUT import *

 from OpenGL.GLU import *

 import common

 import sys

 window = 0

 sph = common.sphere(16,16,1)

 camera = common.camera()

 plane = common.plane(12,12,1.,1.)

 def InitGL(width,height):

     glClearColor(0.1,0.1,0.5,0.1)

     glClearDepth(1.0)

     glPolygonMode(GL_FRONT_AND_BACK, GL_LINE)

     glMatrixMode(GL_PROJECTION)

     glLoadIdentity()

     gluPerspective(45.0,float(width)/float(height),0.1,100.0)

     camera.move(0.0,3.0,-5)

 def DrawGLScene():

     glClear(GL_COLOR_BUFFER_BIT | GL_DEPTH_BUFFER_BIT)

     glMatrixMode(GL_MODELVIEW)

     camera.setLookat()

     plane.draw()

     glTranslatef(-1.5,0.0,0.0)

     glBegin(GL_QUADS)

     glVertex3f(-1.0, 1.0, 0.0)

     glVertex3f(1.0, 1.0, 0.0)

     glVertex3f(1.0, -1.0, 0.0)

     glVertex3f(-1.0, -1.0, 0.0)

     glEnd()

     glTranslatef(3.0, 0.0, 0.0)

     sph.draw()

     glutSwapBuffers()

 def mouseButton( button, mode, x, y ):

     if button == GLUT_RIGHT_BUTTON:

         camera.mouselocation = [x,y]

 def ReSizeGLScene(Width, Height):

     glViewport(0, 0, Width, Height)

     glMatrixMode(GL_PROJECTION)

     glLoadIdentity()

     gluPerspective(45.0, float(Width)/float(Height), 0.1, 100.0)

     glMatrixMode(GL_MODELVIEW)

 def main():

     global window

     glutInit(sys.argv)

     glutInitDisplayMode(GLUT_RGBA | GLUT_DOUBLE | GLUT_DEPTH)

     glutInitWindowSize(640,400)

     glutInitWindowPosition(800,400)

     window = glutCreateWindow("opengl")

     glutDisplayFunc(DrawGLScene)

     glutIdleFunc(DrawGLScene)

     glutReshapeFunc(ReSizeGLScene)

     glutMouseFunc( mouseButton )

     glutMotionFunc(camera.mouse)

     glutKeyboardFunc(camera.keypress)

     glutSpecialFunc(camera.keypress)

     InitGL(640, 480)

     glutMainLoop()

 main()
显示效果
代码很简单,把球,网络,漫游摄像机应用进去。注意glutMouseFunc( mouseButton )与glutMotionFunc(camera.mouse)组合用才能达到原来OpenTK提供的鼠标检测功能,因为glutmousefunc只检测鼠标的按下等动作,意思你一直按下移动他是不会引用的,在这引用的是glutmotionfunc,这个大家可以自己去试验。
下面放出效果图:
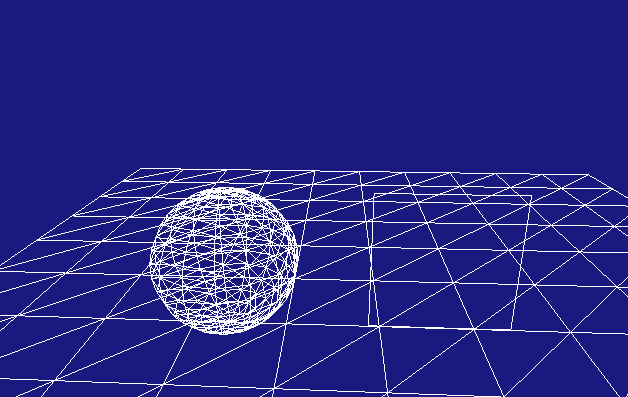
效果很简单,主要是为了下文先做一个基本的效果,同时也是用pyOpengl对前面的一点总结。
代码下载:代码 和上面说的一样,其中EDSF前后左右移动,WR分别向上与向下,鼠标右键加移动鼠标控制方向,V切换第一人称与第三人称。UP与DOWN切换前面操作的移动幅度。
初试PyOpenGL一 (Python+OpenGL)的更多相关文章
- 初试PyOpenGL四 (Python+OpenGL)GPU粒子系统与基本碰撞
这篇相当于是对前三篇的总结,基本效果如下: 在初试PyOpenGL一 (Python+OpenGL)讲解Pyopengl环境搭建,网格,球体,第一与第三人称摄像机的实现.在初试PyOpenGL二 (P ...
- 初试PyOpenGL二 (Python+OpenGL)基本地形生成与高度检测
在上文中,讲述了PyOpenGL的基本配置,以及网格,球形的生成,以及基本的漫游.现在利用上一篇的内容,来利用高程图实现一个基本的地形,并且,利用上文中的第三人称漫游,以小球为视角,来在地形上前后左右 ...
- 初试PyOpenGL三 (Python+OpenGL)GPGPU基本运算与乒乓技术
这篇GPGPU 概念1: 数组= 纹理 - 文档文章提出的数组与纹理相等让人打开新的眼界与思维,本文在这文基础上,尝试把这部分思想拿来用在VBO粒子系统上. 在前面的文章中,我们把CPU的数据传到GP ...
- (Python OpenGL)【5】平移 PyOpenGL
(Python OpenGL) 原文:http://ogldev.atspace.co.uk/www/tutorial06/tutorial06.html (英文) 下面是我翻译过来的: 背景 在本 ...
- (Python OpenGL)【4】Uniform变量 PyOpenGL
(Python OpenGL) 原文:http://ogldev.atspace.co.uk/www/tutorial05/tutorial05.html(英文) __author__ = " ...
- (Python OpenGL)【3】着色器 PyOpenGL
(Python OpenGL)现在开始我们使用着色器来进行渲染.着色器是目前做3D图形最流行的方式. OpenGL的渲染管线流程: 数据传输到OpenGL—>顶点处理器—>细分着色—> ...
- 【Python OpenGL】【2】第一个三角形(Pyopengl)
根据顶点缓存来生成图元(Python OpenGL) 原文(英文链接)http://ogldev.atspace.co.uk/www/tutorial03/tutorial03.html __auth ...
- (Python OpenGL)【1】你好顶点 PyOpenGL
原文链接(C语言环境)(Python OpenGL) 我用python实现的代码: __author__ = "WSX" from OpenGL.GLUT.freeglut imp ...
- (Python OpenGL)【 0】关于VAO和VBO以及OpenGL新特性
(Python OpenGL)关于新版OpenGL需要了解的: 随着OpenGL状态和固定管线模式的移除,我们不在用任何glEnable函数调用,而且也不会有glVertex.glColor等函数调用 ...
随机推荐
- Vue.js 组件编码规范
本规范提供了一种统一的编码规范来编写 Vue.js 代码.这使得代码具有如下的特性: 其它开发者或是团队成员更容易阅读和理解. IDEs 更容易理解代码,从而提供高亮.格式化等辅助功能 更容易使用现有 ...
- android 自己定义视频播放器之2/1
非常久没更新博客,相信大家年后都比較忙. 今天给大家带来了一款视频播放器,首先确认的得有几点. 1.首先得有个播放视频的view. 2.加点额外功能进去左边上下滑动调节亮度,右边上下滑动调节声量: 3 ...
- 使用sqoop将MySQL数据库中的数据导入Hbase
使用sqoop将MySQL数据库中的数据导入Hbase 前提:安装好 sqoop.hbase. 下载jbdc驱动:mysql-connector-java-5.1.10.jar 将 mysql-con ...
- 转:显示技术中的帧、帧数、帧率、 FPS
在视频领域,电影.电视.数字视频等可视为随时间连续变换的许多张画面,而“帧( Frame)”是指每一张画面.而我们日常口语习惯或者说不严谨的交流中,通常对于帧数( Frames)与帧率( Frame ...
- 每日英语:The Risks of Big Data for Companies
Big data. It's the latest IT buzzword, and it isn't hard to see why. The ability to parse more infor ...
- 基于tcpdump的Android智能移动终端数据包捕获完整解决方案
如何在Android智能手机上捕获数据包? 本文由CSDN-蚍蜉撼青松[主页:http://blog.csdn.net/howeverpf]原创,转载请注明出处! 当前Android系统越来越流行,无 ...
- 【驱动】LCD驱动(FrameBuffer)分析
背景知识 在多媒体的推动下,彩色LCD越来越多地应用到嵌入式系统中,PDA和手机等大多都采用LCD作为显示器材,因此LCD的应用很有实际意义! LCD工作的硬件需求:要使一块LCD正常的显示文字或图像 ...
- 使用 IDEA 开发工具(版本为 IntelliJ IDEA 14.1.4)打可执行jar包的操作步骤
声明:教程演示使用的开发工具的版本是 IntelliJ IDEA 14.1.4. 1.选择IDEA开发工具菜单栏 File --> Project Structure,弹出如下窗口,在左侧的列表 ...
- js实现类似qq表情(插入图片以及获取光标的效果)
<!doctype html><html style="height:100%"><head><meta charset="ut ...
- java 多线程 24 : 线程组
线程组 可以把线程归属到某一个线程组中,线程组中可以有线程对象,也可以有线程组,组中还可以有线程,这样的组织结构有点类似于树的形式,如图所示: 线程组的作用是:可以批量管理线程或线程组对象,有效地对线 ...