android中NavigationView(Design Support)的使用
NavigationView可以实现美观的菜单功能展示,下面看一下怎么使用NavigationView
先是主Activity
activity_main.xml:
<?xml version="1.0" encoding="utf-8"?>

<LinearLayout xmlns:android="http://schemas.android.com/apk/res/android"

    xmlns:app="http://schemas.android.com/apk/res-auto"

    xmlns:tools="http://schemas.android.com/tools"

    android:layout_width="match_parent"

    android:layout_height="match_parent"

    android:orientation="vertical"

    tools:context=".MainActivity">

    <android.support.v7.widget.Toolbar

        android:id="@+id/toolbar1"

        android:layout_width="match_parent"

        android:layout_height="wrap_content"

        android:background="?attr/colorPrimary"

        android:minHeight="?attr/actionBarSize"

        android:theme="?attr/actionBarTheme" />

    <android.support.v4.widget.DrawerLayout

        android:id="@+id/drawer1"

        android:layout_width="match_parent"

        android:layout_height="match_parent">

        <android.support.constraint.ConstraintLayout

            android:layout_width="match_parent"

            android:layout_height="match_parent">

        </android.support.constraint.ConstraintLayout>

            <android.support.design.widget.NavigationView

                android:id="@+id/navMenu"

                android:layout_width="wrap_content"

                android:layout_height="match_parent"

                android:layout_gravity="start"

                app:headerLayout="@layout/main_header"

                app:menu="@menu/menu1">

            </android.support.design.widget.NavigationView>

    </android.support.v4.widget.DrawerLayout>

</LinearLayout>
这个布局是这样的:
最外层是一个上下结构的LinearLayout,从上到下依次是一个Toolbar、一个DrawerLayout
DrawerLayout包括一个ConstraintLayout主界面和一个NavigationView抽屉界面
NavigationView导航菜单包括一个头部,以及头部以下的菜单部分
然后需要添加NavigationView导航菜单的头部,以及菜单:
头部main_header.xml:
<?xml version="1.0" encoding="utf-8"?>

<LinearLayout xmlns:android="http://schemas.android.com/apk/res/android"

    xmlns:app="http://schemas.android.com/apk/res-auto"

    android:layout_width="match_parent"

    android:layout_height="match_parent">

    <ImageView

        android:id="@+id/imageView1"

        android:layout_width="150dp"

        android:layout_height="150dp"

        android:layout_weight="1"

        android:paddingTop="10dp"

        android:paddingBottom="10dp" />

</LinearLayout>
这个头部只有一个ImageView,我先不为这个ImageView指定图片资源,待会我动态指定资源,以便于将这个图片显示成圆形的
导航菜单menu1.xml:
<?xml version="1.0" encoding="utf-8"?>

<menu xmlns:app="http://schemas.android.com/apk/res-auto"

    xmlns:android="http://schemas.android.com/apk/res/android">

    <group android:checkableBehavior="single">

        <item

            android:id="@+id/editItem"

            android:icon="@android:drawable/ic_menu_edit"

            android:title="编辑"

            app:showAsAction="always" />

        <item

            android:id="@+id/helpItem"

            android:icon="@android:drawable/ic_menu_help"

            android:title="帮助"

            app:showAsAction="always" />

        <item

            android:id="@+id/deleteItem"

            android:icon="@android:drawable/ic_menu_delete"

            android:title="删除"

            app:showAsAction="always" />

    </group>

</menu>
这个菜单是有一个group菜单组,里面嵌套了三个item菜单项,注意group组有一个重要的属性android:checkableBehavior="single",这个一定要添加,不然到时候选中效果显示不出来。
最后就是主Activity的java类了
MainActivity.java:
 package com.example.chenrui.app1;

 import android.graphics.BitmapFactory;

 import android.support.annotation.NonNull;

 import android.support.design.widget.NavigationView;

 import android.support.v4.graphics.drawable.RoundedBitmapDrawable;

 import android.support.v4.graphics.drawable.RoundedBitmapDrawableFactory;

 import android.support.v4.widget.DrawerLayout;

 import android.support.v7.app.ActionBarDrawerToggle;

 import android.support.v7.app.AppCompatActivity;

 import android.os.Bundle;

 import android.support.v7.widget.Toolbar;

 import android.view.MenuItem;

 import android.view.View;

 import android.widget.ImageView;

 public class MainActivity extends AppCompatActivity {

     @Override

     protected void onCreate(Bundle savedInstanceState) {

         super.onCreate(savedInstanceState);

         setContentView(R.layout.activity_main);

         Toolbar toolbar = findViewById(R.id.toolbar1);

         setSupportActionBar(toolbar);

         getSupportActionBar().setHomeButtonEnabled(true);

         getSupportActionBar().setDisplayHomeAsUpEnabled(true);

         final DrawerLayout drawerLayout = findViewById(R.id.drawer1);

         ActionBarDrawerToggle toggle = new ActionBarDrawerToggle(this,drawerLayout,toolbar,R.string.open,R.string.close) {

             @Override

             public void onDrawerOpened(View drawerView) {

                 super.onDrawerOpened(drawerView);

             }

             @Override

             public void onDrawerClosed(View drawerView) {

                 super.onDrawerClosed(drawerView);

             }

         };

         toggle.syncState();

         drawerLayout.addDrawerListener(toggle);

         final NavigationView navMenu = findViewById(R.id.navMenu);

         navMenu.setNavigationItemSelectedListener(new NavigationView.OnNavigationItemSelectedListener() {

             @Override

             public boolean onNavigationItemSelected(@NonNull MenuItem menuItem) {

                 menuItem.setChecked(true);

                 drawerLayout.closeDrawers();

                 return true;

             }

         });

         ImageView imageView = navMenu.getHeaderView(0).findViewById(R.id.imageView1);

         RoundedBitmapDrawable bitmapDrawable = RoundedBitmapDrawableFactory.create(getResources(),BitmapFactory.decodeResource(getResources(),R.drawable.img01));

         bitmapDrawable.setCircular(true);

         imageView.setImageDrawable(bitmapDrawable);

     }

 }
第24到42行代码是指定Activity的菜单栏,并且为菜单栏添加切换抽屉界面显示或隐藏的按钮
第44到52行代码是响应NavigationView选择事件的,选择一个菜单项,会把对应菜单项置为选中状态,并且隐藏抽屉界面,这个里面还应该有菜单要执行的其他动作,我这里是示例,所以没有做别的操作
第54到57行代码是为NavigationView的头部图片动态指定一个图片资源,并且把图片改成圆角的,注意第54行代码查找图片的方式,因为图片位于NavigationView组件的headerLayout中,无法直接通过findViewById找到这个图片,需要先找到NavigationView组件头部的View,然后通过头部的View找到图片组件。这里是使用了RoundedBitmapDrawable来实现圆角图片的,用起来还是比较简单的。
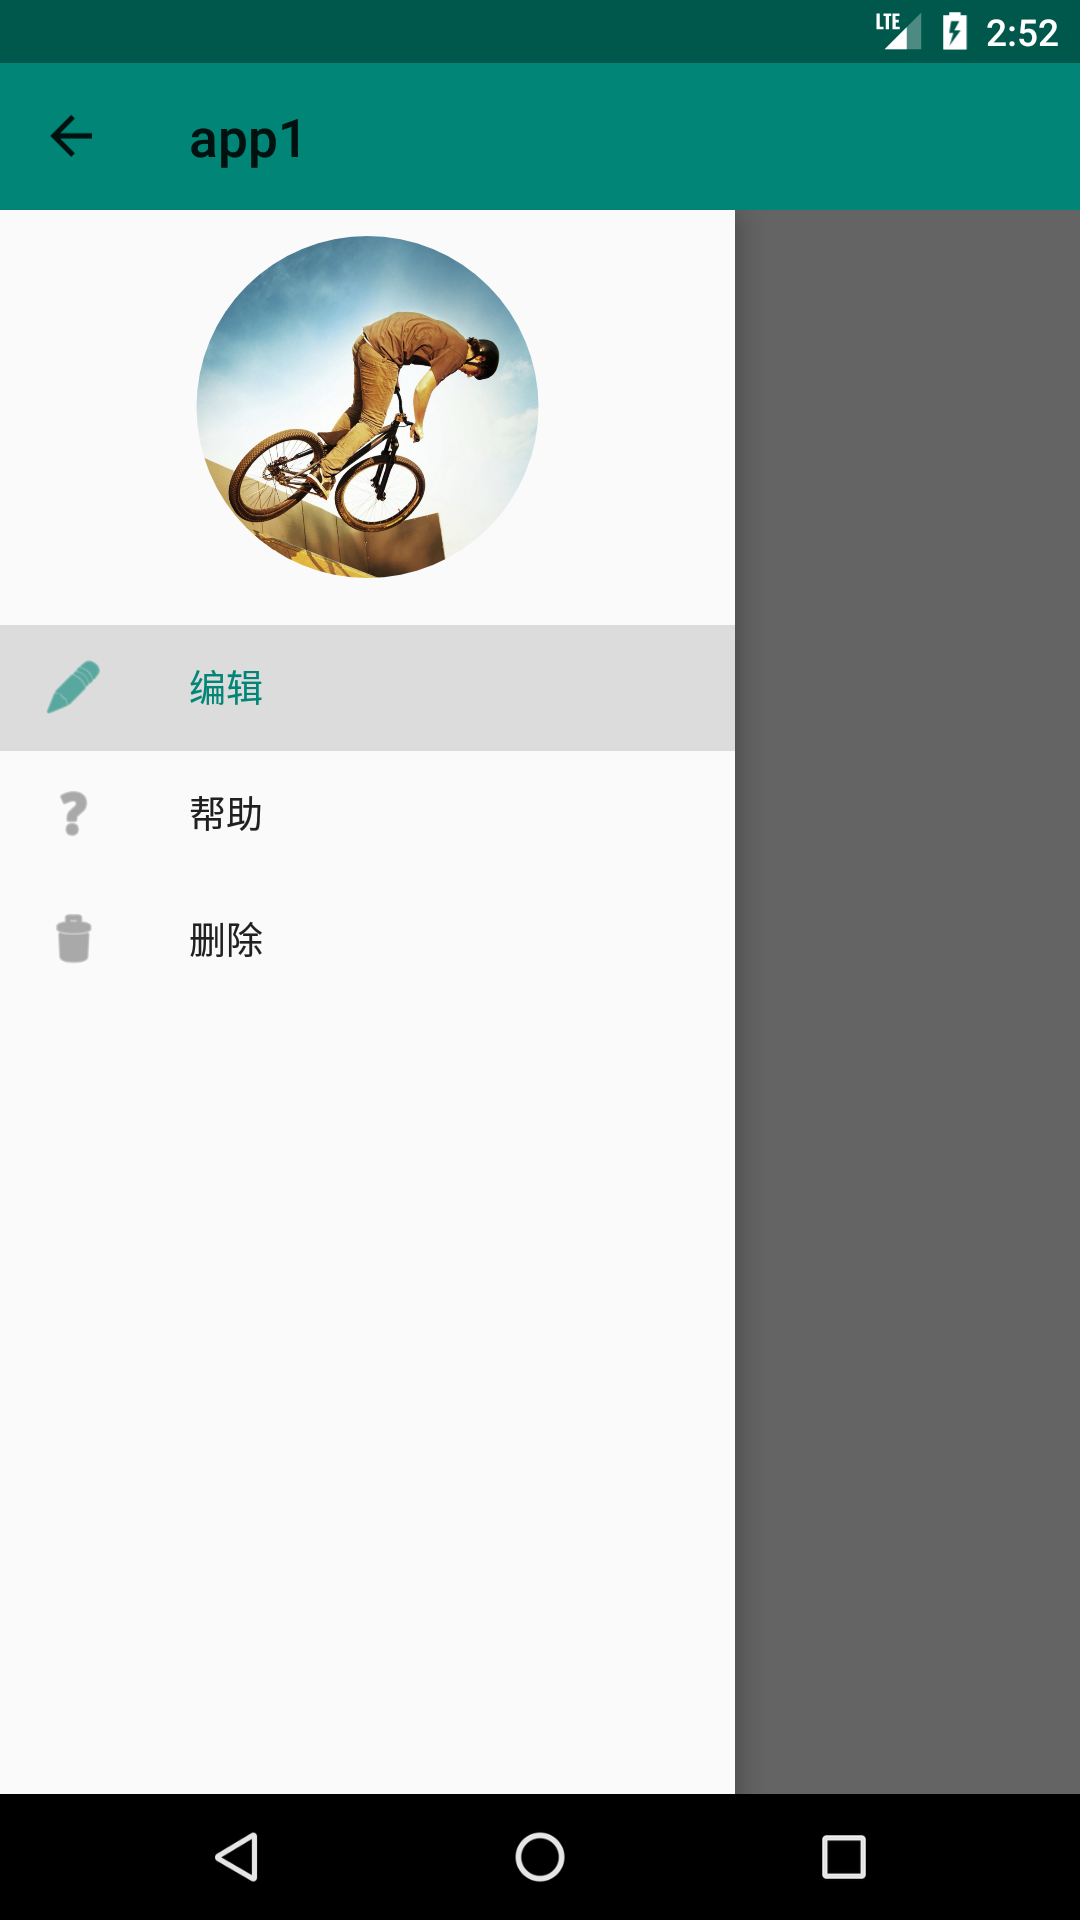
最后看一下执行的效果:
android中NavigationView(Design Support)的使用的更多相关文章
- Android 自己实现 NavigationView [Design Support Library(1)]
转载请标明出处: http://blog.csdn.net/lmj623565791/article/details/46405409: 本文出自:[张鸿洋的博客] 一.概述 Google I/O 2 ...
- Android学习之Design Support Library中TextInputLayout的使用
今天学习了一个Android Design Support Library 中的TextInputLayout控件,感觉还不错,较之以往的Editetxt,多了几分灵活性,使用也非常easy,故此给大 ...
- Android Design Support Library(二)用NavigationView实现抽屉菜单界面
NavigationView在MD设计中非常重要,之前Google也提出了使用DrawerLayout来实现导航抽屉.这次,在Android Design Support Library中,Googl ...
- Android Design Support Library初探,NavigationView实践
前言 在前几天的IO大会上,Google带来了Android M,同时还有Android支持库的新一轮更新,其中更是增加一个全新的支持库Android Design Support Library,包 ...
- android中Snackbar(Design Support)的使用
Snackbar是Android Design Support Library中的一个组件,想使用Snackbar,必须先引入Design Support,我这里引入的是当前的最新版本: implem ...
- Android Design Support Library使用详解
Android Design Support Library使用详解 Google在2015的IO大会上,给我们带来了更加详细的Material Design设计规范,同时,也给我们带来了全新的And ...
- 【转】【翻】Android Design Support Library 的 代码实验——几行代码,让你的 APP 变得花俏
转自:http://mrfufufu.github.io/android/2015/07/01/Codelab_Android_Design_Support_Library.html [翻]Andro ...
- 【转】Android的材料设计兼容库(Design Support Library)
转自:http://www.jcodecraeer.com/a/anzhuokaifa/developer/2015/0531/2958.html?mType=Group Android的材料设计兼容 ...
- Android应用Design Support Library完全使用实例
阅读目录 2-1 综述 2-2 TextInputLayout控件 2-3 FloatingActionButton控件 2-4 Snackbar控件 2-5 TabLayout控件 2-6 Navi ...
随机推荐
- Vue 插件写法
都说Vue2简单,上手容易,但小马过河,自己试了才晓得,除了ES6语法和webpack的配置让你感到陌生,重要的是思路的变换,以前随便拿全局变量和修改dom的锤子不能用了,变换到关注数据本身.vue的 ...
- 对数据集“dsArea”执行查询失败。 (rsErrorExecutingCommand),Query execution failed for dataset 'dsArea'. (rsErrorExecutingCommand),Manually process the TFS data warehouse and analysis services cube
错误提示: 处理报表时出错. (rsProcessingAborted)对数据集“dsArea”执行查询失败. (rsErrorExecutingCommand)Team System 多维数据集或者 ...
- 前端使用AngularJS的$resource,后端ASP.NET Web API,实现增删改查
AngularJS中的$resource服务相比$http服务更适合与RESTful服务进行交互.本篇后端使用ASP.NET Web API, 前端使用$resource,实现增删改查. 本系列包括: ...
- Android控件之ImageSwticher
Android控件之ImageSwticher 1. ImageSwticher介绍 ImageSwitcher是图片切换的控件,它能实现图片切换时的动画效果,包括图片导入效果.图片消失效果等等.An ...
- rtorrent - 强大的命令行BT客户端
NOTE - 文中展示的所有示例和指令都已经在Ubuntu 13.04中测试过. 一. 安装 [root@GY-10000 data]# yum search rtorrent ...
- 架构:The Onion Architecture : part 1(洋葱架构:第一篇)(转载)
原文地址:http://jeffreypalermo.com/blog/the-onion-architecture-part-1/. I've spoken several times about ...
- Thinking in Java---异常处理机制
java的异常处理机制能够使程序有极好的容错性,让程序更加的健壮.所谓的异常,就是指的阻止当前方法或作用域继续运行的问题,,当程序运行时出现异常时,系统就会自己主动生成一个Exception对象来通知 ...
- Python中的文件IO操作(读写文件、追加文件)
Python中文件的读写包含三个步骤:打开文件,读/写文件,关闭文件. 文件打开之后必须关闭,因为在磁盘上读写文件的功能是由操作系统提供的,文件作为对象,被打开后会占用操作系统的资源,而操作系统在同一 ...
- 5分钟了解Mockito
一.什么是mock测试,什么是mock对象? 先来看看下面这个示例: 从上图可以看出如果我们要对A进行测试,那么就要先把整个依赖树构建出来,也就是BCDE的实例. 一种替代方案就是使用mocks 从图 ...
- git如何删除远端不存在的本地分支?
问题:远端分支删除后,如何删除之前拉取的本地分支? 答案: git fetch -p git remote show origin 可以查看remote地址,远程分支,还有本地分支与之相对应关系等信息 ...