Qml 实现仿前端的 Notification (悬浮出现页面上的通知消息)
【写在前面】
经常接触前端的朋友应该经常见到下面的控件:
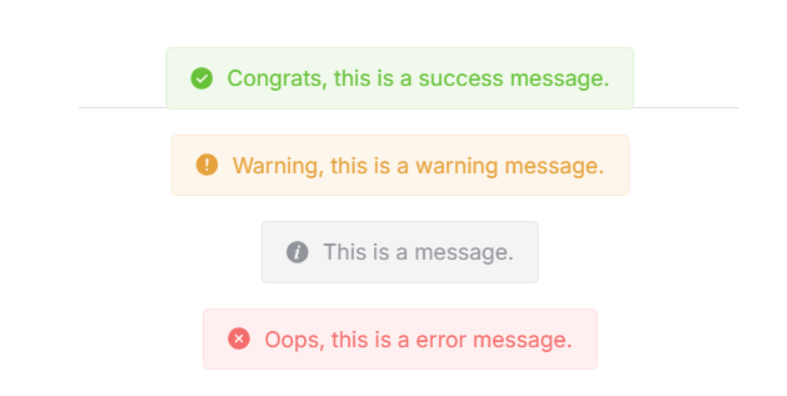
在前端中一般称它为 Notification 或 Message,但本质是一种东西,即:悬浮弹出式的消息提醒框。
这种组件一般具有以下特点:
1、全局/局部显示:它不依赖于具体的页面元素,可以在整个页面的任意位置显示。
2、自动消失:默认情况下,消息会在一定时间后自动消失,也可以设置为不自动消失。
3、多种类型:支持多种类型的消息,如成功(Success)、警告(Warning)、错误(Error)和 消息(Message)等。
4、可配置:可以自定义消息的显示位置、持续时间、内容等。
然鹅 Qml 中并未提供类似的组件,因此我便仿照前端实现了出来,并且更加简单易用。
【正文开始】
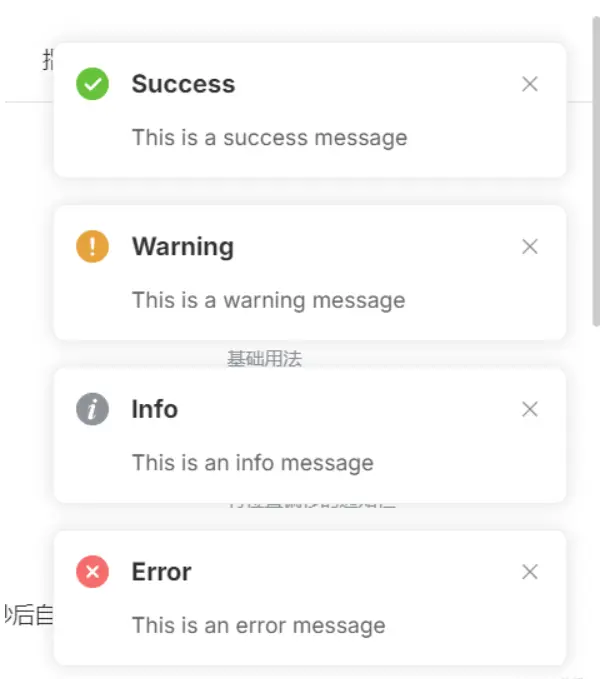
先来看看 Qml Notification 效果图:
实现起来相当简单,只需要 Column + Repeater 即可:
    Column {

        anchors.top: parent.top

        anchors.topMargin: 10

        anchors.horizontalCenter: parent.horizontalCenter

        spacing: 10

        Repeater {

            id: repeater

            model: ListModel {

                id: listModel

            }

            delegate: Rectangle {

                width: root.backgroundWidth

                height: __column.height + root.topMargin + root.bottomMargin

                radius: root.backgroundRadius

                color: root.backgroundColor

                clip: true

                Component.onCompleted: {

                    __timer.interval = timeout;

                    __timer.start();

                }

                NumberAnimation on height {

                    id: __removeAniamtion

                    to: 0

                    running: false

                    duration: 500

                    alwaysRunToEnd: true

                    onFinished: {

                        listModel.remove(index);

                    }

                }

                Timer {

                    id: __timer

                    onTriggered: {

                        __removeAniamtion.start();

                    }

                }

                Column {

                    id: __column

                    width: parent.width

                    anchors.centerIn: parent

                    spacing: root.titleSpacing

                    Row {

                        anchors.horizontalCenter: parent.horizontalCenter

                        spacing: 5

                        Text {

                            id: __icon

                            font.family: fontAwesome.name

                            font.pointSize: root.titleFont.pointSize

                            color: {

                                switch (type) {

                                case Notification.Success: return "green";

                                case Notification.Warning: return "orange";

                                case Notification.Message: return "gray";

                                case Notification.Error: return "red";

                                default: return "";

                                }

                            }

                            text: {

                                switch (type) {

                                case Notification.Success: return "\uf058";

                                case Notification.Warning: return "\uf071";

                                case Notification.Message: return "\uf05a";

                                case Notification.Error: return "\uf057";

                                default: return "";

                                }

                            }

                        }

                        Text {

                            id: __title

                            font: root.titleFont

                            color: root.titleColor

                            text: title

                            wrapMode: Text.WrapAnywhere

                        }

                    }

                    Text {

                        id: __message

                        width: parent.width - 16

                        anchors.horizontalCenter: parent.horizontalCenter

                        font: root.messageFont

                        color: root.messageColor

                        text: message

                        horizontalAlignment: Text.AlignHCenter

                        wrapMode: Text.WrapAnywhere

                    }

                }

                Text {

                    anchors.right: parent.right

                    anchors.top: parent.top

                    anchors.margins: 6

                    text: "×"

                    font.bold: true

                    MouseArea {

                        anchors.fill: parent

                        onClicked: {

                            __timer.stop();

                            __removeAniamtion.restart();

                        }

                    }

                }

            }

        }

    }
然后使用 notify() 来添加通知消息:
    function notify(title, message, type = Notification.None, timeout = 3000) {

        listModel.append({

                             title: title,

                             message: message,

                             type: type,

                             timeout: timeout

                         });

    }
其中参数说明:
title:标题,即通知顶端的标题。message:消息,即通知中间的内容。type:类型,即该通知的类型。timeout:超时,即该通知显示的时长,-1 则是无限。
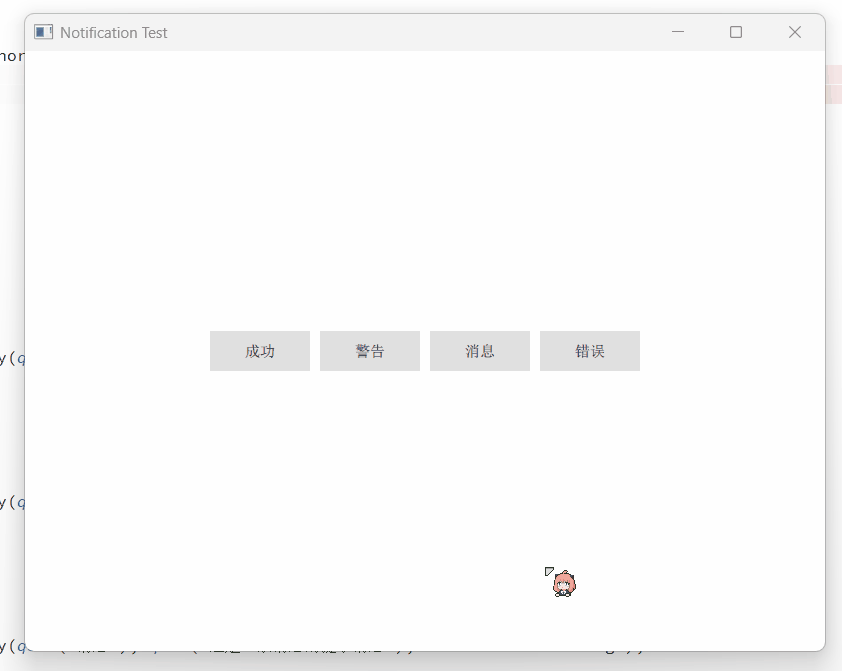
【如何使用】
import QtQuick 2.15

import QtQuick.Controls 2.15

import QtQuick.Window 2.15

Window {

    width: 800

    height: 600

    visible: true

    title: qsTr("Notification Test")

    Notification {

        id: topNotification

        z: 100

        backgroundWidth: 240

        anchors.top: parent.top

        anchors.horizontalCenter: parent.horizontalCenter

        titleFont.pointSize: 11

        messageFont.pointSize: 11

    }

    Column {

        anchors.centerIn: parent

        spacing: 10

        Row {

            spacing: 10

            Button {

                text: qsTr("成功")

                onClicked: {

                    topNotification.notify(qsTr("成功"), qsTr("这是一条成功的提示消息"), Notification.Success);

                }

            }

            Button {

                text: qsTr("警告")

                onClicked: {

                    topNotification.notify(qsTr("警告"), qsTr("这是一条警告的提示消息"), Notification.Warning);

                }

            }

            Button {

                text: qsTr("消息")

                onClicked: {

                    topNotification.notify(qsTr("消息"), qsTr("这是一条消息的提示消息"), Notification.Message);

                }

            }

            Button {

                text: qsTr("错误")

                onClicked: {

                    topNotification.notify(qsTr("错误"), qsTr("这是一条错误的提示消息"), Notification.Error);

                }

            }

        }

    }

}
Notification 可放置在任意位置,然后设置字体背景等等即可。
当然,这种方式是悬浮在当前页面的,如果想要悬浮在全局页面,则必须将其置于主窗口的顶部,具体方法如下:
import QtQuick 2.15

import QtQuick.Controls 2.15

import QtQuick.Window 2.15

Window {

    width: 800

    height: 600

    visible: true

    title: qsTr("Notification Test")

    Page { z: 1 }

    Page { z: 1 }

    Notification {

        id: topNotification

        z: 100

        backgroundWidth: 240

        anchors.top: parent.top

        anchors.horizontalCenter: parent.horizontalCenter

        titleFont.pointSize: 11

        messageFont.pointSize: 11

    }

}
需要保证其他页面 z-order 小于 Notification 组件。
【结语】
最后:项目链接(多多star呀.._):
Github 地址:https://github.com/mengps/QmlControls/tree/master/Notification
Qml 实现仿前端的 Notification (悬浮出现页面上的通知消息)的更多相关文章
- Android桌面悬浮窗效果实现,仿360手机卫士悬浮窗效果
大家好,今天给大家带来一个仿360手机卫士悬浮窗效果的教程,在开始之前请允许我说几句不相干的废话. 不知不觉我发现自己接触Android已有近三个年头了,期间各种的成长少不了各位高手的帮助,总是有很多 ...
- (转)在SAE使用Apple Push Notification Service服务开发iOS应用, 实现消息推送
在SAE使用Apple Push Notification Service服务开发iOS应用, 实现消息推送 From: http://saeapns.sinaapp.com/doc.html 1,在 ...
- 使用Ajax+jQuery来实现前端收到的数据在console上显示+简单的主页设计与bootstrap插件实现图片轮播
1.实现前端输入的数据在console上显示 上一篇是解决了在前端的输入信息在cygwin上显示,这次要给前台们能看见的数据,因为数据库里插入的数据少,所以写的语句翻来覆去就那几个词,emmm···当 ...
- Notification的功能和用法 加薪通知
实现通知栏消息的生成和消除 MainActivity.java public class MainActivity extends Activity { static f ...
- 用nginx的反向代理机制解决前端跨域问题在nginx上部署web静态页面
用nginx的反向代理机制解决前端跨域问题在nginx上部署web静态页面 1.什么是跨域以及产生原因 跨域是指a页面想获取b页面资源,如果a.b页面的协议.域名.端口.子域名不同,或是a页面为ip地 ...
- Angular14 利用Angular2实现文件上传的前端、利用springBoot实现文件上传的后台、跨域问题
一.angular2实现文件上传前端 Angular2使用ng2-file-upload上传文件,Angular2中有两个比较好用的上传文件的第三方库,一个是ng2-file-upload,一个是ng ...
- Vue2.0仿饿了么webapp单页面应用
Vue2.0仿饿了么webapp单页面应用 声明: 代码源于 黄轶老师在慕课网上的教学视频,我自己用vue2.0重写了该项目,喜欢的同学可以去支持老师的课程:http://coding.imooc.c ...
- Android中使用Notification在状态栏上显示通知
场景 状态栏上显示通知效果 注: 博客: https://blog.csdn.net/badao_liumang_qizhi关注公众号 霸道的程序猿 获取编程相关电子书.教程推送与免费下载. 实现 新 ...
- cursor CSS属性定义鼠标指针悬浮在元素上时的外观。
1 1 cursor CSS属性定义鼠标指针悬浮在元素上时的外观. https://developer.mozilla.org/zh-CN/docs/Web/CSS/cursor 概述 cursor ...
- Android仿360手机卫士悬浮窗效果
请看下图: 首先是一个小的悬浮窗显示的是当前使用了百分之多少的内存,点击一下小悬浮窗,就会弹出一个大的悬浮窗,可以一键加速.好,我们现在就来模拟实现一下 ...
随机推荐
- springboot实现异步调用demo
springboot实现异步调用 异步调用特点 异步调用在开发程序中被广泛应用,在异步任务中,主线程不需要阻塞等待异步任务的完成,而是可以继续处理其他请求. 异步调用的特点如下: 非阻塞:主线程在调用 ...
- java后端解决请求跨域
跨域 跨域:指的是浏览器不能执行其他网站的脚本.它是由浏览器的同源策略造成的,是浏览器对javascript施加的安全限制. 例如:a页面想获取b页面资源,如果a.b页面的协议.域名.端口.子域名不同 ...
- Linux 提权-密码搜寻
本文通过 Google 翻译 Password Hunting – Linux Privilege Escalation 这篇文章所产生,本人仅是对机器翻译中部分表达别扭的字词进行了校正及个别注释补充 ...
- oeasy教您玩转python - 9 - # 换行字符
换行字符 回忆上次内容 数制可以转化 bin(n)可以把数字转化为 2进制 hex(n)可以把数字转化为 16进制 int(n)可以把数字转化为 10进制 编码和解码可以转化 encode 编码 ...
- 第九节 JMeter基础-高级登录【接口关联-鉴权】
声明:本文所记录的仅本次操作学习到的知识点,其中商城IP错误,请自行更改. 背景:电商的功能:登录.加入购物车.提交订单.问题:谁把什么商品加入了购物车?这时需要把上一个接口的响应数据(登录成功后返回 ...
- JMeter 配置元件之按条件读取CSV Data Set Config
实践环境 win10 JMeter 5.4.1 需求描述 需求是这样的,需要压测某个接口(取消分配接口),请求这个接口之前,需要先登录系统(物流WMS系统),并在登录后,选择并进入需要操作的仓库,然后 ...
- Java 根据XPATH批量替换XML节点中的值
根据XPATH批量替换XML节点中的值 by: 授客 QQ:1033553122 测试环境 JDK 1.8.0_25 代码实操 message.xml文件 <Request service=&q ...
- java面试一日一题:讲下ThreadLocal
问题:请讲下ThreadLocal 分析:首先要了解ThreadLocal的基本原理:其次要理解ThreadLocal发生内存泄漏的原因:最后ThreadLocal是如何做到线程隔离的 回答要点: 主 ...
- Mac端MySQL安装教程
Mac端: 1.安装 ** 首先进入官网:**https://dev.mysql.com/downloads/mysql/ 根据自身情况是M系列芯片(ARM版)还是Intel系列芯片(x ...
- 快速将headers转字典
使用Headers插件完成快捷操作 在pycharm的Preferences-Plugins-Marketplace下搜索Headers install安装.apply应用,ok确定 接下来只要复制相 ...