【Tool】Augmentor和imgaug——python图像数据增强库
Augmentor和imgaug——python图像数据增强库
Tags: ComputerVision Python
介绍两个图像增强库:Augmentor和imgaug,Augmentor使用比较简单,只有一些简单的操作。 imgaug实现的功能更多,可以对keypoint, bounding box同步处理,比如你现在由一些标记好的数据,只有同时对原始图片和标记信息同步处理,才能有更多的标记数据进行训练。我在segmentation和detection任务经常使用imgaug这个库。
Augmentor
http://augmentor.readthedocs.io/en/master/index.html
Augmentor 是管道化的图像增强库,每一个增强操作都是逐步叠加在图像上。此外对于输入的图像,可以选择按照一定的概率进行增强,比如只随机对一半图像进行旋转。
rotate(probability=0.5, max_left_rotation=5, max_right_rotation=10)
可以实现的操作有, rotate, crop, perspective skew(视角倾斜), elastic distortions(弹性变换), sheering(坐标轴倾斜), mirroring(镜像)
可以使用Augumentor.Pipeline()创建一个实例,调用各种方法向pipeline添加方法, status()可以显示当前pipeline的状态,在status中每个操作都有一个对应的index, remove_operation(index)移除一个操作, 最后调用sample(nums)得到nums个augument后的图像。
import Augmentor

p = Augmentor.Pipeline("/path/to/images/")

p.status()

p.remove_operation(0)
rotate
- rotate() 旋转,非90度旋转会带来padding或者裁剪
- rotate90()
- rotate180()
- rotate270()
- rotate_random_90() 随机旋转,90, 180, 270
resize
crop
- crop_centre()
- crop_by_size()
- crop_random()
sheer
+ sheer()
mirroring
- flip_left_right()
- flip_top_bottom()
- flip_random()
elastic distortion
- random_distortion()
Before

After

弹性变换是在计算机视觉任务中经常使用的一种变换,比较有名的Segmentation Model U-Net就使用了elastic deformation来对自己的数据做Augmentation.最后取得了较好的效果.
imgaug
http://imgaug.readthedocs.io/en/latest/index.html
安装
依赖
- numpy
- scipy
- scikit-image (pip install -U + scikit-image)
- six (pip install -U six)
- OpenCV (i.e. cv2 must be available in python). The library is mainly tested in OpenCV 2, but seems to also work in OpenCV 3.
pip install git+https://github.com/aleju/imgaug
或者
pip install imgaug
前者安装github最新版本,后者安装pypi版本。
basic
Keypoint
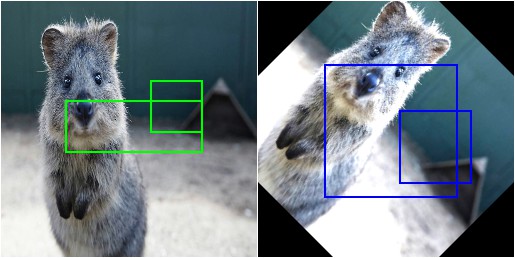
Bounding Boxes
这个部分做object detection的人应该经常用到。
imgaug支持:
- 将bounding boxes作为对象表示
- 增强boundiing boxes
- 在图像上画bounding boxes
- boxing boxes移动, 映射, 计算IoU
Before
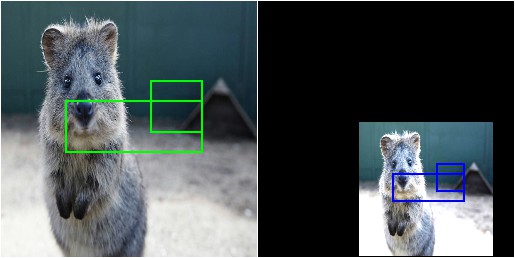
After
由于VOC_PASCAL是在分割和检测领域常见的数据集,这里给出一个使用VOC_PASCAL标记格式进行数据增强的例子。
标记格式:
<?xml version="1.0" ?>

<annotation>

<folder>Pictures</folder>

<filename>bndbox.jpg</filename>

<path>/home/redtea/Pictures/bndbox.jpg</path>

<source>

    <database>Unknown</database>

</source>

<size>

    <width>1200</width>

    <height>1200</height>

    <depth>3</depth>

</size>

<segmented>0</segmented>

    <object>

    <name>cat</name>

    <pose>Unspecified</pose>

    <truncated>0</truncated>

    <difficult>0</difficult>

    <bndbox>

        <xmin>49</xmin>

        <ymin>647</ymin>

        <xmax>599</xmax>

        <ymax>1125</ymax>

    </bndbox>

</object>

    <object>

    <name>dog</name>

    <pose>Unspecified</pose>

    <truncated>0</truncated>

    <difficult>0</difficult>

    <bndbox>

        <xmin>678</xmin>

        <ymin>547</ymin>

        <xmax>1159</xmax>

        <ymax>1159</ymax>

    </bndbox>

</object>

</annotation>
import xml.etree.ElementTree as ET

import pickle

import  os

from os import getcwd

import numpy as np

from PIL import Image

import cv2

import imgaug as ia

from imgaug import augmenters as iaa

ia.seed(1)

def read_xml_annotation(root,image_id):

	in_file = open(os.path.join(root,image_id))

	tree = ET.parse(in_file)

	root = tree.getroot()

	bndbox = root.find('object').find('bndbox')

	xmin = int(bndbox.find('xmin').text)

	xmax = int(bndbox.find('xmax').text)

	ymin = int(bndbox.find('ymin').text)

	ymax = int(bndbox.find('ymax').text)

	return (xmin, ymin, xmax, ymax)

def change_xml_annotation(root, image_id, new_target):

	new_xmin = new_target[0]

	new_ymin = new_target[1]

	new_xmax = new_target[2]

	new_ymax = new_target[3]

	in_file = open(os.path.join(root, str(image_id)+'.xml')) #这里root分别由两个意思

	tree = ET.parse(in_file)

	xmlroot = tree.getroot()

	object = xmlroot.find('object')

	bndbox = object.find('bndbox')

	xmin = bndbox.find('xmin')

	xmin.text = str(new_xmin)

	ymin = bndbox.find('ymin')

	ymin.text = str(new_ymin)

	xmax = bndbox.find('xmax')

	xmax.text = str(new_xmax)

	ymax = bndbox.find('ymax')

	ymax.text = str(new_ymax)

	tree.write(os.path.join(root,str(image_id)+"_aug"+'.xml'))

if __name__ == "__main__":

	cmd = os.getcwd()

	image_id = "bndbox"

	img = Image.open(os.path.join(cmd, str(image_id)+'.jpg'))

	img = np.array(img)

	bndbox = read_xml_annotation(cmd, str(image_id)+'.xml')

	bbs = ia.BoundingBoxesOnImage([

	   ia.BoundingBox(x1=bndbox[0], y1=bndbox[1], x2=bndbox[2], y2=bndbox[3])

	], shape=img.shape)

	seq = iaa.Sequential([

	iaa.Flipud(0.5), # vertically flip 20% of all images

	   iaa.Multiply((1.2, 1.5)), # change brightness, doesn't affect BBs

	   iaa.Affine(

	       translate_px={"x": 10, "y": 10},

	       scale=(0.8, 0.95),

	       rotate=(-10,10)

	    ) # translate by 40/60px on x/y axis, and scale to 50-70%, affects BBs

	])

	seq_det = seq.to_deterministic() # 保持坐标和图像同步改变,而不是随机

	image_aug = seq_det.augment_images([img])[0]

	bbs_aug = seq_det.augment_bounding_boxes([bbs])[0]

	before  = bbs.bounding_boxes[0]

	after = bbs_aug.bounding_boxes[0]

	print("BB : (%.4f, %.4f, %.4f, %.4f) -> (%.4f, %.4f, %.4f, %.4f)" % (

        before.x1, before.y1, before.x2, before.y2,

        after.x1, after.y1, after.x2, after.y2)

    )

	image_before = bbs.draw_on_image(img, thickness=2)

	image_after = bbs_aug.draw_on_image(image_aug, thickness=2)

	Image.fromarray(image_before).save("before.jpg")

	Image.fromarray(image_after).save('after.jpg')

	new_bndbox = []

	new_bndbox.append(int(bbs_aug.bounding_boxes[0].x1))

	new_bndbox.append(int(bbs_aug.bounding_boxes[0].y1))

	new_bndbox.append(int(bbs_aug.bounding_boxes[0].x2))

	new_bndbox.append(int(bbs_aug.bounding_boxes[0].y2))

	# 修改xml tree 并保存

	change_xml_annotation(cmd, image_id, new_bndbox)


这个包好像不能画出倾斜的bounding box, 我的read xml程序只能读取第一个bounding box,懒得修改了。
总之我觉得如果你Augmentor不能满足你就可以使用imgaug,但是有一点需要注意!imgaug中一些变换会给边缘区域带来黑色填充块,如果这些黑色填充块对你的模型有影响的话,就需要特殊处理!!
【Tool】Augmentor和imgaug——python图像数据增强库的更多相关文章
- Python库 - Albumentations 图片数据增强库
Python图像处理库 - Albumentations,可用于深度学习中网络训练时的图片数据增强. Albumentations 图像数据增强库特点: 基于高度优化的 OpenCV 库实现图像快速数 ...
- 图像数据增强 (Data Augmentation in Computer Vision)
1.1 简介 深层神经网络一般都需要大量的训练数据才能获得比较理想的结果.在数据量有限的情况下,可以通过数据增强(Data Augmentation)来增加训练样本的多样性, 提高模型鲁棒性,避免过拟 ...
- ubuntu为python处理图片安装图片数据增强库imgaug
1 依赖Required dependencies: six numpy scipy scikit-image (pip install -U scikit-image) OpenCV (i.e. c ...
- python的数据可视化库 matplotlib 和 pyecharts
Matplotlib大家都很熟悉 不谈. ---------------------------------------------------------------------------- ...
- Python的数据基础库Numpy怎样对数组进行排序
Numpy怎样对数组排序 Numpy给数组排序的三个方法: numpy.sort:返回排序后数组的拷贝 array.sort:原地排序数组而不是返回拷贝 numpy.argsort:间接排序,返回的是 ...
- Python数据可视化库-Matplotlib(一)
今天我们来学习一下python的数据可视化库,Matplotlib,是一个Python的2D绘图库 通过这个库,开发者可以仅需要几行代码,便可以生成绘图,直方图,功率图,条形图,错误图,散点图等等 废 ...
- 数据增强利器--Augmentor
最近遇到数据样本数目不足的问题,自己写的增强工具生成数目还是不够,终于在网上找到一个数据增强工具包,足够高级,足够傻瓜.想要多少就有多少!再也不怕数据不够了! 简介 Augmentor是一个Pytho ...
- 音频数据增强及python实现
博客作者:凌逆战 博客地址:https://www.cnblogs.com/LXP-Never/p/13404523.html 音频时域波形具有以下特征:音调,响度,质量.我们在进行数据增强时,最好只 ...
- python将xml文件数据增强(labelimg)
在处理faster-rcnn和yolo时笔者使用labelimg标注图片 但是我们只截取了大概800张左右的图,这个量级在训练时肯定是不够的,所以我们需要使用数据增强(无非是旋转加噪调量度)来增加我们 ...
随机推荐
- codevs——T2894 Txx考试
http://codevs.cn/problem/2894/ 时间限制: 1 s 空间限制: 32000 KB 题目等级 : 黄金 Gold 题解 查看运行结果 题目描述 Descri ...
- 《深入理解Android 卷III》第八章深入理解Android壁纸
<深入理解Android 卷III>即将公布,作者是张大伟. 此书填补了深入理解Android Framework卷中的一个主要空白,即Android Framework中和UI相关的部分 ...
- [Javascript Crocks] Safely Access Nested Object Properties with `propPath`
In this lesson, we’ll look at the propPath utility function. We’ll ask for a property multiple level ...
- Android Handler消息机制深入浅出
尊重原创:http://blog.csdn.net/yuanzeyao/article/details/38408493 作为Android开发者,Handler这个类应该是再熟悉只是了.由于差点儿不 ...
- pip3使用
安装好python3.5,在D:\study\python\python35\Scripts目录下打开命令行 执行命令pip3 list 查看已经安装的东西,提示需要升级,执行命令python -m ...
- Selenium实例----12306网站测试
http://blog.csdn.net/xc5683/article/details/9629827
- MEAN框架介绍
近期在Angular社区的原型开发人员间.一种全Javascript的开发架构MEAN正突然流行起来.其首字母分别代表的是:(M)ongoDB--NoSQL的文档数据库,使用JSON风格来存储数据,甚 ...
- Activiti的简单入门样例(经典的请假样例)
经典的请假样例: 流程例如以下,首先须要部门经理审批.假设请假天数大于2天,则须要总经理审批,否则HR审批就可以 一:创建maven项目,项目结构例如以下: watermark/2/text/aHR0 ...
- 用虚拟机创建win7 32位系统来测试win 7 64位系统无法安装cad 2004 缺少acdb16.dll的问题
- C# 获取操作系统相关信息
1.获取操作系统版本(PC,PDA均支持) Environment.OSVersion 2.获取应用程序当前目录(PC支持) Environment.CurrentDirectory 3.列举本地硬盘 ...