BitmapMesh动画
一、概要
我们经常用到Canvas.drawBitmap方法,却很少用到Canvas.drawBitmapMesh方法。这个方法为我们做图片变形提供了无限可能,同时也对数学功底有较高的要求。下面先看一下方法介绍:
   /**

     * Draw the bitmap through the mesh, where mesh vertices are evenly distributed across the

     * bitmap. There are meshWidth+1 vertices across, and meshHeight+1 vertices down. The verts

     * array is accessed in row-major order, so that the first meshWidth+1 vertices are distributed

     * across the top of the bitmap from left to right. A more general version of this method is

     * drawVertices().

     *

     * Prior to API level {@value Build.VERSION_CODES#P} vertOffset and colorOffset were ignored,

     * effectively treating them as zeros. In API level {@value Build.VERSION_CODES#P} and above

     * these parameters will be respected.

     *

     * @param bitmap The bitmap to draw using the mesh

     * @param meshWidth The number of columns in the mesh. Nothing is drawn if this is 0

     * @param meshHeight The number of rows in the mesh. Nothing is drawn if this is 0

     * @param verts Array of x,y pairs, specifying where the mesh should be drawn. There must be at

     *            least (meshWidth+1) * (meshHeight+1) * 2 + vertOffset values in the array

     * @param vertOffset Number of verts elements to skip before drawing

     * @param colors May be null. Specifies a color at each vertex, which is interpolated across the

     *            cell, and whose values are multiplied by the corresponding bitmap colors. If not

     *            null, there must be at least (meshWidth+1) * (meshHeight+1) + colorOffset values

     *            in the array.

     * @param colorOffset Number of color elements to skip before drawing

     * @param paint May be null. The paint used to draw the bitmap

     */

    public void drawBitmapMesh(@NonNull Bitmap bitmap, int meshWidth, int meshHeight,

            @NonNull float[] verts, int vertOffset, @Nullable int[] colors, int colorOffset,

            @Nullable Paint paint) {

        super.drawBitmapMesh(bitmap, meshWidth, meshHeight, verts, vertOffset, colors, colorOffset,

                paint);

    }
简单翻译一下:
- 此方法将Bitmap看做一张网,通过网的形状决定图片绘制形状
- meshWidth和meshHeight分别为横向和纵向分割网格数
- 所有网格顶点均匀分布,且排序为从左到右,从上到下
- verts为变换后所有网格顶点的坐标数组
- Android P版本之前vertOffset和colorOffset两个参数无效
下面通过一张简图来解释BitmapMesh的绘制原理:
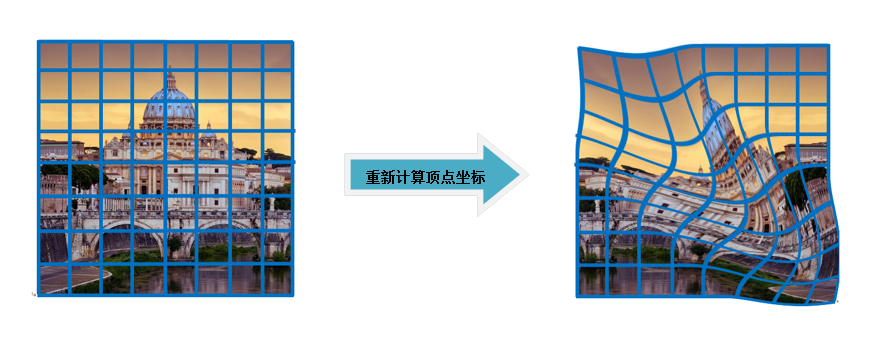
如上,原图均匀分割成8*8格,对应(8+1)*(8+1)个顶点,假设原顶点坐标数组为origs[],通过遍历并按照特定算法重新计算后,得出新顶点坐标数组verts[],drawBitmapMesh根据verts[]重新绘制图片。
原理很好理解,本质上是两个数组的变换,关键是变换算法的设计。
二、实例讲解
下面通过一个简单实例讲解Canvas.drawBitmapMesh的具体用法,先看效果图:

核心代码如下:
public class BitmapMeshView extends TextView {

    //横向、纵向划分格数:80*80

    private static final int WIDTH = 80;

    private static final int HEIGHT = 80;

    private Bitmap bitmap = null;

    //顶点数:81*81

    private final int COUNT = (WIDTH + 1) * (HEIGHT + 1);

    //顶点坐标数组

    private final float[] orig = new float[COUNT * 2];

    //转换后顶点坐标数组

    private final float[] verts = new float[COUNT * 2];

    float bitmapWidth;

    float unitWidth;

    float bitmapHeight;

    float halfHeight;

    private static final double HALF_PI = Math.PI / 2;

    @Override

    public boolean onTouchEvent(MotionEvent event) {

        startPlay();

        return super.onTouchEvent(event);

    }

    public void startPlay() {

        initBitmap();

        ValueAnimator va = ValueAnimator.ofFloat(0, 1.3f);  //因变形区域是0.3,所以最大1.3才能保证完全展开

        va.setDuration(1200);

        va.addUpdateListener(new ValueAnimator.AnimatorUpdateListener() {

            @Override

            public void onAnimationUpdate(ValueAnimator animation) {

                float value = (float) animation.getAnimatedValue();

                calcuVerts(value);

                invalidate();

            }

        });

        va.start();

    }

    private void initBitmap() {

        if (bitmap == null) {

            buildDrawingCache();  //获取View截图

            bitmap = getDrawingCache();

            bitmapWidth = bitmap.getWidth();

            unitWidth = bitmapWidth * 0.3f;  //变形区域长度

            bitmapHeight = bitmap.getHeight();

            halfHeight = bitmapHeight / 2;  //1/2高度

            /*算出顶点原始坐标*/

            int index = 0;

            for (int y = 0; y <= HEIGHT; y++) {

                float fy = bitmapHeight * y / HEIGHT;

                for (int x = 0; x <= WIDTH; x++) {

                    float fx = bitmapWidth * x / WIDTH;

                    orig[index * 2 + 0] = verts[index * 2 + 0] = fx;

                    orig[index * 2 + 1] = verts[index * 2 + 1] = fy;

                    index += 1;

                }

            }

        }

    }

    /**

     * 计算转换后的顶点坐标

     * @param input 已展开比例

     */

    private void calcuVerts(float input) {

        for (int j = 0; j <= HEIGHT; j++) {

            for (int i = 0; i <= WIDTH; i++) {

                float startX = input * bitmapWidth; //变形部分最右端x值

                float cx = i * 1.0f / WIDTH * bitmapWidth;  //当前顶点x坐标

                float cy = j * 1.0f / HEIGHT * bitmapHeight;  //当前顶点y坐标

                float toHalf = cy - halfHeight;  //距离垂直中线的距离

                if (cx >= startX) { //右侧未展开区域

                    verts[(j * (WIDTH + 1) + i) * 2 + 1] = halfHeight;  //计算y坐标

                    verts[(j * (WIDTH + 1) + i) * 2] = cx;  //计算x坐标

                } else if (cx <= startX - unitWidth) { //左侧完全展开区域

                    verts[(j * (WIDTH + 1) + i) * 2 + 1] = cy;

                    verts[(j * (WIDTH + 1) + i) * 2] = cx;

                } else { // 中间正在展开区域

                    float ratio = (startX - cx) / unitWidth;

                    verts[(j * (WIDTH + 1) + i) * 2 + 1] = (float) (halfHeight + toHalf * Math.sin(HALF_PI * ratio));

                    verts[(j * (WIDTH + 1) + i) * 2] = (float) (cx - toHalf * Math.cos(HALF_PI * ratio) * 1f);

                }

            }

        }

    }

    @Override

    protected void onDraw(Canvas canvas) {

        if (bitmap != null) {

            canvas.drawBitmapMesh(bitmap, WIDTH, HEIGHT, verts, 0, null, 0, null);

        } else {

            super.onDraw(canvas);

        }

    }

}
代码注释已经非常详细,不再一一解读。正如上面所说,drawBitmapMesh的重点是顶点坐标变换算法的设计,体现在本示例即是calcuVerts(float input)函数的设计。这是我们下面讲解的重点:
首先看下图
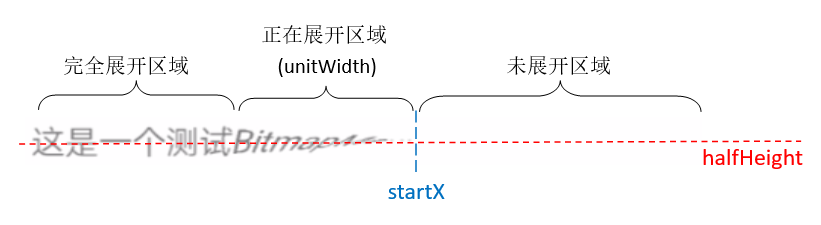
我们把这条文本分成三段:完全展开区域、正在展开区域、未展开区域。我们需要分别计算出这三段文本对应的顶点坐标:
(1)完全展开区域的顶点坐标和原始坐标是一样的:
 else if (cx <= startX - unitWidth) { //左侧完全展开区域

      verts[(j * (WIDTH + 1) + i) * 2 + 1] = cy;

      verts[(j * (WIDTH + 1) + i) * 2] = cx;

 }
(2)未展开区域的顶点y坐标都是halfHeight
if (cx >= startX) { //右侧未展开区域

      verts[(j * (WIDTH + 1) + i) * 2 + 1] = halfHeight;  //计算y坐标

      verts[(j * (WIDTH + 1) + i) * 2] = cx;  //计算x坐标

}
(3)重点是正在展开区域的坐标计算
我们把正在展开区域放大,假设(cx,cy)是其中某个原顶点坐标,(cx',cy')是经过计算变换后的顶点坐标,算法的重点是通过(cx,cy)计算出(cx',cy')。

根据动画效果不难想象点 (cx',cy') 实际上位于点 (cx,cy) 绕 (cx,halfHeiht) 圆心的弧线上,参考上面的辅助线
$cy' = halfHeight - h = halfHeight - |toHalf| * sinθ$
$cx' = cx + w = cx + |toHalf| * cosθ$
我们继续分析,在变形区域内,
- (cx,cy)距startX越远,展开幅度越大,θ角度越大,最大为90°,即(cx',cy')和(cx,cy)重合
- (cx,cy)距startX越近,展开幅度越小,θ角度越小,最小为0°,即(cx',cy')位于中线上
- θ角度呈线性变化,即θ = HALF_PI * (startX - cx) / unitWidth
- 因View坐标系Y轴是向下的,所以toHalf实际上是负值
综上分析,得出正在展开区域的顶点坐标算法:
 else { // 中间正在展开区域

      float ratio = (startX - cx) / unitWidth;

      verts[(j * (WIDTH + 1) + i) * 2 + 1] = (float) (halfHeight + toHalf * Math.sin(HALF_PI * ratio));

      verts[(j * (WIDTH + 1) + i) * 2] = (float) (cx - toHalf * Math.cos(HALF_PI * ratio) * 1f);

 }
上述(1)(2)(3)共同组成了目标顶点坐标的算法。
再结合动画原理,startX从0到bitmapWidth+unitWidth过渡,就形成了文本完全展开的动画。
三、总结
Canvas的drawBitmapMesh方法是一个很强大的存在,但是想用它做出逼真的效果需要很强的数学和物理基础。坐标变换算法的设计和代码实现是该方法的关键。下面列举两个Github上的开源项目:
Github源码地址:https://github.com/NanBox/RippleLayout
对应博客地址:https://blog.csdn.net/a49220824/article/details/70476008

Github源码地址:https://github.com/DeesonWoo/MyDrawBitmapMeshDemo
BitmapMesh动画的更多相关文章
- Android 吸入动画效果详解
1,背景 吸入(Inhale)效果,最初我是在iOS上面看到的,它是在Note程序中,用户可能添加了一页记录,在做删除时,它的删除效果是:这一页内容吸入到一个垃圾框的图标里面.请看下图所示: ==== ...
- Android图形动画
一.动画基础 本质 每帧绘制不同的内容. 基本过程 开始动画后,调用View的invalidate触发重绘.重绘后检查动画是否停止,若未停止则继续调用invalidate触发下一帧(下一次重绘),直到 ...
- 动画requestAnimationFrame
前言 在研究canvas的2D pixi.js库的时候,其动画的刷新都用requestAnimationFrame替代了setTimeout 或 setInterval 但是jQuery中还是采用了s ...
- 梅须逊雪三分白,雪却输梅一段香——CSS动画与JavaScript动画
CSS动画并不是绝对比JavaScript动画性能更优越,开源动画库Velocity.js等就展现了强劲的性能. 一.两者的主要区别 先开门见山的说说两者之间的区别. 1)CSS动画: 基于CSS的动 ...
- CSS 3学习——animation动画
以下内容根据官方文档翻译以及自己的理解整理. 1. 介绍 本方案介绍动画(animations).通过动画,开发者可以将CSS属性值的变化指定为一个随时间变化的关键帧(keyframes)的集合.在 ...
- javascript动画系列第三篇——碰撞检测
前面的话 前面分别介绍了拖拽模拟和磁性吸附,当可视区域内存在多个可拖拽元素,就出现碰撞检测的问题,这也是javascript动画的一个经典问题.本篇将详细介绍碰撞检测 原理介绍 碰撞检测的方法有很多, ...
- 虾扯蛋:Android View动画 Animation不完全解析
本文结合一些周知的概念和源码片段,对View动画的工作原理进行挖掘和分析.以下不是对源码一丝不苟的分析过程,只是以搞清楚Animation的执行过程.如何被周期性调用为目标粗略分析下相关方法的执行细节 ...
- Visaul Studio 常用快捷键的动画演示
从本篇文章开始,我将会陆续介绍提高 VS 开发效率的文章,欢迎大家补充~ 在进行代码开发的时候,我们往往会频繁的使用键盘.鼠标进行协作,但是切换使用两种工具会影响到我们的开发速度,如果所有的操作都可以 ...
- transtion:过渡动画
p.p1 { margin: 0.0px 0.0px 0.0px 0.0px; font: 17.0px Monaco; color: #4f5d66 } p.p2 { margin: 0.0px 0 ...
随机推荐
- python数据标准化
def datastandard(): from sklearn import preprocessing import numpy as np x = np.array([ [ 1., -1., 2 ...
- linux根据进程名字杀死进程
ps -ef | grep procedure_name | grep -v grep | awk '{print $2}' | xargs kill -9 Linux Shell脚本实现根据进程名杀 ...
- CentOS 7 x64下Apache+MySQL(Mariadb)+PHP5.6的安装
每次搭建新服务器,都要来来回回把这些包再装一下,来来回回搞了不下20遍了吧,原来都是凭经验,配置过程中重复入坑是难免的,故写此文做个备忘.虽然有像xampp这样的集成包,但是在生产环境的Linux发行 ...
- UVA The Tower of Babylon
The Tower of Babylon Perhaps you have heard of the legend of the Tower of Babylon. Nowadays many det ...
- Spring中获取Session的方法汇总
Spring: web.xml <listener> <listener-class>org.springframework.web.context.request.Reque ...
- Cocos Code IDE里xcodeprojectlua脚本更新
lua脚本改动后xcode须要clean又一次编译才干更新,这个是xcode里的老毛病了,网上有一些脚本但不是针对Cocos Code IDE的project文件夹的,这里列出 cocos2dx版本号 ...
- 支付宝又惹怒Windows Phone用户了
支付宝,重新.把WP用户惹怒了. 事情是酱紫的,苹果公布Apple Watch之后.支付宝钱包第一时间在微博上表示:"已经完毕适配Apple Watch版本号的开发工作,中国用户在订购App ...
- 新建maven web工程报错
问题: 检查本地仓库: 检查1.0跟release的文件夹: 试试:http://www.ithao123.cn/content-8028507.html 然后选择maven catalog下的:(这 ...
- HDU1846(巴什博奕)
Brave Game Time Limit: 1000/1000 MS (Java/Others) Memory Limit: 32768/32768 K (Java/Others) Total ...
- DNS通道检测 国内学术界研究情况——研究方法:基于特征或者流量,使用机器学习决策树分类算法居多
http://xuewen.cnki.net/DownloadArticle.aspx?filename=BMKJ201104017&dbtype=CJFD<浅析基于DNS协议的隐蔽通道 ...