Android商城开发系列(十一)—— 首页秒杀布局实现
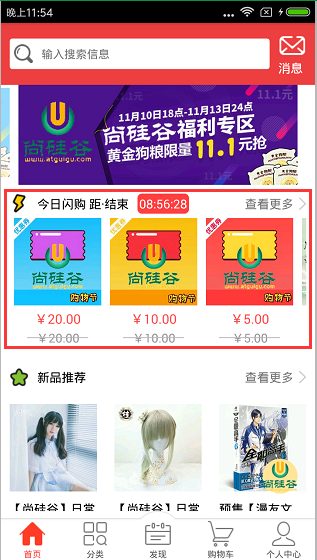
首页秒杀布局如下图:
布局使用的是LinearLayout和RecyclerView去实现,新建seckkill_item.xml,代码如下所示:
 <?xml version="1.0" encoding="utf-8"?>

 <LinearLayout

     xmlns:android="http://schemas.android.com/apk/res/android"

     android:orientation="vertical"

     android:layout_width="380dp"

     android:layout_height="180dp"

     android:background="#fff"

     android:padding="10dp">

     <LinearLayout

         android:layout_width="match_parent"

         android:layout_height="wrap_content">

         <ImageView

             android:layout_width="wrap_content"

             android:layout_height="wrap_content"

             android:src="@mipmap/home_arrow_left_flash"/>

         <TextView

             android:layout_width="wrap_content"

             android:layout_height="wrap_content"

             android:layout_marginLeft="10dp"

             android:text="今日闪购 距·结束"

             android:textColor="#000"/>

         <TextView

             android:id="@+id/tv_time_seckill"

             android:layout_width="wrap_content"

             android:layout_height="wrap_content"

             android:layout_marginLeft="10dp"

             android:background="@drawable/time_shape"

             android:padding="2dp"

             android:text="00:00:00"

             android:textColor="#fff"/>

         <TextView

             android:id="@+id/tv_more_seckill"

             android:layout_width="wrap_content"

             android:layout_height="wrap_content"

             android:background="@mipmap/home_arrow_right"

             android:gravity="end"

             android:text="查看更多"/>

     </LinearLayout>

     <android.support.v7.widget.RecyclerView

         android:id="@+id/rv_seckill"

         android:layout_width="380dp"

         android:layout_height="match_parent"/>

 </LinearLayout>
在drawable目录下设置倒计时的TextView颜色,新建time_shape,代码如下所示:
 <?xml version="1.0" encoding="utf-8"?>

 <shape xmlns:android="http://schemas.android.com/apk/res/android"

     android:shape="rectangle">

     <solid android:color="#ff4040" />

     <corners android:radius="5dp" />

 </shape>
布局弄好了,我们要把数据展示在界面上,在HomeFragmentAdapter类的onCreateViewHolder()方法中去创建秒杀ViewHolder(SeckillViewHolder),在SeckillViewHolder中使用Handler去实现了秒杀倒计时的效果,SeckillViewHolder代码如下所示:
  /**

      * 秒杀

      */

     class SeckillViewHolder extends RecyclerView.ViewHolder{

         private Context mContext;

         private TextView tv_time_seckill;

         private TextView tv_more_seckill;

         private RecyclerView rv_seckill;

         private SeckillRecycleViewAdapter adapter;

         /**

          * 相差多少时间-毫秒

          */

         private long dt = 0;

         //使用Handler实现秒杀倒计时效果

         private Handler handler = new Handler(){

             @Override

             public void handleMessage(Message msg) {

                 super.handleMessage(msg);

                 dt = dt - 1000;

                 //时间格式化

                 SimpleDateFormat dateFormat = new SimpleDateFormat("hh:mm:ss");

                 //获取当前系统时间

                 String time = dateFormat.format(new Date(dt));

                 tv_time_seckill.setText(time);

                 handler.removeMessages(0);

                 //发送消息,不断减时间

                 handler.sendEmptyMessageDelayed(0,1000);

                 if (dt <= 0){

                     //把消息移除

                     handler.removeCallbacksAndMessages(null);

                 }

             }

         };

         public SeckillViewHolder(Context mContext, View itemView) {

             super(itemView);

             this.mContext = mContext;

             //初始化布局控件

             tv_time_seckill = (TextView) itemView.findViewById(R.id.tv_time_seckill);

             tv_more_seckill = (TextView) itemView.findViewById(R.id.tv_more_seckill);

             rv_seckill = (RecyclerView) itemView.findViewById(R.id.rv_seckill);

         }

         public void setData(ResultBeanData.ResultBean.SeckillInfoEntity seckill_info) {

             //得到数据后,就是设置数据(TextView和RecyclerView)的数据

             adapter = new SeckillRecycleViewAdapter(mContext,seckill_info.getList());

             rv_seckill.setAdapter(adapter);

             //设置布局管理器

             rv_seckill.setLayoutManager(new LinearLayoutManager(mContext,LinearLayoutManager.HORIZONTAL,false));

             //设置item的点击事件

             adapter.setOnSeckillRecyclerView(new SeckillRecycleViewAdapter.OnSeckillRecyclerView() {

                 @Override

                 public void onItemClick(int position) {

                     Toast.makeText(mContext,"秒杀"+position,Toast.LENGTH_SHORT).show();

                     startGoodsInfoActivity();

                 }

             });

             //秒杀倒计时-毫秒

             dt = Integer.valueOf(seckill_info.getEnd_time()) - Integer.valueOf(seckill_info.getStart_time());

             //进入后1秒钟就去发送这个消息

             handler.sendEmptyMessageDelayed(0,1000);

         }

     }
得到数据了,就是设置数据(TextView和RecyclerView)的数据,首先新建一个item_seckill.xml,代码如下所示:
 <?xml version="1.0" encoding="utf-8"?>

 <LinearLayout

     xmlns:android="http://schemas.android.com/apk/res/android"

     android:id="@+id/ll_root"

     android:orientation="vertical"

     android:layout_width="match_parent"

     android:layout_height="match_parent"

     android:padding="5dp">

     <ImageView

         android:id="@+id/iv_figure"

         android:layout_width="100dp"

         android:layout_height="100dp"

         android:background="@mipmap/new_img_loading_2"/>

     <TextView

         android:id="@+id/tv_cover_price"

         android:layout_width="100dp"

         android:layout_height="wrap_content"

         android:layout_marginTop="5dp"

         android:gravity="center_horizontal"

         android:text="¥166.66"

         android:textColor="#ff4c4c"

         android:textSize="15dp"/>

     <RelativeLayout

         android:layout_width="100dp"

         android:layout_height="wrap_content"

         android:layout_marginTop="2dp">

         <TextView

             android:id="@+id/tv_origin_price"

             android:layout_width="100dp"

             android:layout_height="wrap_content"

             android:gravity="center_horizontal"

             android:text="¥288.88"

             android:textColor="#9a9a9a"/>

         <View

             android:layout_width="70dp"

             android:layout_height="1dp"

             android:layout_centerInParent="true"

             android:background="#ffbababa"/>

     </RelativeLayout>

 </LinearLayout>
新建一个SeckillRecycleViewAdapter类,代码如下所示:
 package com.nyl.shoppingmall.home.adapter;

 import android.content.Context;

 import android.support.v7.widget.RecyclerView;

 import android.view.View;

 import android.view.ViewGroup;

 import android.widget.ImageView;

 import android.widget.TextView;

 import com.bumptech.glide.Glide;

 import com.nyl.shoppingmall.R;

 import com.nyl.shoppingmall.home.bean.ResultBeanData;

 import com.nyl.shoppingmall.utils.Constants;

 import java.util.List;

 /**

  * 秒杀RecycleView的适配器

  */

 public class SeckillRecycleViewAdapter extends RecyclerView.Adapter<SeckillRecycleViewAdapter.ViewHolder>{

     private final Context mContext;

     private final List<ResultBeanData.ResultBean.SeckillInfoEntity.ListBean> list;

     public SeckillRecycleViewAdapter(Context mContext, List<ResultBeanData.ResultBean.SeckillInfoEntity.ListBean> list) {

         this.mContext = mContext;

         this.list = list;

     }

     /**

      * 创建ViewHolder

      * @param parent

      * @param viewType

      * @return

      */

     @Override

     public ViewHolder onCreateViewHolder(ViewGroup parent, int viewType) {

         View itemView = View.inflate(mContext, R.layout.item_seckill,null);

         return new ViewHolder(itemView);

     }

     /**

      * 绑定数据

      * @param holder

      * @param position

      */

     @Override

     public void onBindViewHolder(ViewHolder holder, int position) {

         //根据位置得到对应的数据

         ResultBeanData.ResultBean.SeckillInfoEntity.ListBean listBean = list.get(position);

         //绑定数据

         //使用Glide获取到图片数据

         Glide.with(mContext).load(Constants.BASE_URL_IMAGE+listBean.getFigure()).into(holder.iv_figure);

         //获取价钱的数据

         holder.tv_cover_price.setText(listBean.getCover_price());

         //获取降价的数据

         holder.tv_origin_price.setText(listBean.getOrigin_price());

     }

     @Override

     public int getItemCount() {

         return list.size();

     }

     class ViewHolder extends RecyclerView.ViewHolder{

         private ImageView iv_figure;

         private TextView tv_cover_price;

         private TextView tv_origin_price;

         public ViewHolder(View itemView) {

             super(itemView);

             iv_figure = (ImageView) itemView.findViewById(R.id.iv_figure);

             tv_cover_price = (TextView) itemView.findViewById(R.id.tv_cover_price);

             tv_origin_price = (TextView) itemView.findViewById(R.id.tv_origin_price);

             itemView.setOnClickListener(new View.OnClickListener() {

                 @Override

                 public void onClick(View view) {

                   //  Toast.makeText(mContext,"秒杀=="+getLayoutPosition(),Toast.LENGTH_SHORT).show();

                     if (onSeckillRecyclerView != null){

                         onSeckillRecyclerView.onItemClick(getLayoutPosition());

                     }

                 }

             });

         }

     }

     /**

      * 监听器

      */

     public interface OnSeckillRecyclerView{

         //当某条被点击的时候回调

         public void onItemClick(int position);

     }

     private OnSeckillRecyclerView onSeckillRecyclerView;

     /**

      * 设置item的监听器

      * @param onSeckillRecyclerView

      */

     public void setOnSeckillRecyclerView(OnSeckillRecyclerView onSeckillRecyclerView){

         this.onSeckillRecyclerView = onSeckillRecyclerView;

     }

 }
关于秒杀布局实现就讲到!
Android商城开发系列(十一)—— 首页秒杀布局实现的更多相关文章
- Android商城开发系列(四)——butterknife的使用
在上一篇博客:Android商城开发系列(三)——使用Fragment+RadioButton实现商城底部导航栏实现商城的底部导航栏时,里面用到了butterknife,今天来讲解一下的butterk ...
- Android商城开发系列(十二)—— 首页推荐布局实现
首页新品推荐的布局效果如下图: 这块布局是使用LinearLayout和GridView去实现,新建recommend_item.xml,代码如下所示: <?xml version=" ...
- Android商城开发系列(九)—— 首页频道布局的实现
在上一篇博客当中,我们讲了关于首页轮询广告的实现,接下来讲解一下首页频道布局的实现,如下图所示: 这个布局用的是gridview去完成的,新建一个channel_item,代码如下所示: <?x ...
- Android商城开发系列(一)——开篇
最近在看尚硅谷的硅谷商城视频,想系统学习一下Android的商城开发流程,打算跟着视频的一步步做出一个商城,然后写博客总结记录一下整个商城的开发过程以及使用到的技术知识点,这个商城的最终效果如下图所示 ...
- Android商城开发系列(五)—— 商城首页回到顶部和搜索框布局实现
今天我们来开发商城的首页[输入搜索框]布局和点击右下角图片回到顶部的效果 搜索功能在App中很常见,尤其是在商城类的项目当中,一般都会提供很强大的搜索功能,App的搜索布局一般都是在App的顶部,如下 ...
- Android商城开发系列(十三)—— 首页热卖商品布局实现
热卖商品布局效果如下图: 这个布局跟我们上节做的推荐是一样的,也是用LinearLayout和GridView去实现的,新建一个hot_item.xml,代码如下所示: <?xml versio ...
- Android商城开发系列(十)—— 首页活动广告布局实现
在上一篇博客当中,我们讲了频道布局的实现,接下来我们讲解一下活动广告布局的实现,效果如下图: 这个是用viewpager去实现的,新建一个act_item.xml,代码如下所示: <?xml v ...
- Android商城开发系列(七)—— 使用RecyclerView展示首页数据
前面我们讲到了使用OkHttp请求网络和FastJson解析数据了,接下来我们就开始把获取到的数据通过数据适配器展示在页面上了.Adapter是用来帮助填充数据的中间桥梁,简单点说就是:将各种数据以合 ...
- Android商城开发系列(六)——使用 OkHttpUtils 请求网络 + 使用 fastjson解析数据
OkHttp是Google推荐使用的一个开源的网络请求框架,Android开发中涉及到网络请求和接口调用现在大部分都是使用OkHttp,网上已经有不少人针对OkHttp进行了封装,这里推荐一下鸿洋大神 ...
随机推荐
- C#回调函数的简单讲解与应用例子
using System; namespace CallBackTest{ class Program //用户层,执行输入等操作 { static void Main(string[] args) ...
- sublime text 3安装及使用
Sublime Text 3中文版是一款跨平台代码编辑器(Code Editor)软件.Sublime Text 3既可以编写代码还可以编辑文本,是程序员必不可少的工具,相比之前的版本Sublime ...
- Ajax的完整兼容各种浏览器版本代码
<script type="text/javascript"> function createAjax(){ var request=false; //window对象 ...
- 发布一个npm包
前言 我这里是写了一个vue轮播图插件,因此我使用了vue的脚手架工具创建一个项目,当然你也可以选择自己搭建脚手架. 本例中我会使用vue脚手架创建一个项目,并发布到npm上面去. 通过脚手架创建项目 ...
- java学习笔记——基于Robot类的屏幕分享
直接上代码,具体看注释: package robot; import java.awt.AWTException; import java.awt.Dimension; import java.awt ...
- 【转】如何解决C盘根目录无法创建或写入文件
源地址:http://blog.csdn.net/xinke453/article/details/7496545
- uva 10817(数位dp)
uva 10817(数位dp) 某校有m个教师和n个求职者,需讲授s个课程(1<=s<=8, 1<=m<=20, 1<=n<=100).已知每人的工资c(10000 ...
- java 定位问题方法 (jdb 和 jstack)
使用java 做开发,大部分的朋友都是利用DIE 来做debug 工作,因为这样可视化效果好. 但是在真实的工作中,很多使用遇到问题,手头或者环境是不允许你利用DIE 来对源码做debug 工作,开发 ...
- 原生 Ajax 封装 和 Axios 二次 封装
AJAX 异步的JavaScript与XML技术( Asynchronous JavaScript and XML ) Ajax 不需要任何浏览器插件,能在不更新整个页面的前提下维护数据,但需要用户允 ...
- MySQL常用配置和性能压力测试:MySQL系列之十五
一.MySQL常用配置 以下所有配置参数以32G内存的服务器为基 1.打开独立的表空间 innodb_file_per_table = 1 2.MySQL服务所允许的同时会话数的上限,默认为151,经 ...