
记一次编译tensorflow-gpu爬过的坑
废话不多说,先说最终成功的版本:系统=>centos7 ,cuda=>10.0 ,cudnn=>7.5 ,nccl=>源码编译, tensorflow=>最新版本源码编译
第一次尝试:cuda=>10.1 cudnn=>7.5 nccl=>2.4.2
1.cuda下载包:*.run,,直接 sh ./*.run 按照提示选择就能安装,一般选择默认路径 /usr/local/cuda方便后续操作
配置环境,在/etc/profile末尾加上
export PATH="/usr/local/cuda/bin:$PATH"

export LD_LIBRARY_PATH="/usr/local//lib64:$LD_LIBRARY_PATH"
2.cudnn 解压后文件夹为cuda,将头文件和库文件分别拷贝到cuda对应的目录下:
sudo cp cuda/include/cudnn.h /usr/local/cuda/include

sudo cp cuda/lib64/libcudnn* /usr/local/cuda/lib64
更改执行权限
sudo chmod a+r /usr/local/cuda/include/cudnn.h

sudo chmod a+r /usr/local/cuda/lib64/libcudnn*
查看nvcc是否成功
nvcc --version

3.安装nccl
目前官网只有*.rpm格式,网上说的deb格式没找到,所以没法试验是否能用,所以使用rpm安装
rpm -ivh nccl*.rpm
但是这一步是解压,会解压到/var/nccl*目录下,发现下面有三个rpm文件,依次rpm安装
4.安装bazel
因为编译tensorflow需要使用google的bazel,看网上教程让下载bazel-0.24.1-dist.zip,解压后编译
./compile.sh
发现报错,需要安装cmake(见后面)
编译报错,忘了什么错了,搜索无果,重新下载bazel-0.24.1-installer-linux-x86_64.sh版本在线安装,直接运行,成功!
5.安装cmake
下载cmake>3.4的版本,解压编译安装
./configure

gmake

make install
配置环境变量
PATH=/usr/local/cmake/bin:$PATH

export PATH
6.编译tensorflow
按照提示选择路径及插件
Please specify the location of python. [Default is /usr/bin/python]:

Do you wish to build TensorFlow with jemalloc as malloc support? [Y/n]: n

Do you wish to build TensorFlow with Google Cloud Platform support? [Y/n]: n

Do you wish to build TensorFlow with Hadoop File System support? [Y/n]: n

Do you wish to build TensorFlow with Amazon S3 File System support? [Y/n]: n

Do you wish to build TensorFlow with Apache Kafka Platform support? [Y/n]: n

Do you wish to build TensorFlow with XLA JIT support? [y/N]: n

Do you wish to build TensorFlow with GDR support? [y/N]: N

Do you wish to build TensorFlow with VERBS support? [y/N]: N

Do you wish to build TensorFlow with OpenCL SYCL support? [y/N]: N

Do you wish to build TensorFlow with CUDA support? [y/N]: Y

Please specify the CUDA SDK version you want to use, e.g. 7.0. [Leave empty to default to CUDA 10.0]:10.1

Please specify the location where CUDA 10.1 toolkit is installed. Refer to README.md for more details. [Default is /usr/local/cuda]:

Please specify the cuDNN version you want to use. [Leave empty to default to cuDNN 7.0]:

Please specify the location where cuDNN  library is installed. Refer to README.md for more details. [Default is /usr/local/cuda-10.1]:

Do you wish to build TensorFlow with TensorRT support? [y/N]: N

Please specify the NCCL version you want to use. [Leave empty to default to NCCL 2]: 2.4.2

Please specify the location where NCCL  library is installed. Refer to README.md for more details. [Default is /usr/local/cuda-10.0]:

Please note that each additional compute capability significantly increases your build time and binary size. [Default is: 6.1]

Do you want to use clang as CUDA compiler? [y/N]: N

Please specify which gcc should be used by nvcc as the host compiler. [Default is /usr/bin/gcc]: /usr/bin/gcc

Do you wish to build TensorFlow with MPI support? [y/N]: N

Please specify optimization flags to use during compilation when bazel option “–config=opt” is specified [Default is -march=native]:

Would you like to interactively configure ./WORKSPACE for Android builds? [y/N]:N
使用编译命令
bazel build --config=opt --config=cuda //tensorflow/tools/pip_package:build_pip_package
报错
Cuda Configuration Error: No library found under: /usr/local/cuda-10.1/lib64/libcublas.so.10.1, /usr/local/cuda-10.1/lib64/stubs/libcublas.so.10.1, /usr/local/cuda-10.1/lib/powerpc64le-linux-gnu/libcublas.so.10.1, /usr/local/cuda-10.1/lib/x86_64-linux-gnu/libcublas.so.10.1, /usr/local/cuda-10.1/lib/x64/libcublas.so.10.1, /usr/local/cuda-10.1/lib/libcublas.so.10.1, /usr/local/cuda-10.1/libcublas.so.10.1
搜索后发现大部分人都认为cuda10.1尚不可用,只能放弃,中间试过加入链接(https://github.com/tensorflow/tensorflow/issues/26289)
sudo ln -s /usr/local/cuda-10.1/targets/x86_64-linux/lib/libcublas.so.10.1.0.105 /usr/lib64/libcublas.so.10.0
执行编译后报新的错误
Cuda Configuration Error: None of the libraries match their SONAME: /home/bernard/opt/cuda_test/cuda/lib64/libcublas.so.10.1
决定卸掉10.1,重装10.0
第二次尝试:cuda=>10.0 cudnn=>7.5 nccl=>2.4.2
1.下载cuda10.0的安装包,其他不变
2.编译tensorflow时报新的错误
fatal error: nccl.h: No such file or directory
找不到nccl.h,就是说上面那种方式安装失败
搜索发现需要安装 libnccl2 libnccl-dev libnccl-static ,但是网上教程都是ubuntu的使用apt get 安装,centos只有yum,尝试执行,报错
No package "libnccl" available
3.使用rpm卸载nccl,重新编译安装nccl
github上clone下nccl项目,编译安装
cd nccl

make -j src.build

make src.build

yum install build-essential devscripts debhelper

make pkg.debian.build
4.重新编译tensorflow
Please specify the location of python. [Default is /usr/bin/python]:

Do you wish to build TensorFlow with jemalloc as malloc support? [Y/n]: n

Do you wish to build TensorFlow with Google Cloud Platform support? [Y/n]: n

Do you wish to build TensorFlow with Hadoop File System support? [Y/n]: n

Do you wish to build TensorFlow with Amazon S3 File System support? [Y/n]: n

Do you wish to build TensorFlow with Apache Kafka Platform support? [Y/n]: n

Do you wish to build TensorFlow with XLA JIT support? [y/N]: n

Do you wish to build TensorFlow with GDR support? [y/N]: N

Do you wish to build TensorFlow with VERBS support? [y/N]: N

Do you wish to build TensorFlow with OpenCL SYCL support? [y/N]: N

Do you wish to build TensorFlow with CUDA support? [y/N]: Y

Please specify the CUDA SDK version you want to use, e.g. 7.0. [Leave empty to default to CUDA 10.0]:

Please specify the location where CUDA 10.1 toolkit is installed. Refer to README.md for more details. [Default is /usr/local/cuda]:

Please specify the cuDNN version you want to use. [Leave empty to default to cuDNN 7.0]:

Please specify the location where cuDNN  library is installed. Refer to README.md for more details. [Default is /usr/local/cuda-10.0]:

Do you wish to build TensorFlow with TensorRT support? [y/N]: N

Please specify the NCCL version you want to use. [Leave empty to default to NCCL 2]:

Please specify the location where NCCL  library is installed. Refer to README.md for more details. [Default is /usr/local/cuda-10.0]:

Please note that each additional compute capability significantly increases your build time and binary size. [Default is: 6.1]

Do you want to use clang as CUDA compiler? [y/N]: N

Please specify which gcc should be used by nvcc as the host compiler. [Default is /usr/bin/gcc]: /usr/bin/gcc

Do you wish to build TensorFlow with MPI support? [y/N]: N

Please specify optimization flags to use during compilation when bazel option “–config=opt” is specified [Default is -march=native]:

Would you like to interactively configure ./WORKSPACE for Android builds? [y/N]:N
标红的做了修改,其他不变,大概等一个小时后编译完成
转换为whl文件
bazel-bin/tensorflow/tools/pip_package/build_pip_package /tmp/tensorflow_pkg
使用pip安装
pip install /tmp/tensorflow_pkg/*.whl
成功截图

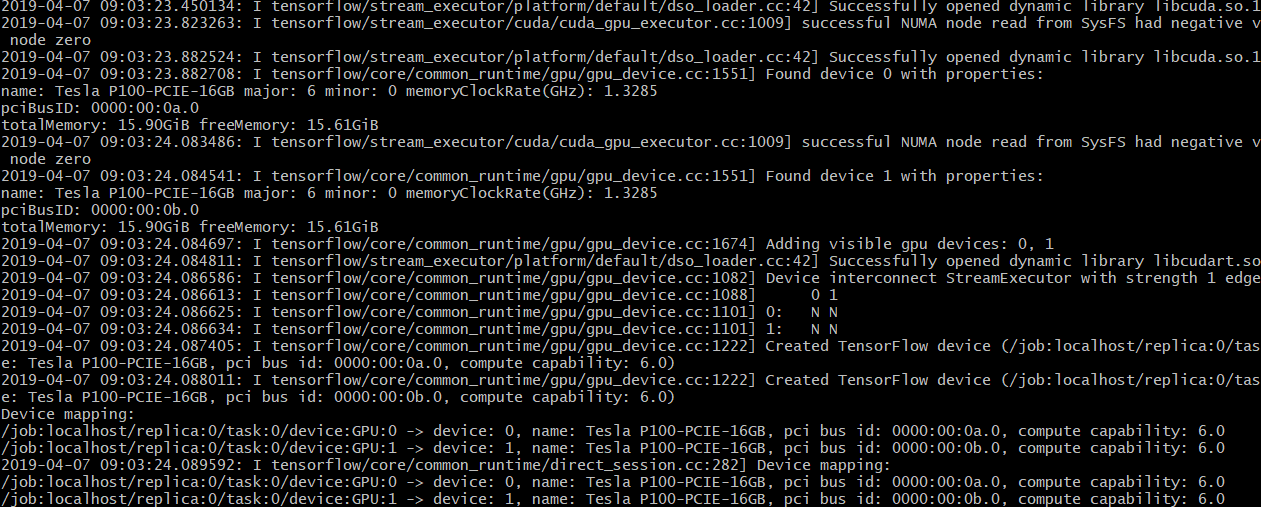
5.测试tensorflow,gpu是否可用
import tensorflow as tf

sess = tf.Session(config=tf.ConfigProto(log_device_placement=True))
报了一个很奇怪的错误

开始以为是没有编译tensorboard依赖,看了源码发现并不需要另外下载,最后查看了一下tensorboard的文件时间,发现是以前安装的没有卸载干净,pip uninstall 卸载后重新安装,一切正常
总结
其实安装完cuda和cudnn后可以直接pip install tensorflow-gpu的,不用自己重新编译(也就不需要安装cmake,bazel),当初以为没有最新版本,所以自己编译,后来发现直接安装的编译环境就是cuda10.0,不过贴合系统的编译总是好用的,哈哈!
下面是直接安装的截图,AVX2没有正常使用,所以还是编译一把好点

记一次编译tensorflow-gpu爬过的坑的更多相关文章
- 【转】Ubuntu 16.04安装配置TensorFlow GPU版本
之前摸爬滚打总是各种坑,今天参考这篇文章终于解决了,甚是鸡冻\(≧▽≦)/,电脑不知道怎么的,安装不了16.04,就安装15.10再升级到16.04 requirements: Ubuntu 16.0 ...
- Win10 x64 + CUDA 10.0 + cuDNN v7.5 + TensorFlow GPU 1.13 安装指南
Win10 x64 + CUDA 10.0 + cuDNN v7.5 + TensorFlow GPU 1.13 安装指南 Update : 2019.03.08 0. 环境说明 硬件:Ryzen R ...
- 记录从裸机到TensorFlow GPU版运行 的配置过程
实验室原来有一台装Ubuntu Server系统的服务器,安装有tensorflow,在使用过程中经常出现断网.死机.自动关机等毛病,忍无可忍,决定重装系统 配置如下:Dell工作站,Xeon-E5 ...
- 编译TensorFlow-serving GPU版本
编译TensorFlow-serving GPU版本 TensorFlow Serving 介绍 编译GPU版本 下载源码 git clone https://github.com/tensorflo ...
- Ubuntu 16.04 + CUDA 8.0 + cuDNN v5.1 + TensorFlow(GPU support)安装配置详解
随着图像识别和深度学习领域的迅猛发展,GPU时代即将来临.由于GPU处理深度学习算法的高效性,使得配置一台搭载有GPU的服务器变得尤为必要. 本文主要介绍在Ubuntu 16.04环境下如何配置Ten ...
- 备注: ubt 16.04 安装 gtx 1060 --- 成功运行 tensorflow - gpu
---------------------------------------------------------------------------------------------------- ...
- 编译TensorFlow源码
编译TensorFlow源码 参考: https://www.tensorflow.org/install/install_sources https://github.com/tensorflo ...
- Python_记一次网站数据定向爬取实现
记一次网站数据定向爬取实现 by:授客 QQ:1033553122 测试环境: Python版本:Python 3.4 Win7 请勿用于商业及非法用途,仅供学习研究用,否则后果自负 数据爬取场景 如 ...
- 通过Anaconda在Ubuntu16.04上安装 TensorFlow(GPU版本)
一. 安装环境 Ubuntu16.04.3 LST GPU: GeForce GTX1070 Python: 3.5 CUDA Toolkit 8.0 GA1 (Sept 2016) cuDNN v6 ...
随机推荐
- POJ 2856 Y2K Accounting Bug【简单暴力】
链接: http://poj.org/problem?id=2586 http://acm.hust.edu.cn/vjudge/contest/view.action?cid=26733#probl ...
- 微信小程序报“app.json”错误解决办法
1.亲测 “app.json未找到入口 app.json 文件,或者文件读取失败,请检查后重新编译.” 是由于新创建的界面xxx.json所在的文件夹为0KB造成的,你可以试着在xxx.json文件内 ...
- 在普通网页中如何调用html5+的plus对象
<script> //用法: HTML5+的plus对象,必须由click事件触发后,才能在普通网页中使用.所以在没有click的情况下,调用本文件可以解决问题! //在代码中使用: pl ...
- JVM类加载器
系统中的类加载器 1.BootStrap ClassLoader a.启动ClassLoader b.加载rt.jar 2.Extension ClassLoader a.扩展ClassLoader ...
- vim中设置tab的长度的方法
linux下使用vim编程是比較常见的事情,但vim默认的tab是8个空格.但一般的编辑器是4个空格,所以希望改动下.详细方法例如以下:1. 创建文件名称为 .vimrc 的系统文件首先切换到用户根文 ...
- Redis高级进阶(一)
一.redis中的事务 在关系型数据库中事务是必不可少的一个核心功能,生活中也是处处可见,比如我们去银行转账,首先需要将A账户的钱划走,然后存到B账户上,这两个步骤必须在同一事务中,要么都执行,要么都 ...
- P4240 毒瘤之神的考验
题目 P4240 毒瘤之神的考验 神仙题\(emmm\) 前置 首先有一个很神奇的性质: \(\varphi(ij)=\dfrac{\varphi(i)\varphi(j)gcd(i,j)}{\var ...
- 剑指offer——和为s的两个数字VS和为s的连续正数序列
两种方法都类似于快排的变形. #include <iostream> #include <string> using namespace std; bool FindNumbe ...
- 《python基础教程(第二版)》学习笔记 函数(第6章)
<python基础教程(第二版)>学习笔记 函数(第6章) 创建函数:def function_name(params): block return values 记录函数:def f ...
- Oracle可能会遇到问题和解决方法
1.plsql developer查询一列用中文,出现乱码 添加环境变量NLS_LANG = SIMPLIFIED CHINESE_CHINA.ZHS16GBK->软件重启 2.ORA-1251 ...