Linux之sersync数据实时同步
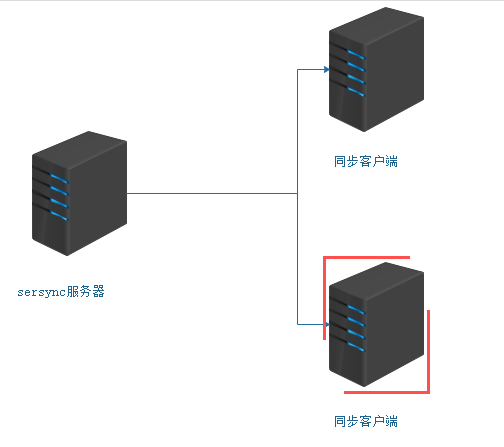
sersync其实是利用inotify和rsync两种软件技术来实现数据实时同步功能的,inotify是用于监听sersync所在服务器上的文件变化,结合rsync软件来进行数据同步,将数据实时同步给客户端服务器。
工作过程:在同步主服务器上开启sersync,负责监听文件系统的变化,然后调用rsync命令把更新的文件同步到目标服务器上,主服务器上安装sersync软件,目标服务器上安装rsync服务
1、客户端配置
[root@localhost2 ~]# cat /etc/rsyncd.conf

##created by cai at --

uid=rsync

gid=rsync

use chroot = no

max connections =

timeout =

pid file = /var/run/rsyncd.pid

lock file = /var/run/rsync.lock

log file = /var/log/rsyncd.log

[data]

path = /data/

ignore errors

read only = false

list = false

hosts allow = 192.168.181.128:/

hosts deny = 0.0.0.0/

auth users = rsync_body

secrets file = /etc/rsync.password
[root@localhost2 ~]# ls -ld /data/
drwxrwxrwx. 3 rsync rsync 4096 Feb 24 16:58 /data/
[root@localhost2 ~]# cat /etc/rsync.password
rsync_body:admin
[root@localhost2 ~]# ls -ld /etc/rsync.password
-rw-------. 1 root root 17 Feb 24 16:26 /etc/rsync.password #600权限
[root@localhost2 ~]# netstat -lntup| grep "rsync"
tcp 0 0 0.0.0.0:873 0.0.0.0:* LISTEN 1497/rsync
tcp 0 0 :::873 :::* LISTEN 1497/rsync
2、主服务器配置
[root@localhost1 ~]# cat /etc/rsync.password

admin

[root@localhost1 ~]# ls -ld /etc/rsync.password

-rw-------  root root  Feb  : /etc/rsync.password
3、安装sersync服务
采用inotify来对文件进行监控,当监控到文件有文件发生改变的时候,就会调用rsync实现触发式实时同步!
安装sersync(注意sersync是工作在rsync的源服务器上,也就是客户端上)
[root@salt-client01 ~]# cd /usr/local/src/

[root@salt-client01 src]# tar -zxvf sersync2..4_64bit_binary_stable_final.tar.gz  -C /usr/local/

GNU-Linux-x86/

GNU-Linux-x86/sersync2

GNU-Linux-x86/confxml.xml

[root@salt-client01 src]# cd /usr/local/

[root@salt-client01 local]# mv GNU-Linux-x86 sersync

[root@salt-client01 local]# cd sersync/

[root@salt-client01 sersync]# mkdir conf bin log

[root@salt-client01sersync]# mv confxml.xml conf

[root@salt-client01sersync]# mv sersync2 bin/sersync
修改配置文件
  ***********************************30行开始******************************

   <commonParams params="-artuz"/>  #-artuz为rsync同步时的参数

    <authstart="true" users="rsync的虚拟用户名(rsync_backup)" passwordfile="rsync的密码文件"/>

   <userDefinedPort start="true"port=""/><!-- port= -->

   <timeout start="false" time=""/><!--timeout= -->

    <sshstart="false"/>

       ************************************第36行***********************************

       <failLogpath="自己定义的log文件夹(/usr/local/sersync/log)rsync_fail_log.sh"

       timeToExecute=""/><!--defaultevery 60mins execute once-->

       *******************************************************************************

       *注:若有多个目录备份可以穿件多个配置文件在启动时的-o参数中添加即可

[root@salt-client01 conf]# diff confxml.xml confxml.xml.bak

,25c24,

<     <localpath watch="/data/">                          #data就是本地需要同步的文件夹到服务器端的目录

<         <remote ip="192.168.91.166" name="data"/>       #data (server的模块名)是rsync 服务端的文件夹,也就是推送到服务器端的目标文件夹,可以配置多个,

---

>     <localpath watch="/opt/tongbu">

>         <remote ip="127.0.0.1" name="tongbu1"/>

31c31

<         <auth start="true" users="rsync_body" passwordfile="/etc/rsync.password"/>   #true 才能生效,rsync_body同步时候虚拟账号,后面是密码文件

---

>         <auth start="false" users="root" passwordfile="/etc/rsync.pas"/>

33c33

<         <timeout start="true" time=""/><!-- timeout= -->                    #true 才能生效

---

>         <timeout start="false" time=""/><!-- timeout= -->

36c36

<     <failLog path="/usr/local/sersync/log/rsync_fail_log.sh" timeToExecute=""/><!--default every 60mins execute once-->  #检测rsync进程判断,没有自动启

---

>     <failLog path="/tmp/rsync_fail_log.sh" timeToExecute=""/><!--default evePry 60mins execute once-->
启动sersync
[root@salt-client01 src]# echo 'export PATH=$PATH:/usr/local/sersync/bin'>>/etc/profile #声明环境变量

[root@salt-client01 src]# source /etc/profile

[root@salt-client01 src]# sersync2 -r -d -o /usr/local/sersync/conf/confxml.xml  #启动

set the system param

execute:echo  > /proc/sys/fs/inotify/max_user_watches

execute:echo  > /proc/sys/fs/inotify/max_queued_events

parse the command param

option: -r     rsync all the local files to the remote servers before the sersync work

option: -d     run as a daemon

option: -o     config xml name:  /usr/local/sersync/conf/confxml.xml

daemon thread num:

parse xml config file

host ip : localhost    host port:

daemon start,sersync run behind the console

use rsync password-file :

user is    rsync_body

passwordfile is     /etc/rsync.password

config xml parse success

please set /etc/rsyncd.conf max connections= Manually

sersync working thread   = (primary thread) + (fail retry thread) + (daemon sub threads)

Max threads numbers is:  = (Thread pool nums) + (Sub threads)

please according your cpu ,use -n param to adjust the cpu rate

------------------------------------------

rsync the directory recursivly to the remote servers once

working please wait...

execute command: cd /data && rsync -artuz -R --delete ./  --timeout= rsync_body@192.168.91.166::data --password-file=/etc/rsync.password >/dev/null >&

run the sersync:

watch path is: /data  #此时可以看出sersync已经启动成功了

#检测脚本

[root@salt-client01 log]# pwd

/usr/local/sersync/log

[root@salt-client01 log]# vim rsync_fail_log.sh

[root@salt-client01 log]# chmod +x rsync_fail_log.sh

[root@salt-client01 ~]# cat /usr/local/sersync/log/rsync_fail_log.sh

#!/bin/bash

#Purpose: Check sersync whether it is alive

#Author: cai meng zhi

SERSYNC="/usr/local/sersync/bin/sersync2"

CONF_FILE="/usr/local/sersync/conf/confxml.xml"

STATUS=$(ps aux |grep 'sersync2'|grep -v 'grep'|wc -l)

if [ $STATUS -eq  ];

then

        $SERSYNC -d -r -o $CONF_FILE &

else

        exit ;

fi

脚本写好以后,添加到计划任务中去

*/ * * * * /bin/bash /usr/local/sersync/log/rsync_fail_log.sh  > /dev/null >&

测试同步:

客户端新增文件

[root@salt-client01 data]# cp /etc/passwd 192.168.91.156.passwd

[root@salt-client01 data]# ll

total

-rw-r--r--  root root  Nov  : 192.168.91.156.passwd

-rw-r--r--  root root     Nov  :

服务端检测

[root@salt-master data]# cd /data/

[root@salt-master data]# ll

total

-rw-r--r--  root root  Nov  : 192.168.91.156.passwd  #说明已经同步过来了

-rw-r--r--  root root     Nov  :

drwxr-xr-x  root root  Nov  : data

客户端测试删除

[root@salt-client01 data]# rm rf 192.168.91.156.passwd

rm: cannot remove `rf': No such file or directory

rm: remove regular file `192.168.91.156.passwd'? y

[root@salt-client01 data]# ll

total

-rw-r--r--  root root  Nov  :

[root@salt-client01 data]#

服务器端:

[root@salt-master data]# ll

total

-rw-r--r--  root root     Nov  :    #说明已经删除掉了

drwxr-xr-x  root root  Nov  : data
4、常见错误汇总
错误一:

@ERROR: auth failed on module xxxxx

rsync: connection unexpectedly closed( bytes read so far)

rsync error: error in rsync protocoldata stream (code ) at io.c()

说明:这是因为密码设置错了,无法登入成功,检查一下rsync.pwd,看客服是否匹配。还有服务器端没启动rsync 服务也会出现这种情况。

错误二:

password file must not beother-accessible

continuing without password file

Password:

说明:这是因为rsyncd.pwdrsyncd.sec的权限不对,应该设置为600。如:chmod600 rsyncd.pwd

错误三:

@ERROR: chroot failed

rsync: connection unexpectedly closed( bytes read so far)

rsync error: error in rsync protocoldata stream (code ) at io.c()

说明:这是因为你在 rsync.conf中设置的 path 路径不存在,要新建目录才能开启同步

错误四:

rsync: failed to connect to218.107.243.: No route to host ()

rsync error: error in socket IO (code10) at clientserver.c() [receiver=2.6.]

说明:防火墙问题导致,这个最好先彻底关闭防火墙,排错的基本法就是这样,无论是S还是C,还有ignore errors选项问题也会导致

错误五:

@ERROR: access denied to www fromunknown (192.168.1.123)

rsync: connection unexpectedly closed( bytes received so far) [receiver]

rsync error: error in rsync protocoldata stream (code ) at io.c()

说明:此问题很明显,是配置选项hostallow的问题,初学者喜欢一个允许段做成一个配置,然后模块又是同一个,致使导致

错误六:

rsync error: received SIGINT,SIGTERM, or SIGHUP (code ) at rsync.c() [generator=2.6.]

rsync error: received SIGUSR1 (code19) at main.c() [receiver=2.6.]

说明:导致此问题多半是服务端服务没有被正常启动,到服务器上去查查服务是否有启动,然后查看下 /var/run/rsync.pid 文件是否存在,最干脆的方法是杀死已经启动了服务,然后再次启动服务或者让脚本加入系统启动服务级别然后shutdown -r now服务器

错误七:

rsync: read error: Connection resetby peer ()

rsync error: error in rsync protocoldata stream (code ) at io.c() [sender=2.6.]

说明:原数据目录里没有数据存在
Linux之sersync数据实时同步的更多相关文章
- (转)Linux系统sersync数据实时同步
Linux系统sersync数据实时同步 原文:http://blog.csdn.net/mingongge/article/details/52985259 前面介绍了以守护进程的方式传输或同步数据 ...
- Rsync+Sersync数据实时同步(双向)
Rsync+Sersync数据实时同步(双向) 服务介绍 一.为什么要用rsync+sersync架构? 1.sersync是基于inotify开发的,类似于inotify-tools的工具 2.se ...
- Linux下Rsync+sersync实现数据实时同步
inotify 的同步备份机制有着缺点,于是看了sersync同步,弥补了rsync的缺点.以下转自:http://www.osyunwei.com/archives/7447.html 前言: 一. ...
- Rsync+sersync实现数据实时同步
前言: 一.为什么要用Rsync+sersync架构? 1.sersync是基于Inotify开发的,类似于Inotify-tools的工具 2.sersync可以记录下被监听目录中发生变化的(包括增 ...
- Linux下Rsync+Inotify-tools实现数据实时同步
Linux下Rsync+Inotify-tools实现数据实时同步 注意:下面的三个案例都是rsync 每次都是全量的同步(这就坑爹了),而且 file列表是循环形式触发rsync ,等于有10个文件 ...
- CentOS7下Rsync+sersync实现数据实时同步
近期公司要上线新项目,后台框架选型我选择当前较为流行的laravel,运行环境使用lnmp. 之前我这边项目tp32+apache,开发工具使用phpstorm. 新建/编辑文件通过phpstorm配 ...
- 项目实战:rsync+sersync实现数据实时同步
一.组网介绍 本次实验使用两台主机: qll251 角色:Rsync server + Sersync server qll252 角色: Rsync client 本次实验采用CentOS7.7系统 ...
- sersync实现数据实时同步
1.1 第一个里程碑:安装sersync软件 1.1.1 将软件上传到服务器当中并解压 1.上传软件到服务器上 rz -E 为了便于管理上传位置统一设置为 /server/tools 中 2.解压软件 ...
- sersync基于rsync+inotify实现数据实时同步
一.环境描述 需求:服务器A与服务器B为主备服务模式,需要保持文件一致性,现采用sersync基于rsync+inotify实现数据实时同步 主服务器A:192.168.1.23 从服务器B:192. ...
随机推荐
- explain之三:MYSQL EXPLAIN语句的extended 选项学习体会,分析诊断工具之二
MySQL 的explain命令有一个extended选项,我想可以很多人都没有注意,因为它对命令的输出结果没有任何改变,只是增加了一个warning.这个 warning中显示了MySQL对SQL的 ...
- DCloud:temple
ylbtech-DCloud: 1.返回顶部 2.返回顶部 3.返回顶部 4.返回顶部 5.返回顶部 6.返回顶部 7.返回顶部 8.返回顶部 9.返回顶部 1 ...
- DevExpress TreeList GridView 样式设置
1.GridView 样式设置 this.gridViewUser.PaintStyleName = "Flat"; 2.TreeList 样式设置 this.treeListDe ...
- GPT 安装win10
BIOS EFI ACHI 安装win10 GPT 分区表 支持FAT,FAT32 gpt 理论支持非常多的分区,容量也支持非常大. MBR分区表 支持FAT,FAT32, NTFS 但是分区数量有限 ...
- catkin 工作空间
catkin 工作空间:组织和管理功能包的文件夹,以 catkin 工具编译 建立工作空间 sch01ar@ubuntu:~$ mkdir -p ~/catkin_ws/src sch01ar@ubu ...
- java.sql.SQLException: Error while processing statement: FAILED: Execution Error, return code 2 from org.apache.hadoop.hive.ql.exec.mr.MapRedTask
执行Hive查询: Console是这样报错的 java.sql.SQLException: Error from org.apache.hadoop.hive.ql.exec.mr.MapRedTa ...
- strophe与openfire模拟的XMPP简单hello程序
/* * 参考<XMPP高级编程+使用JavaScript和jQuery>第三章例子. * 我修改了作者的XMPP服务器到本地的openfire.JavaScript跨域请求,使用Ngin ...
- Hbuilder实用技巧(转)
Hbuilder实用技巧 原创 2016年05月19日 10:25:42 标签: hbuilder 操作 16551 1. Q:怎么实现代码追踪? A:在编辑代码时经常会出现需要跳转到引用文件或者变量 ...
- CentOS7下安装pip和pip3
1.首先检查linux有没有安装python-pip包,直接执行 yum install python-pip 2.没有python-pip包就执行命令 yum -y install epel-rel ...
- centos系统查看本机IP地址
centos系统查看本机IP地址,输入 ifconfig -a查看 centos查询上网公网IP输入 curl ifconfig.me 命令即可查看 centos查询上网网关IP,tracepath ...