
EF core (code first) 通过自动迁移实现多租户数据分离 :按Schema分离数据
前言
本文是多租户系列文章的附加操作文章,如果想查看系列中的其他文章请查看下列文章
主线文章
Asp.net core下利用EF core实现从数据实现多租户(1)
Asp.net core下利用EF core实现从数据实现多租户(2) : 按表分离
Asp.net core下利用EF core实现从数据实现多租户(3): 按Schema分离 附加:EF Migration 操作 (强关联文章,建议先阅读)
附加文章
EF core (code first) 通过自定义 Migration History 实现多租户使用同一数据库时更新数据库结构
EF core (code first) 通过自动迁移实现多租户数据分离 :按Schema分离数据 (本文)
实施
项目介绍
本项目是用系列文章的主分支代码进行修改的。目前项目主要支持使用MySql,通过分库,分表实现多租户。
本文需要实现分Schema,MySql不能实现,所以引入了MSSqlServer。
项目依赖
1. .net core app 3.1。在机器上安装好.net core SDK, 版本3.1
2. Mysql. 使用 Pomelo.EntityFrameworkCore.MySql 包, 版本3.1.1
3. MS Sql Server. 使用 Microsoft.EntityFrameworkCore.SqlServer 包,版本3.1.1
4. EF core,Microsoft.EntityFrameworkCore, 版本3.1.1。这里必须要用3.1的,因为ef core3.0是面向.net standard 2.1.
5. EF core design, Microsoft.EntityFrameworkCore.Design, 版本 3.1.1
6. dotnet-ef tool, 版本 3.1.1
关键要点
其实如果读过我之前的EF core 自动迁移的文章,就会发现其实有几个关键点
1. 通过ef core CLI 生成Migration文件,并且在所有版本的Migration文件中添加一个带参数的构造函数
2. 自定义 MigrationByTenantAssembly 类,通过重写 CreateMigration 实现对修改后的Migration文件进行实例化
3. 自定义 __EFMigrationsHistory 的命名和存放位置
实施步骤
1. 运行dotnet-ef命令,生成Migration files
命令:
1 dotnet-ef migrations add init_schema
执行后,会在项目中的Migrations文件夹下生成多个*.cs文件,其实他们也是可执行C#对象
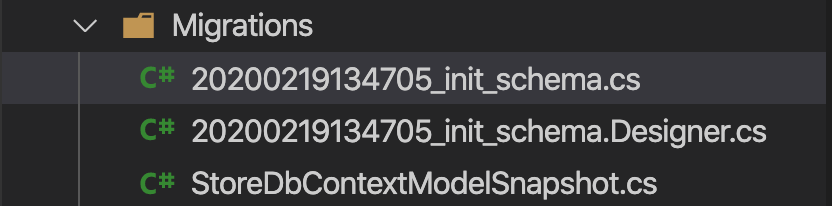
这3个文件中,主要起作用的是*_init_schema.cs这个文件
打开之后我们需要对他进行修改(所有修改内容已进行高亮)
这里修改的主要是:
1.1 新增构造函数,并且在里面添加一个 schema 参数。
1.2 在Up方法中,对调用 EnsureSchema 进行修改,把 schema 变量加在name参数(第16行)
1.3 在Up方法中,对调用 CreateTable 的 schema 参数中添加自定义变量schema (第20行)
1.4 在Down方法中,对调用 DropTable 的 schema 参数中添加自定义变量schema(第39行)
 using Microsoft.EntityFrameworkCore.Migrations;

 namespace kiwiho.Course.MultipleTenancy.EFcore.Api.Migrations

 {

     public partial class init_schema : Migration

     {

         private readonly string schema;

         public init_schema(string schema)

         {

             this.schema = schema;

         }

         protected override void Up(MigrationBuilder migrationBuilder)

         {

             migrationBuilder.EnsureSchema(

                 name: "dbo." + schema);

             migrationBuilder.CreateTable(

                 name: "Products",

                 schema: "dbo." + schema,

                 columns: table => new

                 {

                     Id = table.Column<int>(nullable: false)

                         .Annotation("SqlServer:Identity", "1, 1"),

                     Name = table.Column<string>(maxLength: , nullable: false),

                     Category = table.Column<string>(maxLength: , nullable: true),

                     Price = table.Column<double>(nullable: true)

                 },

                 constraints: table =>

                 {

                     table.PrimaryKey("PK_Products", x => x.Id);

                 });

         }

         protected override void Down(MigrationBuilder migrationBuilder)

         {

             migrationBuilder.DropTable(

                 name: "Products",

                 schema: "dbo." + schema);

         }

     }

 }
2. 添加 MigrationByTenantAssembly 类,同时需要实现 MigrationsAssembly 类和重写 CreateMigration。
 using System;

 using System.Reflection;

 using Microsoft.EntityFrameworkCore;

 using Microsoft.EntityFrameworkCore.Diagnostics;

 using Microsoft.EntityFrameworkCore.Infrastructure;

 using Microsoft.EntityFrameworkCore.Migrations;

 using Microsoft.EntityFrameworkCore.Migrations.Internal;

 namespace kiwiho.Course.MultipleTenancy.EFcore.Api.Infrastructure

 {

     public class MigrationByTenantAssembly : MigrationsAssembly

     {

         private readonly DbContext context;

         public MigrationByTenantAssembly(ICurrentDbContext currentContext,

               IDbContextOptions options, IMigrationsIdGenerator idGenerator,

               IDiagnosticsLogger<DbLoggerCategory.Migrations> logger)

           : base(currentContext, options, idGenerator, logger)

         {

             context = currentContext.Context;

         }

         public override Migration CreateMigration(TypeInfo migrationClass,

               string activeProvider)

         {

             if (activeProvider == null)

                 throw new ArgumentNullException($"{nameof(activeProvider)} argument is null");

             var hasCtorWithSchema = migrationClass

                     .GetConstructor(new[] { typeof(string) }) != null;

             if (hasCtorWithSchema && context is ITenantDbContext tenantDbContext)

             {

                 var instance = (Migration)Activator.CreateInstance(migrationClass.AsType(), tenantDbContext?.TenantInfo?.Name);

                 instance.ActiveProvider = activeProvider;

                 return instance;

             }

             return base.CreateMigration(migrationClass, activeProvider);

         }

     }

 }
MigrationByTenantAssembly
这个类中没有什么特别的,关键在于29~37行。首先需要判断目标 Migration 对象的是否有一个构造函数的参数有且仅有一个string 类型
判断DbContext是否有实现ITenantDbContext接口。
利用 Activator 创建 Migration 实例(把tenant Name传进构造函数)
3. 修改在 MultipleTenancyExtension 类的AddDatabase方法。(所有修改部分已经高亮) (这是非常关键的步骤)
关键点:
必须为 UseMySql 和 UseSqlServer 添加第二个参数,同时定义 __EFMigrationsHistory 的命名和存放位置。注意SqlServer中的schema命名必须跟dbContext中的schema的名字完全相同。由于MySql没有schema的概念,所以MySql中不能加入对应的schema参数。
在最后一行高亮的代码,通过 ReplaceService 替换 dbContext 中默认的 MigrationAssembly 实现类
 internal static IServiceCollection AddDatabase<TDbContext>(this IServiceCollection services,

         ConnectionResolverOption option)

     where TDbContext : DbContext, ITenantDbContext

 {

     services.AddSingleton(option);

     services.AddScoped<TenantInfo>();

     services.AddScoped<ISqlConnectionResolver, TenantSqlConnectionResolver>();

     services.AddDbContext<TDbContext>((serviceProvider, options) =>

     {

         var dbContextManager = serviceProvider.GetService<IDbContextManager>();

         var resolver = serviceProvider.GetRequiredService<ISqlConnectionResolver>();

         var tenant = serviceProvider.GetService<TenantInfo>();

         DbContextOptionsBuilder dbOptionBuilder = null;

         switch (option.DBType)

         {

             case DatabaseIntegration.MySql:

                 dbOptionBuilder = options.UseMySql(resolver.GetConnection(),

                     optionBuilder =>

                     {

                         if (option.Type == ConnectionResolverType.ByTabel)

                         {

                             optionBuilder.MigrationsHistoryTable($"{tenant.Name}__EFMigrationsHistory");

                         }

                     });

                 break;

             case DatabaseIntegration.SqlServer:

                 dbOptionBuilder = options.UseSqlServer(resolver.GetConnection(),

                     optionBuilder =>

                     {

                         if (option.Type == ConnectionResolverType.ByTabel)

                         {

                             optionBuilder.MigrationsHistoryTable($"{tenant.Name}__EFMigrationsHistory");

                         }

                         if (option.Type == ConnectionResolverType.BySchema)

                         {

                             optionBuilder.MigrationsHistoryTable("__EFMigrationsHistory", $"dbo.{tenant.Name}");

                         }

                     });

                 break;

             default:

                 throw new System.NotSupportedException("db type not supported");

         }

         if (option.Type == ConnectionResolverType.ByTabel || option.Type == ConnectionResolverType.BySchema)

         {

             dbOptionBuilder.ReplaceService<IModelCacheKeyFactory, TenantModelCacheKeyFactory<TDbContext>>();

             dbOptionBuilder.ReplaceService<Microsoft.EntityFrameworkCore.Migrations.IMigrationsAssembly, MigrationByTenantAssembly>();

         }

     });

     return services;

 }
4. 修改StoreDbContext 中的 OnModelCreating 方法
 protected override void OnModelCreating(ModelBuilder modelBuilder)

 {

     // seperate by table

     // modelBuilder.Entity<Product>().ToTable(this.tenantInfo.Name + "_Products");

     // seperate by Schema

     modelBuilder.Entity<Product>().ToTable(nameof(this.Products), "dbo."+this.tenantInfo.Name);

 }
5. 修改ProductController的构造函数
 public ProductController(StoreDbContext storeDbContext)

 {

     this.storeDbContext = storeDbContext;

     // this.storeDbContext.Database.EnsureCreated();

     this.storeDbContext.Database.Migrate();

 }
查看效果
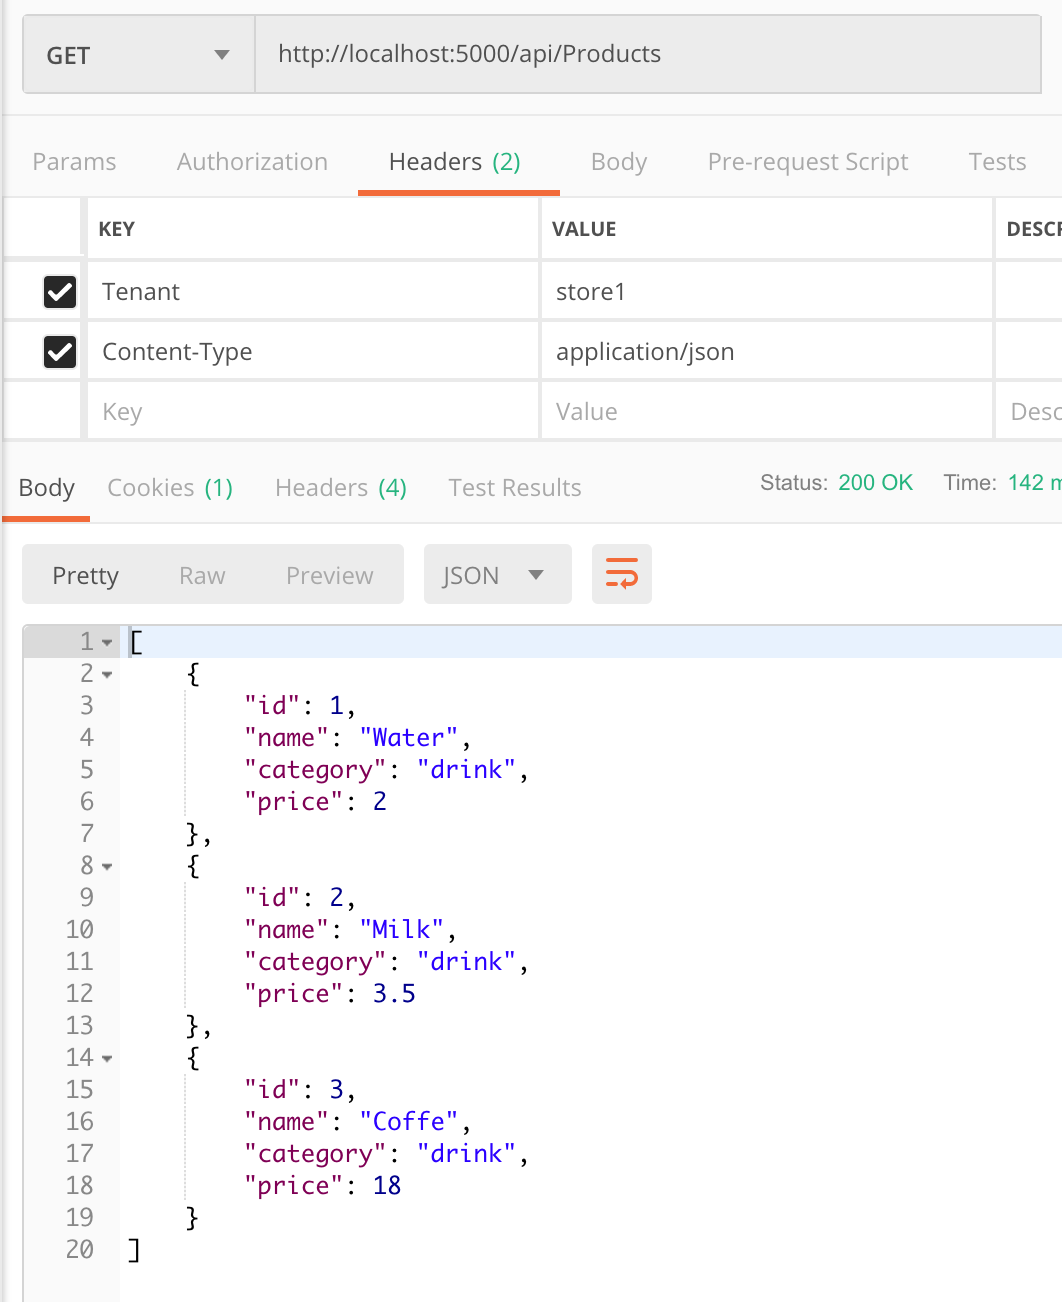
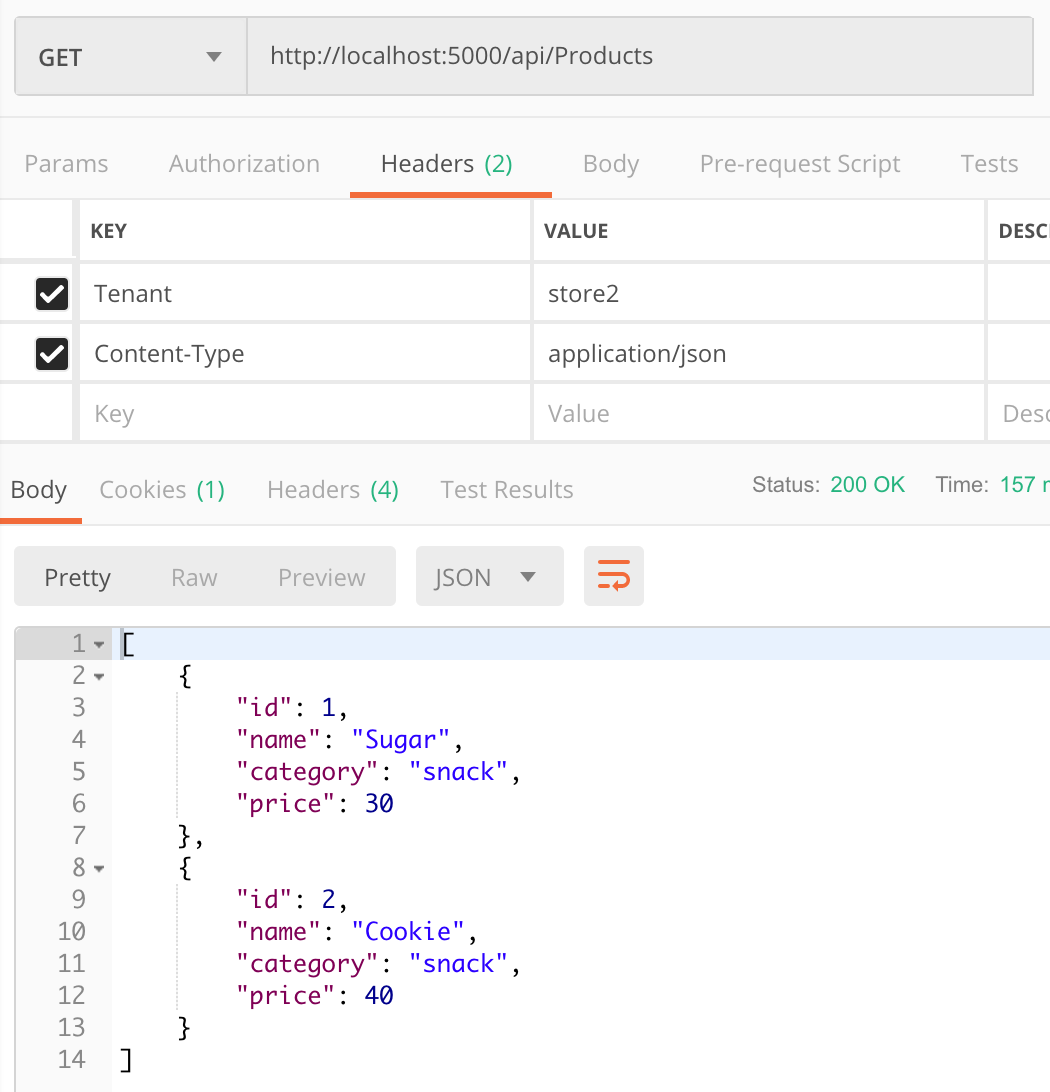
1. 我们还是跟本系列的其他文章一样,分别在store1和store2中添加数据。
其中怎么添加的就不再重复贴图了,简单来说就是调用controller的post方法在数据库中添加数据
查询 store1 的数据
查询 store2 的数据
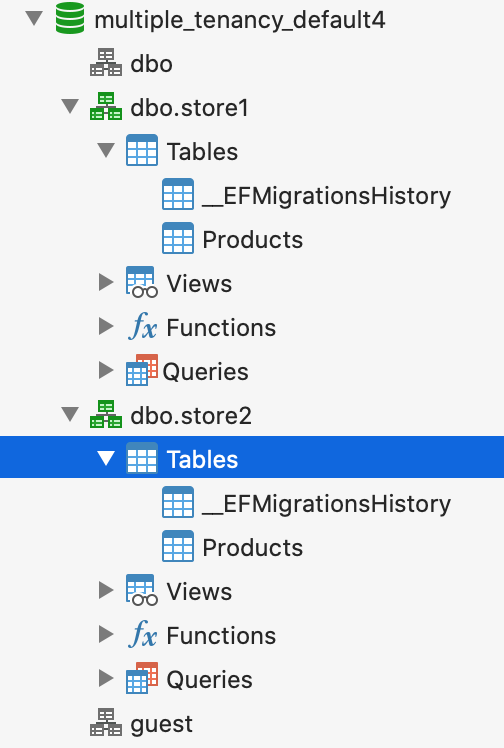
2. 查看数据库的机构和数据。
这是数据库的结构, 可以看到有4个schema,其中 dbo.store1 和 dbo.store2 是存放我们自己的数据的。
dbo.store1 和 dbo.store2 里面分别有一个__EFMigrationsHistory 表,这个就是EF core自动迁移的版本记录。
store1 中的数据
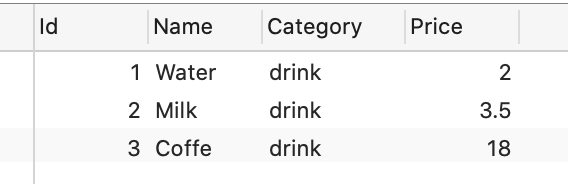
store2 中的数据

添加迁移版本
读到这里的朋友可能还会有个疑问,觉得我这个自动迁移只做了一个版本,似乎不足以证明这个方案是可以行的。
1. 那我们就简单在Product里面再加一个 Discount 的字段。注意了,新加的字段我建议使用可空类型
 using System.ComponentModel.DataAnnotations;

 namespace kiwiho.Course.MultipleTenancy.EFcore.Api.DAL

 {

     public class Product

     {

         [Key]

         public int Id { get; set; }

         [StringLength(), Required]

         public string Name { get; set; }

         [StringLength()]

         public string Category { get; set; }

         public double? Price { get; set; }

         public double? Discount { get; set; }

     }

 }
2. 通过dotnet-ef CLI运行命令,添加Migration版本
dotnet-ef migrations add disount_support
可以看到在Migrations 目录下多了2个*.cs文件
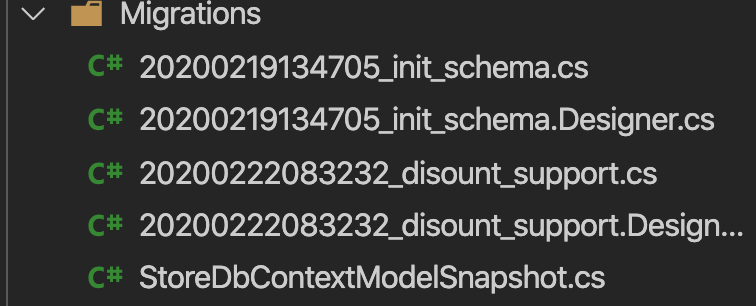
我们根据本文前面的步骤依样画瓢,分别添加带参数的构造函数和修改 Up 和 Down 方法
 using Microsoft.EntityFrameworkCore.Migrations;

 namespace kiwiho.Course.MultipleTenancy.EFcore.Api.Migrations

 {

     public partial class disount_support : Migration

     {

         private readonly string schema;

         public disount_support(string schema)

         {

             this.schema = schema;

         }

         protected override void Up(MigrationBuilder migrationBuilder)

         {

             migrationBuilder.AddColumn<double>(

                 name: "Discount",

                 schema: "dbo." + schema,

                 table: "Products",

                 nullable: true);

         }

         protected override void Down(MigrationBuilder migrationBuilder)

         {

             migrationBuilder.DropColumn(

                 name: "Discount",

                 schema: "dbo." + schema,

                 table: "Products");

         }

     }

 }
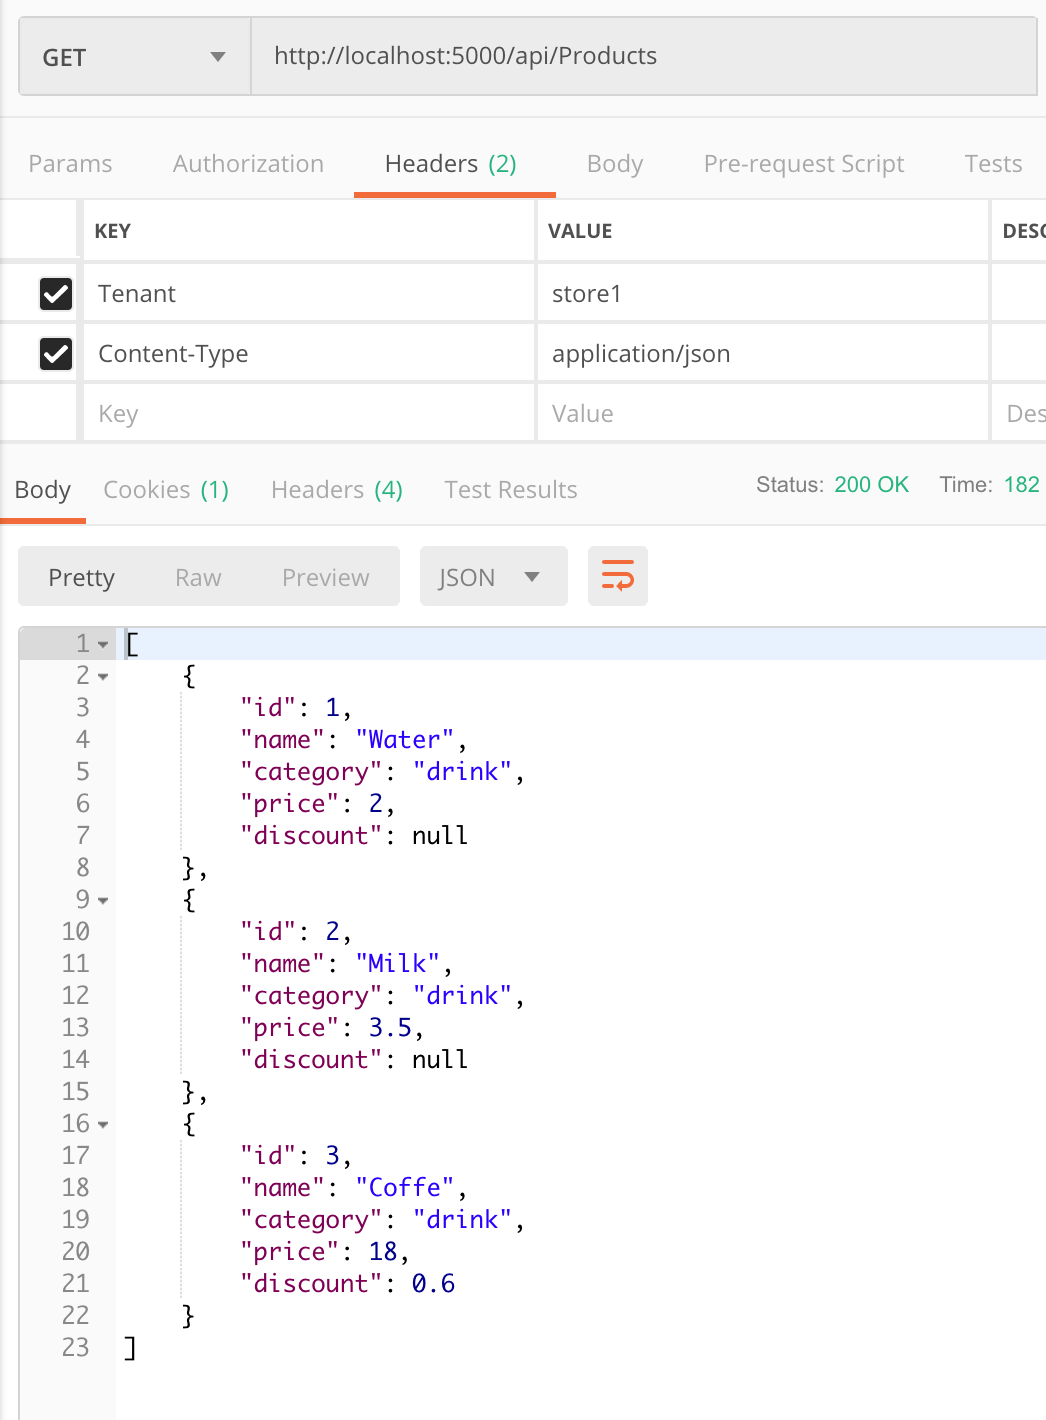
我们启动项目,调用查询接口。然后在修改 store1 中的Coffee的Discount (这里注意的是,需要先调用接口,再到数据库中修改数据)
下面就是 store1 的查询结果,可以看到Coffee的Discount是0.6 ,就会说咖啡是打六折的
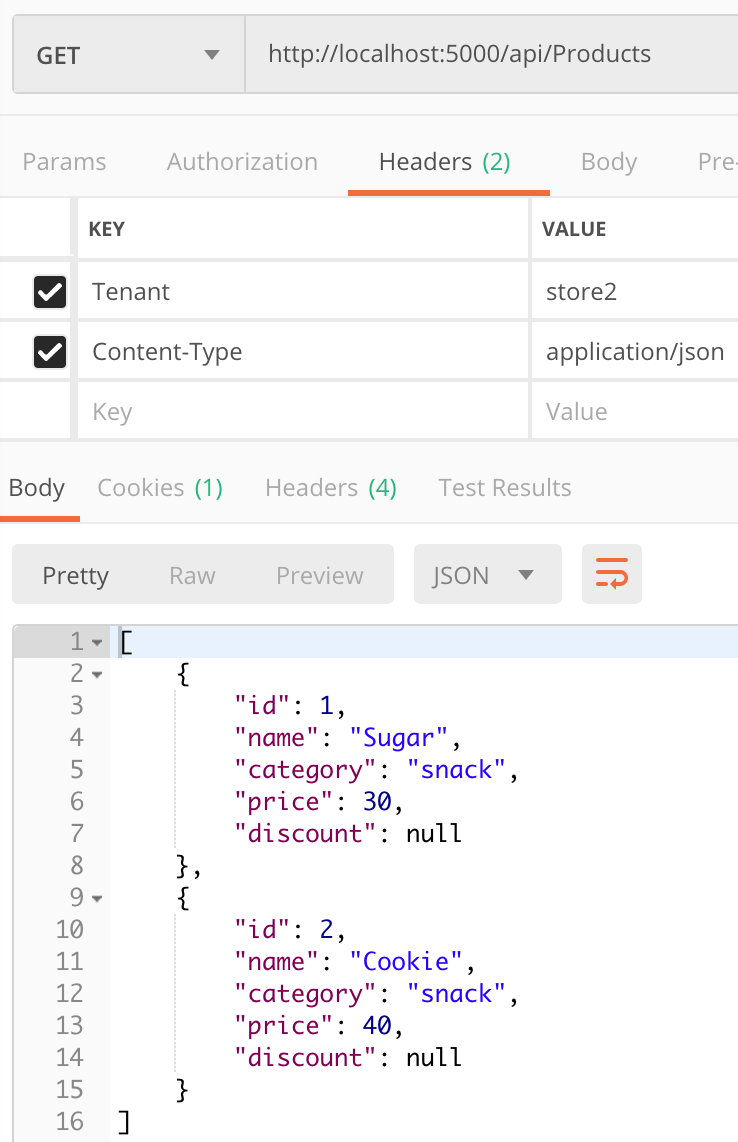
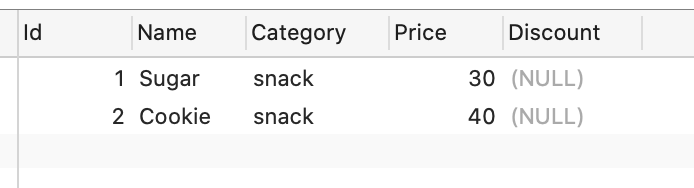
下面我们对比 store1 和 store2 的表结构和数据。发现 store2 中并没有Discount的字段。并且 __EFMigrationsHistory 中只有一条记录
原因是我们还没执行接口,导致EF core的自动迁移并没有生效
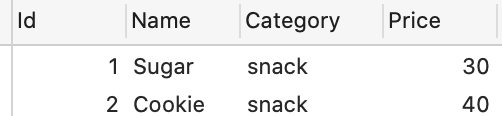

我们重新调用 store2 的接口,然后在看数据库表结构。发现 store2 中的Discount已经加上去了
总结
EF core的自动迁移的具体实操步骤就是上文所述了。
我再次重申,EF core的自动迁移并不是必备的,而是选配。 我非常不建议在运行多年并且有多租户结构的项目中使用 EF core 的 code first 模式。
不过假设你的项目已经分离得很不错,或是一个全新项目,我建议大家尝试。
关于代码
本系列的所有文章代码都会上传到github中,目前master是主分支,由于自动迁移部分只是附加内容,所以本文所有代码,请查看分支 EF_code_first_part3
github 地址:
https://github.com/woailibain/EFCore.MultipleTenancyDemo/tree/EF_code_first_part3
EF core (code first) 通过自动迁移实现多租户数据分离 :按Schema分离数据的更多相关文章
- EF core (code first) 通过自定义 Migration History 实现多租户使用同一数据库时更新数据库结构
前言 写这篇文章的原因,其实由于我写EF core 实现多租户的时候,遇到的问题. 具体文章的链接: Asp.net core下利用EF core实现从数据实现多租户(1) Asp.net core下 ...
- EF core Code First 简单的使用方法
好吧,我又回来了,其实一直都想写一篇关于EF core 的文章去记录自己在开发时候遇到的问题. 为什么要使用EF框架呢,因为原始的ADO.NET需要编写大量的数据访问代码,所以使用EF会更方便.但是今 ...
- ef core code first from exist db
目标 为现有数据库生成新的连接,允许只选择部分表 可以处理一些很怪的需求,比如EF升级EF Core(这个可能有其他解),EF.EF Core同时连接一个数据库 我遇到的问题是: 原项目是.net f ...
- EF Core中怎么实现自动更新实体的属性值到数据库
我们在开发系统的时候,经常会遇到这种需求数据库表中的行被更新时需要自动更新某些列. 数据库 比如下面的Person表有一列UpdateTime,这列数据要求在行被更新后自动更新为系统的当前时间. Pe ...
- .Net Core+Angular6 学习 第四部分(EF Core(Code First))
目的: 打算通过EF core 练习从database receive data 显示到UI. 1. 创建一个新的project Model.定义一个 base interface entity以及实 ...
- ef core code frist
https://docs.microsoft.com/zh-cn/ef/core/get-started/aspnetcore/new-db?view=aspnetcore-2.1 1.先创建对应的实 ...
- Asp.Net Core WebApi (Swagger+EF Core/Code First)
Swagger简介: Swagger™的目标是为REST APIs 定义一个标准的,与语言无关的接口,使人和计算机在看不到源码或者看不到文档或者不能通过网络流量检测的情况下能发现和理解各种服务的功能. ...
- EF Core ThenInclude 2.0自动完成提示有误,坑了一下
只要代码正确,可以编译运行的... https://github.com/dotnet/roslyn/issues/8237
- Asp.net core下利用EF core实现从数据实现多租户(1)
前言 随着互联网的的高速发展,大多数的公司由于一开始使用的传统的硬件/软件架构,导致在业务不断发展的同时,系统也逐渐地逼近传统结构的极限. 于是,系统也急需进行结构上的升级换代. 在服务端,系统的I/ ...
随机推荐
- 奇葩的Failed to configure a DataSource: 'url' attribute is not specified and no embedded datasource could be configured.
启动springboot的时候莫名其妙出现这个错误,我properties里面也没配置数据源啥的,但就是出现这个错误 解决方法: 在启动类上加@SpringBootApplication(exclud ...
- 【C&数据结构】---关于链表结构的前序插入和后序插入
刷LeetCode题目,需要用到链表的知识,忽然发现自己对于链表的插入已经忘得差不多了,以前总觉得理解了记住了,但是发现真的好记性不如烂笔头,每一次得学习没有总结输出,基本等于没有学习.连复盘得机会都 ...
- 曹工说Spring Boot源码(11)-- context:component-scan,你真的会用吗(这次来说说它的奇技淫巧)
写在前面的话 相关背景及资源: 曹工说Spring Boot源码(1)-- Bean Definition到底是什么,附spring思维导图分享 曹工说Spring Boot源码(2)-- Bean ...
- Webpack实战(五):轻松读懂Webpack如何分离样式文件
在上一篇文章中我给大家分享了预处理器(loader),里面讲到了style-loader 和css-loader,有关样式引入的问题,但是上面的样式文件只是引入到style标签里面,并不是我想要的样式 ...
- Nginx的踩坑实录
1.昨天在为一个新项目配置地址转发,搞了很久都没生效,日志也没有问题,但就是没到转发的目标机器上. nginx.conf 配置如下: location /prism{ proxy_pass http: ...
- request session
例子 url = 'http://beanhome.com/user/login' header = { "Content-Type": 'application/json', & ...
- python super()函数:调用父类的构造方法
python子类会继承父类所有的类属性和类方法.严格来说,类的构造方法其实就是实例方法,因此,父类的构造方法,子类同样会继承. 我们知道,python是一门支持多继承的面向对象编程语言,如果子类继承的 ...
- 18年第一弹射 和网络有关; 艾曲塞嗯诶系列篇 two
35: 华为AR G3系列路由器可以通过FTP和TFTP更新系统文件,AR G3系列路由器可以作为FTP Client , FTP Server ,TFTP Client 36: 两台路由器间通过串口 ...
- winform dataGridView 点击列标题排序
winform手动绑定数据后,点击列标题不能实现自动排序,苦苦寻找方法,发现下面的是可行的. //建立DataTable将当前dataGridView中的数据读进DataTable中 public D ...
- JVM: JVM 内存划分
概述 如果在大学里学过或者在工作中使用过 C 或者 C++ 的读者一定会发现这两门语言的内存管理机制与 Java 的不同.在使用 C 或者 C++ 编程时,程序员需要手动的去管理和维护内存,就是说需要 ...