python用直方图规定化实现图像风格转换
以下内容需要直方图均衡化、规定化知识
均衡化:https://blog.csdn.net/macunshi/article/details/79815870
规定化:https://blog.csdn.net/macunshi/article/details/79819263
直方图均衡化应用:
图像直方图均衡化能拉伸灰度图,让像素值均匀分布在0,255之间,使图像看起来不会太亮或太暗,常用于图像增强;
直方图规定化应用:
举个例子,当我们需要对多张图像进行拼接时,我们希望这些图片的亮度、饱和度保持一致,事实上就是让它们的直方图分布一致,这时就需要直方图规定化。
直方图规定化与均衡化的思想一致,事实上就是找到各个灰度级别的映射关系。具体实现的过程中一般会选一个参考图像记为A,找到A的直方图与目标图像的直方图的映射关系,从而找到目标图像的像素以A为“参考”时的映射关系。
具体实现可参考文中链接(看完茅塞顿开)
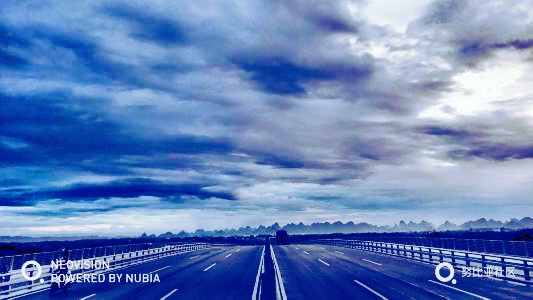
基于python利用直方图规定化统一图像风格
参考图像

原始图像(第一行)/处理后的图像(第二行)
 |
 |
 |
 |
 |
 |
 |
 |
源码:
import os

import cv2

import numpy as np

def get_map(Hist):

    # 计算概率分布Pr

    sum_Hist = sum(Hist)

    Pr = Hist/sum_Hist

    # 计算累计概率Sk

    Sk = []

    temp_sum = 0

    for n in Pr:

        temp_sum = temp_sum + n

        Sk.append(temp_sum)

    Sk = np.array(Sk)

    # 计算映射关系img_map

    img_map = []

    for m in range(256):

        temp_map = int(255*Sk[m] + 0.5)

        img_map.append(temp_map)

    img_map = np.array(img_map)

    return img_map

def get_off_map(map_): # 计算反向映射,寻找最小期望

    map_2 = list(map_)

    off_map = []

    temp_pre = 0 # 如果循环开始就找不到映射时,默认映射为0

    for n in range(256):

        try:

            temp1 = map_2.index(n)

            temp_pre = temp1

        except BaseException:

            temp1 = temp_pre # 找不到映射关系时,近似取向前最近的有效映射值

        off_map.append(temp1)

    off_map = np.array(off_map)

    return off_map

def get_infer_map(infer_img):

    infer_Hist_b = cv2.calcHist([infer_img], [0], None, [256], [0,255])

    infer_Hist_g = cv2.calcHist([infer_img], [1], None, [256], [0,255])

    infer_Hist_r = cv2.calcHist([infer_img], [2], None, [256], [0,255])

    infer_b_map = get_map(infer_Hist_b)

    infer_g_map = get_map(infer_Hist_g)

    infer_r_map = get_map(infer_Hist_r)

    infer_b_off_map = get_off_map(infer_b_map)

    infer_g_off_map = get_off_map(infer_g_map)

    infer_r_off_map = get_off_map(infer_r_map)

    return [infer_b_off_map, infer_g_off_map, infer_r_off_map]

def get_finalmap(org_map, infer_off_map): # 计算原始图像到最终输出图像的映射关系

    org_map = list(org_map)

    infer_off_map = list(infer_off_map)

    final_map = []

    for n in range(256):

        temp1 = org_map[n]

        temp2 = infer_off_map[temp1]

        final_map.append(temp2)

    final_map = np.array(final_map)

    return final_map

def get_newimg(img_org, org2infer_maps):

    w, h, _ = img_org.shape

    b, g ,r =cv2.split(img_org)

    for i in range(w):

        for j in range(h):

            temp1 = b[i,j]

            b[i,j] = org2infer_maps[0][temp1]

    for i in range(w):

        for j in range(h):

            temp1 = g[i,j]

            g[i,j] = org2infer_maps[1][temp1]

    for i in range(w):

        for j in range(h):

            temp1 = r[i,j]

            r[i,j] = org2infer_maps[2][temp1]

    newimg = cv2.merge([b,g,r])

    return newimg

def get_new_img(img_org, infer_map):

    org_Hist_b = cv2.calcHist([img_org], [0], None, [256], [0,255])

    org_Hist_g = cv2.calcHist([img_org], [1], None, [256], [0,255])

    org_Hist_r = cv2.calcHist([img_org], [2], None, [256], [0,255])

    org_b_map = get_map(org_Hist_b)

    org_g_map = get_map(org_Hist_g)

    org_r_map = get_map(org_Hist_r)

    org2infer_map_b = get_finalmap(org_b_map, infer_map[0])

    org2infer_map_g = get_finalmap(org_g_map, infer_map[1])

    org2infer_map_r = get_finalmap(org_r_map, infer_map[2])

    return get_newimg(img_org, [org2infer_map_b, org2infer_map_g, org2infer_map_r])

if __name__ == "__main__":

    dstroot = './imgs'

    infer_img_path = './abc.png'

    infer_img = cv2.imread(infer_img_path)

    outroot = './out1'

    infer_map = get_infer_map(infer_img) # 计算参考映射关系

    dstlist = os.listdir(dstroot)

    for n in dstlist:

        img_path = os.path.join(dstroot, n)

        print(img_path)

        img_org = cv2.imread(img_path)

        new_img = get_new_img(img_org, infer_map) # 根据映射关系获得新的图像

        new_path = os.path.join(outroot, n)

        cv2.imwrite(new_path, new_img)
python用直方图规定化实现图像风格转换的更多相关文章
- Ubuntu16.04+GTX1080配置TensorFlow并实现图像风格转换
1. TensorFlow TensorFlow是谷歌基于DistBelief进行研发的第二代人工智能学习系统,表达了高层次的机器学习计算,大幅简化了第一代系统,并且具备更好的灵活性和可延展性. Te ...
- Python之数据规整化:清理、转换、合并、重塑
Python之数据规整化:清理.转换.合并.重塑 1. 合并数据集 pandas.merge可根据一个或者多个不同DataFrame中的行连接起来. pandas.concat可以沿着一条轴将多个对象 ...
- A Neural Algorithm of Artistic Style 图像风格转换 - keras简化版实现
前言 深度学习是最近比较热的词语.说到深度学习的应用,第一个想到的就是Prisma App的图像风格转换.既然感兴趣就直接开始干,读了论文,一知半解:看了别人的源码,才算大概了解的具体的实现,也惊叹别 ...
- 「新手必看」Python+Opencv实现摄像头调用RGB图像并转换成HSV模型
在ROS机器人的应用开发中,调用摄像头进行机器视觉处理是比较常见的方法,现在把利用opencv和python语言实现摄像头调用并转换成HSV模型的方法分享出来,希望能对学习ROS机器人的新手们一点帮助 ...
- 【神经网络与深度学习】neural-style、chainer-fast-neuralstyle图像风格转换使用
neural-style 官方地址:这个是使用torch7实现的;torch7安装比较麻烦.我这里使用的是大神使用TensorFlow实现的https://github.com/anishathaly ...
- fast neural style transfer图像风格迁移基于tensorflow实现
引自:深度学习实践:使用Tensorflow实现快速风格迁移 一.风格迁移简介 风格迁移(Style Transfer)是深度学习众多应用中非常有趣的一种,如图,我们可以使用这种方法把一张图片的风格“ ...
- 神经风格转换Neural Style Transfer a review
原文:http://mp.weixin.qq.com/s/t_jknoYuyAM9fu6CI8OdNw 作者:Yongcheng Jing 等 机器之心编译 风格迁移是近来人工智能领域内的一个热门研究 ...
- [python-opencv]图像二值化【图像阈值】
图像二值化[图像阈值]简介: 如果灰度图像的像素值大于阈值,则为其分配一个值(可以是白色255),否则为其分配另一个值(可以是黑色0) 图像二值化就是将灰度图像上的像素值设置为0或255,也就是将整个 ...
- Win8Metro(C#)数字图像处理--2.34直方图规定化
原文:Win8Metro(C#)数字图像处理--2.34直方图规定化 [函数名称] WriteableBitmap HistogramSpecificateProcess(WriteableBi ...
随机推荐
- js函数中的this关键字
关于这个this关键字,也是很多项目中常常被用到的,那么,有人也许会问,干嘛要用this呢,在函数被调用时,直接指明是什么对象在调用不就行了?还整那么个模模糊糊的概念出来干嘛?不过嘛,存在即真理,既然 ...
- 【javascript】京东商品浏览放大镜效果
1.onclick点击小图可以切换图片 2.onmouseover显示黄色div与放大图片的div 3.onmouseout,2的内容消失 4.onmousemove黄色div跟随鼠标移到,但是不能超 ...
- Java面向对象中this关键字详解 意义+实例讲解【hot】
this关键字 >>>便于理解简单的定义 this关键字可以简单的理解为,谁调用this所在的方法,this就是谁. 类的构造函数与getter.setter方法常用到this关键字 ...
- SpringBoot 之 拦截配置 与SpringCloud
个人博客网:https://wushaopei.github.io/ (你想要这里多有) 一.SpringBoot 与 SpringMVC 的区别? SpringMVC是基于Spring的MV ...
- Java实现 第十一届 蓝桥杯 (本科组)省内模拟赛
有错误的或者有问题的欢迎评论 计算机存储中有多少字节 合法括号序列 无向连通图最少包含多少条边 字母重新排列 凯撒密码加密 反倍数 正整数的摆动序列 螺旋矩阵 小明植树 户户通电 计算机存储中有多少字 ...
- Java实现 LeetCode 321 拼接最大数
321. 拼接最大数 给定长度分别为 m 和 n 的两个数组,其元素由 0-9 构成,表示两个自然数各位上的数字.现在从这两个数组中选出 k (k <= m + n) 个数字拼接成一个新的数,要 ...
- java实现第七届蓝桥杯圆圈舞
圆圈舞 题目描述 春天温暖的阳光照耀着大地,正是草原上的小动物们最快乐的时候.小动物们在草原上开了一个舞会,欢度这美好的时光. 舞会上最重要的一个环节就是跳圆舞曲,n只小动物手拉手围成一大圈,随着音乐 ...
- SpringSceurity(3)---图形验证码功能实现
SpringSceurity(3)---图形验证码功能实现 有关springSceurity之前有写过两篇文章: 1.SpringSecurity(1)---认证+授权代码实现 2.SpringSec ...
- Cookie默认不设置path时,哪些请求会携带cookie数据
默认不设置path的时候,只会在请求和servlet同路径的情况下才会携带cookie中存储的数据,包含同级目录和下级目录 例如: 在http://localhost:8080/day01/test/ ...
- mysql导入超大sql文件
mysql导入超大sql文件 在网上找了个2017年行政区划的sql文件,需要导入到本地mysql库中,同事使用navicat导入的时候直接卡死了,该SQL文件差不多112MB大小.通过百度.goog ...