CentOS 7.0 lamp
CentOS 7.0默认使用的是firewall作为防火墙,这里改为iptables防火墙。
1、关闭firewall:
systemctl stop firewalld.service #停止firewall
systemctl disable firewalld.service #禁止firewall开机启动
2、安装iptables防火墙
yum install iptables-services #安装
vi /etc/sysconfig/iptables #编辑防火墙配置文件
# Firewall configuration written by system-config-firewall
# Manual customization of this file is not recommended.
*filter
:INPUT ACCEPT [0:0]
:FORWARD ACCEPT [0:0]
:OUTPUT ACCEPT [0:0]
-A INPUT -m state --state ESTABLISHED,RELATED -j ACCEPT
-A INPUT -p icmp -j ACCEPT
-A INPUT -i lo -j ACCEPT
-A INPUT -m state --state NEW -m tcp -p tcp --dport 22 -j ACCEPT
-A INPUT -m state --state NEW -m tcp -p tcp --dport 80 -j ACCEPT
-A INPUT -m state --state NEW -m tcp -p tcp --dport 3306 -j ACCEPT
-A INPUT -j REJECT --reject-with icmp-host-prohibited
-A FORWARD -j REJECT --reject-with icmp-host-prohibited
COMMIT
:wq! #保存退出
systemctl restart iptables.service #最后重启防火墙使配置生效
systemctl enable iptables.service #设置防火墙开机启动
二、关闭SELINUX
vi /etc/selinux/config
#SELINUX=enforcing #注释掉
#SELINUXTYPE=targeted #注释掉
SELINUX=disabled #增加
:wq! #保存退出
setenforce 0 #使配置立即生效
安装篇:
一、安装Apache
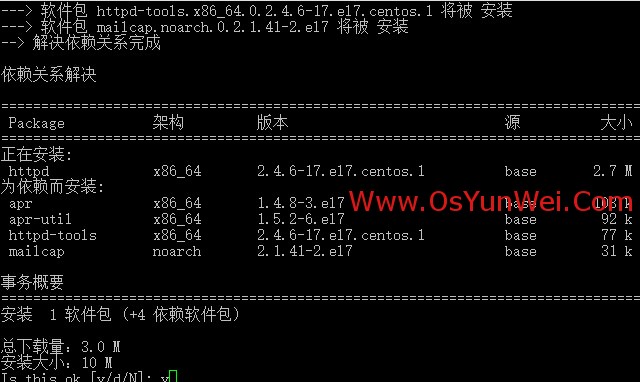
系统运维 www.osyunwei.com 温馨提醒:qihang01原创内容©版权所有,转载请注明出处及原文链
yum install httpd #根据提示,输入Y安装即可成功安装
systemctl start httpd.service #启动apache
systemctl stop httpd.service #停止apache
systemctl restart httpd.service #重启apache
systemctl enable httpd.service #设置apache开机启动
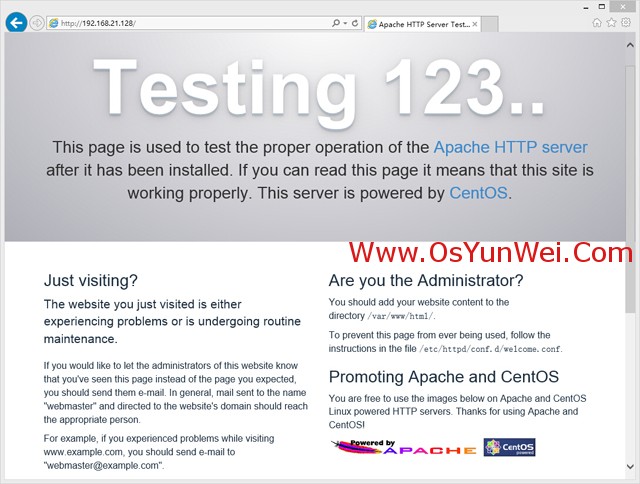
在客户端浏览器中打开服务器IP地址,会出现下面的界面,说明apache安装成功
系统运维 www.osyunwei.com 温馨提醒:qihang01原创内容©版权所有,转载请注明出处及原文链
二、安装MariaDB
CentOS 7.0中,已经使用MariaDB替代了MySQL数据库
1、安装MariaDB
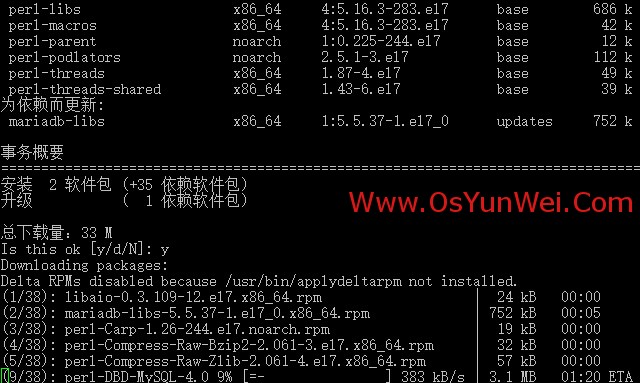
yum install mariadb mariadb-server #询问是否要安装,输入Y即可自动安装,直到安装完成
systemctl start mariadb.service #启动MariaDB
systemctl stop mariadb.service #停止MariaDB
systemctl restart mariadb.service #重启MariaDB
systemctl enable mariadb.service #设置开机启动
cp /usr/share/mysql/my-huge.cnf /etc/my.cnf #拷贝配置文件(注意:如果/etc目录下面默认有一个my.cnf,直接覆盖即可)
2、为root账户设置密码
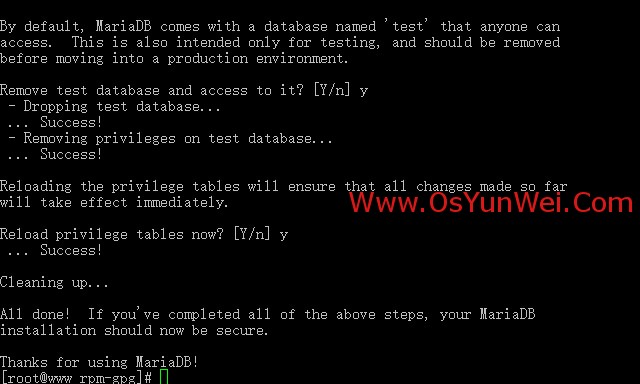
mysql_secure_installation
回车,根据提示输入Y
输入2次密码,回车
根据提示一路输入Y
最后出现:Thanks for using MySQL!
MariaDB密码设置完成,重新启动 MariaDB:
systemctl restart mariadb.service #重启MariaDB
三、安装PHP
1、安装PHP
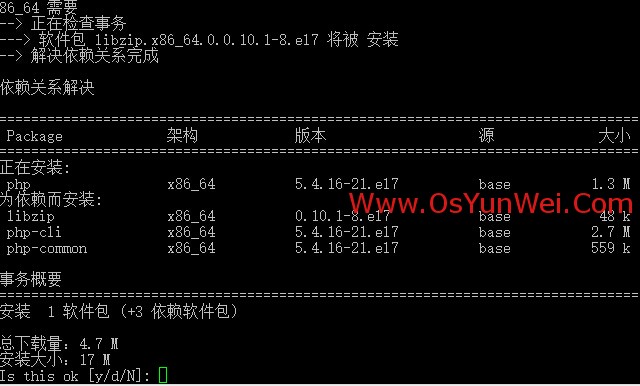
yum install php #根据提示输入Y直到安装完成
2、安装PHP组件,使PHP支持 MariaDB
yum install php-mysql php-gd libjpeg* php-ldap php-odbc php-pear php-xml php-xmlrpc php-mbstring php-bcmath php-mhash
#这里选择以上安装包进行安装,根据提示输入Y回车
systemctl restart mariadb.service #重启MariaDB
systemctl restart httpd.service #重启apache
配置篇
一、Apache配置
vi /etc/httpd/conf/httpd.conf #编辑文件
ServerSignature On #添加,在错误页中显示Apache的版本,Off为不显示
Options Indexes FollowSymLinks #修改为:Options Includes ExecCGI FollowSymLinks(允许服务器执行CGI及SSI,禁止列出目录)
#AddHandler cgi-script .cgi #修改为:AddHandler cgi-script .cgi .pl (允许扩展名为.pl的CGI脚本运行)
AllowOverride None #修改为:AllowOverride All (允许.htaccess)
AddDefaultCharset UTF-8 #修改为:AddDefaultCharset GB2312 (添加GB2312为默认编码)
#Options Indexes FollowSymLinks #修改为 Options FollowSymLinks(不在浏览器上显示树状目录结构)
DirectoryIndex index.html #修改为:DirectoryIndex index.html index.htm Default.html Default.htm index.php(设置默认首页文件,增加index.php)
MaxKeepAliveRequests 500 #添加MaxKeepAliveRequests 500 (增加同时连接数)
:wq! #保存退出
systemctl restart httpd.service #重启apache
rm -f /etc/httpd/conf.d/welcome.conf /var/www/error/noindex.html #删除默认测试页
二、php配置
vi /etc/php.ini #编辑
date.timezone = PRC #把前面的分号去掉,改为date.timezone = PRC
disable_functions = passthru,exec,system,chroot,scandir,chgrp,chown,shell_exec,proc_open,proc_get_status,ini_alter,ini_alter,ini_restore,dl,openlog,syslog,readlink,symlink,popepassthru,stream_socket_server,escapeshellcmd,dll,popen,disk_free_space,checkdnsrr,checkdnsrr,getservbyname,getservbyport,disk_total_space,posix_ctermid,posix_get_last_error,posix_getcwd, posix_getegid,posix_geteuid,posix_getgid, posix_getgrgid,posix_getgrnam,posix_getgroups,posix_getlogin,posix_getpgid,posix_getpgrp,posix_getpid, posix_getppid,posix_getpwnam,posix_getpwuid, posix_getrlimit, posix_getsid,posix_getuid,posix_isatty, posix_kill,posix_mkfifo,posix_setegid,posix_seteuid,posix_setgid, posix_setpgid,posix_setsid,posix_setuid,posix_strerror,posix_times,posix_ttyname,posix_uname
#列出PHP可以禁用的函数,如果某些程序需要用到这个函数,可以删除,取消禁用。
expose_php = Off #禁止显示php版本的信息
short_open_tag = ON #支持php短标签
open_basedir = .:/tmp/ #设置表示允许访问当前目录(即PHP脚本文件所在之目录)和/tmp/目录,可以防止php木马跨站,如果改了之后安装程序有问题(例如:织梦内容管理系统),可以注销此行,或者直接写上程序的目录/data/www.osyunwei.com/:/tmp/
:wq! #保存退出
systemctl restart mariadb.service #重启MariaDB
systemctl restart httpd.service #重启apache
测试篇
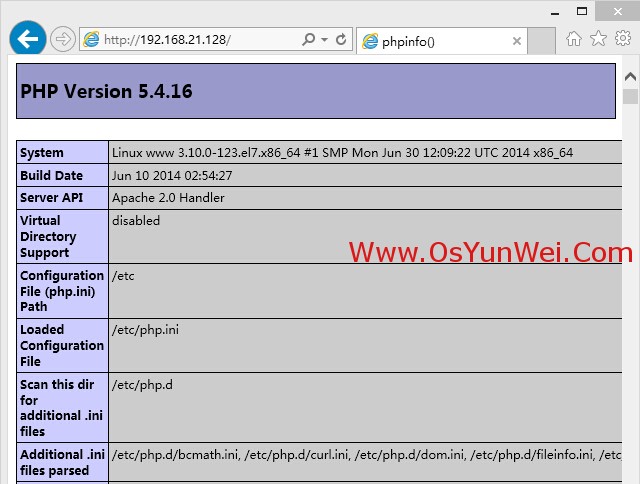
cd /var/www/html
vi index.php #输入下面内容
<?php
phpinfo();
?>
:wq! #保存退出
php报错提示
CentOS 下开启PHP错误提示
默认模式下的apache是没有开启错误语法提示的,是为了安全性的问题。但如果用LAMP作为测试机,就很必要开启提示了。不然错误在那里也搞不清。
修改php.ini文件。不同的安装,php.ini存放的位置也有所不同。最简单的办法是用phpinfo()来先查看存放位置,我在6.4下用yum安装的 目录在 /etc/php.ini。
chmod 777 /etc/php.ini
vi /etc/php.ini
修改下行,把Off值改成On
display_errors = Off
搜索下行
error_reporting = E_ALL & ~E_NOTICE 或 error_reporting = E_ALL & ~E_DEPRECATED
改为
error_reporting = E_ALL | E_STRICT
修改Apache的 httpd.conf
这文件在/etc/httpd/conf/httpd.conf
修改权限后,添加:
php_flag display_errors on
php_value error_reporting 2039
重启Apache,提示就出来
在客户端浏览器输入服务器IP地址,可以看到如下图所示相关的配置信息!
注意:apache默认的程序目录是/var/www/html
php的默认配置文件php.ini 在 /etc [需要尽心配置] display_errors = On error_reporting = E_ALL
权限设置:chown apache.apache -R /var/www/htm
mysql 用户权限管理
MariaDB [mysql]use mysql

MariaDB [mysql]> select host,user,password from user;

+-----------+------+-------------------------------------------+

| host      | user | password                                  |

+-----------+------+-------------------------------------------+

| localhost | root | *37E0EF06D9CA90C15EBE908A02C6806F |

| 127.0.0.1 | root | *7E0EF06D9CA90C15EBE908A02C6806F |

| ::       | root | *7F37E0EF06D9CA90C15EBE908A02C6806F |

+-----------+------+-------------------------------------------+

MariaDB [mysql]> create user '用户'@'%' identified by '密码';

MariaDB [mysql]> grant all on *.*  to  '用户';

MariaDB [mysql]> flush privileges;

结果:

+-----------+------+-------------------------------------------+

| host      | user | password                                  |

+-----------+------+-------------------------------------------+

| localhost | root | *E0EF06D9CA90C15EBE908A02C6806F |

| 127.0.0.1 | root | *37E0EF06D9CA90C15EBE908A02C6806F |

| ::       | root | *EF06D9CA90C15EBE908A02C6806F |

| %         | 用户 | *7E0EF06D9CA90C15EBE908A02C6806F |

+-----------+------+-------------------------------------------+
create user ‘username’@’host’ identified by ‘password’; grant 权限1,权限2,…权限n on 数据库名称.表名称 to 用户名@用户地址 identified by ‘连接口令’;
grant all on *.* to '';
CentOS 7.0 lamp的更多相关文章
- CentOS 7.0系统安装配置LAMP服务器(Apache+PHP+MariaDB)
CentOS 7.0接触到的用户是比较少的,今天看了站长写了一篇关于centos7中安装配置LAMP服务器的教程,下面我把文章稍加整理一下转给大家学习交流,希望例子能给各位带来帮助哦. cento ...
- CentOS 7.0安装配置LAMP服务器(Apache+PHP+MariaDB)
CentOS 7.0默认使用的是firewall作为防火墙,这里改为iptables防火墙. 1.关闭firewall: systemctl stop firewalld.service #停止fir ...
- CentOS 7.0 安装配置LAMP服务器方法(Apache+PHP+MariaDB)(转)
转自:http://www.jb51.net/os/188488.html 作者:佚名 字体:[增加 减小] 来源:osyunwei 准备篇: CentOS 7.0系统安装配置图解教程 http:/ ...
- CentOS 6.0 系统 LAMP(Apache+MySQL+PHP)安装步骤
一.安装 MySQL 首先来进行 MySQL 的安装.打开超级终端,输入: [root@localhost ~]# yum install mysql mysql-server 安装完毕,让 MySQ ...
- 【转】CentOS 6.0 系统 LAMP(Apache+MySQL+PHP)安装步骤
一.安装 MySQL 首先来进行 MySQL 的安装.打开超级终端,输入: [root@localhost ~]# yum install mysql mysql-server 安装完毕,让 MySQ ...
- CentOS 7.0 安装配置LAMP服务器方法(Apache+PHP+MariaDB)
一.配置防火墙,开启80端口.3306端口 CentOS 7.0默认使用的是firewall作为防火墙,这里改为iptables防火墙. 1.关闭firewall: #停止firewall服务 sys ...
- CentOS 6.0下phpvod搭建教程(LAMP+phpvod)
之所以安装CentOS是因为之前试过RedHat,但是发现RedHat在安装时,无法获取安装源,原因是RedHat系统没有在RHN注册. 网上的很多教程都说可以直接换用CentOS的源,可我小搞里一会 ...
- CentOS下搭建LAMP环境详解
前言:在这里将介绍如何在CentOS下搭建LAMP环境(全部使用源码编译安装),用于web服务器开发. •LAMP: Linux + Apache + PHP + Mysql. •系统: CentOS ...
- How to install Wordpress 4.0 on CentOS 7.0
This document describes how to install and configure Wordpress 4.0 on CentOS 7.0. WordPress started ...
随机推荐
- SQL各种JOIN
JOIN(= INNER JOIN):返回匹配的结果,没有匹配则没结果: LEFT JOIN(= LEFT OUTER JOIN):返回匹配的与左表的所有数据: RIGHT JOIN(= RIGHT ...
- (转)ping: www.baidu.com: Name or service not known centos7 -bash: ifconfig: command not found
[root@mysqlcentos01 ~]# ping www.baidu.com ping: www.baidu.com: Name or service not known [root@mysq ...
- (62)C# 动态绑定
动态绑定不能绕过成员可访问性的规则
- WebBrowser元素定位的常用方法
在delphi中想要使用WebBrowser控件,需要一了解一些浏览器和网站制作的知识.操作元素(增删改查).需要提前了解HTML DOM.
- R语言利用ROCR评测模型的预测能力
R语言利用ROCR评测模型的预测能力 说明 受试者工作特征曲线(ROC),这是一种常用的二元分类系统性能展示图形,在曲线上分别标注了不同切点的真正率与假正率.我们通常会基于ROC曲线计算处于曲线下方的 ...
- html5 新增元素以及css3新特性
HTML5 1.HTML5 新元素 HTML5提供了新的元素来创建更好的页面结构: 标签 描述 <article> 定义页面独立的内容区域. <aside> 定义页面的侧边栏内 ...
- 百度网盘不限速-Motrix
目录: Windows 下使用 Motrix Mac 下使用 BaiduNetdiskPlugin-macOS Mac 下使用 Motrix Windows 系统 Motrix 1. Google ...
- 静态链表 C++版
笔记静态链表的实现 #include "stdafx.h" #include<iostream> using namespace std; #define MAXSIZ ...
- python面试题之请谈谈.pyc文件和.py文件的不同之处
虽然这两种文件均保存字节代码,但.pyc文件是Python文件的编译版本,它有平台无关的字节代码,因此我们可以在任何支持.pyc格式文件的平台上执行它.Python会自动生成它以优化性能(加载时间,而 ...
- ubantu下关于linux命令合集
ubantu下linux的命令与操作 1.熟悉linux目录是学习linux非常必要的第一步 linux目录结构: linux目录: /:根目录,一般根目录下只存放目录,在Linux下有且只有一个根目 ...