IOS使用Core-Plot画折线图
关于Core-Plot的配置。大家能够參考我的上一篇博客:http://1.wildcat.sinaapp.com/?p=99
版权全部。转载请注明原文转自:http://blog.csdn.net/wildcatlele/article/details/25483923
大家能够到:http://1.wildcat.sinaapp.com/?p=102观看本篇博客更友好的排版格式
或者你英语好也能够參考github上的wiki介绍:https://code.google.com/p/core-plot/wiki/UsingCorePlotInApplications
先看一下效果图:
watermark/2/text/aHR0cDovL2Jsb2cuY3Nkbi5uZXQvd2lsZGNhdGxlbGU=/font/5a6L5L2T/fontsize/400/fill/I0JBQkFCMA==/dissolve/70/gravity/Center" alt="" />
好了以下说说详细使用吧:
1.改动ViewController.h文件例如以下:
|
1
2
3
4
5
6
7
8
9
10
11
12
13
|
//
// ViewController.h
// CorePlotDemo
//
// Created by wildcat on 14-5-9.
// Copyright (c) 2014年 com.wildcat. All rights reserved.
//
#import <UIKit/UIKit.h>
#import "CorePlot-CocoaTouch.h"
@interface ViewController : UIViewController<CPTPlotDataSource>
@property (nonatomic, strong) CPTGraphHostingView *hostView;
@end
|
2.在.m文件里的implement以下加入
|
1
|
@synthesizehostView=hostView_;
|
3.在以下接着加入几个方法
|
1
2
3
4
5
6
7
8
9
10
11
12
13
14
15
16
17
18
19
20
21
22
23
24
25
|
#pragma mark - UIViewController lifecycle methods
-(void)viewDidAppear:(BOOL)animated
{
[super
viewDidAppear:animated];
[self
initPlot];
}
#pragma mark - Chart behavior
-(void)initPlot
{
[self
configureHost];
[self
configureGraph];
[self
configurePlots];
[self
configureAxes];
}
-(void)configureHost
{
}
-(void)configureGraph
{
}
-(void)configurePlots
{
}
-(void)configureAxes
{
}
|
4.在@end上边加入
#pragma mark - CPTPlotDataSource methods

-(NSUInteger)numberOfRecordsForPlot:(CPTPlot *)plot{

    return0;

}

-(NSNumber *)numberForPlot:(CPTPlot *)plotfield:(NSUInteger)fieldEnumrecordIndex:(NSUInteger)index{

    return[NSDecimalNumberzero];

}
5.加入以下代码到-(void)configureHost函数:
self.hostView=[(CPTGraphHostingView *)[CPTGraphHostingViewalloc]initWithFrame:CGRectMake(0,10,self.view.bounds.size.width-10,self.view.bounds.size.height/2)];

    self.hostView.allowPinchScaling=YES;

    [self.viewaddSubview:self.hostView];
以上代码的主要作用就是声明一个视图用于画图。以下的折线图将绘制到这个视图上,然后加入为self.view的子视图。
6.加入以下代码到configureGraph:
//create an CPXYGraph and host it inside the view

    CPTTheme *theme=[CPTThemethemeNamed:kCPTPlainWhiteTheme];

    CPTXYGraph *graph=(CPTXYGraph *)[themenewGraph];

    graph.paddingLeft=10.0;

    graph.paddingTop=10.0;

    graph.paddingRight=10.0;

    graph.paddingBottom=10.0;

    self.hostView.hostedGraph=graph;

    CPTXYPlotSpace *plotSpace2=(CPTXYPlotSpace *)graph.defaultPlotSpace;

    //一屏内可显示的x,y方向的量度范围

    plotSpace2.xRange=[CPTPlotRangeplotRangeWithLocation:CPTDecimalFromCGFloat(-0.6)

                                                  length:CPTDecimalFromCGFloat(6.0)];

    plotSpace2.yRange=[CPTPlotRangeplotRangeWithLocation:CPTDecimalFromCGFloat(-1.0)

                                                  length:CPTDecimalFromCGFloat(10.0)];

    plotSpace2.allowsUserInteraction=YES;
7.加入以下代码到configurePlots:
 // 1 - Get graph and plot space

    CPTGraph *graph = self.hostView.hostedGraph;

    CPTXYPlotSpace *plotSpace = (CPTXYPlotSpace *) graph.defaultPlotSpace;

    //2:创建线性

    CPTMutableLineStyle *lineStyle=[CPTMutableLineStyle lineStyle];

    lineStyle.miterLimit        = 1.0f;

    lineStyle.lineWidth         = 3.0f;

    lineStyle.lineColor         = [CPTColor blueColor];

    //3.设置数据点

    CPTScatterPlot * lowScatterPlot  = [[CPTScatterPlot alloc] init];

    lowScatterPlot.dataLineStyle = lineStyle;

    lowScatterPlot.identifier    = @"LOWER";

    lowScatterPlot.dataSource    = self;   //设置数据源

    [graph addPlot:lowScatterPlot toPlotSpace:plotSpace];

        //....

    CPTScatterPlot * highScatterPlot  = [[CPTScatterPlot alloc] init];

    highScatterPlot.dataLineStyle = lineStyle;

    highScatterPlot.identifier    = @"HIGH";

    highScatterPlot.dataSource    = self;

    [graph addPlot:highScatterPlot toPlotSpace:plotSpace];

    //4.设置显示区域,滑动到数据点处

    [plotSpace scaleToFitPlots:[NSArray arrayWithObjects:lowScatterPlot,highScatterPlot, nil]];

    CPTMutablePlotRange *xRange = [plotSpace.xRange mutableCopy];

    [xRange expandRangeByFactor:CPTDecimalFromCGFloat(1.1f)];

    plotSpace.xRange = xRange;

    CPTMutablePlotRange *yRange = [plotSpace.yRange mutableCopy];

    [yRange expandRangeByFactor:CPTDecimalFromCGFloat(1.2f)];

    plotSpace.yRange = yRange;

    //5.设置折线

    CPTMutableLineStyle *lowLineStyle = [lowScatterPlot.dataLineStyle mutableCopy];

    lowLineStyle.lineWidth = 2.0f;  //折线宽度

    lowLineStyle.lineColor = [CPTColor blueColor]; //折线颜色

    lowScatterPlot.dataLineStyle = lowLineStyle; //设置数据线样式

    CPTMutableLineStyle *lowSymbolLineStyle = [CPTMutableLineStyle lineStyle];

    lowSymbolLineStyle.lineColor = [CPTColor blueColor];

    //...

    CPTMutableLineStyle *highLineStyle = [lowScatterPlot.dataLineStyle mutableCopy];

    highLineStyle.lineWidth = 2.0f;  //折线宽度

    highLineStyle.lineColor = [CPTColor redColor]; //折线颜色

    highScatterPlot.dataLineStyle = highLineStyle; //设置数据线样式

    CPTMutableLineStyle *highSymbolLineStyle = [CPTMutableLineStyle lineStyle];

    highSymbolLineStyle.lineColor = [CPTColor redColor];

    //6.设置拐点

    CPTPlotSymbol *lowSymbol = [CPTPlotSymbol ellipsePlotSymbol];

    lowSymbol.fill = [CPTFill fillWithColor:[CPTColor blueColor]];

    lowSymbol.lineStyle = lowSymbolLineStyle;

    lowSymbol.size = CGSizeMake(6.0f, 6.0f); //拐点大小

    lowScatterPlot.plotSymbol = lowSymbol;

    CPTPlotSymbol *highSymbol = [CPTPlotSymbol ellipsePlotSymbol];

    highSymbol.fill = [CPTFill fillWithColor:[CPTColor redColor]];

    highSymbol.lineStyle = highSymbolLineStyle;

    highSymbol.size = CGSizeMake(6.0f, 6.0f); //拐点大小

    highScatterPlot.plotSymbol = highSymbol;
以上代码主要是设置折线、拐点的类型以及设置高低温两个折线图.最重要的是加入数据源 .dataSource = self;
8.设置x、y轴的间隔及细分刻度等。加入以下代码到configureAxes函数:
CPTGraph *graph=self.hostView.hostedGraph;

    //1:创建线性

    CPTMutableLineStyle *lineStyle=[CPTMutableLineStylelineStyle];

    //axes 设置x,y轴属性。如原点。

    //得到x,y轴的集合

    CPTXYAxisSet *axisSet=(CPTXYAxisSet *)graph.axisSet;

    lineStyle.miterLimit=1.0f;

    lineStyle.lineWidth=0.5f;

    lineStyle.lineColor=[CPTColorblueColor];

    //设置x轴线

    CPTXYAxis *x=axisSet.xAxis;

    x.orthogonalCoordinateDecimal=CPTDecimalFromString(@"0");//原点为0.(y=0)

    x.majorIntervalLength=CPTDecimalFromString(@"1");// x轴主刻度:显示数字标签的量度间隔

    x.minorTicksPerInterval=0;// x轴细分刻度:每个主刻度范围内显示细分刻度的个数

    x.minorTickLineStyle=lineStyle;

    //设置y 轴

    CPTXYAxis *y=axisSet.yAxis;

    y.orthogonalCoordinateDecimal=CPTDecimalFromString(@"0");

    y.majorIntervalLength=CPTDecimalFromString(@"1");

    y.minorTicksPerInterval=0;

    y.minorTickLineStyle=lineStyle;
9.设置数据源方法,改动两个方法例如以下:
#pragma mark - CPTPlotDataSource methods

-(NSUInteger)numberOfRecordsForPlot:(CPTPlot *)plot {

    return 4; //数据点个数

}

static int a=1;

-(NSNumber *)numberForPlot:(CPTPlot *)plot field:(NSUInteger)fieldEnum recordIndex:(NSUInteger)index {

    switch (fieldEnum) {

        case CPTScatterPlotFieldX:

            if (a>4) {

                a=1;

            }

                return [NSNumber numberWithInt:a++];

            break;

        case CPTScatterPlotFieldY:

            if ([plot.identifier isEqual:@"LOWER"] == YES) {

                return [NSNumber numberWithInt:arc4random()%8];

            }else if([plot.identifier isEqual:@"HIGH"] == YES){

                return [NSNumber numberWithInt:arc4random()%8+10];

            }

            break;

    }

    return [NSDecimalNumber zero];

}
好了一切设置完成执行看看效果。
补充:
Core Plot 框架结构分析
CorePlot 的类结构关系例如以下:
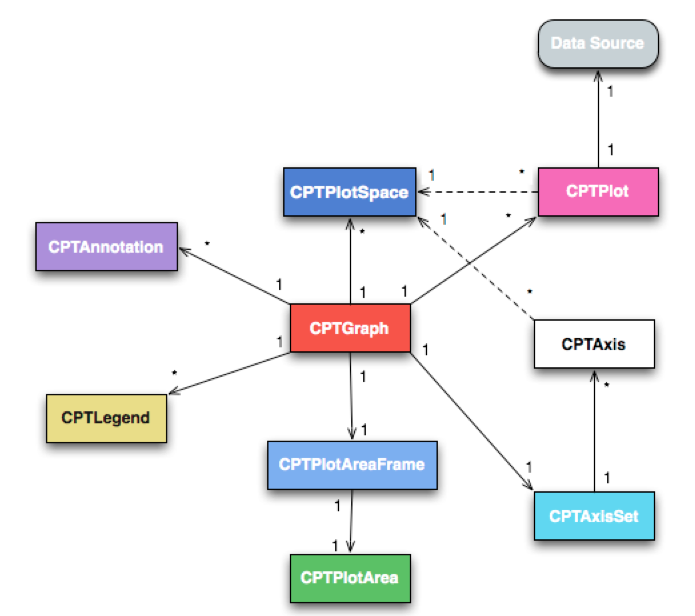
当中最核心的就是 CPTGraph,本演示样例中的 CPTXYGraph是它的子类;一个图 CPTGraph包括一个轴集 CPTAxiset。每个轴集可包括多个轴;一个图 CPTGraph 可包括多个图空间 CPTPlotSpace;一个图 CPTGraph 可包括多个图形CPTSplot(曲线,饼图,柱状图等);图形CPTSplot 和轴都展如今某个图空间 CPTPlotSpace 中。
其余的部分,尚未介绍到。暂且不提。
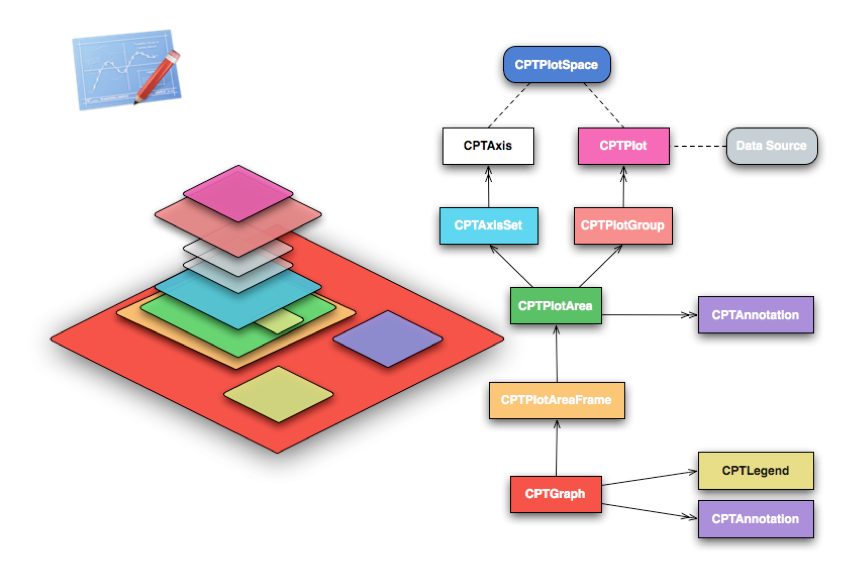
或许下图能更形象地描写叙述出 Core Plot 各种对象之间的关系。
IOS使用Core-Plot画折线图的更多相关文章
- python中matplotlib画折线图实例(坐标轴数字、字符串混搭及标题中文显示)
最近在用python中的matplotlib画折线图,遇到了坐标轴 "数字+刻度" 混合显示.标题中文显示.批量处理等诸多问题.通过学习解决了,来记录下.如有错误或不足之处,望请指 ...
- SAS 画折线图PROC GPLOT
虽然最后做成PPT里的图表会被要求用EXCEL画,但当我们只是在分析的过程中,想看看数据的走势,直接在SAS里画会比EXCEL画便捷的多. 修改起来也会更加的简单,,不用不断的修改程序然后刷新EXCE ...
- Matplotlib学习---用matplotlib画折线图(line chart)
这里利用Jake Vanderplas所著的<Python数据科学手册>一书中的数据,学习画图. 数据地址:https://raw.githubusercontent.com/jakevd ...
- echars画折线图的一种数据处理方式
echars画折线图的一种数据处理方式 <!DOCTYPE html> <html> <head> <meta charset="utf-8&quo ...
- 使用OpenCV画折线图
使用OpenCV画直方图是一件轻松的事情,画折线图就没有那么Easy了,还是使用一个库吧: GraphUtils 源代码添加入工程 原文链接:http://www.360doc.com/content ...
- iOS绘制坐标图,折线图-Swift
坐标图,经常会在各种各样的App中使用,最常用的一种坐标图就是折线图,根据给定的点绘制出对应的坐标图是最基本的需求.由于本人的项目需要使用折线图,第一反应就是搜索已经存在的解决方案,因为这种需求应该很 ...
- gnuplot画折线图
之前尝试用jfreechart画自定义横坐标的折线图或时序图,发现很复杂,后来改用gnuplot了. gnuplot在网上一搜就能找到下载地址. 安装完成后,主要是命令行形式的交互界面,至少比jfre ...
- iOS 使用 Core Plot 绘制统计图表入门
本文转载至 http://blog.csdn.net/zhibudefeng/article/details/7677457 iOS(iPhone/iPad) 下图形组件有两个有名的,s7gra ...
- python用matplotlib画折线图
折线图: import matplotlib.pyplot as plt y1=[10,13,5,40,30,60,70,12,55,25] x1=range(0,10) x2=range(0,10) ...
随机推荐
- electron-searchMovies
之前学了electron,前段时间又学了一下vue,为了增加熟练度决定将两者结合做个有趣的东西.想来想去最后决定将原来用 PyQt 写的MovieHeavens重新写一遍,使用electron-vue ...
- 总结ASP.NET C#中经常用到的13个JS脚本代码
1.按钮前后台事件 <asp:Button ID="Button1" runat="server" OnClick="Button1_Click ...
- mysql中什么是逻辑备份
需求描述: mysql中,或者说关系型数据库中逻辑备份到底指的是什么呢,主要还是对于 概念的理解,在此记录下. 概念解释: 逻辑备份:主要指的是保存数据库的逻辑结构(比如:create dattaba ...
- 第五章 面向方面编程___OOP和AOP随想
面向方面编程,又称面向切面编程(Aspect-Oriented-Programming),英文缩写 AOP,可以说是 OOP(Object-Oriented-Programming)面向对象编程的补充 ...
- 2014年王道论坛研究生机试练习赛(一) set 1 GrassLand密码
题目 根据手机按键上的对应关系将字母转成数字, 简单模拟题 总结 1. scanf("%s", input); 不需要加上 & 2. 字符串的终结符是 '\0' 3. sc ...
- angularjs基础——控制器
1)当使用非空ng-app和ng-controller时,变量由angularjs控制器来处理 2)控制器接管模型变量后,直接修改模型,模版里的变量还是会自动变的 <!DOCTYPE html& ...
- 实例:用类来写一个 memcached 启动脚本
[root@localhost ~]$ yum install -y memcached #!/usr/bin/env python #-*- coding:utf-8 -*- import os i ...
- ios 图片处理( 1.按比例缩放 2.指定宽度按比例缩放
本文转载至 http://blog.sina.com.cn/s/blog_6f29e81f0101tat6.html //按比例缩放,size 是你要把图显示到 多大区域 CGSizeMake(300 ...
- JAVA中替换字符的方法replace和replaceAll 区别
replace和replaceAll是JAVA中常用的替换字符的方法,它们的区别是:1)replace的参数是char和CharSequence,即可以支持字符的替换,也支持字符串的替换(CharSe ...
- iOS - 布局重绘机制相关方法的研究
iOS View布局重绘机制相关方法 布局 - (void)layoutSubviews - (void)layoutIfNeeded- (void)setNeedsLayout —————————— ...