Android中如何使用JUnit进行单元测试 eclipse
Android中如何使用JUnit进行单元测试
|
<instrumentation android:name="android.test.InstrumentationTestRunner"
android:targetPackage="com.example.junittest" android:label="@string/app_name"
></instrumentation>
|
|
<?xml version="1.0" encoding="utf-8"?>
<manifest xmlns:android="http://schemas.android.com/apk/res/android"
package="com.example.junittest"
android:versionCode="1"
android:versionName="1.0" >
<uses-sdk
android:minSdkVersion="8"
android:targetSdkVersion="18" />
<instrumentation android:name="android.test.InstrumentationTestRunner"
android:targetPackage="com.example.junittest" android:label="@string/app_name"
></instrumentation>
<application
android:allowBackup="true"
android:icon="@drawable/ic_launcher"
android:label="@string/app_name"
android:theme="@style/AppTheme" >
<uses-library android:name="android.test.runner"/>
<activity
android:name="com.example.junittest.MainActivity"
android:label="@string/app_name" >
<intent-filter>
<action android:name="android.intent.action.MAIN" />
<category android:name="android.intent.category.LAUNCHER" />
</intent-filter>
</activity>
</application>
</manifest>
|
|
package com.example.junittest;
public class Calculator {
public int add(int x,int y){
return x+y;
}
public int sub(int x,int y){
return x-y;
}
public int divide(int x,int y){
return x/y;
}
public int multiply(int x,int y){
return x*y;
}
}
|
|
package com.example.test;
import junit.framework.Assert;
import com.example.junittest.Calculator;
import android.test.AndroidTestCase;
import android.util.Log;
public class CalculatorTester extends AndroidTestCase {
private static final String TAG = CalculatorTester.class.getSimpleName();
private Calculator calculator;
/**
* This method is invoked before any of the test methods in the class.
* Use it to set up the environment for the test (the test fixture. You can use setUp() to instantiate a new Intent with the action ACTION_MAIN. You can then use this intent to start the Activity under test.
*/
@Override
protected void setUp() throws Exception {
Log.e(TAG, "setUp");
calculator = new Calculator();
super.setUp();
}
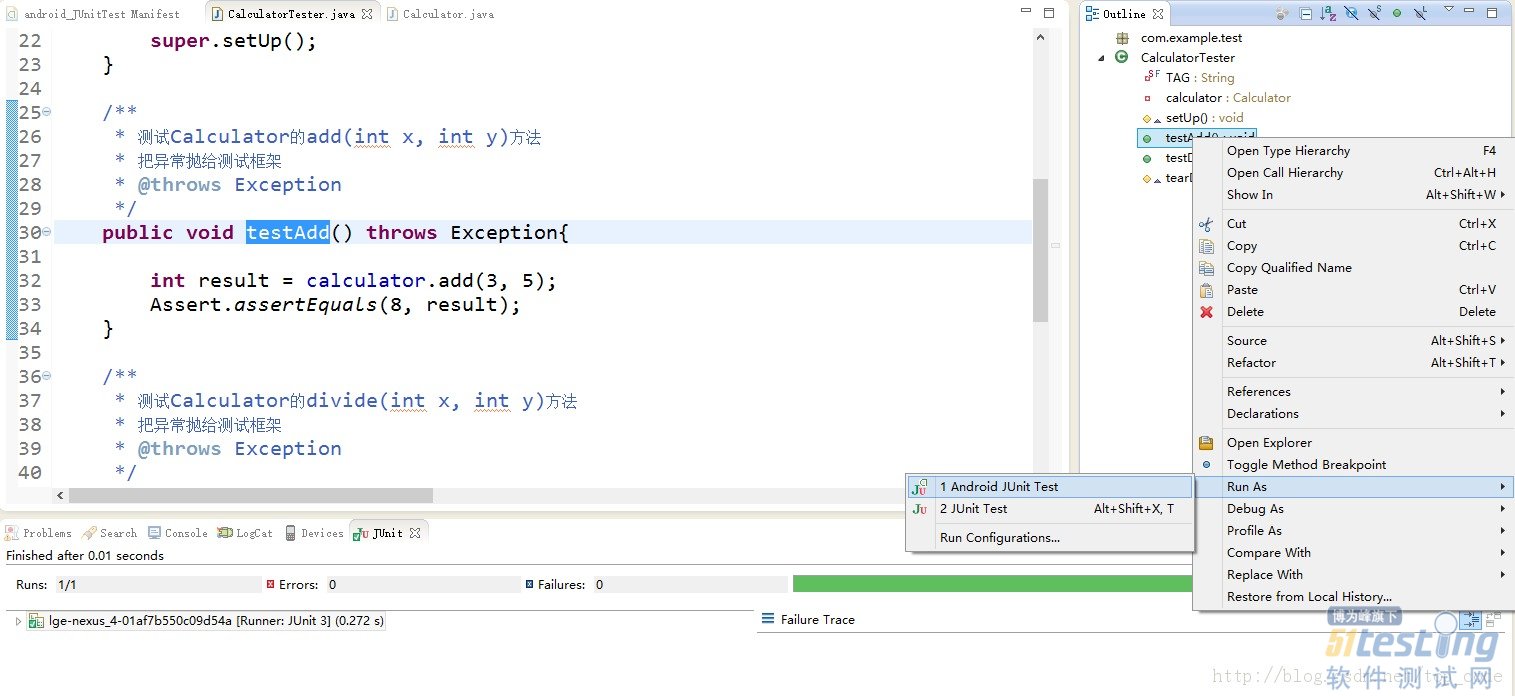
/**
* 测试Calculator的add(int x, int y)方法
* 把异常抛给测试框架
* @throws Exception
*/
public void testAdd() throws Exception{
int result = calculator.add(3, 5);
Assert.assertEquals(8, result);
}
/**
* 测试Calculator的divide(int x, int y)方法
* 把异常抛给测试框架
* @throws Exception
*/
public void testDivide() throws Exception{
int result = calculator.divide(10, 0);
Assert.assertEquals(10, result);
}
/**
* This method is invoked after all the test methods in the class.
* Use it to do garbage collection and to reset the test fixture.
*/
@Override
protected void tearDown() throws Exception {
Log.e(TAG, "tearDown");
calculator = null;
super.tearDown();
}
}
|

Android中如何使用JUnit进行单元测试 eclipse的更多相关文章
- Android之如何使用JUnit进行单元测试
转的:http://www.blogjava.net/qileilove/archive/2014/05/19/413824.html Android中如何使用JUnit进行单元测试 在我们日常开发a ...
- SpringBoot重点详解--使用Junit进行单元测试
目录 添加依赖与配置 ApplicationContext测试 Environment测试 MockBean测试 Controller测试 情况一 情况二 方法一 方法二 本文将对在Springboo ...
- 在Android中进行单元测试遇到的问题
问题1.Cannot connect to VM socket closed 在使用JUnit进行测试的时候,遇到这个问题.网上的解释是:使用Eclipse对Java代码进行调试,无论是远程JVM还 ...
- 软件工程第二次作业(Android Studio利用Junit进行单元测试)
一.开发工具的安装和运行 1.安装 由于我的电脑之前就安装好了Android Studio,就不再重装了.在这里就给出几条安装过程中需要注意的地方吧: 安装包最好在官网下载已经带有Android SD ...
- Android使用JUnit进行单元测试
前言:为什么要进行单元测试?单元测试能快速是开发者,找到代码中的问题所在,因为是单元测试,所以代码只执行响应的测试单元,执行快解决问题的效率高,同时提高代码的质量. Android中的单元测试可简单分 ...
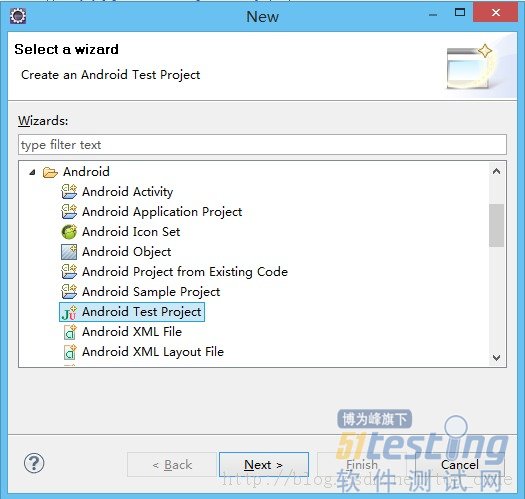
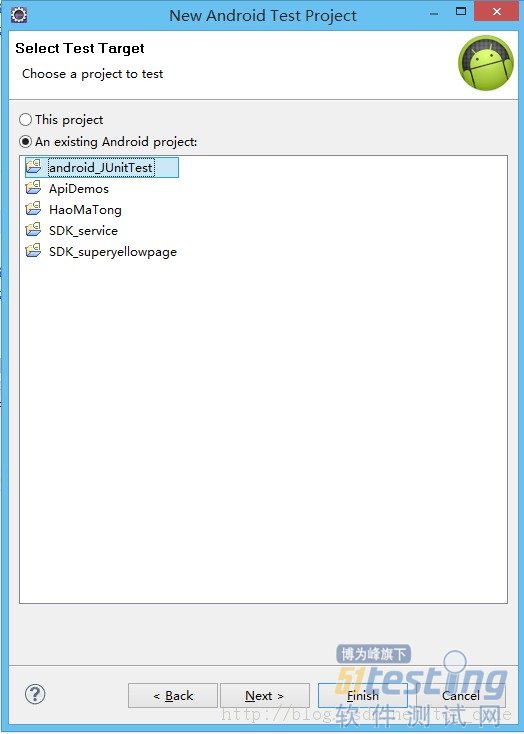
- Android中使用自身携带的Junit新建一个测试工程
1.新建立一个Android工程 package com.shellway.junit; public class Service { public int divide(int a,int b){ ...
- 如何将Android默认的Camra程序导入到eclipse中
由于工作需要将camera源码导入到Eclipse中,找了很多的方法,现将自己的整理发出来.... 由于开发的要求,需要将Android默认的Camra程序导入到eclipse中,进行修改和再开发. ...
- Android中的单元测试
2015年5月19日 23:10 在Android中,已经内置了Junit所以不需要在导包.只要继承AndroidTestCase类就可以了. 首先需要修改AndroidManifes ...
- Android 开发之开发插件使用:Eclipse 插件 SQLiteManger eclipse中查看数据内容--翻译
最近研究了一段时间Android开发后发现,google自带的ADT工具,缺失一些开发常用的东西,希望可以构建一个类似使用JAVA EE开发体系一样开发的工具包集合,包括前台开发,调试,到后台数据库的 ...
随机推荐
- Python3基础 print \" 输出单引号与双引号
Python : 3.7.0 OS : Ubuntu 18.04.1 LTS IDE : PyCharm 2018.2.4 Conda ...
- ${user.home} is not working in jenkins windows system
default setting create m2 in C:\Windows\system32\config\systemprofile change it to <localReposito ...
- python fromkeys() 创建字典
# d = dict.fromkeys("张无忌","赵敏") #创建字典 # print(d)#{'张': '赵敏', '无': '赵敏', '忌': '赵敏 ...
- php 获取某个日期n天之后的日期
<?php $date=date_create("2013-03-15"); date_add($date,date_interval_create_from_date_st ...
- Mediator(中介者)
意图: 用一个中介对象来封装一系列的对象交互.中介者使各对象不需要显式地相互引用,从而使其耦合松散,而且可以独立地改变它们之间的交互. 适用性: 一组对象以定义良好但是复杂的方式进行通信.产生的相互依 ...
- m_Orchestrate learning system---网站的语言选择功能(中文英文)
m_Orchestrate learning system---网站的语言选择功能(中文英文) 一.总结 一句话总结:有两种方法,一是session+js端代码,而是session+php端代码. 推 ...
- UVA-1613 K-Graph Oddity (着色问题)
题目大意:一张n个顶点.m条边的无向连通图,用k种颜色着色(相邻顶点颜色不能相同),其中k为不小于点的最大度数的最小奇数. 题目分析:水题一道.建张图深搜一下就行了. # include<ios ...
- 《转》深入理解Activity启动流程(一)–Activity启动的概要流程
本文原创作者:Cloud Chou. 原文地址:http://www.cloudchou.com/android/post-788.html Android中启动某个Activity,将先启动Acti ...
- HTML, CSS. JS的各种奇淫技巧
1. js 中为了省字节,性能, 防止被重写等发明了各种写法,记录下 //取整 parseInt(a,10); //Before Math.floor(a); //Before a>>0; ...
- 转:Android-apt
转自http://blog.csdn.net/zjbpku/article/details/22976291 What is this? The Android-apt plugin assists ...