Ubuntu16.04下安装Tensorflow CPU版本(图文详解)
不多说,直接上干货!
推荐
全网最详细的基于Ubuntu14.04/16.04 + Anaconda2 / Anaconda3 + Python2.7/3.4/3.5/3.6安装Tensorflow详细步骤(图文)(博主推荐)
其实啊,不难。对于Ubuntu而言,大家都知道,系统自带就已经有了python(蟒蛇)。
输入以下命令安装pip
sudo apt-get install python-pip python-dev

zhouls@zhouls-virtual-machine:~$ sudo apt-get install python-pip python-dev

[sudo] password for zhouls:

Reading package lists... Done

Building dependency tree

Reading state information... Done

The following packages were automatically installed and are no longer required:

  linux-headers-4.4.- linux-headers-4.4.--generic

  linux-image-4.4.--generic linux-image-extra-4.4.--generic

Use 'sudo apt autoremove' to remove them.

The following additional packages will be installed:

  libexpat1-dev libpython-all-dev libpython-dev libpython2.-dev python-all

  python-all-dev python-pip-whl python-pkg-resources python-setuptools

  python-wheel python2.-dev

Suggested packages:

  python-setuptools-doc

The following NEW packages will be installed:

  libexpat1-dev libpython-all-dev libpython-dev libpython2.-dev python-all

  python-all-dev python-dev python-pip python-pip-whl python-pkg-resources

  python-setuptools python-wheel python2.-dev

 upgraded,  newly installed,  to remove and  not upgraded.

Need to get 29.8 MB of archives.

After this operation, 45.1 MB of additional disk space will be used.

Do you want to continue? [Y/n] y

Get: http://cn.archive.ubuntu.com/ubuntu xenial-updates/main amd64 libexpat1-dev amd64 2.1.0-7ubuntu0.16.04.2 [115 kB]

Get: http://cn.archive.ubuntu.com/ubuntu xenial-updates/main amd64 libpython2.7-dev amd64 2.7.12-1ubuntu0~16.04.1 [27.8 MB]

Get: http://cn.archive.ubuntu.com/ubuntu xenial/main amd64 libpython-dev amd64 2.7.11-1 [7,728 B]

Get: http://cn.archive.ubuntu.com/ubuntu xenial/main amd64 libpython-all-dev amd64 2.7.11-1 [992 B]

Get: http://cn.archive.ubuntu.com/ubuntu xenial/main amd64 python-all amd64 2.7.11-1 [978 B]

Get: http://cn.archive.ubuntu.com/ubuntu xenial-updates/main amd64 python2.7-dev amd64 2.7.12-1ubuntu0~16.04.1 [276 kB]

Get: http://cn.archive.ubuntu.com/ubuntu xenial/main amd64 python-dev amd64 2.7.11-1 [1,160 B]

Get: http://cn.archive.ubuntu.com/ubuntu xenial/main amd64 python-all-dev amd64 2.7.11-1 [1,000 B]

Get: http://cn.archive.ubuntu.com/ubuntu xenial-updates/universe amd64 python-pip-whl all 8.1.1-2ubuntu0.4 [1,110 kB]

Get: http://cn.archive.ubuntu.com/ubuntu xenial-updates/universe amd64 python-pip all 8.1.1-2ubuntu0.4 [144 kB]

Get: http://cn.archive.ubuntu.com/ubuntu xenial/main amd64 python-pkg-resources all 20.7.0-1 [108 kB]

Get: http://cn.archive.ubuntu.com/ubuntu xenial/main amd64 python-setuptools all 20.7.0-1 [169 kB]

Get: http://cn.archive.ubuntu.com/ubuntu xenial/universe amd64 python-wheel all 0.29.0-1 [48.0 kB]

Fetched 29.8 MB in 29s (, kB/s)

Selecting previously unselected package libexpat1-dev:amd64.

(Reading database ...  files and directories currently installed.)

Preparing to unpack .../libexpat1-dev_2.1.0-7ubuntu0.16.04.2_amd64.deb ...

Unpacking libexpat1-dev:amd64 (2.1.-7ubuntu0.16.04.) ...

Selecting previously unselected package libpython2.-dev:amd64.

Preparing to unpack .../libpython2.-dev_2.7.12-1ubuntu0~16.04.1_amd64.deb ...

Unpacking libpython2.-dev:amd64 (2.7.-1ubuntu0~16.04.) ...

Selecting previously unselected package libpython-dev:amd64.

Preparing to unpack .../libpython-dev_2.7.11-1_amd64.deb ...

Unpacking libpython-dev:amd64 (2.7.-) ...

Selecting previously unselected package libpython-all-dev:amd64.

Preparing to unpack .../libpython-all-dev_2.7.11-1_amd64.deb ...

Unpacking libpython-all-dev:amd64 (2.7.-) ...

Selecting previously unselected package python-all.

Preparing to unpack .../python-all_2.7.11-1_amd64.deb ...

Unpacking python-all (2.7.-) ...

Selecting previously unselected package python2.-dev.

Preparing to unpack .../python2.-dev_2.7.12-1ubuntu0~16.04.1_amd64.deb ...

Unpacking python2.-dev (2.7.-1ubuntu0~16.04.) ...

Selecting previously unselected package python-dev.

Preparing to unpack .../python-dev_2.7.11-1_amd64.deb ...

Unpacking python-dev (2.7.-) ...

Selecting previously unselected package python-all-dev.

Preparing to unpack .../python-all-dev_2.7.11-1_amd64.deb ...

Unpacking python-all-dev (2.7.-) ...

Selecting previously unselected package python-pip-whl.

Preparing to unpack .../python-pip-whl_8.1.1-2ubuntu0.4_all.deb ...

Unpacking python-pip-whl (8.1.-2ubuntu0.) ...

Selecting previously unselected package python-pip.

Preparing to unpack .../python-pip_8.1.1-2ubuntu0.4_all.deb ...

Unpacking python-pip (8.1.-2ubuntu0.) ...

Selecting previously unselected package python-pkg-resources.

Preparing to unpack .../python-pkg-resources_20.7.0-1_all.deb ...

Unpacking python-pkg-resources (20.7.-) ...

Selecting previously unselected package python-setuptools.

Preparing to unpack .../python-setuptools_20.7.0-1_all.deb ...

Unpacking python-setuptools (20.7.-) ...

Selecting previously unselected package python-wheel.

Preparing to unpack .../python-wheel_0.29.0-1_all.deb ...

Unpacking python-wheel (0.29.-) ...

Processing triggers for doc-base (0.10.) ...

Processing  added doc-base file...

Processing triggers for man-db (2.7.-) ...

Setting up libexpat1-dev:amd64 (2.1.-7ubuntu0.16.04.) ...

Setting up libpython2.-dev:amd64 (2.7.-1ubuntu0~16.04.) ...

Setting up libpython-dev:amd64 (2.7.-) ...

Setting up libpython-all-dev:amd64 (2.7.-) ...

Setting up python-all (2.7.-) ...

Setting up python2.-dev (2.7.-1ubuntu0~16.04.) ...

Setting up python-dev (2.7.-) ...

Setting up python-all-dev (2.7.-) ...

Setting up python-pip-whl (8.1.-2ubuntu0.) ...

Setting up python-pip (8.1.-2ubuntu0.) ...

Setting up python-pkg-resources (20.7.-) ...

Setting up python-setuptools (20.7.-) ...

Setting up python-wheel (0.29.-) ...

zhouls@zhouls-virtual-machine:~$
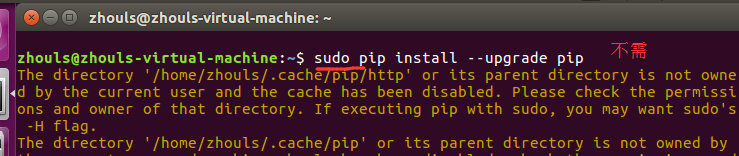
3、需要更新pip
自带的pip版本较低,需要更新。
pip install --upgrade pip

不是
sudo pip install --upgrade pip

4、安装pip
sudo pip install --upgrade https://ci.tensorflow.org/view/Nightly/job/nightly-matrix-cpu/TF_BUILD_IS_OPT=OPT,TF_BUILD_IS_PIP=PIP,TF_BUILD_PYTHON_VERSION=PYTHON2,label=cpu-slave/lastSuccessfulBuild/artifact/pip_test/whl/tensorflow-1.2.0rc1-cp27-none-linux_x86_64.whl
此处的链接为:https://github.com/tensorflow/tensorflow寻找自己需要的软件包。
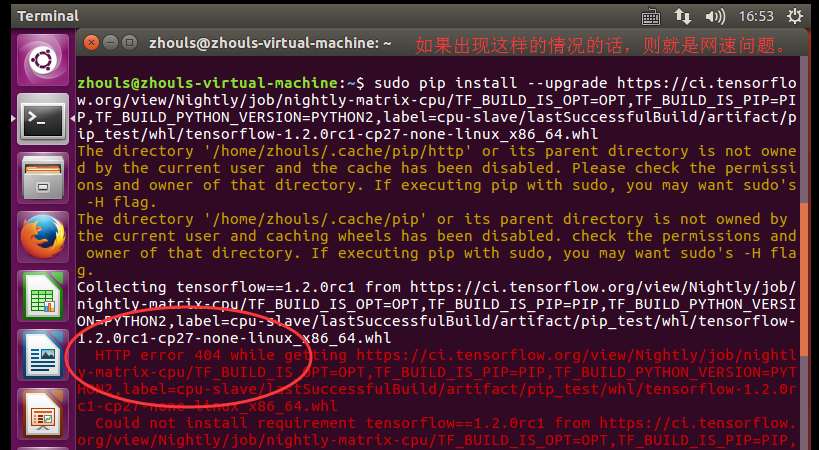
zhouls@zhouls-virtual-machine:~$ sudo pip install --upgrade https://ci.tensorflow.org/view/Nightly/job/nightly-matrix-cpu/TF_BUILD_IS_OPT=OPT,TF_BUILD_IS_PIP=PIP,TF_BUILD_PYTHON_VERSION=PYTHON2,label=cpu-slave/lastSuccessfulBuild/artifact/pip_test/whl/tensorflow-1.2.0rc1-cp27-none-linux_x86_64.whl

The directory '/home/zhouls/.cache/pip/http' or its parent directory is not owned by the current user and the cache has been disabled. Please check the permissions and owner of that directory. If executing pip with sudo, you may want sudo's -H flag.

The directory '/home/zhouls/.cache/pip' or its parent directory is not owned by the current user and caching wheels has been disabled. check the permissions and owner of that directory. If executing pip with sudo, you may want sudo's -H flag.

Collecting tensorflow==1.2.0rc1 from https://ci.tensorflow.org/view/Nightly/job/nightly-matrix-cpu/TF_BUILD_IS_OPT=OPT,TF_BUILD_IS_PIP=PIP,TF_BUILD_PYTHON_VERSION=PYTHON2,label=cpu-slave/lastSuccessfulBuild/artifact/pip_test/whl/tensorflow-1.2.0rc1-cp27-none-linux_x86_64.whl

  HTTP error  while getting https://ci.tensorflow.org/view/Nightly/job/nightly-matrix-cpu/TF_BUILD_IS_OPT=OPT,TF_BUILD_IS_PIP=PIP,TF_BUILD_PYTHON_VERSION=PYTHON2,label=cpu-slave/lastSuccessfulBuild/artifact/pip_test/whl/tensorflow-1.2.0rc1-cp27-none-linux_x86_64.whl

  Could not install requirement tensorflow==1.2.0rc1 from https://ci.tensorflow.org/view/Nightly/job/nightly-matrix-cpu/TF_BUILD_IS_OPT=OPT,TF_BUILD_IS_PIP=PIP,TF_BUILD_PYTHON_VERSION=PYTHON2,label=cpu-slave/lastSuccessfulBuild/artifact/pip_test/whl/tensorflow-1.2.0rc1-cp27-none-linux_x86_64.whl because of error 404 Client Error: Not Found for url: https://ci.tensorflow.org/view/Nightly/job/nightly-matrix-cpu/TF_BUILD_IS_OPT=OPT,TF_BUILD_IS_PIP=PIP,TF_BUILD_PYTHON_VERSION=PYTHON2,label=cpu-slave/lastSuccessfulBuild/artifact/pip_test/whl/tensorflow-1.2.0rc1-cp27-none-linux_x86_64.whl

Could not install requirement tensorflow==1.2.0rc1 from https://ci.tensorflow.org/view/Nightly/job/nightly-matrix-cpu/TF_BUILD_IS_OPT=OPT,TF_BUILD_IS_PIP=PIP,TF_BUILD_PYTHON_VERSION=PYTHON2,label=cpu-slave/lastSuccessfulBuild/artifact/pip_test/whl/tensorflow-1.2.0rc1-cp27-none-linux_x86_64.whl because of HTTP error 404 Client Error: Not Found for url: https://ci.tensorflow.org/view/Nightly/job/nightly-matrix-cpu/TF_BUILD_IS_OPT=OPT,TF_BUILD_IS_PIP=PIP,TF_BUILD_PYTHON_VERSION=PYTHON2,label=cpu-slave/lastSuccessfulBuild/artifact/pip_test/whl/tensorflow-1.2.0rc1-cp27-none-linux_x86_64.whl for URL https://ci.tensorflow.org/view/Nightly/job/nightly-matrix-cpu/TF_BUILD_IS_OPT=OPT,TF_BUILD_IS_PIP=PIP,TF_BUILD_PYTHON_VERSION=PYTHON2,label=cpu-slave/lastSuccessfulBuild/artifact/pip_test/whl/tensorflow-1.2.0rc1-cp27-none-linux_x86_64.whl

zhouls@zhouls-virtual-machine:~$
大家,找个网速好的时间段,执行就是了。
同时,大家可以关注我的个人博客:
http://www.cnblogs.com/zlslch/ 和 http://www.cnblogs.com/lchzls/ http://www.cnblogs.com/sunnyDream/
详情请见:http://www.cnblogs.com/zlslch/p/7473861.html
人生苦短,我愿分享。本公众号将秉持活到老学到老学习无休止的交流分享开源精神,汇聚于互联网和个人学习工作的精华干货知识,一切来于互联网,反馈回互联网。
目前研究领域:大数据、机器学习、深度学习、人工智能、数据挖掘、数据分析。 语言涉及:Java、Scala、Python、Shell、Linux等 。同时还涉及平常所使用的手机、电脑和互联网上的使用技巧、问题和实用软件。 只要你一直关注和呆在群里,每天必须有收获
对应本平台的讨论和答疑QQ群:大数据和人工智能躺过的坑(总群)(161156071)![]()
![]()
![]()
![]()
![]()


Ubuntu16.04下安装Tensorflow CPU版本(图文详解)的更多相关文章
- Ubuntu16.04下安装Tensorflow GPU版本(图文详解)
不多说,直接上干货! 推荐 全网最详细的基于Ubuntu14.04/16.04 + Anaconda2 / Anaconda3 + Python2.7/3.4/3.5/3.6安装Tensorflow详 ...
- 通过Anaconda在Ubuntu16.04上安装 TensorFlow(GPU版本)
一. 安装环境 Ubuntu16.04.3 LST GPU: GeForce GTX1070 Python: 3.5 CUDA Toolkit 8.0 GA1 (Sept 2016) cuDNN v6 ...
- Windows7 64bits下安装TensorFlow CPU版本(图文详解)
不多说,直接上干货! Installing TensorFlow on Windows的官网 https://www.tensorflow.org/install/install_windows 首先 ...
- ubuntu16.04下安装TensorFlow(GPU加速)----详细图文教程【转】
本文转载自:https://blog.csdn.net/zhaoyu106/article/details/52793183 le/details/52793183 写在前面 一些废话 接触深度学习已 ...
- Ubuntu16.04下安装tensorflow(GPU加速)【转】
本文转载自:https://blog.csdn.net/qq_30520759/article/details/78947034 版权声明:本文为博主原创文章,未经博主允许不得转载. https:// ...
- 全网最全最详细的Windows下安装Anaconda2 / Anaconda3(图文详解)
不多说,直接上干货! 说明: Anaconda2-5.0.0-Windows-x86_64.exe安装下来,默认的Python2.7 Anaconda3-4.2.0-Windows-x86_64.ex ...
- Ubuntu16.04下Mongodb(离线安装方式|非apt-get)安装部署步骤(图文详解)(博主推荐)
不多说,直接上干货! 说在前面的话 首先,查看下你的操作系统的版本. root@zhouls-virtual-machine:~# cat /etc/issue Ubuntu LTS \n \l r ...
- Ubuntu16.04下Mongodb官网安装部署步骤(图文详解)(博主推荐)
不多说,直接上干货! 在这篇博客里,我采用了非官网的安装步骤,来进行安装.走了弯路,同时,也是不建议.因为在大数据领域和实际生产里,还是要走正规的为好. Ubuntu16.04下Mongodb(离线安 ...
- Ubuntu16.04下安装多版本cuda和cudnn
Ubuntu16.04下安装多版本cuda和cudnn 原文 https://blog.csdn.net/tunhuzhuang1836/article/details/79545625 前言 因为之 ...
随机推荐
- C指针类型转换问题
先看下面的代码: #include<stdio.h> int main () { int a; char *x; x = (char *) &a; a = 512; x[0] = ...
- java中list或数组中随机子集工具类
package com.example.demo.test; import java.util.ArrayList;import java.util.Arrays;import java.util.L ...
- Java Web中的编码解析
在springmvc工程web.xml中配置中文编码 <!-- 配置请求过滤器,编码格式设为UTF-8,避免中文乱码--> <filter> <filter-name&g ...
- Java学习--异常处理及其应用类
异常是运行时在代码序列中引起的非正常状况,换句话说,异常是运行时错误.在不支持异常处理的计算机语言中,必须手动检查和处理错误----通常是通过使用错误代码,等等.这种方式既笨拙又麻烦.Java的异常处 ...
- [luoguP2420] 让我们异或吧(dfs + 异或的性质)
传送门 因为异或满足结合律和交换律. a^b^b=a 所以这个题直接求根节点到每个点路径上的异或值. 对于每组询问直接输出根到两个点的异或值的异或的值. ——代码 #include <cstdi ...
- 《TCP/IP详解卷1:协议》——第4章 ARP:地址解析协议(转载)
章节回顾: 1.引言 当一台主机把以太网数据帧发送到位于同一局域网上的另一台主机时,是根据48 bit的以太网地址来确定目的接口的.设备驱动程序从不检查IP数据报中的目的IP地址.地址解析为这两种不同 ...
- angularjs ngRoute的使用简单例子
很丑的小例子,刚学angularjs,写下来方面以后看. 1.例子的工程目录如下: 2.index.html代码如下: <!DOCTYPE html><html><hea ...
- poj3635 FULL tank(TLE) 有限制的最短路(BFS搜索)。
用的BFS+优先队列+二进制压缩状态判重+链式前向星, TLE,好像有人这样过了...好像要用A*算法,还不太会,所以暂时放弃.但是也学会了很多,学习了链式前向星,更深理解了BFS求最优的时候,什么时 ...
- iOS - 设置系统类似的方法弃用警告的方式
在开发过程中,调用系统方法时,经常可以看xCode 提示 该方法已弃用,如下图: 觉得特别炫,查一下资料,如果自己也想实现如下的效果,只需要采用系统的如下几个关键字加在方法名后面就可以了: NS_DE ...
- iOS 混合变换旋转 CGAffineTransform
在ios 中, Core Graphics 提供了一系列的函数可以在一个变换的基础上做深层次的变换,如果做一个既要缩放又要旋转的变换,以下的方法比较实用. CGAffineTransformScale ...