
mysql 更新(九) pymysql模块的使用
本节重点:
- pymysql的下载和使用
- execute()之sql注入
- 增、删、改:conn.commit()
- 查:fetchone、fetchmany、fetchall
一、pymysql的下载和使用
之前我们都是通过MySQL自带的命令行客户端工具mysql来操作数据库,那如何在python程序中操作数据库呢?这就用到了pymysql模块,该模块本质就是一个套接字客户端软件,使用前需要事先安装。
(1)pymysql模块的下载
pip3 install pymysql
(2)pymysql的使用
数据库和数据都已存在
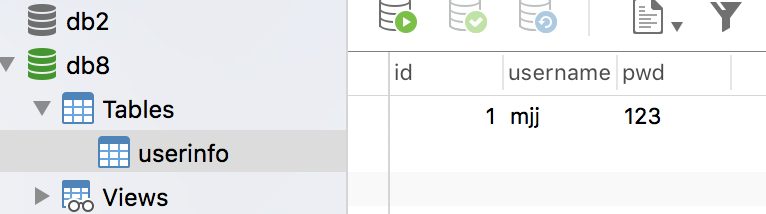

# 实现:使用Python实现用户登录,如果用户存在则登录成功(假设该用户已在数据库中)

import pymysql
user = input('请输入用户名:')

pwd = input('请输入密码:')

# 1.连接
conn = pymysql.connect(host='127.0.0.1', port=3306, user='root', password='', db='db8', charset='utf8')

# 2.创建游标
cursor = conn.cursor()

#注意%s需要加引号
sql = "select * from userinfo where username='%s' and pwd='%s'" %(user, pwd)
print(sql)

# 3.执行sql语句
cursor.execute(sql)

result=cursor.execute(sql) #执行sql语句,返回sql查询成功的记录数目
print(result)

# 关闭连接,游标和连接都要关闭
cursor.close()
conn.close()

if result:
    print('登陆成功')
else:
    print('登录失败')
二、execute()之sql注入
最后那一个空格,在一条sql语句中如果遇到select * from userinfo where username='mjj' -- asadasdas' and pwd='' 则--之后的条件被注释掉了(注意--后面还有一个空格)

#1、sql注入之:用户存在,绕过密码
mjj' -- 任意字符

#2、sql注入之:用户不存在,绕过用户与密码
xxx' or 1=1 -- 任意字符

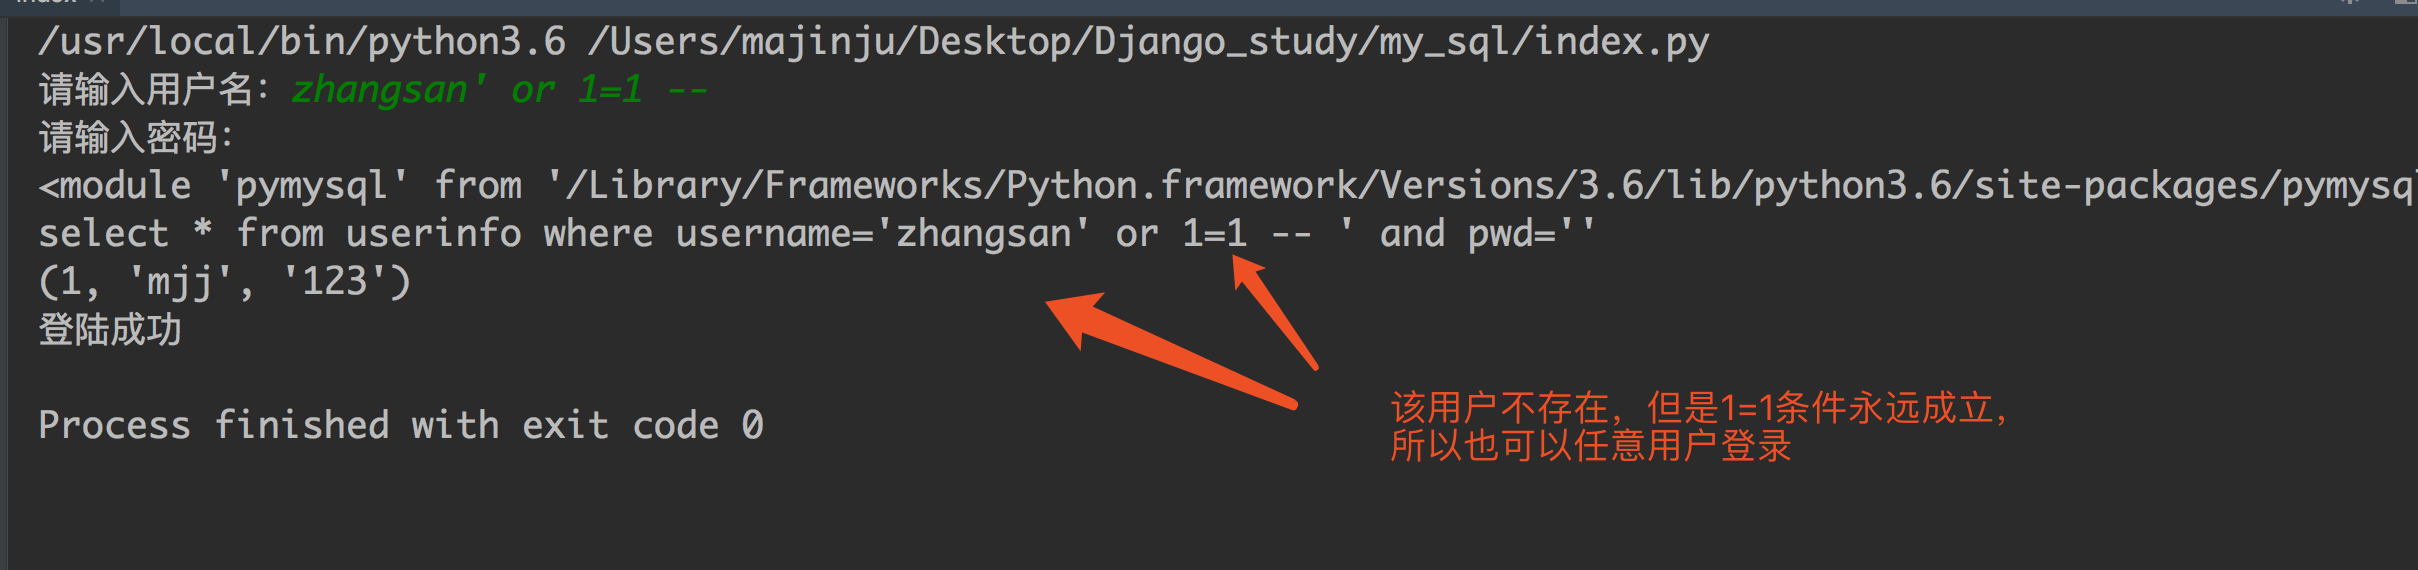
解决方法:
# 原来是我们对sql进行字符串拼接
# sql="select * from userinfo where name='%s' and password='%s'" %(username,pwd)
# print(sql)
# result=cursor.execute(sql)

#改写为(execute帮我们做字符串拼接,我们无需且一定不能再为%s加引号了)
sql="select * from userinfo where name=%s and password=%s" #!!!注意%s需要去掉引号,因为pymysql会自动为我们加上
result=cursor.execute(sql,[user,pwd]) #pymysql模块自动帮我们解决sql注入的问题,只要我们按照pymysql的规矩来。
三、增、删、改:conn.commit()
commit()方法:在数据库里增、删、改的时候,必须要进行提交,否则插入的数据不生效。
import pymysql
username = input('请输入用户名:')

pwd = input('请输入密码:')

# 1.连接
conn = pymysql.connect(host='localhost', port=3306, user='root', password='', db='db8', charset='utf8')

# 2.创建游标
cursor = conn.cursor()

# 操作
# 增
# sql = "insert into userinfo(username,pwd) values (%s,%s)"

# effect_row = cursor.execute(sql,(username,pwd))#同时插入多条数据#cursor.executemany(sql,[('李四','110'),('王五','119')])
# print(effect_row)#

# 改
# sql = "update userinfo set username = %s  where id = 2"
# effect_row = cursor.execute(sql,username)
# print(effect_row)

# 删
sql = "delete from userinfo  where id = 2"
effect_row = cursor.execute(sql)
print(effect_row)

#一定记得commit
conn.commit()

# 4.关闭游标
cursor.close()

# 5.关闭连接
conn.close()
四、查:fetchone、fetchmany、fetchall
fetchone():获取下一行数据,第一次为首行;
fetchall():获取所有行数据源
fetchmany(4):获取4行数据
查看一下表内容:
mysql> select * from userinfo;
+----+----------+-----+
| id | username | pwd |
+----+----------+-----+
|  1 | mjj      | 123 |
|  3 | 张三     | 110 |
|  4 | 李四     | 119 |
+----+----------+-----+
3 rows in set (0.00 sec)
使用fetchone():
import pymysql

# 1.连接
conn = pymysql.connect(host='localhost', port=3306, user='root', password='', db='db8', charset='utf8')

# 2.创建游标
cursor = conn.cursor()

sql = 'select * from userinfo'
cursor.execute(sql)

# 查询第一行的数据
row = cursor.fetchone()
print(row) # (1, 'mjj', '123')

# 查询第二行数据
row = cursor.fetchone()
print(row) # (3, '张三', '110')

# 4.关闭游标
cursor.close()

# 5.关闭连接
conn.close()
使用fetchall():
import pymysql

# 1.连接
conn = pymysql.connect(host='localhost', port=3306, user='root', password='', db='db8', charset='utf8')

# 2.创建游标
cursor = conn.cursor()

sql = 'select * from userinfo'
cursor.execute(sql)

# 获取所有的数据
rows = cursor.fetchall()
print(rows)

# 4.关闭游标
cursor.close()

# 5.关闭连接
conn.close()

#运行结果
((1, 'mjj', '123'), (3, '张三', '110'), (4, '李四', '119'))
默认情况下,我们获取到的返回值是元组,只能看到每行的数据,却不知道每一列代表的是什么,这个时候可以使用以下方式来返回字典,每一行的数据都会生成一个字典:
cursor = conn.cursor(cursor=pymysql.cursors.DictCursor) #在实例化的时候,将属性cursor设置为pymysql.cursors.DictCursor
在fetchone示例中,在获取行数据的时候,可以理解开始的时候,有一个行指针指着第一行的上方,获取一行,它就向下移动一行,所以当行指针到最后一行的时候,就不能再获取到行的内容,所以我们可以使用如下方法来移动行指针:
cursor.scroll(1,mode='relative')  # 相对当前位置移动
cursor.scroll(2,mode='absolute') # 相对绝对位置移动
第一个值为移动的行数,整数为向下移动,负数为向上移动,mode指定了是相对当前位置移动,还是相对于首行移动
# 1.Python实现用户登录
# 2.Mysql保存数据

import pymysql

# 1.连接
conn = pymysql.connect(host='localhost', port=3306, user='root', password='', db='db8', charset='utf8')

# 2.创建游标
cursor = conn.cursor(cursor=pymysql.cursors.DictCursor)

sql = 'select * from userinfo'
cursor.execute(sql)

# 查询第一行的数据
row = cursor.fetchone()
print(row) # (1, 'mjj', '123')

# 查询第二行数据
row = cursor.fetchone() # (3, '张三', '110')
print(row)

cursor.scroll(-1,mode='relative') #设置之后,光标相对于当前位置往前移动了一行,所以打印的结果为第二行的数据
row = cursor.fetchone()
print(row)

cursor.scroll(0,mode='absolute') #设置之后,光标相对于首行没有任何变化,所以打印的结果为第一行数据
row = cursor.fetchone()
print(row)

# 4.关闭游标
cursor.close()

# 5.关闭连接
conn.close()

#结果如下

{'id': 1, 'username': 'mjj', 'pwd': '123'}
{'id': 3, 'username': '张三', 'pwd': '110'}
{'id': 3, 'username': '张三', 'pwd': '110'}
{'id': 1, 'username': 'mjj', 'pwd': '123'}
fetchmany():
import pymysql

# 1.连接
conn = pymysql.connect(host='localhost', port=3306, user='root', password='', db='db8', charset='utf8')

# 2.创建游标
cursor = conn.cursor(cursor=pymysql.cursors.DictCursor)

sql = 'select * from userinfo'
cursor.execute(sql)

# 获取2条数据
rows = cursor.fetchmany(2)
print(rows)

# 4.关闭游标

# rows = cursor.fetchall()
# print(rows)
cursor.close()

# 5.关闭连接
conn.close()

#结果如下:
[{'id': 1, 'username': 'mjj', 'pwd': '123'}, {'id': 3, 'username': '张三', 'pwd': '110'}]
核心代码 哈哈哈 自己看
import pymysql

#开启 连接数据库conn=pymysql.Connect(host='127.0.0.1', port=3306, user='root', password='', db='pc')

#存入数据库cursor=conn.cursor()#创建游标对象 ,用游标对象创建sq语句sql='insert into pc.woshishui values (NULL ,"网","三")'   #处理自增字段 直接把id设置为NULL

print(sql)cursor.execute(sql)

conn.commit()

#关闭数据库cursor.close()conn.close()
mysql 更新(九) pymysql模块的使用的更多相关文章
- Mysql(九):Python连接MySQL数据库之pymysql模块使用
Python3连接MySQL 本文介绍Python3连接MySQL的第三方库--PyMySQL的基本使用. PyMySQL介绍 PyMySQL 是在 Python3.x 版本中用于连接 MySQL 服 ...
- MySQL学习12 - pymysql模块的使用
一.pymysql的下载和使用 1.pymysql模块的下载 2.pymysql的使用 二.execute()之sql注入 三.增.删.改:conn.commit() 四.查:fetchone.fet ...
- Python连接MySQL数据库之pymysql模块使用
安装PyMySQL pip install pymysql PyMySQL介绍 PyMySQL是在python3.x版本中用于连接MySQL服务器的一个库,2中则使用mysqldb. Django中也 ...
- 操作mysql(import pymysql模块)
pymysql模块 import pymysql #1.连上数据库.账号.密码.ip.端口号.数据库 #2.建立游标 #3.执行sql #4.获取结果 #5.关闭游标 #6.连接关闭 #charest ...
- Python连接MySQL数据库之pymysql模块
pymysql 在python3.x 中用于连接MySQL服务器的一个库:Python2中则使用mysqldb pymysql的模块的基本的使用 # 导入pymysql模块 import pymysq ...
- mysql五:pymysql模块
一.介绍 之前都是通过MySQ自带的命令行客户端工具Mysql来操作数据库,那如何在Python程序中操作数据库呢?这就需要用到pymysql模块了. 这个模块本质就是一个套接字客户端软件,使用前需要 ...
- python关于MySQL的API -- pymysql模块
1.模块安装 pip install pymysql 2.执行sql语句 import pymysql #添加数据 conn = pymysql.connect(host='127.0.0.1', p ...
- MySQL:记录的增删改查、单表查询、约束条件、多表查询、连表、子查询、pymysql模块、MySQL内置功能
数据操作 插入数据(记录): 用insert: 补充:插入查询结果: insert into 表名(字段1,字段2,...字段n) select (字段1,字段2,...字段n) where ...; ...
- Python 3.5 连接Mysql数据库(pymysql 方式)
由于 MySQLdb 模块还不支持 Python3.x,官方的Mysql连接包只支持到3.4,所以 Python3.5 如果想连接MySQL需要安装 pymysql 模块. pymysql 模块可以通 ...
随机推荐
- 神经网络损失函数中的正则化项L1和L2
神经网络中损失函数后一般会加一个额外的正则项L1或L2,也成为L1范数和L2范数.正则项可以看做是损失函数的惩罚项,用来对损失函数中的系数做一些限制. 正则化描述: L1正则化是指权值向量w中各个元素 ...
- 【c++基础】vector中按照Point类型某一个变量进行排序
code // sort(a.begin(), a.end(), cmpy); //subfunction bool cmpy(cv::Point const& a, cv::Point co ...
- Word Embeddings
能够充分意识到W的这些属性不过是副产品而已是很重要的.我们没有尝试着让相似的词离得近.我们没想把类比编码进不同的向量里.我们想做的不过是一个简单的任务,比如预测一个句子是不是成立的.这些属性大概也就是 ...
- C#单例的多种写法
单例的细分写法 本文提供全流程,中文翻译.Chinar坚持将简单的生活方式,带给世人!(拥有更好的阅读体验 -- 高分辨率用户请根据需求调整网页缩放比例) 1 最吊大的 一种--C#这样的高级语言特有 ...
- NASSA’s Robot
NASSA的机器人降落到了火星,降落的地方可以用X-Y坐标表示.机器人最开始在(0, 0).由于传输问题,部分指令可能会混淆,现在给出确定的命令与未知命令,请帮忙确认机器人的X.Y坐标最小最大值分别是 ...
- 《DSP using MATLAB》Problem 4.18
代码: %% ------------------------------------------------------------------------ %% Output Info about ...
- Java Web HelloWorld!
距离上次做Java Web开发已经两年多了,我几乎忘得一干二净……都忘记咋搭建环境了……,然后Eclipse官网莫名其妙的挂掉.幸好电脑里还有份两年前的开发环境备份…… 重拾Java Web开发啊,说 ...
- hive 创建orc表
orc表 创建具备ACID及Transactions的表 这里的表需要具备下面几个条件: 1. 必须以 ORC 格式存储 2. 必须分 bucket,且不能 sort 3. 必须显式声明tran ...
- streamsets k8s 部署试用
使用k8s 进行 streamsets的部署(没有使用持久化存储) k8s deploy yaml 文件 deploy.yaml apiVersion: extensions/v1beta1 kind ...
- 在CentOS和RHEL中配置SNMPv3
首先,使用yum安装必要的软件 [root@server ~]# yum install net-snmp-utils net-snmp-devel安装完成之后, 先停止snmpd,再创建具有只读属性 ...