
VirtualBox network / study environment setup for RHEL
I re-visited the RHEL study material and setup the environment again, noted down the procedure.
1, copied the *.vdi (rhel6std.vdi and RHEL6-Student.vdi) file from Lenovo ThinkPad T400 to my new Lenovo ThinkPad X1, created the new machine by importing the *.vdi, no need to install the system again.
2, setup the network at Linux Instructor and Linux Student
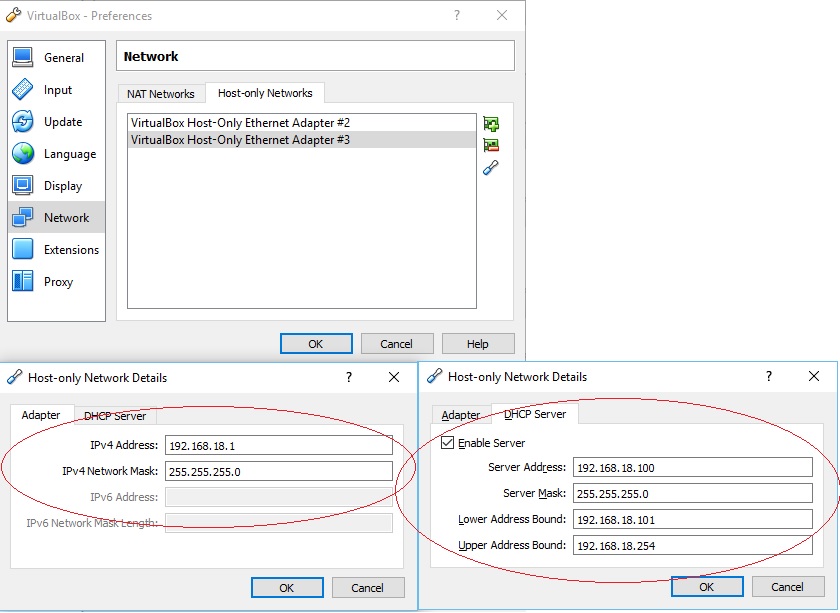
In VirtualBox Manager, File->Preferences...->Network, to create "VirtualBox Host-Only Ethernet Adapter #2" and "VirtualBox Host-Only Ethernet #3".
The Adapter #2 leave it as default,

The Adapter #3 set as below, server address allocated as 192.168.18.100, server mask as 255.255.255.0, address range as 192.168.18.101 ~ 192.168.18.254:
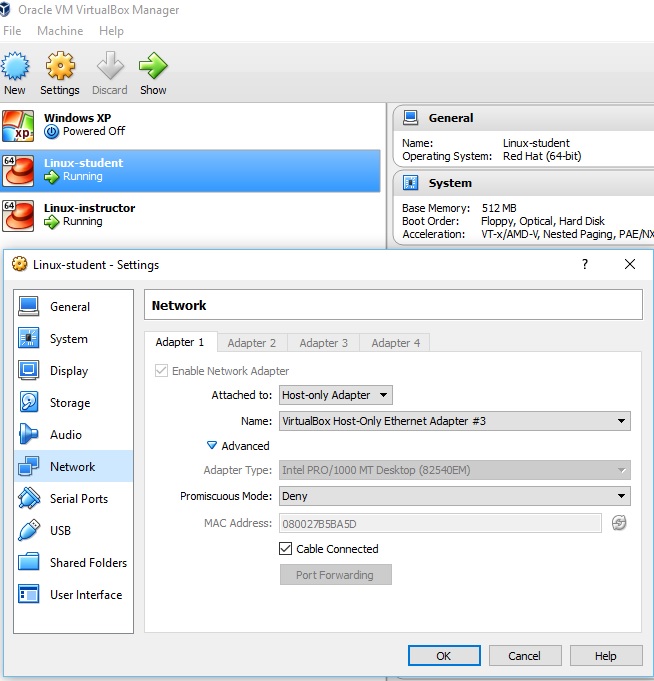
In Linux-student->Machine->Settings, set as below,
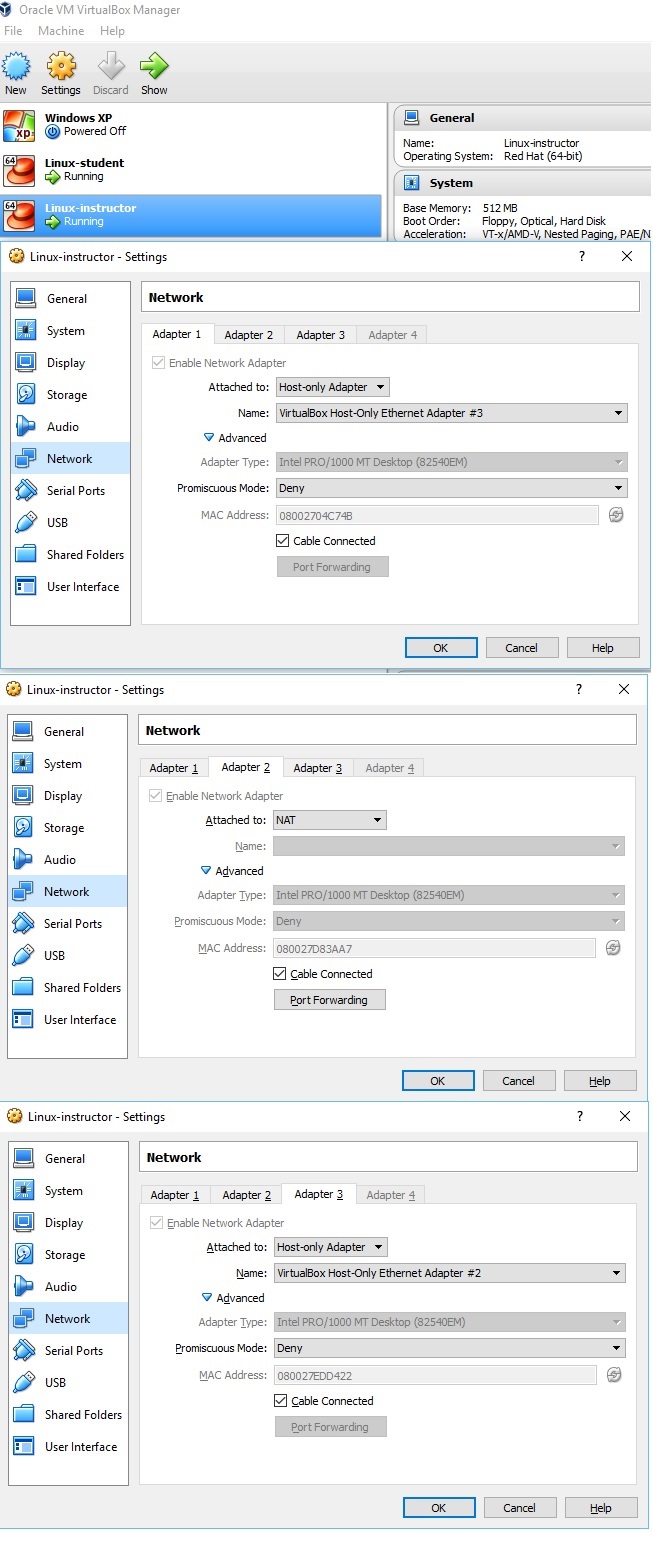
In Linux-Instructor->Machine->Settings, set as below,
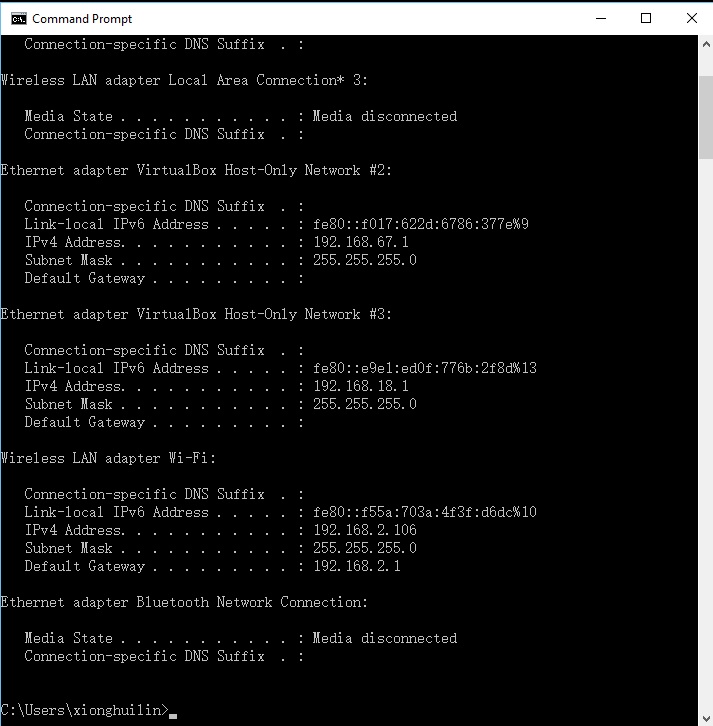
In Windows, the network configuration as below,
Network configuration on Linux-Instructor, as I cloned the machine, I didn't change anything and tried to test the network connection, but failed, the configuration as below,
/etc/sysconfig/network-scripts/glsorig-ifcfg-eth0
DEVICE="eth0"


BOOTPROTO="static"


DNS1="192.168.0.254"


HOSTNAME="instructor.example.com"


HWADDR="00:0C:29:65:C0:CE"


IPADDR="192.168.0.254"


MTU="1500"


NETMASK="255.255.255.0"


NM_CONTROLLED="yes"


ONBOOT="yes"
/etc/sysconfig/network-scripts/ifcfg-br0
DEVICE=br0


BOOTPROTO=none


IPADDR=192.168.0.254


NETMASK=255.255.255.0


DNS1=192.168.0.254


HOSTNAME="instructor.example.com"


IPV6INIT=no


NAME="Bridge eth0"


NM_CONTROLLED=no


ONBOOT=yes


PEERNTP="no"


DELAY=0


TYPE=Bridge


USERCTL=no
/etc/sysconfig/network-scripts/ifcfg-br0:0
# gls remote.test interface


DEVICE=br0:0


IPADDR=192.168.1.254


NETMASK=255.255.255.0


TYPE=Ethernet


BOOTPROTO=none


IPV6INIT=no


USERCTL=no
/etc/sysconfig/network-scripts/ifcfg-eth0
DEVICE=eth0


BOOTPROTO=none


DNS1=192.168.0.254


HOSTNAME="instructor.example.com"


IPADDR=192.168.0.254


MTU=1500


NETMASK=255.255.255.0


NM_CONTROLLED=yes


ONBOOT=yes


BRIDGE=br0


TYPE=Ethernet


HWADDR=08:00:27:04:C7:4B


IPV6INIT=no


USERCTL=no
/etc/sysconfig/network-scripts/ifcfg-eth1
DEVICE=eth1


BOOTPROTO=dhcp


ONBOOT=yes


TYPE=Ethernet


IPV6INIT=no


USERCTL=no
/etc/sysconfig/network-scripts/ifcfg-lo
DEVICE=lo


IPADDR=127.0.0.1


NETMASK=255.0.0.0


NETWORK=127.0.0.0


# If you're having problems with gated making 127.0.0.0/8 a martian,


# you can change this to something else (255.255.255.255, for example)


BROADCAST=127.255.255.255


ONBOOT=yes


NAME=loopback
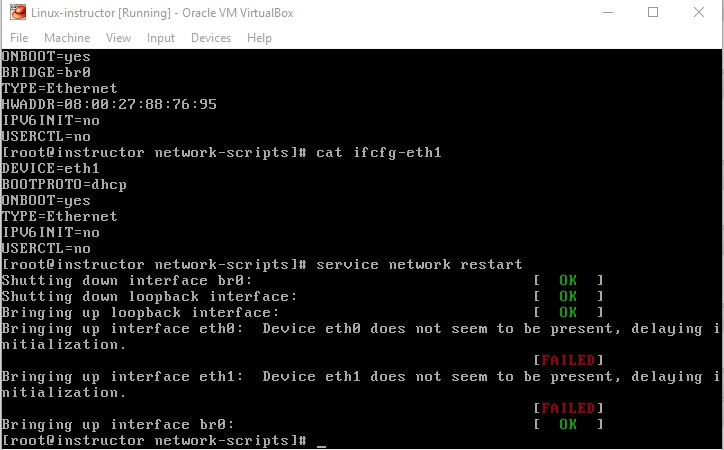
Bringing up interface eth0: Device eth0 does not seem to be present, delaying initialization.
Bringing up interface eth1: Device eth0 does not seem to be present, delaying initialization.
As below,
Delete the file /etc/udev/rules.d/70-persistent-net.rules, by commands:
mv 70-persistent-net.rules 70-persistent-net.rules.bak


reboot
encountered below problems,
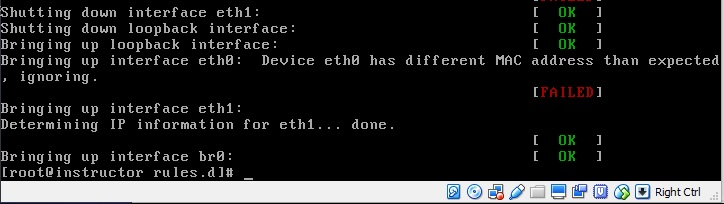
change the MAC_address in the ethernet configuration file as required, by commands,
ifconfig -a                                    #this is to get the MAC address of the etho0


vim /etc/sysconfig/network-scripts/ifcfg-eth0   #modify the MAC address in the configuration file
service network restart
For Linux-Instructors network configuration, I configured all and I am not sure which file makes it work.
Network configuration on Linux-Student, as below,
[student@server1 Desktop]$ cat /etc/sysconfig/network-scripts/ifcfg-eth0


DEVICE=eth0


BOOTPROTO=none


IPADDR=192.168.0.101


NETMASK=255.255.255.0


ONBOOT=yes


GATEWAY=192.168.0.254


TYPE=Ethernet


DNS1=192.168.0.254


IPV6INIT=no


USERCTL=no


PEERDNS=no
and by command
setup
In "Device configuration" -> "eth0 (eth0) - Intel Corporation 82540EM Gigabit Ethernet Controller"
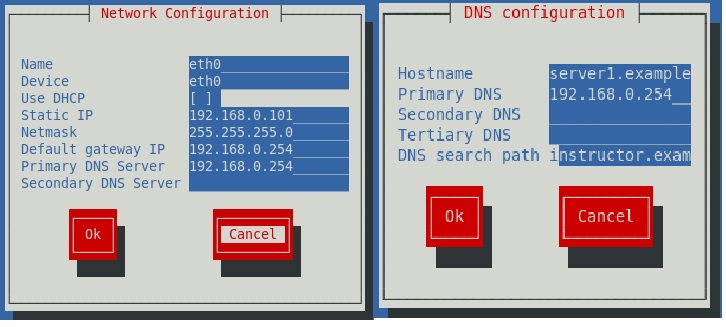
/etc/init.d/NetworkManager stop


chkconfig NetworkManager off


service network restart
3, testing the result from Linux-student and Linux-Instructor
the connection from Linux-student as Linux-student -> Linux-Instructor->Window Host-> Internet, testing ping 8.8.8.8, ping instructor.example.com, ping 192.168.0.254, all successful,
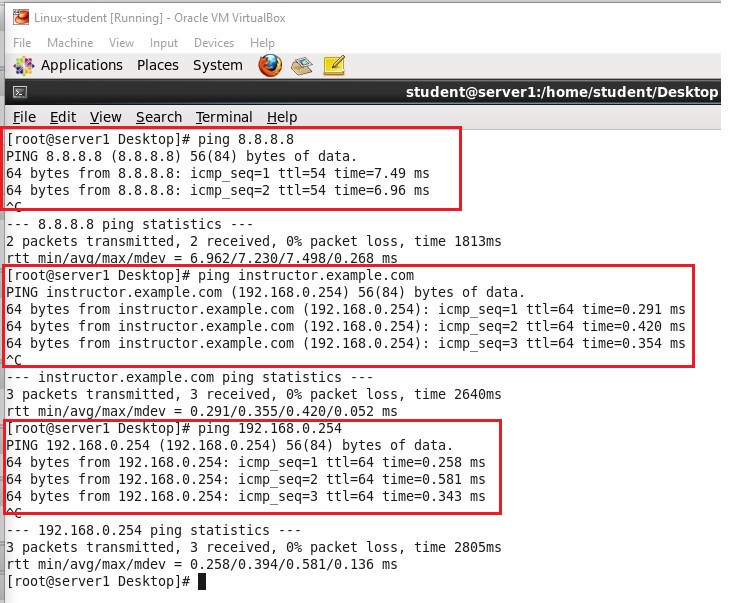
the connection from Linux -Instructor as, Linux-student -> Linux-Instructor->Window host-> Internet, testing ping 8.8.8.8, ping 192.168.0.101, all successful,
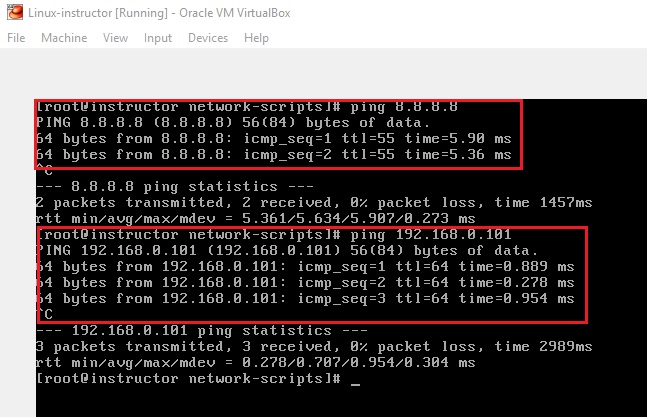
4, installation of VirtualBox Additions( VBOXADDITIONS_4.3.12_93733 ), and configure the share the folder between the Windows and Linux
Please refer to this link, http://xionghuilin.com/?p=7
5, reference links,
https://www.centos.org/forums/viewtopic.php?t=26971
https://www.centos.org/forums/viewtopic.php?t=7684
VirtualBox network / study environment setup for RHEL的更多相关文章
- Configure a bridged network interface for KVM using RHEL 5.4 or later?
environment Red Hat Enterprise Linux 5.4 or later Red Hat Enterprise Linux 6.0 or later KVM virtual ...
- Network Experiment Environment Construction
In order to provide an environment for network experiments in the future, I use VirutalBox to create ...
- VirtualBox Network Config
Sharing Host VPN with VirtualBox guest After looking for this solution everywhere, I finally found a ...
- Struts 2 - Environment Setup
Our first task is to get a minimal Struts 2 application running. This chapter will guide you on how ...
- [React Fundamentals] Development Environment Setup
In this lesson we'll setup a simple build process for converting our ES6 React components into ES5 u ...
- VirtualBox Network设置的NAT和Bridged Adapter模式区别
区别: NAT模式下,虚拟机仍然可以访问网络,但是从网络接收者的眼中看来,这些网络请求都来自宿主机,而感知不到虚拟机.外网也无法访问虚拟机网络.虚拟机和宿主机器的IP地址在不同的子网,比如192.16 ...
- [Flux] 1. Development Environment Setup
Install packages: { "name": "reactflux", "version": "1.0.0", ...
- [Environment setup]python+selenium+Eclipse+pydev环境搭建
转载自: http://www.cnblogs.com/Bonker/p/3584707.html http://www.cnblogs.com/fnng/archive/2013/05/29/310 ...
- Azure Sphere Development Environment Setup
1. Visual Studio 目前,Visual Studio 2017/2019支持Azure Sphere开发,后续,微软会加入Visual Studio Code的支持.以Visual St ...
随机推荐
- cocos2dx3.2升级Android5的坑
虽然已经转到服务端,但是对客户端的事情,偶尔还看看.公司的游戏用的是cocos2dx 3.2的版本, 然而在Android 5 上却无法运行. 先是没有触摸事件. 在stackoverflow上看到, ...
- 三篇很好的讲解keppalived的博客
VRRP协议介绍 参考资料: RFC 3768 1. 前言 VRRP(Virtual Router Redundancy Protocol)协议是用于实现路由器冗余的协议,最新协议在RFC3768中定 ...
- RabbitMQ之HelloWorld【译】
简介 RabbitMQ是一个消息代理,主要的想法很简单:它接收并转发消息.你可以把它当做一个邮局,当你发送邮件到邮筒,你相信邮差先生最终会将邮件投递给收件人.RabbitMQ在这个比喻里,是一个邮筒, ...
- Web app root system property already set to different value 错误原因及解决
http://yzxqml.iteye.com/blog/1761540 ——————————————————————————————————————————————————————————————— ...
- WORD里怎样能做到局部“分栏”就是一页里有的分有的不分
选中你要分的部分再分栏如果不想分的部分也被分了,那就可以选中不想分的那部分,选择“分栏”->“一栏” 转自:http://zhidao.baidu.com/question/9873268.ht ...
- HTML邮件注意事项(转)
1.全局规则之一,不要写<style>标签.不要写class,所有CSS都用style属性,什么元素需要什么样式就用style写内联的CSS. 2.全局规则之二,少用图片,邮箱不会过滤你的 ...
- VC++ 窗口拆分CSplitterWnd
前言 当前许多优秀的软件都采用“多视”技术. 所谓“多视”,是指在同一个框架窗口里同时显示多个视图. 通过运用这种技术,可以在框架的有限控件内同时提供用户更大的信息量,并且使得用户界面 ...
- python3----练习题(图片转字符画)
import argparse from PIL import Image def parse_param(): parser = argparse.ArgumentParser() # 命令行输入参 ...
- layui多选框
多选下拉框:http://sun.faysunshine.com/layui/formSelects-v4/example/example_v4.html 1.下载formSelects-v4.1 2 ...
- hdu4122(单调队列)
处理题目中给的日期,然后用单调队列维护 Alice's mooncake shop Time Limit: 2000/1000 MS (Java/Others) Memory Limit: 32 ...