
使用saltstack自动部署K8S
一、环境准备
1.1 规划
|
1. 操作系统 CentOS-7.x-x86_64。 2. 关闭 iptables 和 SELinux。 3. 所有节点的主机名和 IP 地址,使用/etc/hosts 做好主机名解析。 |
|||
| 主机名 | IP地址(NAT) | CPU | 内存 |
| k8s-master | eth0 : 10.0.0.25 | 1VCPU | 2G |
| k8s-node-1 | eth0 : 10.0.0.26 | 1VCPU | 2G |
| k8s-node-1 | eth0 : 10.0.0.27 | 1VCPU | 2G |
1.2 网络设置

1.3 配置静态IP地址
#将 UUID 和 MAC 地址已经其它配置删除掉,3个节点除了IP和主机名不同其他相同。
[root@k8s-master ~]# cat /etc/sysconfig/network-scripts/ifcfg-eth0

TYPE=Ethernet

BOOTPROTO=static

NAME=eth0

DEVICE=eth0

ONBOOT=yes

IPADDR=10.0.0.25

NETMASK=255.255.255.0

GATEWAY=10.0.0.254

DNS=223.5.5.5

#重启网络服务

[root@k8s-master ~]# systemctl restart network

#设置 DNS 解析

[root@k8s-master ~]# vi /etc/resolv.conf

nameserver 223.5.5.5
1.4 关闭selinux、防火墙
setenforce 0

sed -i 's#SELINUX=enforcing#SELINUX=disabled#' /etc/selinux/config

systemctl disable firewalld.service

systemctl stop firewalld.service

systemctl stop NetworkManager

systemctl disable NetworkManager
1.5 设置主机名解析
3个节点都做
cat >>/etc/hosts<<EOF
10.0.0.25 k8s-master
10.0.0.26 k8s-node-1
10.0.0.27 k8s-node-2
EOF
1.6 配置epel源
3个节点都做
rpm -ivh http://mirrors.aliyun.com/epel/epel-release-latest-7.noarch.rpm

#下载常用命令

yum install -y net-tools vim lrzsz tree screen lsof tcpdump nc mtr nmap

#保证能上网

[root@k8s-master ~]# ping www.baidu.com -c3

PING www.a.shifen.com (61.135.169.121) 56(84) bytes of data.

64 bytes from 61.135.169.121: icmp_seq=1 ttl=128 time=5.41 ms

64 bytes from 61.135.169.121: icmp_seq=2 ttl=128 time=6.55 ms

64 bytes from 61.135.169.121: icmp_seq=3 ttl=128 time=8.97 ms

--- www.a.shifen.com ping statistics ---

3 packets transmitted, 3 received, 0% packet loss, time 2023ms

rtt min/avg/max/mdev = 5.418/6.981/8.974/1.486 ms
1.7 配置免秘钥登录
只在master节点做
[root@k8s-master ~]# ssh-keygen -t rsa

Generating public/private rsa key pair.

Enter file in which to save the key (/root/.ssh/id_rsa):

Enter passphrase (empty for no passphrase):

Enter same passphrase again:

Your identification has been saved in /root/.ssh/id_rsa.

Your public key has been saved in /root/.ssh/id_rsa.pub.

The key fingerprint is:

b1:a0:5b:::0e:8f:1e::bf::1f:d1:f3::c4 root@k8s-master

The key's randomart image is:

+--[ RSA ]----+

|    o o .+.      |

|     X   .E .    |

|  . + * o  =     |

|   + + + +  .    |

|    + + S        |

|     =           |

|    .            |

|                 |

|                 |

+-----------------+

[root@k8s-master ~]# ssh-copy-id k8s-master

The authenticity of host 'k8s-master (10.0.0.25)' can't be established.

ECDSA key fingerprint is :5c::a1:b4:cc:bf:::a5:d5:d1:::3c:9a.

Are you sure you want to continue connecting (yes/no)? yes

/usr/bin/ssh-copy-id: INFO: attempting to log in with the new key(s), to filter out any that are already installed

/usr/bin/ssh-copy-id: INFO:  key(s) remain to be installed -- if you are prompted now it is to install the new keys

root@k8s-master's password:

Number of key(s) added:

Now try logging into the machine, with:   "ssh 'k8s-master'"

and check to make sure that only the key(s) you wanted were added.

[root@k8s-master ~]# ssh-copy-id k8s-node-

The authenticity of host 'k8s-node-1 (10.0.0.26)' can't be established.

ECDSA key fingerprint is :5c::a1:b4:cc:bf:::a5:d5:d1:::3c:9a.

Are you sure you want to continue connecting (yes/no)? yes

/usr/bin/ssh-copy-id: INFO: attempting to log in with the new key(s), to filter out any that are already installed

/usr/bin/ssh-copy-id: INFO:  key(s) remain to be installed -- if you are prompted now it is to install the new keys

root@k8s-node-'s password:

Number of key(s) added:

Now try logging into the machine, with:   "ssh 'k8s-node-1'"

and check to make sure that only the key(s) you wanted were added.

[root@k8s-master ~]# ssh-copy-id k8s-node-

The authenticity of host 'k8s-node-2 (10.0.0.27)' can't be established.

ECDSA key fingerprint is :5c::a1:b4:cc:bf:::a5:d5:d1:::3c:9a.

Are you sure you want to continue connecting (yes/no)? yes

/usr/bin/ssh-copy-id: INFO: attempting to log in with the new key(s), to filter out any that are already installed

/usr/bin/ssh-copy-id: INFO:  key(s) remain to be installed -- if you are prompted now it is to install the new keys

root@k8s-node-'s password:

Number of key(s) added:

Now try logging into the machine, with:   "ssh 'k8s-node-2'"

and check to make sure that only the key(s) you wanted were added.
二、安装Salt-SSH并克隆本项目代码
2.1master节点做
2.1 安装Salt SSH

[root@k8s-master ~]# yum install -y https://repo.saltstack.com/yum/redhat/salt-repo-latest-2.el7.noarch.rpm

[root@k8s-master ~]# yum install -y salt-ssh git

2.2 获取项目代码放置在/srv目录

[root@k8s-master ~]# git clone https://github.com/unixhot/salt-kubernetes.git

[root@k8s-master ~]# cd salt-kubernetes/

[root@k8s-master salt-kubernetes]# mv * /srv/

[root@k8s-master salt-kubernetes]# cd /srv/

[root@k8s-master srv]# cp master /etc/salt/master

[root@k8s-master srv]# cp roster /etc/salt/roster

2.3 下载二进制文件

链接: https://pan.baidu.com/s/1kJmvR9wzleHGHnSVHaNpMg

密码: 4taa

下载完成后,将文件移动到/srv/salt/k8s/目录下。

[root@linux-node1 ~]# cd /srv/salt/k8s/

[root@k8s-master k8s]# unzip k8s-v1.9.3-auto.zip

[root@k8s-master k8s]# ls -l files/

总用量

drwxr-xr-x  root root    3月   : cfssl-1.2

drwxrwxr-x  root root  3月   : cni-plugins-amd64-v0.7.0

drwxr-xr-x  root root    3月   : etcd-v3.3.1-linux-amd64

drwxr-xr-x  root root    3月   : flannel-v0.10.0-linux-amd64

drwxr-xr-x  root root    3月   : k8s-v1.9.3
三、Salt SSH管理的机器以及角色分配
- k8s-role: 用来设置K8S的角色
- etcd-role: 用来设置etcd的角色,如果只需要部署一个etcd,只需要在一台机器上设置即可
- etcd-name: 如果对一台机器设置了etcd-role就必须设置etcd-name
3.1master节点做
[root@k8s-master ~]# vim /etc/salt/roster

k8s-master:

  host: 10.0.0.25

  user: root

  priv: /root/.ssh/id_rsa

  minion_opts:

    grains:

      k8s-role: master

      etcd-role: node

      etcd-name: etcd-node1

k8s-node-:

  host: 10.0.0.26

  user: root

  priv: /root/.ssh/id_rsa

  minion_opts:

    grains:

      k8s-role: node

      etcd-role: node

      etcd-name: etcd-node2

k8s-node-:

  host: 10.0.0.27

  user: root

  priv: /root/.ssh/id_rsa

  minion_opts:

    grains:

      k8s-role: node

      etcd-role: node

      etcd-name: etcd-node3
四、配置参数
4.1master节点做
[root@k8s-master ~]# vim /srv/pillar/k8s.sls

# -*- coding: utf- -*-

#设置Master的IP地址(必须修改)

MASTER_IP: "10.0.0.25"

#设置ETCD集群访问地址(必须修改)

ETCD_ENDPOINTS: "https://10.0.0.25:2379,https://10.0.0.26:2379,https://10.0.0.27:2379"

#设置ETCD集群初始化列表(必须修改)

ETCD_CLUSTER: "etcd-node1=https://10.0.0.25:2380,etcd-node2=https://10.0.0.26:2380,etcd-node3=https://10.0.0.27:2380"

#通过Grains FQDN自动获取本机IP地址,请注意保证主机名解析到本机IP地址

NODE_IP: {{ grains['fqdn_ip4'][] }}

#设置BOOTSTARP的TOKEN,可以自己生成

BOOTSTRAP_TOKEN: "ad6d5bb607a186796d8861557df0d17f"

#配置Service IP地址段

SERVICE_CIDR: "10.1.0.0/16"

#Kubernetes服务 IP (从 SERVICE_CIDR 中预分配)

CLUSTER_KUBERNETES_SVC_IP: "10.1.0.1"

#Kubernetes DNS 服务 IP (从 SERVICE_CIDR 中预分配)

CLUSTER_DNS_SVC_IP: "10.1.0.2"

#设置Node Port的端口范围

NODE_PORT_RANGE: "20000-40000"

#设置POD的IP地址段

POD_CIDR: "10.2.0.0/16"

#设置集群的DNS域名

CLUSTER_DNS_DOMAIN: "cluster.local."
五、执行SaltStack状态
5.1master节点做
5.1 测试Salt SSH联通性

[root@k8s-master ~]# salt-ssh '*' test.ping
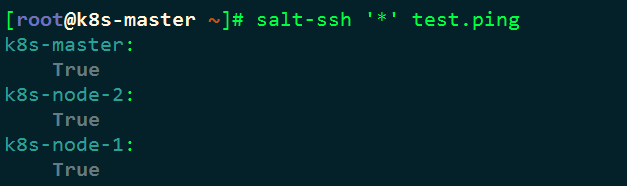
5.2 部署Etcd,由于Etcd是基础组建,需要先部署,目标为部署etcd的节点。

[root@k8s-master ~]#  salt-ssh -L 'k8s-master,k8s-node-1,k8s-node-2' state.sls k8s.etcd


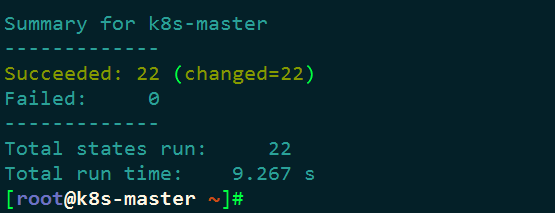
5.3 部署K8S集群

由于包比较大,这里执行时间较长,5分钟+,如果执行有失败可以再次执行即可!

[root@k8s-master ~]#  salt-ssh '*' state.highstate
六、测试Kubernetes安装
6.1master节点做
[root@k8s-master ~]# source /etc/profile

[root@k8s-master ~]# kubectl get cs

[root@k8s-master ~]# kubectl get node
七、测试Kubernetes集群和Flannel网络
7.1master节点做
[root@k8s-master ~]#  kubectl run net-test --image=alpine --replicas= sleep

需要等待拉取镜像,可能稍有的慢,请等待。

[root@linux-node1 ~]# kubectl get pod -o wide

测试联通性,如果都能ping通,说明Kubernetes集群部署完毕,。

[root@k8s-master ~]#  ping -c  10.2.12.2

PING 10.2.12.2 (10.2.12.2) () bytes of data.

 bytes from 10.2.12.2: icmp_seq= ttl= time=8.72 ms

--- 10.2.12.2 ping statistics ---

 packets transmitted,  received, % packet loss, time 0ms

rtt min/avg/max/mdev = 8.729/8.729/8.729/0.000 ms

[root@k8s-master ~]#  ping -c  10.2.24.2

PING 10.2.24.2 (10.2.24.2) () bytes of data.

 bytes from 10.2.24.2: icmp_seq= ttl= time=22.9 ms

--- 10.2.24.2 ping statistics ---

 packets transmitted,  received, % packet loss, time 0ms

rtt min/avg/max/mdev = 22.960/22.960/22.960/0.000 ms
八、如何新增Kubernetes节点
. 设置主机名解析

. 设置SSH无密码登录

. 在/etc/salt/roster里面,增加对应的机器IP

. 执行SaltStack状态:salt-ssh '*' state.highstate

. [root@k8s-node- ~]# vim /etc/salt/roster

k8s-node-:

  host: 10.0.0.28

  user: root

  priv: /root/.ssh/id_rsa

  minion_opts:

    grains:

      k8s-role: node

. [root@linux-node1 ~]# salt-ssh '*' state.highstate
使用saltstack自动部署K8S的更多相关文章
- 持续集成之应用k8s自动部署
持续集成之应用k8s自动部署 Intro 上次我们提到了docker容器化及自动化部署,这仅仅适合个人项目或者开发环境部署,如果要部署到生产环境,必然就需要考虑很多因素,比如访问量大了如何调整部署,如 ...
- spinnaker自动发布k8s部署应用<一>
一.准备环境 !docker-ce---17.06.2-ce !k8s集群----1.11.1 !helm部署工具---helm-v2.10.0 !spinnaker-charts---spinnak ...
- 基于saltstack自动化部署高可用kubernetes集群
SaltStack自动化部署HA-Kubernetes 本项目在GitHub上,会不定期更新,大家也可以提交ISSUE,地址为:https://github.com/skymyyang/salt-k8 ...
- 使用saltstack批量部署服务器运行环境事例——批量部署nagios客户端
之前关于搭建web服务器集群实验的这篇文章http://www.cnblogs.com/cjyfff/p/3553579.html中,关于如何用saltstack批量部署服务器这一点当时没有记录到文章 ...
- kubernetes系列03—kubeadm安装部署K8S集群
本文收录在容器技术学习系列文章总目录 1.kubernetes安装介绍 1.1 K8S架构图 1.2 K8S搭建安装示意图 1.3 安装kubernetes方法 1.3.1 方法1:使用kubeadm ...
- 自动化运维工具SaltStack详细部署【转】
==========================================================================================一.基础介绍==== ...
- 部署 k8s Cluster(上)[转]
我们将部署三个节点的 Kubernetes Cluster. k8s-master 是 Master,k8s-node1 和 k8s-node2 是 Node. 所有节点的操作系统均为 Ubuntu ...
- .Net Core自动化部署系列(三):使用GitLab CI/CD 自动部署Api到Docker
之前写过使用Jenkins实现自动化部署,最近正好没事研究了下GitLab的自动化部署,顺便记录一下. 使用GitLab部署我们需要准备两件事,第一个起码你得有个GitLab,自己搭建或者使用官方的都 ...
- Kubeasz部署K8s基础测试环境简介
下面介绍使用Kubeasz部署K8s集群环境. https://github.com/easzlab/kubeasz在需要使用kubeeasz项目安装的k8s时,需要将所有需要它来部署的节点上,都安装 ...
随机推荐
- vuejs中的回车事件
@keyup.enter.native="事件名称"
- 性能测试专题:Locust工具实战之“蝗虫”降世
阅读全文需5分钟. 1. 前言 在上一篇文章中,我们已经为大家介绍了什么是Locust,具体可参照:性能专题:Locust工具实战之开篇哲学三问,简单来说,Locust 是基于 Python 语言下的 ...
- Ubuntu中使用Nginx+rtmp模块搭建流媒体视频点播服务
1. 背景 不知不觉笔者来到流媒体部门已经一年半多了,积攒了不少的流媒体知识,但平时工作也比较忙,很少进行总结性的梳理,最近准备花几个周末时间写一个流媒体系列的实践文章,也算是给自己做总结的同时帮助有 ...
- JAVA网络通信底层调用LINUX探究
前言:该博客花了我一个下午得心血,全部手打,路过给个赞,拒绝抄袭!!!!!!!!!!!!!!!!!!!!!!!!! 简单的SOCKET通信程序 先从一段简单的JAVA程序性开始写起,这里我们才用半双工 ...
- 【02】对象的Getter and Setter
java和C#非常相似,它们大部分的语法是一样的,但尽管如此,也有一些地方是不同的. 为了更好地学习java或C#,有必要分清它们两者到底在哪里不同. 我们这次要来探讨对象的Getter and Se ...
- python网络爬虫之解析网页的正则表达式(爬取4k动漫图片)[三]
前言 hello,大家好 本章可是一个重中之重,因为我们今天是要爬取一个图片而不是一个网页或是一个json 所以我们也就不用用到selenium模块了,当然有兴趣的同学也一样可以使用selenium去 ...
- C#-面向对象:争议TDD(测试驱动开发)
----------------------- 绝对原创!版权所有,转发需经过作者同意. ----------------------- 在谈到特性的使用场景时,还有一个绝对离不开的就是 单元测试 按 ...
- Java 虚拟机结构
一 数据类型 与 Java 程序语言中的数据类型相似,Java 虚拟机可以操作的数据类型可分为两类:原始类型(Primitive Types,也经常翻译为原生类型或者基本类型)和引用类型(Refere ...
- lvm_lv_extend
根分区lv扩容 xfs格式 neokylinV7.0 [root@localhost ~]# fdisk /dev/vda 欢迎使用 fdisk (util-linux 2.23.2). 更改将停留在 ...
- Leecode_137_singleNumberII
参考: http://blog.csdn.net/jocyln9026/article/details/19397477