C# 内存法图像处理
内存法通过把图像储存在内存中进行处理,效率大大高于GetPixel方法,安全性高于指针法。
笔者当初写图像处理的时候发现网上多是用GetPixel方法实现,提到内存法的时候也没有具体实现,所以笔者在这里具体实现一下- -,望指正。
首先讲一下用到的一些方法。
1.LockBits和UnlockBits:使用 LockBits 方法,可在系统内存中锁定现有的位图,以便通过编程方式进行更改,每调用LockBits之后都应该调用一次UnlockBits。
2.Scan0:图像的第一个字节地址。
3.Stride:步幅,扫描宽度,形象的说就是一行的长度。
4.PixelFormat:数据的实际像素格式。
给出原图:

一、灰度
对每个像素点进行加权平均,(方法不唯一)。

        /// <summary>

        /// 灰化实现方法

        /// </summary>

        void Image_Ashing()

        {

            if (pbshowbox.Image != null)

            {

                int Height = this.pbshowbox.Image.Height;

                int Width = this.pbshowbox.Image.Width;

                Bitmap bitmap = new Bitmap(Width, Height, PixelFormat.Format24bppRgb);

                Bitmap MyBitmap = (Bitmap)this.pbshowbox.Image;

                BitmapData oldData = MyBitmap.LockBits(new Rectangle(, , Width, Height), ImageLockMode.ReadOnly, PixelFormat.Format24bppRgb);

                BitmapData newData = bitmap.LockBits(new Rectangle(, , Width, Height), ImageLockMode.ReadWrite, PixelFormat.Format24bppRgb);

                unsafe

                {

                    byte* pin = (byte*)(oldData.Scan0.ToPointer());

                    byte* pout = (byte*)(newData.Scan0.ToPointer());

                    for (int y = ; y < oldData.Height; y++)

                    {

                        for (int x = ; x < oldData.Width; x++)

                        {

                            byte Result = (byte)(pin[] * 0.1 + pin[] * 0.2 + pin[] * 0.7);//加权平均实现灰化

                            pout[] = (byte)(Result);

                            pout[] = (byte)(Result);

                            pout[] = (byte)(Result);

                            pin = pin + ;

                            pout = pout + ;

                        }

                        pin += oldData.Stride - oldData.Width * ;

                        pout += newData.Stride - newData.Width * ;

                    }

                    bitmap.UnlockBits(newData);

                    MyBitmap.UnlockBits(oldData);

                    this.pbshowbox.Image = bitmap;

                }

            }

            else

            {

                MessageBox.Show("请先打开一张图片!");

            }

        }
二、柔化
像素点与周围像素点差别较大时取平均值。

        /// <summary>

        /// 柔化实现方法

        /// </summary>

        void Image_Soften()

        {

            if (pbshowbox.Image != null)

            {

                int Height = this.pbshowbox.Image.Height;

                int Width = this.pbshowbox.Image.Width;

                Bitmap bitmap = new Bitmap(Width, Height, PixelFormat.Format32bppRgb);

                Bitmap MyBitmap = (Bitmap)this.pbshowbox.Image;

                BitmapData oldData = MyBitmap.LockBits(new Rectangle(, , Width, Height), ImageLockMode.ReadOnly, PixelFormat.Format32bppRgb);

                BitmapData newData = bitmap.LockBits(new Rectangle(, , Width, Height), ImageLockMode.ReadWrite, PixelFormat.Format32bppRgb);

                unsafe

                {

                    byte* pin = (byte*)(oldData.Scan0.ToPointer());

                    byte* pout = (byte*)(newData.Scan0.ToPointer());

                    //高斯模板

                    int[] Gauss = { , , , , , , , ,  };

                    for (int i = ; i < Width - ; i++)

                    {

                        for (int j = ; j < Height - ; j++)

                        {

                            int r = , g = , b = ;

                            int Index = ;

                            for (int col = -; col <= ; col++)

                            {

                                for (int row = -; row <= ; row++)

                                {

                                    int off = ((j + row) * (Width) + (i + col)) * ;

                                    r += pin[off + ] * Gauss[Index];

                                    g += pin[off + ] * Gauss[Index];

                                    b += pin[off + ] * Gauss[Index];

                                    Index++;

                                }

                            }

                            r /= ;

                            g /= ;

                            b /= ;

                            //处理颜色值溢出

                            if (r < ) r = ;

                            if (r > ) r = ;

                            if (g < ) g = ;

                            if (g > ) g = ;

                            if (b < ) b = ;

                            if (b > ) b = ;

                            int off2 = (j * Width + i) * ;

                            pout[off2 + ] = (byte)r;

                            pout[off2 + ] = (byte)g;

                            pout[off2 + ] = (byte)b;

                        }

                    }

                    bitmap.UnlockBits(newData);

                    MyBitmap.UnlockBits(oldData);

                    this.pbshowbox.Image = bitmap;

                }

            }

            else

            {

                MessageBox.Show("请先打开一张图片!");

            }

        }
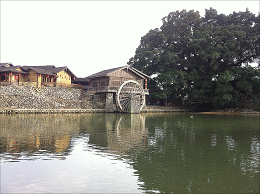
三、锐化
突出显示颜色值大的像素点。
        /// <summary>

        /// 锐化实现方法,显示数值最大像素点

        /// </summary>

        void Image_Sharpen()

        {

            if (this.pbshowbox.Image != null)

            {

                int Height = this.pbshowbox.Image.Height;

                int Width = this.pbshowbox.Image.Width;

                Bitmap bitmap = new Bitmap(Width, Height, PixelFormat.Format32bppRgb);

                Bitmap MyBitmap = (Bitmap)this.pbshowbox.Image;

                BitmapData oldData = MyBitmap.LockBits(new Rectangle(, , Width, Height), ImageLockMode.ReadOnly, PixelFormat.Format32bppRgb);

                BitmapData newData = bitmap.LockBits(new Rectangle(, , Width, Height), ImageLockMode.ReadWrite, PixelFormat.Format32bppRgb);

                unsafe

                {

                    byte* pin = (byte*)(oldData.Scan0.ToPointer());

                    byte* pout = (byte*)(newData.Scan0.ToPointer());

                    //拉普拉斯模板

                    int[] Laplacian = { -, -, -, -, , -, -, -, - };

                    for (int i = ; i < Width - ; i++)

                    {

                        for (int j = ; j < Height - ; j++)

                        {

                            int r = , g = , b = ;

                            int Index = ;

                            for (int col = -; col <= ; col++)

                            {

                                for (int row = -; row <= ; row++)

                                {

                                    int off = ((j + row) * (Width) + (i + col)) * ;

                                    r += pin[off + ] * Laplacian[Index];

                                    g += pin[off + ] * Laplacian[Index];

                                    b += pin[off + ] * Laplacian[Index];

                                    Index++;

                                }

                            }

                            if (r < ) r = ;

                            if (r > ) r = ;

                            if (g < ) g = ;

                            if (g > ) g = ;

                            if (b < ) b = ;

                            if (b > ) b = ;

                            int off2 = (j * Width + i) * ;

                            pout[off2 + ] = (byte)r;

                            pout[off2 + ] = (byte)g;

                            pout[off2 + ] = (byte)b;

                        }

                    }

                    bitmap.UnlockBits(newData);

                    MyBitmap.UnlockBits(oldData);

                    this.pbshowbox.Image = bitmap;

                }

            }

            else

            {

                MessageBox.Show("请先打开一张图片!");

            }

        }
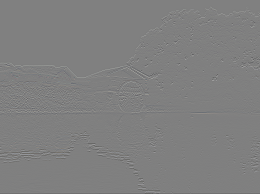
四、浮雕
对图像像素点的像素值分别与相邻像素点的像素值相减后加上128, 然后将其作为新的像素点的值。
        /// <summary>

        /// 浮雕实现方法

        /// </summary>

        void Image_Relief()

        {

            if (this.pbshowbox.Image != null)

            {

                int Height = this.pbshowbox.Image.Height;

                int Width = this.pbshowbox.Image.Width;

                Bitmap bitmap = new Bitmap(Width, Height, PixelFormat.Format24bppRgb);

                Bitmap MyBitmap = (Bitmap)this.pbshowbox.Image;

                BitmapData oldData = MyBitmap.LockBits(new Rectangle(, , Width, Height), ImageLockMode.ReadOnly, PixelFormat.Format24bppRgb);

                BitmapData newData = bitmap.LockBits(new Rectangle(, , Width, Height), ImageLockMode.ReadWrite, PixelFormat.Format24bppRgb);

                unsafe

                {

                    byte* pin_1 = (byte*)(oldData.Scan0.ToPointer());

                    byte* pin_2 = pin_1 + (oldData.Stride);

                    byte* pout = (byte*)(newData.Scan0.ToPointer());

                    for (int y = ; y < oldData.Height - ; y++)

                    {

                        for (int x = ; x < oldData.Width; x++)

                        {

                            int b = (int)pin_1[] - (int)pin_2[] + ;

                            int g = (int)pin_1[] - (int)pin_2[] + ;

                            int r = (int)pin_1[] - (int)pin_2[] + ;

                            if (r < ) r = ;

                            if (r > ) r = ;

                            if (g < ) g = ;

                            if (g > ) g = ;

                            if (b < ) b = ;

                            if (b > ) b = ;

                            pout[] = (byte)(b);

                            pout[] = (byte)(g);

                            pout[] = (byte)(r);

                            pin_1 = pin_1 + ;

                            pin_2 = pin_2 + ;

                            pout = pout + ;

                        }

                        pin_1 += oldData.Stride - oldData.Width * ;

                        pin_2 += oldData.Stride - oldData.Width * ;

                        pout += newData.Stride - newData.Width * ;

                    }

                    bitmap.UnlockBits(newData);

                    MyBitmap.UnlockBits(oldData);

                    this.pbshowbox.Image = bitmap;

                }

            }

            else

            {

                MessageBox.Show("请先打开一张图片!");

            }

        }
五、底片
颜色值取反。

        /// <summary>

        /// 底片实现方法

        /// </summary>

        void Image_Negative()

        {

            if (pbshowbox.Image != null)

            {

                int Height = this.pbshowbox.Image.Height;

                int Width = this.pbshowbox.Image.Width;

                Bitmap bitmap = new Bitmap(Width, Height, PixelFormat.Format24bppRgb);

                Bitmap MyBitmap = (Bitmap)this.pbshowbox.Image;

                BitmapData oldData = MyBitmap.LockBits(new Rectangle(, , Width, Height), ImageLockMode.ReadOnly, PixelFormat.Format24bppRgb);

                BitmapData newData = bitmap.LockBits(new Rectangle(, , Width, Height), ImageLockMode.ReadWrite, PixelFormat.Format24bppRgb);

                unsafe

                {

                    byte* pin = (byte*)(oldData.Scan0.ToPointer());

                    byte* pout = (byte*)(newData.Scan0.ToPointer());

                    for (int y = ; y < oldData.Height; y++)

                    {

                        for (int x = ; x < oldData.Width; x++)

                        {

                            pout[] = (byte)( - pin[]);

                            pout[] = (byte)( - pin[]);

                            pout[] = (byte)( - pin[]);

                            pin = pin + ;

                            pout = pout + ;

                        }

                        pin += oldData.Stride - oldData.Width * ;

                        pout += newData.Stride - newData.Width * ;

                    }

                    bitmap.UnlockBits(newData);

                    MyBitmap.UnlockBits(oldData);

                    this.pbshowbox.Image = bitmap;

                }

            }

            else

            {

                MessageBox.Show("请先打开一张图片!");

            }

        }
六、积木
低像素置0,高像素置255。

        /// <summary>

        /// 积木实现方法

        /// </summary>

        private void Image_Block()

        {

            if (this.pbshowbox.Image != null)

            {

                int Height = this.pbshowbox.Image.Height;

                int Width = this.pbshowbox.Image.Width;

                Bitmap bitmap = new Bitmap(Width, Height);

                Bitmap Mybitmap = (Bitmap)this.pbshowbox.Image;

                BitmapData oldData = Mybitmap.LockBits(new Rectangle(, , Width, Height), ImageLockMode.ReadOnly, PixelFormat.Format24bppRgb);

                BitmapData newData = bitmap.LockBits(new Rectangle(, , Width, Height), ImageLockMode.ReadWrite, PixelFormat.Format24bppRgb);

                unsafe

                {

                    byte* pin = (byte*)(oldData.Scan0.ToPointer());

                    byte* pout = (byte*)(newData.Scan0.ToPointer());

                    for (int y = ; y < oldData.Height; y++)

                    {

                        for (int x = ; x < oldData.Width; x++)

                        {

                            int avg = (pin[] + pin[] + pin[]) / ;

                            if (avg > )

                            {

                                pout[] = ;

                                pout[] = ;

                                pout[] = ;

                            }

                            else

                            {

                                pout[] = ;

                                pout[] = ;

                                pout[] = ;

                            }

                            pin = pin + ;

                            pout = pout + ;

                        }

                        pin = pin + oldData.Stride - oldData.Width * ;

                        pout = pout + newData.Stride - newData.Width * ;

                    }

                    bitmap.UnlockBits(newData);

                    Mybitmap.UnlockBits(oldData);

                    this.pbshowbox.Image = bitmap;

                }

            }

            else

            {

                MessageBox.Show("请先打开一张图片!");

            }

        }
有些图片效果看起来不明显是因为笔者把图缩小了,其实效果挺明显的- -。
C# 内存法图像处理的更多相关文章
- C# 图像处理:将图像(24位真彩)转为 8位灰度图像 采用了内存法,大大提高了效率
/// <summary> /// 将源图像灰度化,并转化为8位灰度图像. /// </summary> /// <param name="original&q ...
- c#图像处理入门(-bitmap类和图像像素值获取方法) 转
一.Bitmap类 Bitmap对象封装了GDI+中的一个位图,此位图由图形图像及其属性的像素数据组成.因此Bitmap是用于处理由像素数据定义的图像的对象.该类的主要方法和属性如下: 1. GetP ...
- C#数字图像处理的3种方法
本文主要通过彩色图象灰度化来介绍C#处理数字图像的3种方法,Bitmap类.BitmapData类和Graphics类是C#处理图像的的3个重要的类. Bitmap只要用于处理由像素数据定义的图像的对 ...
- c#图像处理入门
一.Bitmap类 Bitmap对象封装了GDI+中的一个位图,此位图由图形图像及其属性的像素数据组成.因此Bitmap是用于处理由像素数据定义的图像的对象.该类的主要方法和属性如下: 1. GetP ...
- c#图像处理入门(-bitmap类和图像像素值获取方法)
c#图像处理入门 -bitmap类和图像像素值获取方法 一.Bitmap类 Bitmap对象封装了GDI+中的一个位图,此位图由图形图像及其属性的像素数据组成.因此Bitmap是用于处理由像素数据定义 ...
- C#数字图像处理算法学习笔记(一)--C#图像处理的3中方法
C#数字图像处理算法学习笔记(一)--C#图像处理的3中方法 Bitmap类:此类封装了GDI+中的一个位图,次位图有图形图像及其属性的像素数据组成.因此此类是用于处理像素数据定义的图形的对象.该类的 ...
- c#数字图像处理(二)彩色图像灰度化,灰度图像二值化
为加快处理速度,在图像处理算法中,往往需要把彩色图像转换为灰度图像,在灰度图像上得到验证的算法,很容易移植到彩色图像上.24位彩色图像每个像素用3个字节表示,每个字节对应着R.G.B分量的亮度(红.绿 ...
- C#中的bitmap类和图像像素值获取方法
一.Bitmap类 Bitmap对象封装了GDI+中的一个位图,此位图由图形图像及其属性的像素数据组成.因此Bitmap是用于处理由像素数据定义的图像的对象.该类的主要方法和属性如下: 1. GetP ...
- C# 处理图像三种方法对比
C#本身自带有一定的图像处理能力,即使在不依赖Emgu CV的情况下,也是有很大的潜质的. 不过,最近在处理大量图片时,发现图片数量较少时,处理本身所带来的延时不会让人敏感,但是数量较大时,程序花费大 ...
随机推荐
- 快速、冒泡排序算法(PHP版)
1.冒泡排序算法改进: 方法一: function bubbleSort($arr){//$arr(1...n)是待排序的文件,采用自下向上扫描,对$arr做冒泡排序 $bFlag = true; / ...
- HTTP 缓存控制总结
引言 通过网络获取内容既缓慢,成本又高:大的响应需要在客户端和服务器之间进行多次往返通信,这拖延了浏览器可以使用和处理内容的时间,同时也增加了访问者的数据成本.因此,缓存和重用以前获取的资源的能力成为 ...
- yii 获取系统级请求参数的常用方法
1.GET/POST 1.1.获取GET/POST过来的数据 Yii::app()->request->getParam('id'); 1.2.判断数据提交方式 Yii::app()-&g ...
- win7下禁用ctrl alt del +上下左右键
1.控制面板 2.屏幕分辨率 3.高级设置 4.英特尔图形和媒体控制面板 5.图形属性 6.选项和支持 7.快捷键管理器 8.去掉启动前的勾
- [网络]关于公网IP的一些事
家里的每一个路由器配置里,都有一个公网Ip,即下图中的IP地址
- C#基础知识学习手记1
这篇随笔主要用来记录我在C#学习过程做的笔记,算作是一门课程中的小知识点吧. 1. 变量和表达式 1.1 如何在输出带有引号(英文双引号.英文单引号)以 ...
- SpringMVC学习系列 之 表单标签
http://www.cnblogs.com/liukemng/p/3754211.html 本篇我们来学习Spring MVC表单标签的使用,借助于Spring MVC提供的表单标签可以让我们在视图 ...
- 机房收费系统(VB.NET)——存储过程实战
最初接触存储过程是在耿建玲老师的视频里,当初仅仅是草草过了一遍.仅仅是有了个印象.知道了这个名词:大二时也有SqlServer数据库这门课,只是老师没讲,自己也没看:真正对存储过程的了解来自于自学考试 ...
- 安装Rational Rose启动报错:无法启动此程序,由于计算机中丢失 suite objects.dll。
执行Rational Rose的时候假设出现这种错误,先检查环境变量有没有common的地址,假设没有直接配上就OK:配置例如以下:D:\Program Files\Rational\Common; ...
- 5天学会jaxws-webservice编程第一天
前言: 随着近几年来,SOA,EAI等架构体系的日渐成熟,Webservice越来越炽手可热,尤其是在企业做异质平台整合时成为了首选的技术. Java的Webservice技术更是层出不穷,比較流行的 ...
