iptables之路由网关共享上网/端口映射
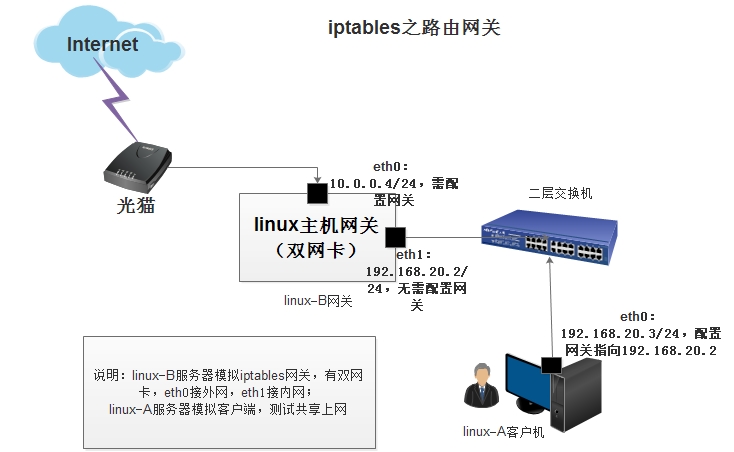
linux-A 主机配置eth0即可:
[root@linux-A ~]# ifconfig eth0|sed -n '2p'

inet addr:192.168.20.3 Bcast:192.168.20.255 Mask:255.255.255.0

[root@linux-A ~]# route -n

Kernel IP routing table

Destination Gateway Genmask Flags Metric Ref Use Iface

192.168.20.0 0.0.0.0 255.255.255.0 U 0 0 0 eth0

169.254.0.0 0.0.0.0 255.255.0.0 U 1002 0 0 eth0

0.0.0.0 192.168.20.2 0.0.0.0 UG 0 0 0 eth0

[root@linux-A ~]# /etc/init.d/iptables status

iptables: Firewall is not running.
linux-B网关服务器配置及步骤:
1.先配置好每个网卡的IP地址(linux-B的eth0必须要可以上外网),并置零所有规则和计数器
[root@linux-B ~]# ifconfig eth0|sed -n '2p'

inet addr:10.0.0.4 Bcast:10.0.0.255 Mask:255.255.255.0

[root@linux-B ~]# ifconfig eth1|sed -n '2p'        #<===无需配置网关

inet addr:192.168.20.2 Bcast:192.168.20.255 Mask:255.255.255.0

[root@linux-B ~]# route -n

Kernel IP routing table

Destination Gateway Genmask Flags Metric Ref Use Iface

192.168.20.0 0.0.0.0 255.255.255.0 U 0 0 0 eth1

10.0.0.0 0.0.0.0 255.255.255.0 U 0 0 0 eth0

169.254.0.0 0.0.0.0 255.255.0.0 U 1002 0 0 eth0

169.254.0.0 0.0.0.0 255.255.0.0 U 1003 0 0 eth1

0.0.0.0 10.0.0.254 0.0.0.0 UG 0 0 0 eth0

[root@linux-B~]# iptables -F

[root@linux-B~]# iptables -X

[root@linux-B~]# iptables -Z

[root@linux-B ~]# iptables -P FORWARD ACCEPT

[root@linux-B ~]# iptables -L -n      #<==实验时确保以下为允许状态,然后关闭iptables防火墙测试

Chain INPUT (policy ACCEPT)

target     prot opt source               destination

Chain FORWARD (policy ACCEPT)

target     prot opt source               destination

Chain OUTPUT (policy ACCEPT)

target     prot opt source               destination
[root@ B-linux ~]# /etc/init.d/iptables stop #<==先配置好网关,共享上网成功后再看情况开防火墙,表不同,先一个表调整好再调整另一个表
2.linux-B服务器主机开启 ip_forward 转发功能,并加载相应的模块
[root@linux-B ~]# grep "ip_forward" /etc/sysctl.conf

net.ipv4.ip_forward = 1        #<==确保转发功能开启

[root@linux-B ~]# sysctl -p

[root@linux-B~]# modprobe ip_tables

[root@linux-B~]# modprobe iptable_filter

[root@linux-B~]# modprobe iptable_nat

[root@linux-B~]# modprobe ip_conntrack

[root@linux-B~]# modprobe ip_conntrack_ftp

[root@linux-B ~]# modprobe ip_nat_ftp

[root@linux-B ~]# lsmod |egrep ^ip      #<===确保模块加载,模块加载最好放在 /etc/rc.local 下
3.配置地址转换实现共享上网(POSTROUTING链)
[root@linux-B ~]# iptables -t nat -A POSTROUTING -s 192.168.20.0/24 -o eth0 -j SNAT --to-source 10.0.0.4
参数说明:
-s 192.168.20.0/24                       类似生产环境中的内网网段
-o eth0                                  类似路由器中,有外网IP网卡的接口
-j SNAT --to-source 10.0.0.4             将内网网段IP地址及端口转换为外网IP地址及端口
或使用以下命令也可以实现地址转换
[root@linux-B ~]# iptables -t nat -A POSTROUTING -s 192.168.20.0/24 -o eth0 -j MASQUERADE #<==将外网eth0接口动态获取的IP地址作为地址转换
4.配置目的地址转换/端口转换(PREROUTING链)
[root@linux-B ~]# iptables -t nat -A PREROUTING -i eth0 -d 10.0.0.4 -p tcp --dport 80 -j DNAT --to-destination 192.168.20.3:8080
5.在linux-A主机上ping测试,或其他方法测试查看转换是否成功
[root@linux-A ~]# traceroute www.baidu.com

traceroute to www.baidu.com (14.215.177.39), 30 hops max, 60 byte packets

1 192.168.20.2 (192.168.20.2) 0.421 ms 0.284 ms 0.362 ms

2 10.0.0.254 (10.0.0.254) 0.643 ms 0.734 ms 0.627 ms

[root@linux-A ~]# curl -I www.baidu.com

HTTP/1.1 200 OK

[root@linux-B ~]# iptables -L -n -t nat

Chain PREROUTING (policy ACCEPT)

target prot opt source destination

Chain POSTROUTING (policy ACCEPT)

target prot opt source destination

SNAT all -- 192.168.20.0/24 0.0.0.0/0 to:10.0.0.4

Chain OUTPUT (policy ACCEPT)

target prot opt source destination
提示:更好的方法是利用脚本进行管理,参考脚本如下(脚本来源:老男孩老师QQ49000448)
#!/bin/bash

#!/bin/bash

#this is a server firewall created by oldboy 17:03 2006-7-26

# e_mail:31333741@qq.com

# qqinfo:49000448

# function: a server firewall

# version:1.1

################################################

# oldboy trainning info.

# QQ 1986787350 70271111

# site:http://www.etiantian.org

# blog:http://oldboy.blog.51cto.com

# oldboy trainning QQ group: 208160987 45039636

################################################

#define variable PATH

IPT=/sbin/iptables

LAN_GW_IP=192.168.0.15

WAN_GW_IP=10.0.0.15

LAN_SERVER=192.168.0.14

echo 1 > /proc/sys/net/ipv4/ip_forward

modprobe ip_tables

modprobe iptable_filter

modprobe iptable_nat

modprobe ip_conntrack

modprobe ip_conntrack_ftp

modprobe ip_nat_ftp

modprobe ipt_state

#Remove any existing rules

$IPT -F

$IPT -X

#setting default firewall policy

$IPT --policy OUTPUT ACCEPT

$IPT --policy FORWARD ACCEPT

$IPT -P INPUT DROP

#setting for loopback interface

$IPT -A INPUT -i lo -j ACCEPT

$IPT -A OUTPUT -o lo -j ACCEPT

$IPT -A INPUT -m state --state INVALID -j DROP

$IPT -A OUTPUT -m state --state INVALID -j DROP

# Source Address Spoofing and Other Bad Addresses

$IPT -A INPUT -i eth0 -s 172.16.0.0/12 -j DROP

$IPT -A INPUT -i eth0 -s 0.0.0.0/8 -j DROP

$IPT -A INPUT -i eth0 -s 169.254.0.0/16 -j DROP

$IPT -A INPUT -i eth0 -s 192.0.2.0/24 -j DROP

# prevent all Stealth Scans and TCP State Flags

$IPT -A INPUT -p tcp --tcp-flags ALL ALL -j DROP

# All of the bits are cleared

$IPT -A INPUT -p tcp --tcp-flags ALL NONE -j DROP

$IPT -A INPUT -p tcp --tcp-flags ALL FIN,URG,PSH -j DROP

#SYN and RST are both set

$IPT -A INPUT -p tcp --tcp-flags SYN,RST SYN,RST -j DROP

# SYN and FIN are both set

$IPT -A INPUT -p tcp --tcp-flags SYN,FIN SYN,FIN -j DROP

# FIN and RST are both set

$IPT -A INPUT -p tcp --tcp-flags FIN,RST FIN,RST -j DROP

# FIN is the only bit set, without the expected accompanying ACK

$IPT -A INPUT -p tcp --tcp-flags ACK,FIN FIN -j DROP

# PSH is the only bit set, without the expected accompanying ACK

$IPT -A INPUT -p tcp --tcp-flags ACK,PSH PSH -j DROP

# URG is the only bit set, without the expected accompanying ACK

$IPT -A INPUT -p tcp --tcp-flags ACK,URG URG -j DROP

#setting access rules

#one,ip access rules,allow all the ips of hudong.com

$IPT -A INPUT -s 202.81.17.0/24 -p all -j ACCEPT

$IPT -A INPUT -s 202.81.18.0/24 -p all -j ACCEPT

$IPT -A INPUT -s 124.43.62.96/27 -p all -j ACCEPT

$IPT -A INPUT -s 192.168.1.0/24 -p all -j ACCEPT

$IPT -A INPUT -s 10.0.0.0/24 -p all -j ACCEPT

#second,port access rules

#nagios

$IPT -A INPUT -s 192.168.1.0/24 -p tcp --dport 5666 -j ACCEPT

$IPT -A INPUT -s 202.81.17.0/24 -p tcp --dport 5666 -j ACCEPT

$IPT -A INPUT -s 202.81.18.0/24 -p tcp --dport 5666 -j ACCEPT

#db

$IPT -A INPUT -s 192.168.1.0/24 -p tcp --dport 3306 -j ACCEPT

$IPT -A INPUT -s 192.168.1.0/24 -p tcp --dport 3307 -j ACCEPT

$IPT -A INPUT -s 192.168.1.0/24 -p tcp --dport 3308 -j ACCEPT

$IPT -A INPUT -s 192.168.1.0/24 -p tcp --dport 1521 -j ACCEPT

#ssh difference from other servers here.........................................................>>

$IPT -A INPUT -s 202.81.17.0/24 -p tcp --dport 50718 -j ACCEPT

$IPT -A INPUT -s 202.81.18.0/24 -p tcp --dport 50718 -j ACCEPT

$IPT -A INPUT -s 124.43.62.96/27 -p tcp --dport 50718 -j ACCEPT

$IPT -A INPUT -s 192.168.1.0/24 -p tcp --dport 50718 -j ACCEPT

$IPT -A INPUT -p tcp --dport 22 -j ACCEPT

#ftp

#$IPT -A INPUT -p tcp --dport 21 -j ACCEPT

#http

$IPT -A INPUT -p tcp --dport 80 -j ACCEPT

$IPT -A INPUT -s 192.168.1.0/24 -p tcp -m multiport --dport 8080,8081,8082,8888,8010,8020,8030,8150 -j ACCEPT

$IPT -A INPUT -s 202.81.17.0/24 -p tcp -m multiport --dport 8080,8081,8082,8888,8010,8020,8030,8150 -j ACCEPT

$IPT -A INPUT -s 124.43.62.96/27 -p tcp -m multiport --dport 8080,8081,8082,8888,8010,8020,8030,8150 -j ACCEPT

#snmp

$IPT -A INPUT -s 192.168.1.0/24 -p UDP --dport 161 -j ACCEPT

$IPT -A INPUT -s 202.81.17.0/24 -p UDP --dport 161 -j ACCEPT

$IPT -A INPUT -s 202.81.18.0/24 -p UDP --dport 161 -j ACCEPT

#rsync

$IPT -A INPUT -s 192.168.1.0/24 -p tcp -m tcp --dport 873 -j ACCEPT

$IPT -A INPUT -s 202.81.17.0/24 -p tcp -m tcp --dport 873 -j ACCEPT

$IPT -A INPUT -s 202.81.18.0/24 -p tcp -m tcp --dport 873 -j ACCEPT

$IPT -A INPUT -s 124.43.62.96/27 -p tcp -m tcp --dport 873 -j ACCEPT

#nfs 2049,portmap 111

$IPT -A INPUT -s 192.168.1.0/24 -p udp -m multiport --dport 111,892,2049 -j ACCEPT

$IPT -A INPUT -s 192.168.1.0/24 -p tcp -m multiport --dport 111,892,2049 -j ACCEPT

#others RELATED

#$IPT -A INPUT -p icmp -m icmp --icmp-type any -j ACCEPT

$IPT -A INPUT -s 124.43.62.96/27 -p icmp -m icmp --icmp-type any -j ACCEPT

$IPT -A INPUT -s 192.168.1.0/24 -p icmp -m icmp --icmp-type any -j ACCEPT

$IPT -A INPUT -m state --state ESTABLISHED,RELATED -j ACCEPT

$IPT -A OUTPUT -m state --state ESTABLISHED,RELATED -j ACCEPT

###############nat start##############################

#nat internet

iptables -t nat -A POSTROUTING -s 192.168.0.0/255.255.255.0 -o eth1 -j SNAT --to-source $LAN_GW_IP

#www server nat wan to lan

iptables -t nat -A PREROUTING -d $WAN_GW_IP -p tcp -m tcp --dport 80 -j DNAT --to-destination $$LAN_SERVER:80

iptables -t nat -A POSTROUTING -d $LAN_SERVER -p tcp --dport 80 -j SNAT --to LAN_GW_IP
更多内幕知识及原理深入了解,看下面好友链接
http://www.cnblogs.com/f-ck-need-u/p/7397146.html
iptables之路由网关共享上网/端口映射的更多相关文章
- ROS2.9.27架设网吧软路由实战篇之端口映射与回流
转载:http://blog.csdn.net/zm2714/article/details/7924280 上一篇:ROS2.9.27架设网吧软路由实战篇之连通网络,主要讲述了网吧架设软路由ROS2 ...
- ubuntu12.04单卡server(mentohust认证)再加上交换机做路由软件共享上网
最近成立了实验室的网络环境中,通过交换机连接的所有主机实验室.想要一个通过该server(单卡)做网关,使用mentohust认证外网,然后内网中的其它主机通过此网关来连接外网. 1.首先在serve ...
- iptables、防火墙配置、NAT端口映射
一,配置一个filter表放火墙 (1)查看本机关于IPTABLES的设置情况 [root@tp ~]# iptables -L -n Chain INPUT (policy ACCEPT) targ ...
- 使用iptables为docker容器动态添加端口映射
1.将当前iptables的配置写入保存到/etc/sysconfig/iptables 2.保存 /etc/init.d/iptables sava 3.修改iptables配置(vi /etc/s ...
- Hyper-V端口映射
有时候我们为了让局域网或外网用户直接远程访问或访问虚拟机里的服务,可以将实机端口直接映射到Hyper-V的虚拟机里面,省去很多麻烦. 下面是hyper-v共享IP端口映射一些常用命令共享IP端口映射一 ...
- iptables filter表 案例、iptables nat表的路由功能 、端口映射
1.小案例 #!/bin/bashipt="/usr/sbin/iptables"$ipt -F$ipt -P INPUT DROP$ipt -P OUTPUT ACCEPT$ip ...
- iptables nat及端口映射
iptables nat及端口映射 发布: 2010-6-11 15:05 | 作者: admin | 来源: SF NetWork 门户网站 iptables 应用初探(nat+三层访问控制) ip ...
- ip route,ip rule, iptables和docker的端口映射
iptables 默认5个表, 不可增加其他表 raw 用于配置数据包,raw 中的数据包不会被系统跟踪. filter 是用于存放所有与防火墙相关操作的默认表. nat 用于 网络地址转换(例如:端 ...
- Hyper-V 共享式网络链接 端口映射
远程路由访问我配置了很久都不成功,经过多方搜索,现面的命令能实现端口映射一.查询端口映射情况netsh interface portproxy show v4tov4查询这个IP所有的端口映射.net ...
随机推荐
- target 和 currentTarget的区别
target是当前点击的组件,currentTarget是扑捉到事件的组件
- 用ModelAndView返回视图结果返回的是对应RequestMapping拼接的路径
今天,遇到一个贼坑的问题,就是我明明可以将逻辑视图名视图存入ModelAndView,结果返回的页面信息是RequestMapping拼接的视图解析路径,最后经过检查多遍代码,发现原来是ModelAn ...
- UVA540 Team Queue——题解 by hyl天梦
UVA540 Team Queue 题解 题目描述:题目原题 https://vjudge.net/problem/UVA-540 Queues and Priority Queues are dat ...
- Nest.js你学不会系列-初识Nest
前言 最近在学习研究 Nest 框架,但是在学习过程中除了参考翻阅官方文档外国内几乎没有多少资料能系统的讲解 Nest 的相关内容,所以打算想通过我自己学习的角度讲解下 Nest 框架,不知道能坚持多 ...
- idea实现svn拉分支和合并分支的教程
原文地址:https://blog.csdn.net/qq_27471405/article/details/78498260 今天测试了一下svn拉分支和合并分支的教程,决定分享给大家 拉分支教程: ...
- CSS-15-定位
<!DOCTYPE html> <html> <head> <meta charset="UTF-8"> <title> ...
- zabbix3.4源码安装步骤
zabbix3.4源码安装步骤1.安装环境: 安装机器:22.224.9.227 以下简称监控机: 操作系统信息:内核版本: Linux version 2.6.18-194.1.AXS3 (pack ...
- spring cloud oauth2+JWT整合使用token返回JWT Cannot convert access token to JSON解决办法
我碰到的问题是Token正常,但是资源访问不了,原因是,资源服务配置的时候需要传一个对象: 设置了这个就可以了
- idea maven 动态打包指定环境
jar pom.xml <!-- 指定文件id --> <profiles> <profile> <id>alpha</id> <pr ...
- Maven: 每次更新Maven Project ,JAVA 版本都变为1.5
由于Maven默认编译环境是JAVA 1.5 ,所以我们需要在pom.xml指定编译插件版本号,这样就可以保证更新Maven project版本不变. <!-- java编译插件 --> ...