11 MySQL--Navicat与pymysql模块
1、Navicat的安装下载
一、Navicat

    在生产环境中操作MySQL数据库还是推荐使用命令行工具mysql,但在我们自己开发测试时,

    可以使用可视化工具Navicat,以图形界面的形式操作MySQL数据库

    官网下载:https://www.navicat.com/en/products/navicat-for-mysql

    网盘下载:https://pan.baidu.com/s/1bpo5mqj

    链接:https://pan.baidu.com/s/1Hu-x0mPuSW3g9CxNFlnAng 密码:pqe5

 使用网盘的有免费的注册码

      # 打开 双击:

      # D:\navicatformysql\Navicat for MySQL\navicat

    需要掌握的基本操作

    掌握:

        #1. 测试+链接数据库

        #2. 新建库

        #3. 新建表,新增字段+类型+约束

        #4. 设计表:外键

        #5. 新建查询

        #6. 备份库/表

    注意:

        批量加注释:ctrl+?键

        批量去注释:ctrl+shift+?键
新建查询:
ctrl +? 注释代码
ctrl + shift+/ 解除代码注释
备份库:
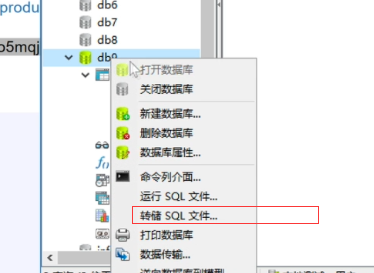
方面自己开发时调试用
二、pymysql模块
介绍:
在python程序中操作数据库呢?这就用到了pymysql模块,
该模块本质就是一个套接字客户端软件,使用前需要事先安装
pip3 install pymysql
前提:
授权加创建
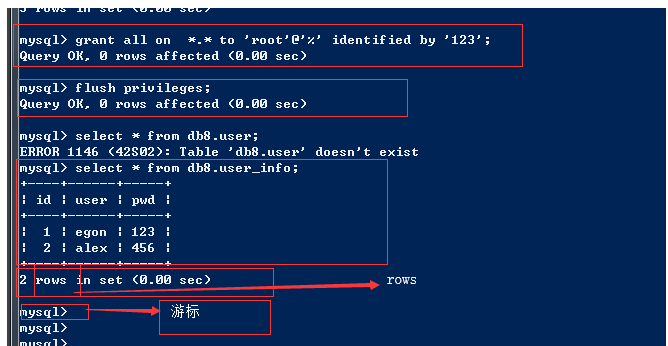
grant all on *.* to 'root'@'%' identified by '';
flush privileges; 端口:3306
ip: 192.168.1.102
mysql -uroot -p123 -h 192.168.1.102
pymysql模块之基本使用:
# pip3 install pymysql

import pymysql

user=input('user>>').strip()

pwd=input('password>>').strip()

# 建立连接

conn=pymysql.connect(

    host=服务端ip

    port=3306,

    user='root',

    password='',

    db='db8',

    charset='utf8'

)

# 拿到游标

cursor=conn.cursor()

# 相当于 >mysql  输入命令

# 执行sql语句

sql = 'select * from user_info where user="%s" and pwd="%s"' %(user,pwd)

rows = cursor.execute(sql)

cursor.close()

conn.close()

if rows:

    print('welcome')

else:

    print('sorry')
pymysql模块之sql注入问题,解决上面程的bug
非法字符的输入可以登录成功
2.sql注入
注意:符号--会注释掉它之后的sql,正确的语法:--后至少有一个任意字符
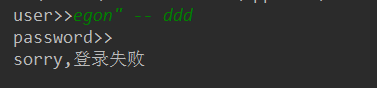
1、sql注入之:用户存在,绕过密码
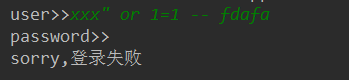
egon' -- 任意字符 2、sql注入之:用户不存在,绕过用户与密码
xxx' or 1=1 -- 任意字符

-- 之后的sql均被注释掉了

or 1=1 永远成立
解决办法:
 解决办法:

            # 原来是我们对sql进行字符串拼接

            # sql="select * from userinfo where name='%s' and password='%s'" %(user,pwd)

            # print(sql)

            # res=cursor.execute(sql)

            #改写为(execute帮我们做字符串拼接,我们无需且一定不能再为%s加引号了)

            sql="select * from userinfo where name=%s and password=%s" #!!!注意%s需要去掉引号,因为pymysql会自动为我们加上

            res=cursor.execute(sql,(user,pwd)) #pymysql模块自动帮我们解决sql注入的问题,只要我们按照pymysql的规矩来。
代码:
# pip3 install pymysql
import pymysql
user=input('user>>').strip()
pwd=input('password>>').strip() # 建立连接
conn=pymysql.connect(
host='10.10.40.140',
port=3306,
user='root',
password='',
db='db8',
charset='utf8'
)
# 拿到游标
cursor=conn.cursor()
# 相当于 >mysql 输入命令 # 执行sql语句
#sql = 'select * from user_info where user="%s" and pwd="%s"' %(user,pwd)
#print(sql)
sql = 'select * from user_info where user=%s and pwd=%s' rows = cursor.execute(sql,[user,pwd])
cursor.close()
conn.close()
if rows:
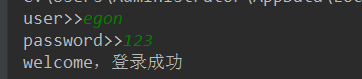
print('welcome,登录成功')
else:
print('sorry,登录失败')
3、pymysql模块之增删改查
增:
import pymysql

#链接

conn=pymysql.connect(host='localhost',user='root',password='',database='egon')

#游标

cursor=conn.cursor()

#执行sql语句

#part1

# sql='insert into userinfo(name,password) values("root","123456");'

# res=cursor.execute(sql) #执行sql语句,返回sql影响成功的行数

# print(res)

#part2

# sql='insert into userinfo(name,password) values(%s,%s);'

# res=cursor.execute(sql,("root","123456")) #执行sql语句,返回sql影响成功的行数

# print(res)

#part3

sql='insert into userinfo(name,password) values(%s,%s);'

res=cursor.executemany(sql,[("root",""),("lhf",""),("eee","")]) #执行sql语句,返回sql影响成功的行数

print(res)

conn.commit() #提交后才发现表中插入记录成功

cursor.close()

conn.close()
查:fetchone(每次查询一个),fetchmany(查询多个),fetchall全部
import pymysql

#链接

conn=pymysql.connect(host='localhost',user='root',password='',database='egon')

#游标

cursor=conn.cursor()

#执行sql语句

sql='select * from userinfo;'

rows=cursor.execute(sql) #执行sql语句,返回sql影响成功的行数rows,将结果放入一个集合,等待被查询

# cursor.scroll(3,mode='absolute') # 相对绝对位置移动

# cursor.scroll(3,mode='relative') # 相对当前位置移动

res1=cursor.fetchone()

res2=cursor.fetchone()

res3=cursor.fetchone()

res4=cursor.fetchmany(2)

res5=cursor.fetchall()

print(res1)

print(res2)

print(res3)

print(res4)

print(res5)

print('%s rows in set (0.00 sec)' %rows)

conn.commit() #提交后才发现表中插入记录成功

cursor.close()

conn.close()

'''

(1, 'root', '123456')

(2, 'root', '123456')

(3, 'root', '123456')

((4, 'root', '123456'), (5, 'root', '123456'))

((6, 'root', '123456'), (7, 'lhf', '12356'), (8, 'eee', '156'))

rows in set (0.00 sec)

'''
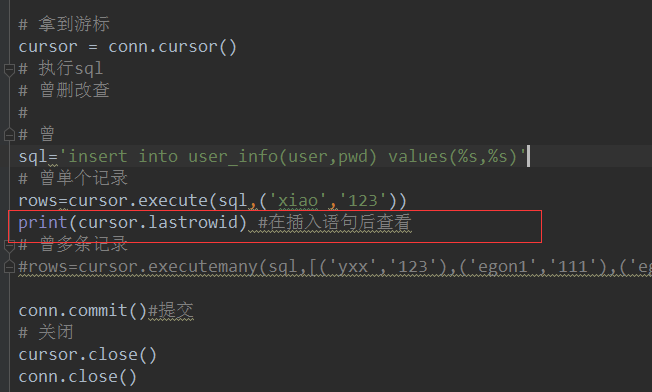
获取插入的最后一条数据的自增ID
print(cursor.lastrowid) #在插入语句后查看

import pymysql

conn=pymysql.connect(host='localhost',user='root',password='',database='egon')

cursor=conn.cursor()

sql='insert into userinfo(name,password) values("xxx","123");'

rows=cursor.execute(sql)

print(cursor.lastrowid) #在插入语句后查看

conn.commit()

cursor.close()

conn.close()
11 MySQL--Navicat与pymysql模块的更多相关文章
- navicat工具 pymysql模块
目录 一 IDE工具介绍(Navicat) 二 pymysql模块 一 IDE工具介绍(Navicat) 生产环境还是推荐使用mysql命令行,但为了方便我们测试,可以使用IDE工具,我们使用Navi ...
- 数据库——可视化工具Navicat、pymysql模块、sql注入问题
数据库--可视化工具Navicat.pymysql模块.sql注入问题 Navicat可视化工具 Navicat是数据库的一个可视化工具,可直接在百度搜索下载安装,它可以通过鼠标"点点点&q ...
- MySQL多表查询,Navicat使用,pymysql模块,sql注入问题
一.多表查询 #建表 create table dep( id int, name varchar(20) ); create table emp( id int primary key auto_i ...
- mysql五:pymysql模块
一.介绍 之前都是通过MySQ自带的命令行客户端工具Mysql来操作数据库,那如何在Python程序中操作数据库呢?这就需要用到pymysql模块了. 这个模块本质就是一个套接字客户端软件,使用前需要 ...
- navicat 使用 pymysql模块
新健库 ,新增字段+类型+约束 设计表:外键(自增) 新建查询 建立表模型 /* 数据导入: Navicat Premium Data Transfer Source Server : localho ...
- 数据库 - Navicat与pymysql模块
一.Nabicat 在生产环境中操作MySQL数据库还是推荐使用命令行工具mysql,但在我们自己开发测试时, 可以使用可视化工具Navicat,以图形界面的形式操作MySQL数据库 官网下载:htt ...
- MySQL学习12 - pymysql模块的使用
一.pymysql的下载和使用 1.pymysql模块的下载 2.pymysql的使用 二.execute()之sql注入 三.增.删.改:conn.commit() 四.查:fetchone.fet ...
- Python连接MySQL数据库之pymysql模块使用
安装PyMySQL pip install pymysql PyMySQL介绍 PyMySQL是在python3.x版本中用于连接MySQL服务器的一个库,2中则使用mysqldb. Django中也 ...
- 操作mysql(import pymysql模块)
pymysql模块 import pymysql #1.连上数据库.账号.密码.ip.端口号.数据库 #2.建立游标 #3.执行sql #4.获取结果 #5.关闭游标 #6.连接关闭 #charest ...
- Python连接MySQL数据库之pymysql模块
pymysql 在python3.x 中用于连接MySQL服务器的一个库:Python2中则使用mysqldb pymysql的模块的基本的使用 # 导入pymysql模块 import pymysq ...
随机推荐
- 021PHP基础知识——代码重用
<?php /** * 代码重用 * include() require() 载入文件 * include() 如果载入的文件不存在,提示警告错误. * require() 如果载入的文件不存在 ...
- Vue.js学习笔记:在元素 和 template 中使用 v-if 指令
f 指令 语法比较简单,直接上代码: <!DOCTYPE HTML PUBLIC "-//W3C//DTD HTML 4.01 Transitional//EN" " ...
- Alpha阶段敏捷冲刺---Day1
一.Daily Scrum Meeting照片 二.今天冲刺情况反馈 1.昨天已完成的工作 昨天我们组全体成员在五社区五号楼719召开了紧急会议,在会议上我们梳理了编写这个程序的所有流程,并且根 ...
- 查看nvidia显卡命令
http://blog.csdn.net/luo123n/article/details/50296973 nvidia-smi
- MyBatis_Study_002(进阶,增删改查)
源码:https://github.com/carryLess/mbtsstd-002.git 1.主配置文件 <?xml version="1.0" encoding=&q ...
- POI2015题解
POI2015题解 吐槽一下为什么POI2015开始就成了破烂波兰文题目名了啊... 咕了一道3748没写打表题没什么意思,还剩\(BZOJ\)上的\(14\)道题. [BZOJ3746][POI20 ...
- 初识安卓小程序(Android短信发送器)
首先,先创建一个安卓项目(我的版本号是4.4.2的),名字为"短信发送器" 然后在res目录下找到layout目录,找到activity_main.xml或fragment_mai ...
- 关于 ThinkPHP5 使用 getBy 字段名方式获取数据
关于 ThinkPHP5 使用 getBy 字段名方式获取数据 有小伙半说怎么全文搜索都没有搜索到 getByName 之类的函数. 其实是在这里.
- 再看Spring Could微服务的关键组件
Consul是用go开发的开源注册中心服务,内置服务发现与注册.raft一致性协议实现.健康检查.多数据中心等方案.与Eurker相比,consul还能对异构服务如rpc提供支持. 作为微服务系统的核 ...
- Fiddler显示响应时间 显示服务器IP
在主界面菜单上 Rules->CustomRules 在class Handlers{}里添加class 如: 显示响应时间 class Handlers { …… ) function Tim ...