11 MySQL--Navicat与pymysql模块
1、Navicat的安装下载
一、Navicat
在生产环境中操作MySQL数据库还是推荐使用命令行工具mysql,但在我们自己开发测试时,
可以使用可视化工具Navicat,以图形界面的形式操作MySQL数据库 官网下载:https://www.navicat.com/en/products/navicat-for-mysql
网盘下载:https://pan.baidu.com/s/1bpo5mqj
链接:https://pan.baidu.com/s/1Hu-x0mPuSW3g9CxNFlnAng 密码:pqe5
使用网盘的有免费的注册码
# 打开 双击:
# D:\navicatformysql\Navicat for MySQL\navicat 需要掌握的基本操作
掌握:
#1. 测试+链接数据库
#2. 新建库
#3. 新建表,新增字段+类型+约束
#4. 设计表:外键
#5. 新建查询
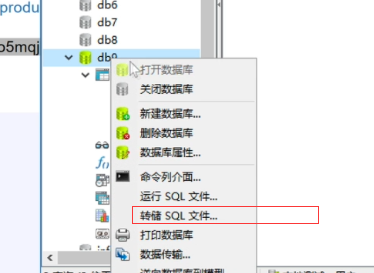
#6. 备份库/表 注意:
批量加注释:ctrl+?键
批量去注释:ctrl+shift+?键
新建查询:
ctrl +? 注释代码
ctrl + shift+/ 解除代码注释
备份库:
方面自己开发时调试用
二、pymysql模块
介绍:
在python程序中操作数据库呢?这就用到了pymysql模块,
该模块本质就是一个套接字客户端软件,使用前需要事先安装
pip3 install pymysql
前提:
授权加创建
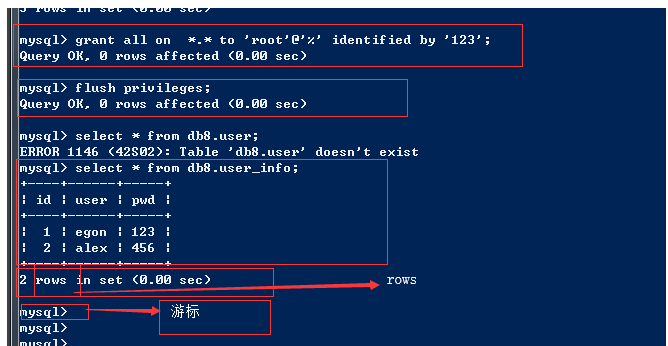
grant all on *.* to 'root'@'%' identified by '';
flush privileges; 端口:3306
ip: 192.168.1.102
mysql -uroot -p123 -h 192.168.1.102
pymysql模块之基本使用:
# pip3 install pymysql

import pymysql

user=input('user>>').strip()

pwd=input('password>>').strip()

# 建立连接

conn=pymysql.connect(

    host=服务端ip

    port=3306,

    user='root',

    password='',

    db='db8',

    charset='utf8'

)

# 拿到游标

cursor=conn.cursor()

# 相当于 >mysql  输入命令

# 执行sql语句

sql = 'select * from user_info where user="%s" and pwd="%s"' %(user,pwd)

rows = cursor.execute(sql)

cursor.close()

conn.close()

if rows:

    print('welcome')

else:

    print('sorry')
pymysql模块之sql注入问题,解决上面程的bug
非法字符的输入可以登录成功
2.sql注入
注意:符号--会注释掉它之后的sql,正确的语法:--后至少有一个任意字符
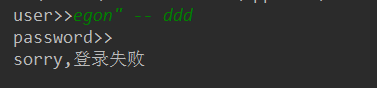
1、sql注入之:用户存在,绕过密码
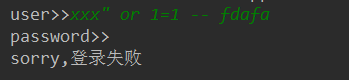
egon' -- 任意字符 2、sql注入之:用户不存在,绕过用户与密码
xxx' or 1=1 -- 任意字符

-- 之后的sql均被注释掉了

or 1=1 永远成立
解决办法:
 解决办法:

            # 原来是我们对sql进行字符串拼接

            # sql="select * from userinfo where name='%s' and password='%s'" %(user,pwd)

            # print(sql)

            # res=cursor.execute(sql)

            #改写为(execute帮我们做字符串拼接,我们无需且一定不能再为%s加引号了)

            sql="select * from userinfo where name=%s and password=%s" #!!!注意%s需要去掉引号,因为pymysql会自动为我们加上

            res=cursor.execute(sql,(user,pwd)) #pymysql模块自动帮我们解决sql注入的问题,只要我们按照pymysql的规矩来。
代码:
# pip3 install pymysql
import pymysql
user=input('user>>').strip()
pwd=input('password>>').strip() # 建立连接
conn=pymysql.connect(
host='10.10.40.140',
port=3306,
user='root',
password='',
db='db8',
charset='utf8'
)
# 拿到游标
cursor=conn.cursor()
# 相当于 >mysql 输入命令 # 执行sql语句
#sql = 'select * from user_info where user="%s" and pwd="%s"' %(user,pwd)
#print(sql)
sql = 'select * from user_info where user=%s and pwd=%s' rows = cursor.execute(sql,[user,pwd])
cursor.close()
conn.close()
if rows:
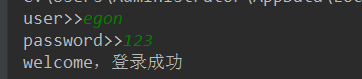
print('welcome,登录成功')
else:
print('sorry,登录失败')
3、pymysql模块之增删改查
增:
import pymysql

#链接

conn=pymysql.connect(host='localhost',user='root',password='',database='egon')

#游标

cursor=conn.cursor()

#执行sql语句

#part1

# sql='insert into userinfo(name,password) values("root","123456");'

# res=cursor.execute(sql) #执行sql语句,返回sql影响成功的行数

# print(res)

#part2

# sql='insert into userinfo(name,password) values(%s,%s);'

# res=cursor.execute(sql,("root","123456")) #执行sql语句,返回sql影响成功的行数

# print(res)

#part3

sql='insert into userinfo(name,password) values(%s,%s);'

res=cursor.executemany(sql,[("root",""),("lhf",""),("eee","")]) #执行sql语句,返回sql影响成功的行数

print(res)

conn.commit() #提交后才发现表中插入记录成功

cursor.close()

conn.close()
查:fetchone(每次查询一个),fetchmany(查询多个),fetchall全部
import pymysql

#链接

conn=pymysql.connect(host='localhost',user='root',password='',database='egon')

#游标

cursor=conn.cursor()

#执行sql语句

sql='select * from userinfo;'

rows=cursor.execute(sql) #执行sql语句,返回sql影响成功的行数rows,将结果放入一个集合,等待被查询

# cursor.scroll(3,mode='absolute') # 相对绝对位置移动

# cursor.scroll(3,mode='relative') # 相对当前位置移动

res1=cursor.fetchone()

res2=cursor.fetchone()

res3=cursor.fetchone()

res4=cursor.fetchmany(2)

res5=cursor.fetchall()

print(res1)

print(res2)

print(res3)

print(res4)

print(res5)

print('%s rows in set (0.00 sec)' %rows)

conn.commit() #提交后才发现表中插入记录成功

cursor.close()

conn.close()

'''

(1, 'root', '123456')

(2, 'root', '123456')

(3, 'root', '123456')

((4, 'root', '123456'), (5, 'root', '123456'))

((6, 'root', '123456'), (7, 'lhf', '12356'), (8, 'eee', '156'))

rows in set (0.00 sec)

'''
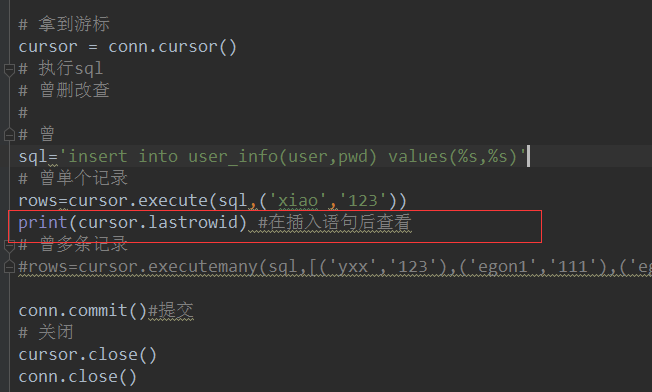
获取插入的最后一条数据的自增ID
print(cursor.lastrowid) #在插入语句后查看

import pymysql

conn=pymysql.connect(host='localhost',user='root',password='',database='egon')

cursor=conn.cursor()

sql='insert into userinfo(name,password) values("xxx","123");'

rows=cursor.execute(sql)

print(cursor.lastrowid) #在插入语句后查看

conn.commit()

cursor.close()

conn.close()
11 MySQL--Navicat与pymysql模块的更多相关文章
- navicat工具 pymysql模块
目录 一 IDE工具介绍(Navicat) 二 pymysql模块 一 IDE工具介绍(Navicat) 生产环境还是推荐使用mysql命令行,但为了方便我们测试,可以使用IDE工具,我们使用Navi ...
- 数据库——可视化工具Navicat、pymysql模块、sql注入问题
数据库--可视化工具Navicat.pymysql模块.sql注入问题 Navicat可视化工具 Navicat是数据库的一个可视化工具,可直接在百度搜索下载安装,它可以通过鼠标"点点点&q ...
- MySQL多表查询,Navicat使用,pymysql模块,sql注入问题
一.多表查询 #建表 create table dep( id int, name varchar(20) ); create table emp( id int primary key auto_i ...
- mysql五:pymysql模块
一.介绍 之前都是通过MySQ自带的命令行客户端工具Mysql来操作数据库,那如何在Python程序中操作数据库呢?这就需要用到pymysql模块了. 这个模块本质就是一个套接字客户端软件,使用前需要 ...
- navicat 使用 pymysql模块
新健库 ,新增字段+类型+约束 设计表:外键(自增) 新建查询 建立表模型 /* 数据导入: Navicat Premium Data Transfer Source Server : localho ...
- 数据库 - Navicat与pymysql模块
一.Nabicat 在生产环境中操作MySQL数据库还是推荐使用命令行工具mysql,但在我们自己开发测试时, 可以使用可视化工具Navicat,以图形界面的形式操作MySQL数据库 官网下载:htt ...
- MySQL学习12 - pymysql模块的使用
一.pymysql的下载和使用 1.pymysql模块的下载 2.pymysql的使用 二.execute()之sql注入 三.增.删.改:conn.commit() 四.查:fetchone.fet ...
- Python连接MySQL数据库之pymysql模块使用
安装PyMySQL pip install pymysql PyMySQL介绍 PyMySQL是在python3.x版本中用于连接MySQL服务器的一个库,2中则使用mysqldb. Django中也 ...
- 操作mysql(import pymysql模块)
pymysql模块 import pymysql #1.连上数据库.账号.密码.ip.端口号.数据库 #2.建立游标 #3.执行sql #4.获取结果 #5.关闭游标 #6.连接关闭 #charest ...
- Python连接MySQL数据库之pymysql模块
pymysql 在python3.x 中用于连接MySQL服务器的一个库:Python2中则使用mysqldb pymysql的模块的基本的使用 # 导入pymysql模块 import pymysq ...
随机推荐
- Tomcat : Invalid character found in the request target
Invalid character found in the request target. The valid characters are defined in RFC 7230 and RFC ...
- 本地绑定域名及host做快速解析与域名屏蔽处理
在电脑中成功安装好IIS后,打开C:\WINDOWS\system32\drivers\etc\用记事本打开hosts文件,把127.0.0.1 localhost复制,粘贴到最后,然后把loca ...
- Nginx实践03-配置虚拟主机的3种方式
基于IP.端口号.名称3种方式 1.基于IP的虚拟主机配置(使用最少) 基于ip的虚拟主机配置,需要配置单个网卡上多个ip地址,这种方式管理比较麻烦,所以用的很少. 1.1 设置单个网卡多个IP 查看 ...
- POJ1651 Multiplication Puzzle【区间DP】
LINK 每次删除一个数,代价是左右两边相邻的数的当前数的积 第一个和最后一个数不能删除 问最后只剩下第一个数的最后一个数的最小代价 思路 很简单的DP 正着考虑没有办法确定两边的数 那么就把每个区间 ...
- 《DSP using MATLAB》Problem 2.17
1.代码: %% ------------------------------------------------------------------------ %% Output Info abo ...
- cocos2dx 安卓真机调试问题汇总
cocos compile编译apk问题汇总: 1,dx编译报错,没有足够的空间 ANTBUILD : [dx] error : Could not create the Java Virtual M ...
- Mysql5.6 buffer_pool预热功能
通常在mysql重启服务后,需要通过手工执行SQL来预热buffer_pool,在mysql5.6中,有如下参数可以无需人工干预. innodb_buffer_pool_dump_at_shutdow ...
- 实用的IP地址处理模块IPy
https://www.cnblogs.com/cherishry/p/5916935.html IPy安装 pip install IPy IP地址.网段的基本处理 IPy模块包含IP类,使用它可以 ...
- ubuntu 16.04安装HUSTOJ过程
一.背景介绍: 因为工作需要,想在学校搭建一个OJ平台用于程序测试与评价.于是需要搭建oJ,由于之前都是在云端服务器搭建系统,没有在实际服务器平台搭建过,所以遇到不少坑,都靠自己来填补.故而写下此教程 ...
- 【linux】du命令
Linux du命令也是查看使用空间的,但是与df命令不同的是Linux du命令是对文件和目录磁盘使用的空间的查看,还是和df命令有一些区别的. 1.命令格式: du [选项][文件] 2.命令功能 ...