ASP.NET MVC 4.0 学习2-留言板實現
新增專案實現留言板功能,瞭解MVC的運行機制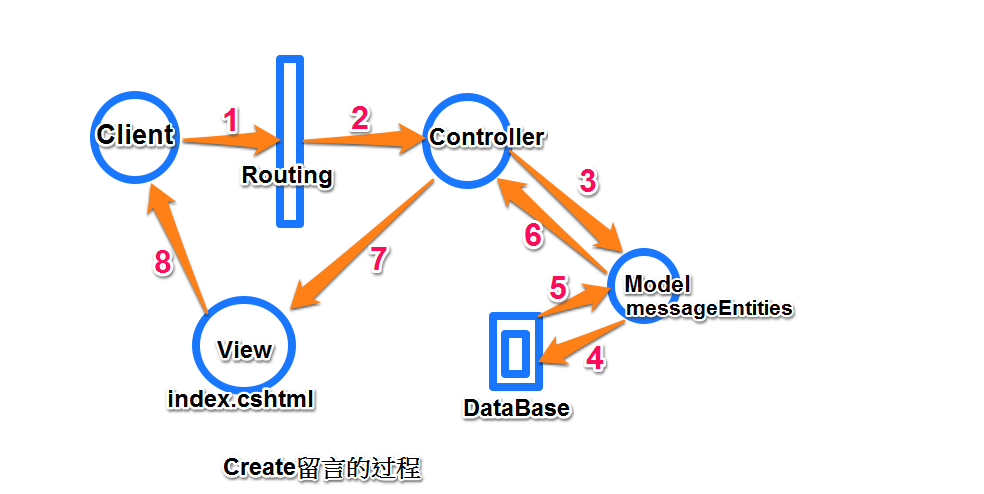
1,新增專案


2,添加數據庫文件message.mdf


Ctrl+W,L 打開資料庫連接,添加存放留言的Atricle表

添加字段,後點擊"更新"後看到新增的Atricle表(Content 應該設置為text)

3,添加ADO.NET實體數據模型 (MVC通過實體數據模型對數據庫中的數據進行增删改查)


 ADO.NET實體數據模型添加完成。
4,建立Service
我們把對Model中message.mdf數據處理的類單獨放在Service文件夾中,這樣更加方便之後的維護同樣也符合MVC耦合度低的特點,這一步是為Controller中的Action方法做準備。新建Service文件夾,添加messageDBService.cs類(Entity實體和Controller的橋樑):


Service類中添加兩個方法,分別實現對數據的讀和寫
- GetData():讀取並返回數據庫中Article中的數據
- DBCreate():把接收的數據存放到Article表中
using System;

using System.Collections.Generic;

using System.Linq;

using System.Web;

using MvcApplication1.Models;  //引用Model命名空間

namespace MvcApplication1.Service

{

    public class messageDBService

    {

        //實例化實體數據

        public Models.messageEntities db=new Models.messageEntities();

        //讀取並返回messageEntity中的數據

        public List<Article> GetData()

        {

            return (db.Article.ToList());

        }

        //把從User接受的數據寫入messageEnitity

        public void DBCreate(string strTitle,string strContent)

        {

            //實例化Artile對象

            Article newData=new Article();

            //給Artile對象的屬性賦值

            newData.Title=strTitle;

            newData.Content=strContent;

            newData.time=DateTime.Now;

            //實體添加到Entity中

            db.Article.Add(newData);

            //保存到數據庫

            db.SaveChanges();

        }

    }

}
4,添加控制器Controller

控制器中的Action實現留言板的添加留言查看留言的功能:
- Index:調用Service中的GetData方法,返回Article列表
- Create:顯示頁面
- Create:方法前有[HttpPost]屬性,只有瀏覽器發送POST請求的時候才會執行此方法,調用Service中的CreateDB方法把數據寫到Article表中
using System;

using System.Collections.Generic;

using System.Linq;

using System.Web;

using System.Web.Mvc;

using MvcApplication1.Models;

using MvcApplication1.Service;

namespace MvcApplication1.Controllers

{

    public class messageController : Controller

    {

        //實例化Service

        messageDBService data = new messageDBService();

        // GET: /message/

        public ActionResult Index()

        {

            //Article列表

            return View(data.GetData());

        }

        public ActionResult Create()

        {

            return View();

        }

        [HttpPost]

        public ActionResult Create(string strAtricle, string strContent)

        {

            //調用Service中的Create方法,把數據寫到數據庫中

            data.DBCreate(strAtricle, strContent);

            //重導向到 Action

            return RedirectToAction("Index");

        }

    }

}
5,添加Action對應的View頁面:

View頁面接收Controller傳遞過來的資料,在User提交按鈕的時候把數據傳給Controller
View Index顯示Article內容,更新View如下:
@model IEnumerable<MvcApplication1.Models.Article>

@{

    ViewBag.Title = "留言板";

}

<div>

    <h2>首頁-留言列表</h2>

    @if (Model != null)

    {

        <table>

            <tbody>

                @foreach (var item in Model)

                {

                    <tr>

                        <td>標題:</td>

                        <td>@item.Title</td>

                    </tr>

                    <tr>

                        <td>留言內容:</td>

                        <td>@item.Content</td>

                    </tr>

                    <tr>

                        <td>時間:</td>

                        <td>@item.time</td>

                    </tr>

                }

            </tbody>

        </table>

    }

</div>

   <br />

<div>

    @Html.ActionLink("點擊新增留言", "Create");

</div>
同樣為 Controller中的 Create Action 添加對應的View:
@model IEnumerable<MvcApplication1.Models.Article>

@{

    ViewBag.Title = "Create";

}

<h2>新增留言</h2>

@using (Html.BeginForm("Create", "Message"))

{

    <div>

        @Html.Label("標題")

        @Html.TextBox("strAtricle")

        <br />

        @Html.Label("內容")

        @Html.TextBox("strContent")

        <br />

        <input type="submit" value="送出留言" />

    </div>

}
在~/Views/Shared/_Layout.cshtml(相當於asp.net中的母版頁Master),中添加留言首頁的連接:
  <ul id="menu">

                        <li>@Html.ActionLink("首頁", "Index", "Home")</li>

                        <li>@Html.ActionLink("關於", "About", "Home")</li>

                        <li>@Html.ActionLink("連絡", "Contact", "Home")</li>

                        <li>@Html.ActionLink("留言", "index", "Message")</li>

                    </ul>
以上完成了一個簡單的留言板。
首頁:

點擊"新增留言", @Html.ActionLink("點擊新增留言", "Create"); 程式根據Routing規則找到對應Controller中的Action
 →
→  →
→ →保存到DB
通過留言板我們看到了MVC項目的運行流程如下:

補充:
按照上面的步驟運行,在新增第二條留言的時候會提示主鍵錯誤
原因:Atricle的ID主鍵沒有設置為 自增長
修正步驟:
1,把ID主鍵設置為自增長後點擊"更新"
2,從資料庫更新Model1.edmx文件

2,

3,運行:

ASP.NET MVC 4.0 学习2-留言板實現的更多相关文章
- ASP.NET MVC 4.0 学习5-ActionResult
一,Controller簡介 Controller擔任了資料傳遞的角色,負責流程控制,決定存取哪個Model以及決定顯示哪個View頁面,即ASP.NET MVC中有關於『傳遞』的任務皆由Contro ...
- ASP.NET MVC 4.0 学习6-Model Binding
一,ViewData,ViewBag與TempData ASP.NET MVC架構中,通過繼承在Controller中的ViewData,ViewBag和TempData和View頁面進行資料的存取, ...
- ASP.NET MVC 4.0 学习1-C#基础语法
1,方法多載,相同的方法名稱,不同的參數類型.數量 class Program { static void Main(string[] args) { Program newObject = new ...
- ASP.NET MVC 4.0 学习4-Code First
之前我們需要用到的數據,通過添加Entity實體數據模型把數據庫中需要的Database拉到項目中如下圖, 而就是Code First就是相對於這種處理數據的方法而言的 Code First更加準確的 ...
- ASP.NET MVC 4.0 学习3-Model
Model負責獲取數據庫中的資料,並對數據庫中的數據進行處理. MVC中有關 數據庫 的任務都由Model來完成,Model中對數據資料進行定義,Controller和View中都會參考到Model, ...
- 从零开始学习ASP.NET MVC 1.0
转自:http://www.cnblogs.com/zhangziqiu/archive/2009/02/27/ASPNET-MVC-1.html <从零开始学习ASP.NET MVC 1.0& ...
- 系列文章--从零开始学习ASP.NET MVC 1.0
从零开始学习ASP.NET MVC 1.0 (一) 开天辟地入门篇 从零开始学习 ASP.NET MVC 1.0 (二) 识别URL的Routing组件 从零开始学习 ASP.NET MVC 1.0 ...
- 2.第一个ASP.NET MVC 5.0应用程序
大家好,上一篇对ASP.NET MVC 有了一个基本的认识之后,这一篇,我们来看下怎么从头到尾创建一个ASP.NET MVC 应用程序吧.[PS:返回上一篇文章:1.开始学习ASP.NET MVC] ...
- Profession ASP.NET MVC 2.0 NerdDinner示例可运行源码
最近一段时间在看JonGalloway等著作的<Profession ASP.NET MVC 2.0>.本书并没有按照常规的大部头书籍那样,按部就班的介绍MVC的概念等,而是在第一章直接引 ...
随机推荐
- JavaWeb学习笔记-使用HttpSession对象跟踪会话
使用HttpSession接口开发的步骤: 1.获取HttpSession对象 2.对HttpSession对象进行读写 3.手工终止HttpSession,或者自动终止 常用方法: getId(): ...
- UIWebView与JavaScript(JS) 回调交互 -备
很多关于objc 与 js 交互的文章都比较适用于 mac开发,iOS的webview 还是有所不一样, 参考:http://blog.sina.com.cn/s/blog_693de6100102v ...
- hdu Game of Connections
卡特兰数 递推公式:h(n)=h(n-1)*(4*n-2)/(n+1); import java.math.BigInteger; import java.util.Scanner; public c ...
- SQL Server 性能优化之——重复索引
原文 http://www.cnblogs.com/BoyceYang/archive/2013/06/16/3139006.html 阅读导航 1. 概述 2. 什么是重复索引 3. 查找重复索引 ...
- mysql 的 decimal类型
最近做项目时将decimal定义成了decimal(5,2),然后等到最大的结果都是999.99,找了很多地方找不出bug在哪里插入很更新的数据都是正确的而结果却都是999.99,最后才知道decim ...
- QQ聊天界面的布局和设计(IOS篇)-第二季
QQChat Layout - 第二季 本来第二季是快写好了, 也花了点功夫, 结果gitbook出了点问题, 给没掉了.有些细节可能会一带而过, 如有疑问, 相互交流进步~. 在第一季中我们完成了Q ...
- Spring MVC基础
1.Web MVC基础 MVC的本质是表现层模式,我们以视图模型为中心,将视图和控制器分离出来.就如同分层模式一样,我们以业务逻辑为中心,把表现层和数据访问层代码分离出来是一样的方法.框架只能在技术层 ...
- linux之getcwd函数解析
[lingyun@localhost getcwd]$ cat getcwd.c /********************************************************** ...
- uva 11210 Chinese Mahjong(暴力搜索)
Chinese Mahjong Mahjong () is a game of Chinese origin usually played by four persons with tiles res ...
- [Python笔记][第四章Python正则表达式]
2016/1/28学习内容 第四章 Python字符串与正则表达式之正则表达式 正则表达式是字符串处理的有力工具和技术,正则表达式使用预定义的特定模式去匹配一类具有共同特征的字符串,主要用于字符串处理 ...