08-----pymysql模块使用
pymysql的下载和使用
exctue() 之sql注入
增、删、改:conn.commit()
查:fetchone、fetchmany、fetchall
一、pytmysql的下载和使用
(1)pymysql 模块安装
pip3 install pymysql
(2)pymysql的使用
# 实现:使用Python实现用户登录,如果用户存在则登录成功(假设该用户已在数据库中)

import pymysql

user = input('请输入用户名:')

pwd = input('请输入密码:')

# 1.连接

conn = pymysql.connect(host='127.0.0.1', port=3306, user='root', password='', db='db8', charset='utf8')

# 2.创建游标

cursor = conn.cursor()

#注意%s需要加引号

sql = "select * from userinfo where username='%s' and pwd='%s'" %(user, pwd)

print(sql)

# 3.执行sql语句

cursor.execute(sql)

result=cursor.execute(sql) #执行sql语句,返回sql查询成功的记录数目

print(result)

# 关闭连接,游标和连接都要关闭

cursor.close()

conn.close()

if result:

    print('登陆成功')

else:

    print('登录失败')
二、excute()之sql注入
最后那一个空格,在一条sql语句中如果遇到select * from userinfo where username='mjj' -- asadasdas' and pwd='' 则--之后的条件被注释掉了(注意--后面还有一个空格) #1、sql注入之:用户存在,绕过密码
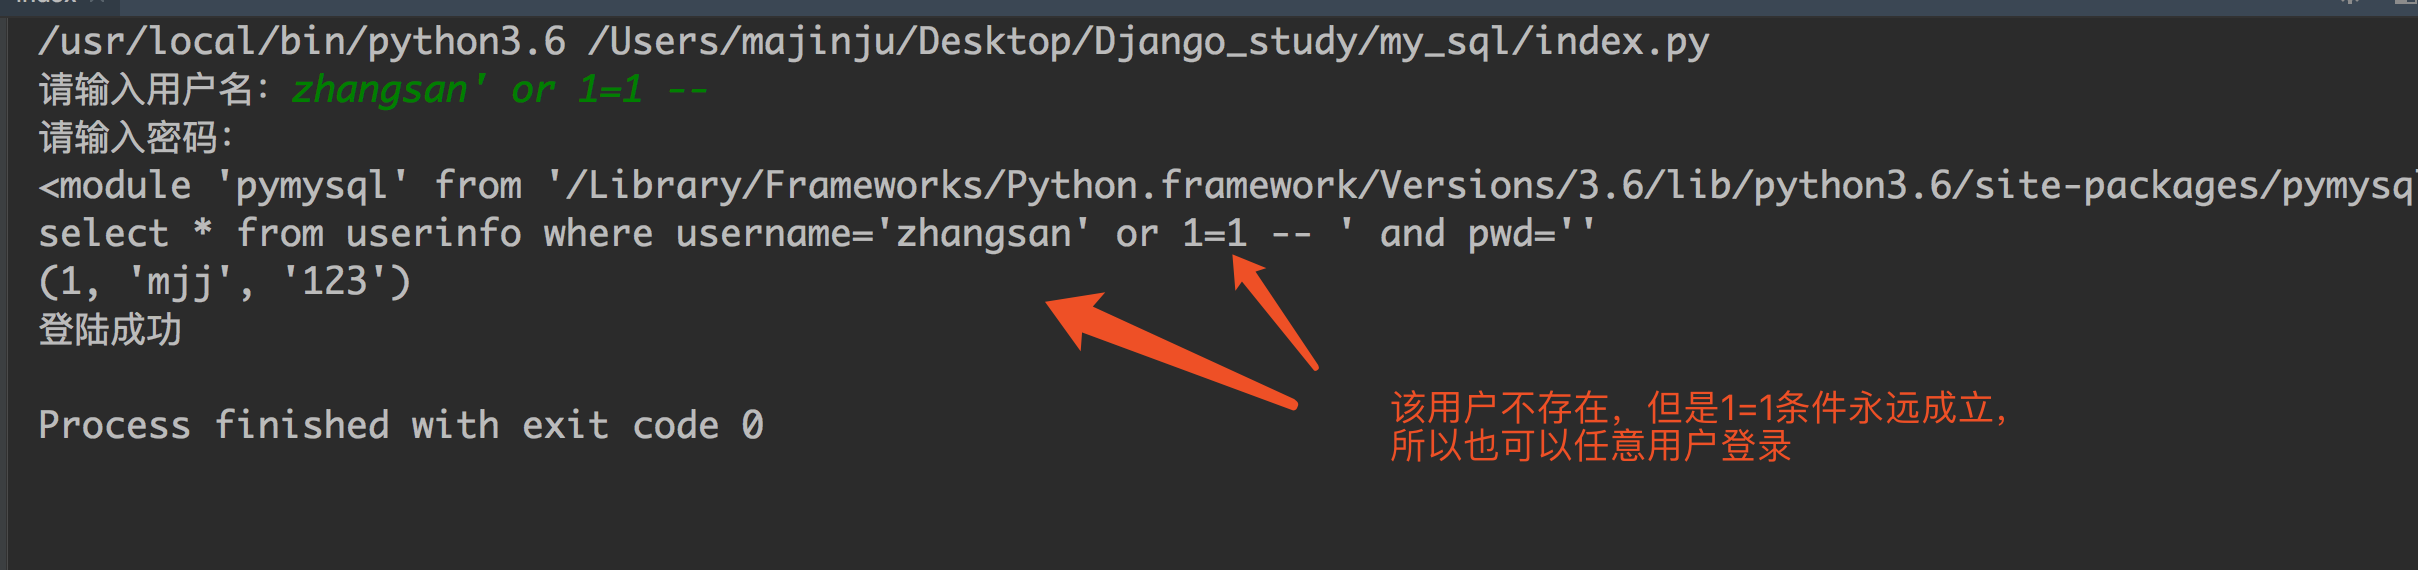
mjj' -- 任意字符 #2、sql注入之:用户不存在,绕过用户与密码
xxx' or 1=1 -- 任意字符

解决办法:
# 原来是我们对sql进行字符串拼接

# sql="select * from userinfo where name='%s' and password='%s'" %(username,pwd)

# print(sql)

# result=cursor.execute(sql)

#改写为(execute帮我们做字符串拼接,我们无需且一定不能再为%s加引号了)

sql="select * from userinfo where name=%s and password=%s" #!!!注意%s需要去掉引号,因为pymysql会自动为我们加上

result=cursor.execute(sql,[user,pwd]) #pymysql模块自动帮我们解决sql注入的问题,只要我们按照pymysql的规矩来。
代码:
#!C:/Python36/python3

#-*- coding:utf-8 -*-

import pymysql

user = input('请输入用户名:')

pwd = input('请输入密码:')

conn = pymysql.connect(host='127.0.0.1',port=3306,user='root',password = '',db='db4',charset='utf8')

cursor = conn.cursor()

sql = "select * from userinfo WHERE username=%s and pwd = %s"

print(sql)

# cursor.execute(sql)

result = cursor.execute(sql,[user,pwd])

print(result)

cursor.close()

conn.close()

if result:

    print("登录成功")

else:

    print("登陆失败")
三、增、删、改:conn。commit()
commit() 方法:在数据库里增、删、改的时候,必须要进行提交,否则插入的数据不生效。
import pymysql

username = input('请输入用户名:')

pwd = input('请输入密码:')

# 1.连接

conn = pymysql.connect(host='localhost', port=3306, user='root', password='', db='db8', charset='utf8')

# 2.创建游标

cursor = conn.cursor()

# 操作

# 增

# sql = "insert into userinfo(username,pwd) values (%s,%s)"

# effect_row = cursor.execute(sql,(username,pwd))

# 同时插入多条数据
# cursor.executemany(sql,[('李四','110'),('王五','119')])

# print(effect_row)

# 改

# sql = "update userinfo set username = %s  where id = 2"

# effect_row = cursor.execute(sql,username)

# print(effect_row)

# 删

sql = "delete from userinfo  where id = 2"

effect_row = cursor.execute(sql)

print(effect_row)

#一定记得commit

conn.commit()

# 4.关闭游标

cursor.close()

# 5.关闭连接

conn.close()
四、查:fetchone、fetchmany、fetchall
fetchone():获取下一行数据,第一次为首行;

fetchall():获取所有行数据源

fetchmany():获取4行数据
使用 fetchone():
import pymysql

# 1.连接

conn = pymysql.connect(host='localhost', port=3306, user='root', password='', db='db8', charset='utf8')

# 2.创建游标

cursor = conn.cursor()

sql = 'select * from userinfo'

cursor.execute(sql)

# 查询第一行的数据

row = cursor.fetchone()

print(row) # (1, 'mjj', '')

# 查询第二行数据

row = cursor.fetchone()

print(row) # (3, '张三', '')

# 4.关闭游标

cursor.close()

# 5.关闭连接

conn.close()
使用 fetchall():
import pymysql

# 1.连接

conn = pymysql.connect(host='localhost', port=3306, user='root', password='', db='db8', charset='utf8')

# 2.创建游标

cursor = conn.cursor()

sql = 'select * from userinfo'

cursor.execute(sql)

# 获取所有的数据

rows = cursor.fetchall()

print(rows)

# 4.关闭游标

cursor.close()

# 5.关闭连接

conn.close()

#运行结果

((1, 'mjj', ''), (3, '张三', ''), (4, '李四', ''))
默认情况下,我们获取到的返回值是元组,只能看到每行的数据,却不知道每一列代表的是什么,这个时候可以使用以下方式来返回字典,每一行的数据都会生成一个字典:
cursor = conn.cursor() #换成以下

cursor = conn.cursor(cursor=pymysql.cursors.DictCursor)  #在实例化的时候,将属性cursor设置为
在 fetchone 示例中,在获取行数据的时候,可以理解开始的时候,有一个行指针指着第一行的上方,获取一行,它就向下移动一行,所以当行指针到最后一行的时候,就不能再获取到行的内容,所以我们可以使用如下方法来移动行指针:
# 1.Python实现用户登录

# 2.Mysql保存数据

import pymysql

# 1.连接

conn = pymysql.connect(host='localhost', port=3306, user='root', password='', db='db8', charset='utf8')

# 2.创建游标

cursor = conn.cursor(cursor=pymysql.cursors.DictCursor)

sql = 'select * from userinfo'

cursor.execute(sql)

# 查询第一行的数据

row = cursor.fetchone()

print(row) # (1, 'mjj', '')

# 查询第二行数据

row = cursor.fetchone() # (3, '张三', '')

print(row)

cursor.scroll(-1,mode='relative') #设置之后,光标相对于当前位置往前移动了一行,所以打印的结果为第二行的数据

row = cursor.fetchone()

print(row)

cursor.scroll(0,mode='absolute') #设置之后,光标相对于首行没有任何变化,所以打印的结果为第一行数据

row = cursor.fetchone()

print(row)

# 4.关闭游标

cursor.close()

# 5.关闭连接

conn.close()

#结果如下

{'id': 1, 'username': 'mjj', 'pwd': ''}

{'id': 3, 'username': '张三', 'pwd': ''}

{'id': 3, 'username': '张三', 'pwd': ''}

{'id': 1, 'username': 'mjj', 'pwd': ''}
fetchmany():
import pymysql

# 1.连接

conn = pymysql.connect(host='localhost', port=3306, user='root', password='', db='db8', charset='utf8')

# 2.创建游标

cursor = conn.cursor(cursor=pymysql.cursors.DictCursor)

sql = 'select * from userinfo'

cursor.execute(sql)

# 获取2条数据

rows = cursor.fetchmany(2)

print(rows)

# 4.关闭游标

# rows = cursor.fetchall()

# print(rows)

cursor.close()

# 5.关闭连接

conn.close()

#结果如下:

[{'id': 1, 'username': 'mjj', 'pwd': '123'}, {'id': 3, 'username': '张三', 'pwd': '110'}]
08-----pymysql模块使用的更多相关文章
- Python中操作mysql的pymysql模块详解
Python中操作mysql的pymysql模块详解 前言 pymsql是Python中操作MySQL的模块,其使用方法和MySQLdb几乎相同.但目前pymysql支持python3.x而后者不支持 ...
- python实战第一天-pymysql模块并练习
操作系统 Ubuntu 15.10 IDE & editor JetBrains PyCharm 5.0.2 ipython3 Python版本 python-3.4.3 安装pymysql模 ...
- pymysql 模块介绍
pymysql模块是python与mysql进行交互的一个模块. pymysql模块的安装: pymysql模块的用法: import pymysql user=input('user>> ...
- Mysql(六):数据备份、pymysql模块
一 IDE工具介绍 生产环境还是推荐使用mysql命令行,但为了方便我们测试,可以使用IDE工具 下载链接:https://pan.baidu.com/s/1bpo5mqj 掌握: #1. 测试+链接 ...
- python如何使用pymysql模块
Python 3.x 操作MySQL的pymysql模块详解 前言pymysql是Python中操作MySQL的模块,其使用方法和MySQLdb几乎相同.但目前pymysql支持python3.x而M ...
- MySQL之pymysql模块
MySQL之pymysql模块 import pymysql #s链接数据库 conn = pymysql.connect( host = '127.0.0.1', #被连接数据库的ip地址 po ...
- PyMySQL模块的使用
PyMySQL介绍 PyMySQL是在Python3.x版本中用于连接MySQL服务器的一个库,Python2系列中则使用mysqldb.Django中也可以使用PyMySQL连接MySQL数据库. ...
- MySQL学习12 - pymysql模块的使用
一.pymysql的下载和使用 1.pymysql模块的下载 2.pymysql的使用 二.execute()之sql注入 三.增.删.改:conn.commit() 四.查:fetchone.fet ...
- 数据库入门-pymysql模块的使用
一.pymysql模块安装 由于本人的Python版本为python3.7,所以用pymysql来连接数据库(mysqldb不支持python3.x) 方法一: #在cmd输入 pip3 instal ...
- Python连接MySQL数据库之pymysql模块使用
安装PyMySQL pip install pymysql PyMySQL介绍 PyMySQL是在python3.x版本中用于连接MySQL服务器的一个库,2中则使用mysqldb. Django中也 ...
随机推荐
- 基于IFC的施工过程模拟程序(4D BIM)
- 在Ubuntu里安装Mysql5.7.23
准备在Linux里安装Mysql,安装过程中遇到很多问题,这里记录下我成功安装的过程. 操作系统:Ubuntu 18.04 数据库:Mysql 5.7.23 安装步骤: 1.下载一个apt,下载mys ...
- spoj2142 Arranging Flowers
传送门 题目大意 给你n和m,表示一个n*n的数独已经填完了m行,让你填出剩下几行,要求答案的字典序最小. 分析 看到这道题我首先想到的是记录每行每列使用了哪些数字,然后贪心的来填,但是发现用这种策略 ...
- hive的not in
最近项目需要对数据做打平操作,原有的sql使用了not in,但是hive 不支持 not in,晚上搜索了下使用 left outer join select * from lefttbl a le ...
- 数组最后一个元素的 引用在 foreach 循环之后仍会保留。建议使用 unset() 来将其销毁
数组最后一个元素$arr = array( 1 , 2 , 3 , 4 );foreach ( $arr as & $value ) { $value = $value ...
- snmp snmp4j的使用
snmp4j的使用 一.什么是snmp及snmp4j? snmp是 Simple Network Management Protocol (简单网络管理协议)的简写. SNMP4J是一个用Java来实 ...
- CENTOS 7 升级安装 Python 3.5
写在前面的话 本文采取源码的方式安装 Python 3.5.2,如果是其它版本会有或多或少的差异,且写这篇的时候官网最新的是 Python 3.7,个人使用 3.5 就足够了,没必要更新到最新,否则出 ...
- Installing the .NET Framework 3.5 on Windows 8, Windows 8.1 and Windows 10
Installing the .NET Framework 3.5 on Windows 8, Windows 8.1 and Windows 10 .NET Framework (current v ...
- P3369 【模板】普通平衡树(权值线段树)
原来线段树还有这种操作(开成一个桶) 用区间维护在这个区间内元素的个数,离散化一下,居然能达到splay的效果 不仅码量大大减少,而且跑的飞快!!! 6种操作 200多ms 插入 xx 数 删除 x ...
- DP【洛谷P3135】[USACO16JAN]堡哞Fort Moo
[洛谷P3135][USACO16JAN]堡哞Fort Moo Bessie和她的朋友Elsie正在建筑一个堡垒,与任何一个好的堡垒一样,这个需要一个强固的框架.Bessie想造一个轮廓是1m宽的空心 ...