
Android UI系列-----EditText和AutoCompleteTextView
在这篇随笔里将主要讲解一下EditText和AutoCompleteTextView这个控件
1.EditText
首先我们先简单来说说EditText这个控件,这个就相当于我们平常web开发中的文本输入框,我们如果要使用EditText,可以在布局文件中声明一个<EditText>这个元素即可,下面就是一个简单的EditText的控件声明:
<EditText

        android:id="@+id/username"

        android:layout_width="match_parent"

        android:layout_height="wrap_content"

        android:hint="username"/>
对于EditText来说,其最重要的一个属性是 android:inputType,这个属性不仅可以指定键盘的显示类型,还能控制一些其他的操作,具体可以参考android的官方API,其默认属性是 android:inputType="text",也就是普通的键盘框,如果我们设置其属性为以下这些,那么其键盘的类型会有所不同:
<EditText

        android:id="@+id/password"

        android:layout_width="match_parent"

        android:layout_height="wrap_content"

        android:hint="password"

        android:inputType="textPassword"/>  这个是我们的密码框

    <EditText

        android:id="@+id/email"

        android:layout_width="match_parent"

        android:layout_height="wrap_content"

        android:hint="email"

        android:inputType="textEmailAddress"/>  当设置为textEmailAddress时,键盘会多出来一个 @ 符号

    <EditText

        android:id="@+id/blog"

        android:layout_width="match_parent"

        android:layout_height="wrap_content"

        android:hint="blog url"

        android:inputType="textUri"/>  设置为textUri时,键盘会多出一个 / 符号

    <EditText

        android:id="@+id/phone"

        android:layout_width="match_parent"

        android:layout_height="wrap_content"

        android:hint="phone"

        android:inputType="phone"/>  设置为phone时,键盘就会变成一个打电话时的键盘

    <EditText

        android:id="@+id/counts"

        android:layout_width="match_parent"

        android:layout_height="wrap_content"

        android:hint="counts"

        android:inputType="number"/>  设置为number时,键盘上全部都是数字键
对于输入框来说,我们通常都要对其输入的数据进行判断,inputType这个属性不会对我们输入的内容进行校验,如果我们要对输入的内容进行校验,我们需要在Activity里面进行操作
EditText有一个setError的方法,当调用这个方法时,则表示输入的数据不合法,我们来看看官方的API对该方法的解释:
void android.widget.TextView.setError(CharSequence error)

Sets the right-hand compound drawable of the TextView to the "error" icon and sets an error message that will be displayed in a popup when the TextView has focus. The icon and error message will be reset to null when any key events cause changes to the TextView's text. If the error is null, the error message and icon will be cleared.
这个方法会给我们一个错误的小图标以及弹出的一段错误提示信息,当我们的这个EditText控件获得焦点的时候,当我们在文本框中输入了任何的值后,这个icon和message都会消失,例如:

EditText还有许多其他的方法,这个在以后实际用的的时候再阐述。
2.AutoCompleteTextView
AutoCompleteTextView这个是一个自动提示内容的文本框,其是EditText的一个子类,
An editable text view that shows completion suggestions automatically while the user is typing. The list of suggestions is displayed in a drop down menu from which the user can choose an item to replace the content of the edit box with.

The drop down can be dismissed at any time by pressing the back key or, if no item is selected in the drop down, by pressing the enter/dpad center key.
我们通常都是自己定义了一组数据集合,可以是array,可以是list,还可以是网络传过来的数据,这组数据是以下拉菜单的方式根据我们输入的关键字来匹配我们数据集合中满足条件的数据项,通过下拉菜单,我们可以enter来选中我们需要的数据,而为AutoCompleteTextView这个控件提供内容的就是我们的 Adapter ,这个叫做适配器,Adapter这个类的作用就是在我们的Data和我们的View之间架设一座桥梁,我们将我们的数据放置到一个Adapter当中,然后通过指定我们对这些数据的布局方式,再将这个Adapter赋给我们的View。
Adapter是一个接口,其拥有许多的实现类,例如:
android.widget.Adapter

Known Indirect Subclasses:

ArrayAdapter<T>, BaseAdapter, CursorAdapter, HeaderViewListAdapter, ListAdapter, ResourceCursorAdapter, SimpleAdapter, SimpleCursorAdapter, SpinnerAdapter, WrapperListAdapter
我们看到,Android为我们提供了许多的Adapter,这是因为我们的数据可能来自不同的途径,而且对于一些特殊的控件,例如Spinner,我们也要有指定的SpinnerAdapter才行,接下来我们就通过一个例子来实现我们的 AutoCompleteTextView 文本提示功能:
首先我们在我们的布局文件中定义一个 <AutoCompleteTextView>标签,例如:
<?xml version="1.0" encoding="utf-8"?>

<RelativeLayout xmlns:android="http://schemas.android.com/apk/res/android"

    android:layout_width="match_parent"

    android:layout_height="match_parent" >

    <TextView

        android:id="@+id/country"

        android:layout_width="wrap_content"

        android:layout_height="wrap_content"

        android:text="所在国家:" />

    <AutoCompleteTextView

        android:id="@+id/auto"

        android:layout_width="match_parent"

        android:layout_height="wrap_content"

        android:layout_toRightOf="@id/country"/>

</RelativeLayout>
接下来我们看看Activity里面的内容:
public class AutoCompleteActivity extends Activity

{

    private AutoCompleteTextView auto;

    @Override

    protected void onCreate(Bundle savedInstanceState)

    {

        super.onCreate(savedInstanceState);

        setContentView(R.layout.auto_complete);

        auto = (AutoCompleteTextView)findViewById(R.id.auto);

        List<String> countries = new ArrayList<String>();

        countries.add("Afghanistan");

        countries.add("Albania");

        countries.add("Algeria");

        countries.add("American");

        countries.add("Andorra");

        countries.add("Anguilla");

        countries.add("Angola");

        countries.add("Antarctica");

        countries.add("China");

        ArrayAdapter<String> adapter = new ArrayAdapter<String>(this, android.R.layout.simple_list_item_1, countries);

        auto.setAdapter(adapter);

    }

}
我们看到,在Activity里面我们定义了一个ArrayAdapter这个类,其有许多的构造方法,我们来看看我们用的这个:
public ArrayAdapter (Context context, int resource, List<T> objects)

Parameters

context    The current context.

resource    The resource ID for a layout file containing a TextView to use when instantiating views.

objects    The objects to represent in the ListView.
第一个参数Context类型的对象,是我们的上下文对象,我们的Activity是Context类的子类,所以可以将当前的这个Activity传进去,第二个参数是一个包含了TextView控件的布局文件的ID,当Adapter加载的时候,就会将我们的数据集合的每一个数据(item)绑定为我们这个布局文件中的每一个TextView控件上,android系统本身给我们提供了许多的默认的布局文件,我们这里使用的是 android.R.layout.simple_list_item_1 这个布局文件(this is a layout provided by Android that provides a standard appearance for text in a list),第三个参数就是我们的数据集合,这里我们传入一个List进去,最后通过setAdapter(adapter)方法将其绑定到我们的AutoCompleteTextView控件上即可。
对于我们的数据集,我们除了可以在Activity中声明一个List或者是Array以为,我们还可以写在android的资源文件中,通过资源文件来得到我们的数据集,例如,我们在
res-->values-->strings.xml 这个文件中指定我们的数据集:
<?xml version="1.0" encoding="utf-8"?>

<resources>

    <string name="app_name">Android_01</string>

    <string name="action_settings">Settings</string>

    <string name="hello_world">Hello world!</string>

    <string-array name="countries">

        <item>Bahrain</item>

        <item>Bangladesh</item>

        <item>Belarus</item>

        <item>Belize</item>

        <item>Brazil</item>

        <item>Cameroon</item>

        <item>Japan</item>

        <item>Hongkong</item>

        <item>Greece</item>

        <item>Germany</item>

        <item>France</item>

        <item>Djibouti</item>

        <item>Denmark</item>

        <item>Canada</item>

    </string-array>

</resources>
然后在代码中,我们可以通过下面这种方式来创建我们的Adapter对象:
String[] countries2 = getResources().getStringArray(R.array.countries);

ArrayAdapter<String> adapter = new ArrayAdapter<String>(this, android.R.layout.simple_list_item_1, countries2);
最后我们来看看效果图:
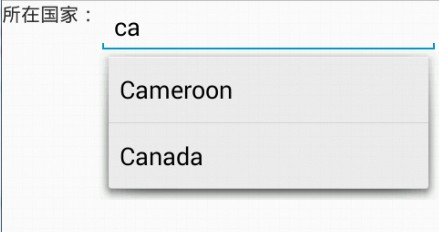
当我们输入两个字母时,就会有内容提示了,我们可以选择我们需要的选项,点击enter即可。
Android UI系列-----EditText和AutoCompleteTextView的更多相关文章
- Android UI系列-----时间、日期、Toasts和进度条Dialog
您可以通过点击 右下角 的按钮 来对文章内容作出评价, 也可以通过左下方的 关注按钮 来关注我的博客的最新动态. 如果文章内容对您有帮助, 不要忘记点击右下角的 推荐按钮 来支持一下哦 如果您对文章内 ...
- 【转】Android UI系列-----时间、日期、Toasts和进度条Dialog
原文网址:http://www.cnblogs.com/xiaoluo501395377/p/3421727.html 您可以通过点击 右下角 的按钮 来对文章内容作出评价, 也可以通过左下方的 关注 ...
- Android UI系列-----Dialog对话框
您可以通过点击 右下角 的按钮 来对文章内容作出评价, 也可以通过左下方的 关注按钮 来关注我的博客的最新动态. 如果文章内容对您有帮助, 不要忘记点击右下角的 推荐按钮 来支持一下哦 如果您对文章内 ...
- Android UI系列--对话框(一)(AlertDialog,TimePickerDialog,DatePickerDialog,ProgressDialog)
一.Dialog介绍 dialog就是一个在屏幕上弹出一个可以让用户做出一个选择,或者输入额外的信息的对话框,一个对话框并不会沾满我们整个的屏幕,并且通常用于模型事件当中需要用户做出一个决定后才会继续 ...
- Android UI系列-----RelativeLayout的相关属性
本篇随笔将主要记录一些RelatieLayout的相关属性,并将猜拳游戏通过RelativeLayout实现出来 RelativeLayout的几组属性 第一组属性:android:layout_be ...
- Android UI系列-----ScrollView和HorizontalScrollView
本篇随笔将讲解一下Android当中比较常用的两个布局容器--ScrollView和HorizontalScrollView,从字面意义上来看也是非常的简单的,ScrollView就是一个可以滚动的V ...
- Android UI系列-----LinearLayout的综合使用
这里将会对LinearLayout的布局方式进行一个综合的使用,通过一个例子来看看LinearLayout的嵌套布局方式,在这之前首先介绍三个属性: 1.①android:layout_weigth: ...
- Android UI系列-----ImageView的scaleType属性
这篇随笔将会简单的记录下ImageView这个控件的一些使用方法,以及其最重要的一个属性: scaleType ImageView这个控件是用来显示图片用的,例如我们可以通过下面这段xml配置来声明显 ...
- Android UI系列-----CheckBox和RadioButton(1)
主要记录一下CheckBox多选框和RadioGroup.RadioButton单选框的设置以及注册监听器 1.CheckBox 布局文件: <LinearLayout xmlns:androi ...
随机推荐
- javascript 常用方法
1. 判断某个object中是否包含某个属性: params.hasOwnProperty($scope.dataObj[i].alias) //true 包含 2.删除object中指定属性 del ...
- Redis 集群方案- 主从切换测试
大约一年多前,公司同事开始使用Redis,不清楚是配置,还是版本的问题,当时的Redis经常在使用一段时间后,连接爆满且不释放.印象中,Redis 2.4.8以下的版本由于设计上的主从库同步问题,就会 ...
- android压力测试命令monkey详解
一.Monkey 是什么?Monkey 就是SDK中附带的一个工具. 二.Monkey 测试的目的?:该工具用于进行压力测试. 然后开发人员结合monkey 打印的日志 和系统打印的日志,结局测试中出 ...
- JS手机端去除默认自带的选择复制菜单
在需要的div上添加以下控制-webkit-user-select: none; -moz-user-select: none; -ms-user-select: none; user-select: ...
- jQuery最佳实践(转载)
本文转载于阮一峰的博文. 上周,我整理了<jQuery设计思想>. 那篇文章是一篇入门教程,从设计思想的角度,讲解“怎么使用jQuery”.今天的文章则是更进一步,讲解“如何用好jQuer ...
- 『TCP/IP详解——卷一:协议』读书笔记——01
从今日起开始认真研读TCP/IP详解这本经典制作,一是巩固我薄弱的计算机网络知识,二来提高我的假期的时间利用率.将心得与思考记录下来,防止白看-哦耶 2013-08-14 18:47:06 第一章 概 ...
- Git 常用几个操作
获取 git clone git@github.com:XXX/learning.git 更新 git pull 添加 git add XXX 上传本地 git commit -m "ap ...
- Model层数据验证
问题1:View层如何向Controller的Action传递Model数据?在View中,可以使用Form表单进行模型数据的提交,同样的,我们需要关联提交数据的类型,则需要在View中使用@mode ...
- gvim 备份文件去除 配置
默认情况下使用Vim编程,在修改文件后系统会自动生成一个带~的备份文件,看上去又乱又讨人厌. 怎么让Vim不自动生成这些备份文件呢? 1. 找到你的Vim安装目录,如果是在Windows下默认路径安装 ...
- kafka go producer 启动基本配置
1.官网上下载kafka安装包:http://kafka.apache.org/downloads.html 2.执行命令运行zookeeper 实例(单点): bin/zookeeper-serve ...